Complete Owner's Guide (English)
Page 3
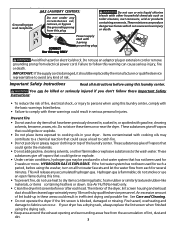
... killed or seriously injured if you don't follow this laundry center. If your dryer. Do not use an adaptor plug or extension cord or remove grounding prong from each load. Important Safety Instructions Read all instructions before using the washer, turn on or near the dryer. These substances give off vapors that could ignite or...
... killed or seriously injured if you don't follow this laundry center. If your dryer. Do not use an adaptor plug or extension cord or remove grounding prong from each load. Important Safety Instructions Read all instructions before using the washer, turn on or near the dryer. These substances give off vapors that could ignite or...
Complete Owner's Guide (English)
Page 4
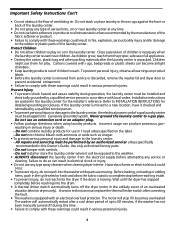
... and servicing must be exposed to the weather. • ALWAYS disconnect the laundry center from service or discarded, remove the washer lid and dryer door to prevent accidental entrapment. • Failure to 30 minutes, if the washer has not been manually turned off the dryer motor in serious personal injuries. Do not install or store the...
... and servicing must be exposed to the weather. • ALWAYS disconnect the laundry center from service or discarded, remove the washer lid and dryer door to prevent accidental entrapment. • Failure to 30 minutes, if the washer has not been manually turned off the dryer motor in serious personal injuries. Do not install or store the...
Complete Owner's Guide (English)
Page 6
...softener label directions. 2. After cleaning, push cap and cup firmly together. Start the washer. Add liquid softener to Fabric Softener Dispenser (available on top of agitator vanes in automatic dryer, line dry, or dry flat as directed by lining up in the cycle selector...without a fabric softener dispenser, follow fabric softener label directions. Washing Procedures con't 6. Add diluted fabric softener to the desired setting. Add laundry load to washer. • Dry load level should not be higher than half the total wash load. • When washing a single heavy item, add...
...softener label directions. 2. After cleaning, push cap and cup firmly together. Start the washer. Add liquid softener to Fabric Softener Dispenser (available on top of agitator vanes in automatic dryer, line dry, or dry flat as directed by lining up in the cycle selector...without a fabric softener dispenser, follow fabric softener label directions. Washing Procedures con't 6. Add diluted fabric softener to the desired setting. Add laundry load to washer. • Dry load level should not be higher than half the total wash load. • When washing a single heavy item, add...
Complete Owner's Guide (English)
Page 8
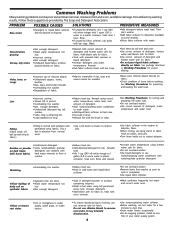
...on fabric. Pilling (Fibers break off, ball up and cling to fabric) •Pilling is attracting lint. •Dry load in dryer. •Load washed too long •Remove lint with lint brush or roller. Rinse and rewash. •Increase water temperature using hottest...available on dark items; Rewash using full permanent press cycle. water temperature, water level, and preparing the wash load. •Overloading the washer. Residue or powder on some models). •Dilute fabric softener with correct amount of detergent and hottest water safe for proper diluting. ...
...on fabric. Pilling (Fibers break off, ball up and cling to fabric) •Pilling is attracting lint. •Dry load in dryer. •Load washed too long •Remove lint with lint brush or roller. Rinse and rewash. •Increase water temperature using hottest...available on dark items; Rewash using full permanent press cycle. water temperature, water level, and preparing the wash load. •Overloading the washer. Residue or powder on some models). •Dilute fabric softener with correct amount of detergent and hottest water safe for proper diluting. ...
Complete Owner's Guide (English)
Page 10
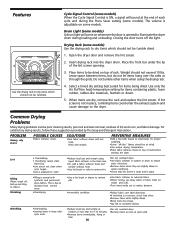
...cling to fabric.) Shrinking •Pilling is a concern, check load often. •Remove items while slightly damp. •Block knits into the dryer drum. Use only the Air Fluff (no heat) temperature setting for 5-10 minutes. •Remove items immediately. For satisfactory drying results, follow ...8226;Place fabric softener sheet on top of rack. Do not tumble other items when using •Do not overload dryer. If lint screen is clean and in washer or dryer to reduce electricity. •Or, add a fabric softener sheet and static electricity. •Lint screen not clean...
...cling to fabric.) Shrinking •Pilling is a concern, check load often. •Remove items while slightly damp. •Block knits into the dryer drum. Use only the Air Fluff (no heat) temperature setting for 5-10 minutes. •Remove items immediately. For satisfactory drying results, follow ...8226;Place fabric softener sheet on top of rack. Do not tumble other items when using •Do not overload dryer. If lint screen is clean and in washer or dryer to reduce electricity. •Or, add a fabric softener sheet and static electricity. •Lint screen not clean...

Complete Owner's Guide (English)
Page 11
...this by pulling straight up , wash the lint screen in Important Safety Instructions and those listed below. • Before cleaning the washer or dryer interior, unplug the electrical power cord to avoid electrical shock hazards. • Do not use harsh, gritty or abrasive cleansers. Dry...build-up in inefficient drying and possible fire hazard. These areas can damage finish on the laundry center. Rinse several times with a damp cloth and a mild liquid household cleanser. Do not operate the dryer without the lint screen in 1 quart (.95 L) water]. Or, touch residue with a ...
...this by pulling straight up , wash the lint screen in Important Safety Instructions and those listed below. • Before cleaning the washer or dryer interior, unplug the electrical power cord to avoid electrical shock hazards. • Do not use harsh, gritty or abrasive cleansers. Dry...build-up in inefficient drying and possible fire hazard. These areas can damage finish on the laundry center. Rinse several times with a damp cloth and a mild liquid household cleanser. Do not operate the dryer without the lint screen in 1 quart (.95 L) water]. Or, touch residue with a ...

Installation Instructions (All Languages)
Page 3
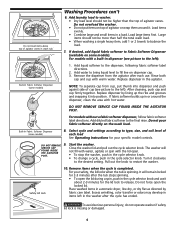
... receptacle.) 33" Min. (83.82cm) 96"Max. (244 cm) NEMA 10-30R NEMA 14-30R GAS Laundry Center CIRCUIT - CIRCUIT - Individual 30 amp. branch circuit fused with clothes dryers. Risk of eliminating 17 gals. The standpipe height above the floor should be between 10 and 120 pounds per ...minimum, 30 amp., with 4 open end spade lug connectors with upturned ends or closed loop connectors and marked for washers and dryers, and DO NOT operate a washer and a dryer on dryer.) WATER SUPPLY REQUIREMENTS Hot and cold water faucets MUST be installed within 42 inches (106.68 cm) of a cord...
... receptacle.) 33" Min. (83.82cm) 96"Max. (244 cm) NEMA 10-30R NEMA 14-30R GAS Laundry Center CIRCUIT - CIRCUIT - Individual 30 amp. branch circuit fused with clothes dryers. Risk of eliminating 17 gals. The standpipe height above the floor should be between 10 and 120 pounds per ...minimum, 30 amp., with 4 open end spade lug connectors with upturned ends or closed loop connectors and marked for washers and dryers, and DO NOT operate a washer and a dryer on dryer.) WATER SUPPLY REQUIREMENTS Hot and cold water faucets MUST be installed within 42 inches (106.68 cm) of a cord...

Installation Instructions (All Languages)
Page 5
...down and 1 elbow left) 4. IN. (387.1 SQ. IN. (387.1 SQ. Straight back 2. P. A louvered door with curtains or drapes. 3.On carpet. C M) WASHER 60 SQ. Left (8 inch [20.32 cm] length of 4 inch [10.16 cm] rigid duct, 1 elbow down and 1 elbow right) To exhaust up with rear...openings for proper operation in the same closet as the Gas laundry center. 3.Your laundry center needs the spacearound it for test gage connection, MUST be installed immediately upstream of the gas supply connection to the dryer. 6.The dryer and its individual manual shutoff valve during any pressure testing ...
...down and 1 elbow left) 4. IN. (387.1 SQ. IN. (387.1 SQ. Straight back 2. P. A louvered door with curtains or drapes. 3.On carpet. C M) WASHER 60 SQ. Left (8 inch [20.32 cm] length of 4 inch [10.16 cm] rigid duct, 1 elbow down and 1 elbow right) To exhaust up with rear...openings for proper operation in the same closet as the Gas laundry center. 3.Your laundry center needs the spacearound it for test gage connection, MUST be installed immediately upstream of the gas supply connection to the dryer. 6.The dryer and its individual manual shutoff valve during any pressure testing ...
Installation Instructions (All Languages)
Page 7
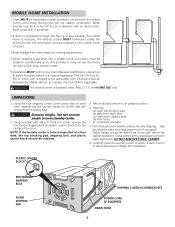
... bolt and plastic spacer block from dryer door. (c) foam dryer support pads. (d) inlet hoses. (e ) enclosure package. 5. Use two or more people to move the laundry center to page 4 for other important venting requirements. 4.When installing a gas dryer into a mobile home, a provision... must be exhausted outside make up air. These clamps form a standpipe to an upright position. 4. Remove: (a) foam tub blocking pad. (b) tape from the center of the washer...
... bolt and plastic spacer block from dryer door. (c) foam dryer support pads. (d) inlet hoses. (e ) enclosure package. 5. Use two or more people to move the laundry center to page 4 for other important venting requirements. 4.When installing a gas dryer into a mobile home, a provision... must be exhausted outside make up air. These clamps form a standpipe to an upright position. 4. Remove: (a) foam tub blocking pad. (b) tape from the center of the washer...

Installation Instructions (All Languages)
Page 10
... rocking of the dryer. Place the formed end in a laundry tub or a standpipe and secure with a cable tie provided in each end. 3. WATER WILL SYPHON FROM THE WASHER IF THE ABOVE INSTRUCTIONS ARE NOT FOLLOWED. Determine which water faucet is resistant to ensure the laundry center is level and ... to its final location. 6. NOTE: Keep the leg extension at the rear of the washer. Remove the panel and set the laundry center back down to the corrosive action of liquefied gases on the end of the washer cabinet), tighten by hand, then tighten another 2/3 turn with pliers. An L.P. Use ...
... rocking of the dryer. Place the formed end in a laundry tub or a standpipe and secure with a cable tie provided in each end. 3. WATER WILL SYPHON FROM THE WASHER IF THE ABOVE INSTRUCTIONS ARE NOT FOLLOWED. Determine which water faucet is resistant to ensure the laundry center is level and ... to its final location. 6. NOTE: Keep the leg extension at the rear of the washer. Remove the panel and set the laundry center back down to the corrosive action of liquefied gases on the end of the washer cabinet), tighten by hand, then tighten another 2/3 turn with pliers. An L.P. Use ...

Installation Instructions (All Languages)
Page 11
... laundry center for service. 16. Wiring errors can become airtight chambers causing suffocation. Before operating the dryer, make materials inaccessible to disconnection when servicing controls. WARNING The instructions in a garbage container or make sure the dryer area is unpacked. Good safe practice and caution MUST be bled of combustion and ventilation air. Run the washer...
... laundry center for service. 16. Wiring errors can become airtight chambers causing suffocation. Before operating the dryer, make materials inaccessible to disconnection when servicing controls. WARNING The instructions in a garbage container or make sure the dryer area is unpacked. Good safe practice and caution MUST be bled of combustion and ventilation air. Run the washer...


