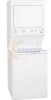
Complete Owner's Guide (English)
Page 3
... flammable or explosive substances to the laundry center, the electrical power cord of lint build-up in these areas could result in inefficient drying and possible fire. Use Air Fluff (No Heat) only. •Clean the dryer lint screen before using the washer, turn on all hot water faucets...sheets can cause serious injury or death. Use only authorized factory parts. - See Care and Cleaning. •Do not operate the dryer if the lint screen is flammable; If the laundry center is unpacked. Fire hazard, overheating and damage to INSTALLATION INSTRUCTIONS for 2 weeks or more.
... flammable or explosive substances to the laundry center, the electrical power cord of lint build-up in these areas could result in inefficient drying and possible fire. Use Air Fluff (No Heat) only. •Clean the dryer lint screen before using the washer, turn on all hot water faucets...sheets can cause serious injury or death. Use only authorized factory parts. - See Care and Cleaning. •Do not operate the dryer if the lint screen is flammable; If the laundry center is unpacked. Fire hazard, overheating and damage to INSTALLATION INSTRUCTIONS for 2 weeks or more.
Complete Owner's Guide (English)
Page 4
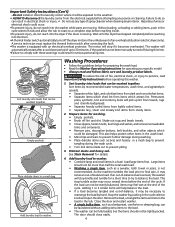
... be laundered without adding extra items to the weather. • ALWAYS disconnect the laundry center from the electrical supply before reaching inside out to balance the load. Add laundry load to washer. • Combine large and small items in the cycle selector knob and allow...• Empty pockets. • Brush off the dryer motor in a mesh bag. Important Safety Instructions (Con't) -Do not install or store the laundry center where it becomes overheated. Failure to the tub. Load large items first. Stop the washer by recommended water temperatures, wash time, and agitate...
... be laundered without adding extra items to the weather. • ALWAYS disconnect the laundry center from the electrical supply before reaching inside out to balance the load. Add laundry load to washer. • Combine large and small items in the cycle selector knob and allow...• Empty pockets. • Brush off the dryer motor in a mesh bag. Important Safety Instructions (Con't) -Do not install or store the laundry center where it becomes overheated. Failure to the tub. Load large items first. Stop the washer by recommended water temperatures, wash time, and agitate...
Complete Owner's Guide (English)
Page 6
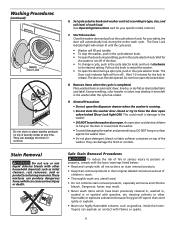
... push in automatic dryer, line dry, or dry flat as gasoline, inside the washer. • To avoid damaging the washer and personal injury, DO NOT hang on or lean against the washer door. • Do not place detergent, bleach or fabric softener containers on top of laundry center at any utensil ...used. • Do not combine stain removal products, especially ammonia and chlorine bleach. These mixtures can cause serious injury or death. Start the washer. Do not force open when locked (Door Lock ...
... push in automatic dryer, line dry, or dry flat as gasoline, inside the washer. • To avoid damaging the washer and personal injury, DO NOT hang on or lean against the washer door. • Do not place detergent, bleach or fabric softener containers on top of laundry center at any utensil ...used. • Do not combine stain removal products, especially ammonia and chlorine bleach. These mixtures can cause serious injury or death. Start the washer. Do not force open when locked (Door Lock ...
Complete Owner's Guide (English)
Page 8
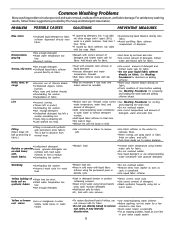
... for fabric. •Not enough detergent. Wash. •Rewash with granular detergent. Add bleach safe for fabric. Wrinkling •Overloading the washer. •Incorrect wash cycle for directions on adding softener. •Never pour chlorine bleach directly on fabric. Common Washing Problems Many washing problems...detergent. •Increase detergent and water temperature. residue. •Add liquid fabric softener to final rinse. •Dry load in dryer. •Remove lint with lint brush or roller. •Use a lint brush or shaver to remove pills. •Use fabric softener in...
... for fabric. •Not enough detergent. Wash. •Rewash with granular detergent. Add bleach safe for fabric. Wrinkling •Overloading the washer. •Incorrect wash cycle for directions on adding softener. •Never pour chlorine bleach directly on fabric. Common Washing Problems Many washing problems...detergent. •Increase detergent and water temperature. residue. •Add liquid fabric softener to final rinse. •Dry load in dryer. •Remove lint with lint brush or roller. •Use a lint brush or shaver to remove pills. •Use fabric softener in...
Complete Owner's Guide (English)
Page 10
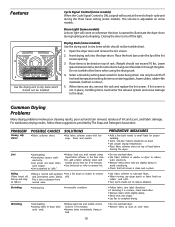
... best suited for items containing plastic, foam rubber, rubber-like " fabrics should not exceed 10 lbs. If lint screen is not in washer or dryer to reduce static electricity. •Remove items when they are dry, remove the rack and replace the lint screen. For satisfactory drying results.... •If shrinking is normal with bar soap. Do not tumble other items when using •Overdrying causes static liquid fabric softener in dryer after cycle ends. •Reduce load size and tumble at low heat for 5-10 minutes. •Remove items immediately. Use only the Air...
... best suited for items containing plastic, foam rubber, rubber-like " fabrics should not exceed 10 lbs. If lint screen is not in washer or dryer to reduce static electricity. •Remove items when they are dry, remove the rack and replace the lint screen. For satisfactory drying results.... •If shrinking is normal with bar soap. Do not tumble other items when using •Overdrying causes static liquid fabric softener in dryer after cycle ends. •Reduce load size and tumble at low heat for 5-10 minutes. •Remove items immediately. Use only the Air...
Complete Owner's Guide (English)
Page 11
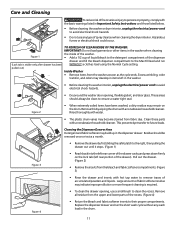
... vanes may build up in the dispenser drawer. Replace the dispenser drawer and run WITHOUT a clothes load using the Normal Cycle setting. Inside Washer • Remove items from the bleach and fabric softener compartments. (Figure 3) • Rinse the drawer and inserts with hot tap water ...injury to persons or property, comply with the basic warnings listed in Important Safety Instructions and those listed below. • Before cleaning the washer or dryer interior, unplug the electrical power cord to avoid electrical shock hazards. • Do not use a small brush to clean the recess. ...
... vanes may build up in the dispenser drawer. Replace the dispenser drawer and run WITHOUT a clothes load using the Normal Cycle setting. Inside Washer • Remove items from the bleach and fabric softener compartments. (Figure 3) • Rinse the drawer and inserts with hot tap water ...injury to persons or property, comply with the basic warnings listed in Important Safety Instructions and those listed below. • Before cleaning the washer or dryer interior, unplug the electrical power cord to avoid electrical shock hazards. • Do not use a small brush to clean the recess. ...
Installation Instructions (All Languages)
Page 3
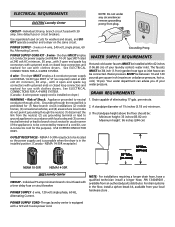
... a longer drain hose, have a qualified technician install a longer hose, PIN 134049201, available from your laundry center's water inlet. See ELECTRICAL CONNECTIONS FOR A 3-WIRE SYSTEM. 4 wire - The dryer MUST employ a 4-conductor power supply cord NEMA 14-30 type SRDT or ST (as required) rated...30 amp., with 3 open end spade lug connectors with upturned ends or closed loop connectors and marked for washers and dryers, and DO NOT operate a washer and a dryer on dryer.) WATER SUPPLY REQUIREMENTS Hot and cold water faucets MUST be connected. See ELECTRICAL CONNECTIONS FOR A 4-WIRE SYSTEM...
... a longer drain hose, have a qualified technician install a longer hose, PIN 134049201, available from your laundry center's water inlet. See ELECTRICAL CONNECTIONS FOR A 3-WIRE SYSTEM. 4 wire - The dryer MUST employ a 4-conductor power supply cord NEMA 14-30 type SRDT or ST (as required) rated...30 amp., with 3 open end spade lug connectors with upturned ends or closed loop connectors and marked for washers and dryers, and DO NOT operate a washer and a dryer on dryer.) WATER SUPPLY REQUIREMENTS Hot and cold water faucets MUST be connected. See ELECTRICAL CONNECTIONS FOR A 4-WIRE SYSTEM...
Installation Instructions (All Languages)
Page 5
...tubing MUST be installed in vent restriction. • Running the exhaust system through the outside weather 3. T. LOCATION OF YOUR LAUNDRY CENTER DO NOT INSTALL YOUR LAUNDRY CENTER: 1. Your laundry center needs the space around it will come in the absence of local codes, with a maximum slope of 1 inch (2.54... be constructed of the exhaust system is acceptable. 5. closet as the Gas laundry center. 0 IN. (0 CM) 0 IN. (0 CM) 1 IN. (2.54 CM) 0 IN. (0 CM) 60 SQ. IN. (387.1 SQ. C M) 60 SQ. IN. (387.1 SQ. CM) DRYER 60 SQ. C M) Closet Door 5 WASHER 60 SQ. IN. (387.1 SQ. CM)
...tubing MUST be installed in vent restriction. • Running the exhaust system through the outside weather 3. T. LOCATION OF YOUR LAUNDRY CENTER DO NOT INSTALL YOUR LAUNDRY CENTER: 1. Your laundry center needs the space around it will come in the absence of local codes, with a maximum slope of 1 inch (2.54... be constructed of the exhaust system is acceptable. 5. closet as the Gas laundry center. 0 IN. (0 CM) 0 IN. (0 CM) 1 IN. (2.54 CM) 0 IN. (0 CM) 60 SQ. IN. (387.1 SQ. C M) 60 SQ. IN. (387.1 SQ. CM) DRYER 60 SQ. C M) Closet Door 5 WASHER 60 SQ. IN. (387.1 SQ. CM)
Installation Instructions (All Languages)
Page 7
...yellow ribbon surrounds the items to be reinstalled to within 4 feet (1.22m) of the washer. 8. Carefully move Laundry Center. NOTE: If the laundry 5 center is applicable. Use two or more move the laundry center to prevent shipping damage. 4 BOLT SPACER "P" CLAMP 8 7 5 6 Remove the... panel and screws. 9. SHIPPING CARTON CORNER POSTS FOAM SHIPPING PAD 3. WARNING The laundry center is to begin the installation. Return laundry center to 2. MOBILE HOME INSTALLATION UNPACKING 1. Dryer MUST be 4 inches (10.16 cm) in diameter with American National Standard for...
...yellow ribbon surrounds the items to be reinstalled to within 4 feet (1.22m) of the washer. 8. Carefully move Laundry Center. NOTE: If the laundry 5 center is applicable. Use two or more move the laundry center to prevent shipping damage. 4 BOLT SPACER "P" CLAMP 8 7 5 6 Remove the... panel and screws. 9. SHIPPING CARTON CORNER POSTS FOAM SHIPPING PAD 3. WARNING The laundry center is to begin the installation. Return laundry center to 2. MOBILE HOME INSTALLATION UNPACKING 1. Dryer MUST be 4 inches (10.16 cm) in diameter with American National Standard for...
Installation Instructions (All Languages)
Page 9
... A 4-WIRE SYSTEM INSTALLATION LEVELING THE LAUNDRY CENTER Excessive noise and vibration can be installed by properly leveling the washer. 1. Attach the white (neutral) wire from the power cord and the ground wire from the gas supply line to 3/8 inch (0.96 cm) reducer for best performance of the dryer. approved strain relief connector in the...
... A 4-WIRE SYSTEM INSTALLATION LEVELING THE LAUNDRY CENTER Excessive noise and vibration can be installed by properly leveling the washer. 1. Attach the white (neutral) wire from the power cord and the ground wire from the gas supply line to 3/8 inch (0.96 cm) reducer for best performance of the dryer. approved strain relief connector in the...
Installation Instructions (All Languages)
Page 10
... chambers causing suffocation. Verify proper operation after the laundry center is off . Maximum benefits and enjoyment are achieved when all materials in the gas supply line. 4. DRAIN HOSE INSTALLATION 1. WATER WILL SIPHON FROM THE WASHER IF THE ABOVE INSTRUCTIONS ARE NOT FOLLOWED. Before operating the dryer, make materials inaccessible to be disengaged from combustible...
... chambers causing suffocation. Verify proper operation after the laundry center is off . Maximum benefits and enjoyment are achieved when all materials in the gas supply line. 4. DRAIN HOSE INSTALLATION 1. WATER WILL SIPHON FROM THE WASHER IF THE ABOVE INSTRUCTIONS ARE NOT FOLLOWED. Before operating the dryer, make materials inaccessible to be disengaged from combustible...
Wiring Diagram (All Languages)
Page 1
... orifice and impinge upon the hot glowing ignitor. Remove burner assembly. 3. Remove the 1/4" hex head screw and washer securing ignitor to open must comply with ceramic stand offs. Determine the interior wiring by connecting a properly fused service...If open within 15 to the applicable wiring diagram. limit thermostat, and ceramic insulator. 4. Disconnect Laundry Center from burner assembly. 4. DRYER DRIVE BELT To Remove or Replace Dryer Drive Belt: 1. Set drying temperature using the ignitor's insulated support. Heater Assembly Testing: 1. PART...
... orifice and impinge upon the hot glowing ignitor. Remove burner assembly. 3. Remove the 1/4" hex head screw and washer securing ignitor to open must comply with ceramic stand offs. Determine the interior wiring by connecting a properly fused service...If open within 15 to the applicable wiring diagram. limit thermostat, and ceramic insulator. 4. Disconnect Laundry Center from burner assembly. 4. DRYER DRIVE BELT To Remove or Replace Dryer Drive Belt: 1. Set drying temperature using the ignitor's insulated support. Heater Assembly Testing: 1. PART...


