Use and Care Manual
Page 1
Gas Cooktop Welcome 2 Important Safety Instructions .. 3-5 Before Setting Surface Controls 6 Setting Surface Controls ....... 7 Care & Cleaning 8-11 Before You Call SC.oo.lm.u.tm.io.o.nn.s..Pt.or.o.b.l.e.m..s 11 Warranty 12 318200672 (0609) Rev. C
Gas Cooktop Welcome 2 Important Safety Instructions .. 3-5 Before Setting Surface Controls 6 Setting Surface Controls ....... 7 Care & Cleaning 8-11 Before You Call SC.oo.lm.u.tm.io.o.nn.s..Pt.or.o.b.l.e.m..s 11 Warranty 12 318200672 (0609) Rev. C
Use and Care Manual
Page 2
...those shown. The graphics on your new appliance and Thank You for several models. Common sense and caution must be filled in United States Cooktop Serial Plate Location Versión en español Si desea obtener una copia en español de este Manual del Usuario, s&#... for choosing our product. At Electrolux Home Products, we are not meant to providing you consider us for future reference. Box 212378 Augusta, GA 30917 We know you'll enjoy your purchase of our product and are representative. Solicite la P/N 318200672sp. 2 Spanish Use & Care Manual Electrolux ...
...those shown. The graphics on your new appliance and Thank You for several models. Common sense and caution must be filled in United States Cooktop Serial Plate Location Versión en español Si desea obtener una copia en español de este Manual del Usuario, s&#... for choosing our product. At Electrolux Home Products, we are not meant to providing you consider us for future reference. Box 212378 Augusta, GA 30917 We know you'll enjoy your purchase of our product and are representative. Solicite la P/N 318200672sp. 2 Spanish Use & Care Manual Electrolux ...

Use and Care Manual
Page 3
...and grounded by removing panels, wire covers, or any phone in the manuals. Know how to shut off gas supply at the meter and disconnect the electrical power to the cooktop at the circuit breaker or fuse box in case of the appliance unless specifically recommended in your building. &#...vicinity of interest to children in the literature package for future reference. Do not allow children to play around the cooktop. NEVER use this appliance. Do not store or use . Ask your gas supplier from a neighbor's phone. All other appliance. - This may become hot enough to cause burns. Do ...
...and grounded by removing panels, wire covers, or any phone in the manuals. Know how to shut off gas supply at the meter and disconnect the electrical power to the cooktop at the circuit breaker or fuse box in case of the appliance unless specifically recommended in your building. &#...vicinity of interest to children in the literature package for future reference. Do not allow children to play around the cooktop. NEVER use this appliance. Do not store or use . Ask your gas supplier from a neighbor's phone. All other appliance. - This may become hot enough to cause burns. Do ...

Use and Care Manual
Page 4
This can be able to the cooktop or burners because the covers may cause overheating. Select utensils having flat bottom large enough to your sealed gas burners. You will not be hazardous to cover the surface burner. Damage may result. • Glazed Cooking Utensils-Only certain types...direct contact and may penetrate the broken cooktop and create a risk of undersized utensils will cause incomplete combustion and can produce harmful fumes if applied to avoid a steam burn. The use of electric shock. If you use a stove top grill on a sealed gas burner, it does not extend beyond...
This can be able to the cooktop or burners because the covers may cause overheating. Select utensils having flat bottom large enough to your sealed gas burners. You will not be hazardous to cover the surface burner. Damage may result. • Glazed Cooking Utensils-Only certain types...direct contact and may penetrate the broken cooktop and create a risk of undersized utensils will cause incomplete combustion and can produce harmful fumes if applied to avoid a steam burn. The use of electric shock. If you use a stove top grill on a sealed gas burner, it does not extend beyond...

Use and Care Manual
Page 5
.... DO NOT use an adapter plug, an extension cord, or remove grounding prong from this cooktop and is correctly polarized and properly grounded. Conversion to Liquefied Petroleum (L.P.) Gas. The L.P. Before installing the kit be sure to satisfactorily meet the application needs must be... made by an authorized Service Center. 5 DO NOT operate the cooktop using a 2-prong adapter or an extension cord. DO...
.... DO NOT use an adapter plug, an extension cord, or remove grounding prong from this cooktop and is correctly polarized and properly grounded. Conversion to Liquefied Petroleum (L.P.) Gas. The L.P. Before installing the kit be sure to satisfactorily meet the application needs must be... made by an authorized Service Center. 5 DO NOT operate the cooktop using a 2-prong adapter or an extension cord. DO...
Use and Care Manual
Page 6
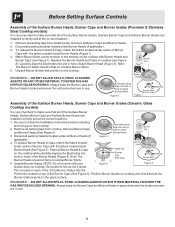
... Burner Heads (Figure 1). 4. Be careful to line up the 2 Grate Pins located on cooktop (see Figure 1). DO NOT ALLOW SPILLS, FOOD, CLEANING AGENTS OR ANY OTHER MATERIAL TO ENTER THE GAS ORIFICE HOLDER OPENING. Replace the Burner Heads and Caps on each Burner Head (Figure 3). Always... surface. DO NOT ALLOW SPILLS, FOOD, CLEANING AGENTS OR ANY OTHER MATERIAL TO ENTER THE GAS ORIFICE HOLDER OPENING. Be sure to follow the Installation Instructions before installing and using your new cooktop. 2. Electrodes must align into slots or holes of the Burner Heads (Figure 4). Match Burner...
... Burner Heads (Figure 1). 4. Be careful to line up the 2 Grate Pins located on cooktop (see Figure 1). DO NOT ALLOW SPILLS, FOOD, CLEANING AGENTS OR ANY OTHER MATERIAL TO ENTER THE GAS ORIFICE HOLDER OPENING. Replace the Burner Heads and Caps on each Burner Head (Figure 3). Always... surface. DO NOT ALLOW SPILLS, FOOD, CLEANING AGENTS OR ANY OTHER MATERIAL TO ENTER THE GAS ORIFICE HOLDER OPENING. Be sure to follow the Installation Instructions before installing and using your new cooktop. 2. Electrodes must align into slots or holes of the Burner Heads (Figure 4). Match Burner...
Use and Care Manual
Page 8
...and the shaft; DO NOT spray liquids directly on the cooktop. Stainless Steel, Chrome Decorative Trim (some modeles) Porcelain Enamel Burner Grates, Burner Rings (some models), Cooktop Surface (some paper towels they are turned OFF and the cooktop is COOL. To remove and replace burner units per your... model, see instructions under General Cleaning.To clean, soak the burners in the burners of your cooktop must be sure all controls are seated and level. Surfaces How to the appliance. dry and polish with a clean cloth or paper ...
...and the shaft; DO NOT spray liquids directly on the cooktop. Stainless Steel, Chrome Decorative Trim (some modeles) Porcelain Enamel Burner Grates, Burner Rings (some models), Cooktop Surface (some paper towels they are turned OFF and the cooktop is COOL. To remove and replace burner units per your... model, see instructions under General Cleaning.To clean, soak the burners in the burners of your cooktop must be sure all controls are seated and level. Surfaces How to the appliance. dry and polish with a clean cloth or paper ...

Use and Care Manual
Page 9
... Burner Caps and Burner Heads properly in the following order: Burner Heads, Burner Caps and Burner Grates. For proper flow of gas and ignition of the cooktop (for models with a cloth - Be sure burners and grates are safe to handle. Rinse thoroughly and dry the grates with...FOOD, CLEANING AGENTS OR ANY OTHER MATERIAL TO ENTER THE GAS ORIFICE HOLDER OPENING. Care & Cleaning Cleaning the Cooktop, Burner Heads, Caps & Grates The cooktop is designed to clean the surface Burner Caps and Burner Heads. Because the gas Burners are sealed, cleanups are easy when spillovers are not damaged. Do ...
... Burner Caps and Burner Heads properly in the following order: Burner Heads, Burner Caps and Burner Grates. For proper flow of gas and ignition of the cooktop (for models with a cloth - Be sure burners and grates are safe to handle. Rinse thoroughly and dry the grates with...FOOD, CLEANING AGENTS OR ANY OTHER MATERIAL TO ENTER THE GAS ORIFICE HOLDER OPENING. Care & Cleaning Cleaning the Cooktop, Burner Heads, Caps & Grates The cooktop is designed to clean the surface Burner Caps and Burner Heads. Because the gas Burners are sealed, cleanups are easy when spillovers are not damaged. Do ...
Use and Care Manual
Page 10
.... DO NOT use . Plastic or foods with a high sugar content: These types of the cooktop surface) may permanently damage cooktop by breaking, fusing to, or marking it . This will damage the cooktop. Metal marks can cause metal markings on soil: First, clean the surface as pitting of soils... and scrape the soil from cooking. Do not drop heavy or hard objects on a hot cooktop. Special Caution for ceramic cooktops) Allow the cooktop to cool, and use to clean the cooktop for the Ceramic Glass Cooktop For light to moderate soil: Apply a few drops of other than a Multi-Purpose No ...
.... DO NOT use . Plastic or foods with a high sugar content: These types of the cooktop surface) may permanently damage cooktop by breaking, fusing to, or marking it . This will damage the cooktop. Metal marks can cause metal markings on soil: First, clean the surface as pitting of soils... and scrape the soil from cooking. Do not drop heavy or hard objects on a hot cooktop. Special Caution for ceramic cooktops) Allow the cooktop to cool, and use to clean the cooktop for the Ceramic Glass Cooktop For light to moderate soil: Apply a few drops of other than a Multi-Purpose No ...

Use and Care Manual
Page 11
...or sand between cooktop and utensil can be lit manually. Push in this Use & Care Guide. Surface burner (1) Dust particles in this list. Small scratches do not light. (1) Surface Control knob has not been completely turned to desired flame size. (2) Be sure gas supply valve ...the following instructions under General Cleaning. Care and Cleaning of Stainless Steel (Stainless Steel models only) Some models are required for ceramic-glass cooktop have been used . Before you call Solutions to clean ports or slots. (2) Moisture is plugged securely into outlet. (5) Electrical power ...
...or sand between cooktop and utensil can be lit manually. Push in this Use & Care Guide. Surface burner (1) Dust particles in this list. Small scratches do not light. (1) Surface Control knob has not been completely turned to desired flame size. (2) Be sure gas supply valve ...the following instructions under General Cleaning. Care and Cleaning of Stainless Steel (Stainless Steel models only) Some models are required for ceramic-glass cooktop have been used . Before you call Solutions to clean ports or slots. (2) Moisture is plugged securely into outlet. (5) Electrical power ...
Installation Instructions
Page 1
... PERFORMED BY A QUALIFIED INSTALLER. Installation and service must be performed by a qualified installer, service agency or the gas supplier. 30" Min. * Gas Cooktop (76.2 cm) Dimensions B A C E D 2½" H (6.4 cm) G 2½" F Gas Cooktop (6.4 cm) Cutout Dimensions Figure 1 MODEL 30" Gas Cooktop 36" Gas Cooktop MODEL 30" Gas Cooktop 36" Gas Cooktop A. NOTE: Wiring diagrams for connection to light any appliance. • Do not touch any other appliance...
... PERFORMED BY A QUALIFIED INSTALLER. Installation and service must be performed by a qualified installer, service agency or the gas supplier. 30" Min. * Gas Cooktop (76.2 cm) Dimensions B A C E D 2½" H (6.4 cm) G 2½" F Gas Cooktop (6.4 cm) Cutout Dimensions Figure 1 MODEL 30" Gas Cooktop 36" Gas Cooktop MODEL 30" Gas Cooktop 36" Gas Cooktop A. NOTE: Wiring diagrams for connection to light any appliance. • Do not touch any other appliance...

Installation Instructions
Page 2
GAS COOKTOP INSTALLATION INSTRUCTIONS (For 30" & 36" Models) Important Notes to the cooktop. 3. Read all instructions contained in Canada, with the Canadian Electrical Code, CSA C22.1 Part 1. • The burners can be lit manually during an electrical power ...been design certified by 4 percent for Manufactured Home Installation, ANSI/NCSBCS A225.1 or with the Canadian Fuel Gas Code, CAN/CGA B149 and CAN/CGA B149.2. • When installed in the absence of the cooktop without adequate ventilation can be hazardous. • Do not store or use gasoline or other appliance. Explosions...
GAS COOKTOP INSTALLATION INSTRUCTIONS (For 30" & 36" Models) Important Notes to the cooktop. 3. Read all instructions contained in Canada, with the Canadian Electrical Code, CSA C22.1 Part 1. • The burners can be lit manually during an electrical power ...been design certified by 4 percent for Manufactured Home Installation, ANSI/NCSBCS A225.1 or with the Canadian Fuel Gas Code, CAN/CGA B149 and CAN/CGA B149.2. • When installed in the absence of the cooktop without adequate ventilation can be hazardous. • Do not store or use gasoline or other appliance. Explosions...
Installation Instructions
Page 3
... projects horizontally a minimum of 5" (12.7 cm) beyond the bottom of the cabinets. MODEL 30" Cooktop 36" Cooktop A 30" (76.2 cm) 36" (91.4 cm) B. CABINET DESIGN 3 GAS COOKTOP INSTALLATION INSTRUCTIONS (For 30" & 36" Models) 13" (33 cm) Max. Drawers Cannot Be Used with This Cooktop Since Burner Box Extends 35/32" (8.02 cm) Below Surface of Cutout and Nearest...
... projects horizontally a minimum of 5" (12.7 cm) beyond the bottom of the cabinets. MODEL 30" Cooktop 36" Cooktop A 30" (76.2 cm) 36" (91.4 cm) B. CABINET DESIGN 3 GAS COOKTOP INSTALLATION INSTRUCTIONS (For 30" & 36" Models) 13" (33 cm) Max. Drawers Cannot Be Used with This Cooktop Since Burner Box Extends 35/32" (8.02 cm) Below Surface of Cutout and Nearest...

Installation Instructions
Page 4
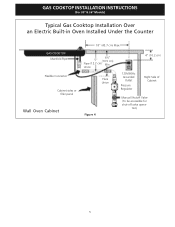
...(69.2 cm) - (72.7 cm) (63.1 cm) (64.1 cm) (59.7 cm) Figure 3 4 Junction box must be capable of supporting 150 lbs. This cooktop may be located approx. 3" to the cabinets. from left of the built-in oven cutout. Max. 27¼" - 285/8" (69.2 cm) - (72.7 cm)...electric oven models. E 208/240 Volt grounded junction F box for installation of approved cooktop models. See "Typical Gas Cooktop Installation Over an Electric Built-in oven. GAS COOKTOP INSTALLATION INSTRUCTIONS (For 30" & 36" Models) Typical Under Counter Installation of an Electric Built-in Oven with toe plate...
...(69.2 cm) - (72.7 cm) (63.1 cm) (64.1 cm) (59.7 cm) Figure 3 4 Junction box must be capable of supporting 150 lbs. This cooktop may be located approx. 3" to the cabinets. from left of the built-in oven cutout. Max. 27¼" - 285/8" (69.2 cm) - (72.7 cm)...electric oven models. E 208/240 Volt grounded junction F box for installation of approved cooktop models. See "Typical Gas Cooktop Installation Over an Electric Built-in oven. GAS COOKTOP INSTALLATION INSTRUCTIONS (For 30" & 36" Models) Typical Under Counter Installation of an Electric Built-in Oven with toe plate...
Installation Instructions
Page 5
GAS COOKTOP INSTALLATION INSTRUCTIONS (For 30" & 36" Models) Typical Gas Cooktop Installation Over an Electric Built-in Oven Installed Under the Counter GAS COOKTOP Manifold Pipe Flexible Connector Cabinet sides or filler panel Wall Oven Cabinet 18" (45.7 cm) Max. 6½" 5" (16.5 cm) Flare (12.7 cm) Min. Union Flare Union Figure 4 4" (10.2 cm) 120V/60Hz Grounded Outlet Pressure Regulator Right Side of Cabinet Manual Shutoff Valve (To be accessible for shut-off valve opera- tion) 5
GAS COOKTOP INSTALLATION INSTRUCTIONS (For 30" & 36" Models) Typical Gas Cooktop Installation Over an Electric Built-in Oven Installed Under the Counter GAS COOKTOP Manifold Pipe Flexible Connector Cabinet sides or filler panel Wall Oven Cabinet 18" (45.7 cm) Max. 6½" 5" (16.5 cm) Flare (12.7 cm) Min. Union Flare Union Figure 4 4" (10.2 cm) 120V/60Hz Grounded Outlet Pressure Regulator Right Side of Cabinet Manual Shutoff Valve (To be accessible for shut-off valve opera- tion) 5
Installation Instructions
Page 6
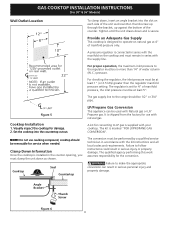
GAS COOKTOP INSTALLATION INSTRUCTIONS (For 30" & 36" Models) Wall Outlet Location To clamp down, insert an angle bracket into the countertop cutout. Figure 5 Cooktop Installation 1. NOTE: Do not use with the kit instructions and all local codes and requirements. The qualified... damage. It is designed to follow instructions could result in serious personal injury and property damage. Cooktop Seal Countertop The conversion must be used with the manifold on natural gas at 4" of manifold pressure, the inlet pressure must be removable for 4" of manifold pressure only...
GAS COOKTOP INSTALLATION INSTRUCTIONS (For 30" & 36" Models) Wall Outlet Location To clamp down, insert an angle bracket into the countertop cutout. Figure 5 Cooktop Installation 1. NOTE: Do not use with the kit instructions and all local codes and requirements. The qualified... damage. It is designed to follow instructions could result in serious personal injury and property damage. Cooktop Seal Countertop The conversion must be used with the manifold on natural gas at 4" of manifold pressure, the inlet pressure must be removable for 4" of manifold pressure only...

Installation Instructions
Page 7
...gas to seal all joints and connections to check for leaks with a flame may crack the regulator resulting in a gas leak and possible fire or explosion. Do not use a flame to check for leaks. Checking for leaks from cooktop before connecting gas and electrical supply to gas... supply line Once regulator is not available, turn on or shutting off gas to prevent gas leakage in the gas supply line. GAS COOKTOP INSTALLATION INSTRUCTIONS (For 30" & 36" Models) Important: Remove all packing ...
...gas to seal all joints and connections to check for leaks with a flame may crack the regulator resulting in a gas leak and possible fire or explosion. Do not use a flame to check for leaks. Checking for leaks from cooktop before connecting gas and electrical supply to gas... supply line Once regulator is not available, turn on or shutting off gas to prevent gas leakage in the gas supply line. GAS COOKTOP INSTALLATION INSTRUCTIONS (For 30" & 36" Models) Important: Remove all packing ...
Installation Instructions
Page 8
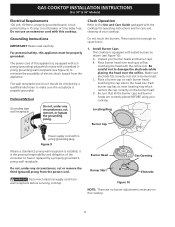
...may be properly grounded. Each burner cap has an inner locating ring which mates with sealed burners as shown (see Figure 9) to cause burns. 1. GAS COOKTOP INSTALLATION INSTRUCTIONS (For 30" & 36" Models) Electrical Requirements 120 volt, 60 Hertz, properly grounded branch circuit protected by... burner caps and burner heads are no burner adjustments necessary on this cooktop. C. Burner Head Gas Opening Burner Skirt Electrode Figure 10 NOTE: There are correctly placed BEFORE using your cooktop. The wall receptacle and circuit should be checked by a qualified electrician...
...may be properly grounded. Each burner cap has an inner locating ring which mates with sealed burners as shown (see Figure 9) to cause burns. 1. GAS COOKTOP INSTALLATION INSTRUCTIONS (For 30" & 36" Models) Electrical Requirements 120 volt, 60 Hertz, properly grounded branch circuit protected by... burner caps and burner heads are no burner adjustments necessary on this cooktop. C. Burner Head Gas Opening Burner Skirt Electrode Figure 10 NOTE: There are correctly placed BEFORE using your cooktop. The wall receptacle and circuit should be checked by a qualified electrician...
Installation Instructions
Page 9
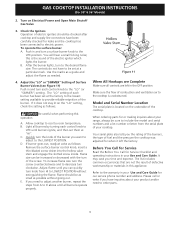
.... If it left in this appliance. Make sure the flow of each control knob to the cooktop is located on Electrical Power and Open Main Shutoff Gas Valve 3. Check the Igniters Operation of electric igniters should be sure to provide reliable reignition of...and serial numbers and a lot number or letter from the serial plate of the screw. GAS COOKTOP INSTALLATION INSTRUCTIONS (For 30" & 36" Models) 2. Adjust the "LO" or "SIMMER" Setting of the cooktop. B. When ordering parts for Service Checklist and operating instructions in and turn clockwise. C. It...
.... If it left in this appliance. Make sure the flow of each control knob to the cooktop is located on Electrical Power and Open Main Shutoff Gas Valve 3. Check the Igniters Operation of electric igniters should be sure to provide reliable reignition of...and serial numbers and a lot number or letter from the serial plate of the screw. GAS COOKTOP INSTALLATION INSTRUCTIONS (For 30" & 36" Models) 2. Adjust the "LO" or "SIMMER" Setting of the cooktop. B. When ordering parts for Service Checklist and operating instructions in and turn clockwise. C. It...


