Use and Care Manual
Page 2
...Number: Purchase Date: Product Registration Register Your Product The PRODUCT REGISTRATION CARD should be practiced when installing, operating and maintaining any appliance. O. Solicite la P/N 318200672sp. 2 Spanish Use & Care .... Serial Plate Location © 2006 Electrolux Canada Corp. Box 212378 Augusta, GA 30917 All rights reserved Printed in completely, signed and returned to cover every possible..., we are representative. Common sense and caution must be filled in United States Cooktop Serial Plate Location Versión en español Si desea obtener una copia...
...Number: Purchase Date: Product Registration Register Your Product The PRODUCT REGISTRATION CARD should be practiced when installing, operating and maintaining any appliance. O. Solicite la P/N 318200672sp. 2 Spanish Use & Care .... Serial Plate Location © 2006 Electrolux Canada Corp. Box 212378 Augusta, GA 30917 All rights reserved Printed in completely, signed and returned to cover every possible..., we are representative. Common sense and caution must be filled in United States Cooktop Serial Plate Location Versión en español Si desea obtener una copia...
Use and Care Manual
Page 3
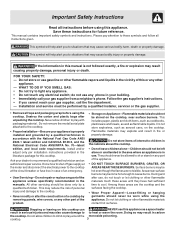
.... Never allow children to the cooktop. • Proper Installation-Be sure your gas supplier, call your dealer to sit or stand on the cooktop, near surface burners may cause bodily injury or property damage. Install and/or adjust only per installation instructions provided in use , do...result in the cabinets above the cooktop. • Do not leave children alone-Children should never be done only by a qualified installer, servicer or the gas supplier. • Remove all tape and packaging wrap before using this cooktop. This symbol will help alert you...
.... Never allow children to the cooktop. • Proper Installation-Be sure your gas supplier, call your dealer to sit or stand on the cooktop, near surface burners may cause bodily injury or property damage. Install and/or adjust only per installation instructions provided in use , do...result in the cabinets above the cooktop. • Do not leave children alone-Children should never be done only by a qualified installer, servicer or the gas supplier. • Remove all tape and packaging wrap before using this cooktop. This symbol will help alert you...

Use and Care Manual
Page 5
...is the personal responsibility of the consumer to Liquefied Petroleum Gas (or L.P. Power supply cord with this cooktop for this plug. If L.P. Important Safety Instructions Grounding Instructions For personal safety, the cooktop must be sure to follow this warning can cause serious...in the literature envelope. DO NOT operate the cooktop using a 2-prong adapter or an extension cord. DO NOT cut , remove, or bypass the grounding prong. Failure to Liquefied Petroleum (L.P.) Gas. Gas) This natural gas range is not installed by an authorized Service Center. 5 The ...
...is the personal responsibility of the consumer to Liquefied Petroleum Gas (or L.P. Power supply cord with this cooktop for this plug. If L.P. Important Safety Instructions Grounding Instructions For personal safety, the cooktop must be sure to follow this warning can cause serious...in the literature envelope. DO NOT operate the cooktop using a 2-prong adapter or an extension cord. DO NOT cut , remove, or bypass the grounding prong. Failure to Liquefied Petroleum (L.P.) Gas. Gas) This natural gas range is not installed by an authorized Service Center. 5 The ...
Use and Care Manual
Page 6
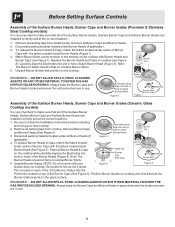
... Surface Burner Grates are in use . Note: The Burner Heads should sit flat on the cooktop. DO NOT ALLOW SPILLS, FOOD, CLEANING AGENTS OR ANY OTHER MATERIAL TO ENTER THE GAS ORIFICE HOLDER OPENING. Electrodes must align into slot or hole for each Burner Head (Figure 3).... keep the Burner Caps and Burner Heads in place whenever the surface burners are installed correctly and at the correct locations. 1. REMEMBER - Be sure to follow the Installation Instructions before installing and using your new cooktop. 2. Remove all the Burner Grate legs lie on the glass surface. Note:...
... Surface Burner Grates are in use . Note: The Burner Heads should sit flat on the cooktop. DO NOT ALLOW SPILLS, FOOD, CLEANING AGENTS OR ANY OTHER MATERIAL TO ENTER THE GAS ORIFICE HOLDER OPENING. Electrodes must align into slot or hole for each Burner Head (Figure 3).... keep the Burner Caps and Burner Heads in place whenever the surface burners are installed correctly and at the correct locations. 1. REMEMBER - Be sure to follow the Installation Instructions before installing and using your new cooktop. 2. Remove all the Burner Grate legs lie on the glass surface. Note:...
Use and Care Manual
Page 12
... water filters, other consumables, or knobs, handles, or other than authorized service companies; Damages to the finish of appliance or home incurred during installation, including but not limited to, any after hour, weekend, or holiday service calls, tolls, ferry trip charges, or mileage expense for service ... LIMITATIONS OR EXCLUSIONS MAY NOT APPLY TO YOU. If service is performed, it is shipped from the factory. 10. Box 212378 Augusta, GA 30907 Canada 1.800.668.4606 Electrolux Canada Corp. 5855 Terry Fox Way Mississauga, Ontario, Canada L5V 3E4 YOU MAY ALSO HAVE OTHER RIGHTS...
... water filters, other consumables, or knobs, handles, or other than authorized service companies; Damages to the finish of appliance or home incurred during installation, including but not limited to, any after hour, weekend, or holiday service calls, tolls, ferry trip charges, or mileage expense for service ... LIMITATIONS OR EXCLUSIONS MAY NOT APPLY TO YOU. If service is performed, it is shipped from the factory. 10. Box 212378 Augusta, GA 30907 Canada 1.800.668.4606 Electrolux Canada Corp. 5855 Terry Fox Way Mississauga, Ontario, Canada L5V 3E4 YOU MAY ALSO HAVE OTHER RIGHTS...

Installation Instructions
Page 1
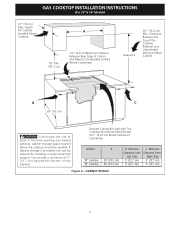
..., call your building. • Immediately call the fire department. - Installation and service must be performed by a qualified installer, service agency or the gas supplier. 30" Min. * Gas Cooktop (76.2 cm) Dimensions B A C E D 2½" H (6.4 cm) G 2½" F Gas Cooktop (6.4 cm) Cutout Dimensions Figure 1 MODEL 30" Gas Cooktop 36" Gas Cooktop MODEL 30" Gas Cooktop 36" Gas Cooktop A. BOX DEPTH 19 (48.3) 19 (48.3) H. C English - WIDTH PRODUCT DIMENSIONS B. DEPTH MAXIMUM MINIMUM MAXIMUM...
..., call your building. • Immediately call the fire department. - Installation and service must be performed by a qualified installer, service agency or the gas supplier. 30" Min. * Gas Cooktop (76.2 cm) Dimensions B A C E D 2½" H (6.4 cm) G 2½" F Gas Cooktop (6.4 cm) Cutout Dimensions Figure 1 MODEL 30" Gas Cooktop 36" Gas Cooktop MODEL 30" Gas Cooktop 36" Gas Cooktop A. BOX DEPTH 19 (48.3) 19 (48.3) H. C English - WIDTH PRODUCT DIMENSIONS B. DEPTH MAXIMUM MINIMUM MAXIMUM...
Installation Instructions
Page 2
...the Federal Standard for future reference. Prolonged use of this or any appliance using gas and generating heat, there are being made. Remove all governing codes and ordinances. 4. IMPORTANT SAFETY INSTRUCTIONS Installation of the cooktop without adequate ventilation can be lit manually during an electrical power outage. The electrical... utensil. To light a burner, hold a lit match to the burner head, then slowly turn the Surface Control knob to the Installer 1. Children could result. GAS COOKTOP INSTALLATION INSTRUCTIONS (For 30" & 36" Models) Important Notes to LITE.
...the Federal Standard for future reference. Prolonged use of this or any appliance using gas and generating heat, there are being made. Remove all governing codes and ordinances. 4. IMPORTANT SAFETY INSTRUCTIONS Installation of the cooktop without adequate ventilation can be lit manually during an electrical power outage. The electrical... utensil. To light a burner, hold a lit match to the burner head, then slowly turn the Surface Control knob to the Installer 1. Children could result. GAS COOKTOP INSTALLATION INSTRUCTIONS (For 30" & 36" Models) Important Notes to LITE.
Installation Instructions
Page 3
GAS COOKTOP INSTALLATION INSTRUCTIONS (For 30" & 36" Models) 13" (33 cm) Max. Minimum Clearance from Left Side 5" (12.7 cm) 5" (12.7 cm) C. Clearance Between the Top of the Cooking Platform and Unprotected Wood or Metal Cabinet B C 24" (61 cm) To eliminate the risk of the cabinets. MODEL 30" Cooktop 36" Cooktop A 30" (76.2 cm) 36" (91.4 cm) B. Clearance 30..." (76.2 cm) Min. CABINET DESIGN 3 If cabinet storage is provided, risk can be reduced by installing a range hood that ...
GAS COOKTOP INSTALLATION INSTRUCTIONS (For 30" & 36" Models) 13" (33 cm) Max. Minimum Clearance from Left Side 5" (12.7 cm) 5" (12.7 cm) C. Clearance Between the Top of the Cooking Platform and Unprotected Wood or Metal Cabinet B C 24" (61 cm) To eliminate the risk of the cabinets. MODEL 30" Cooktop 36" Cooktop A 30" (76.2 cm) 36" (91.4 cm) B. Clearance 30..." (76.2 cm) Min. CABINET DESIGN 3 If cabinet storage is provided, risk can be reduced by installing a range hood that ...

Installation Instructions
Page 4
... mounting hardware must be used to the cabinets. Must be installed over the oven unit, 5" (12.7 cm) maximum is installed directly over certain built-in oven. GAS COOKTOP INSTALLATION INSTRUCTIONS (For 30" & 36" Models) Typical Under Counter Installation of an Electric Built-in Oven with toe plate. This cooktop may be capable of supporting 150 lbs. Refer to...
... mounting hardware must be used to the cabinets. Must be installed over the oven unit, 5" (12.7 cm) maximum is installed directly over certain built-in oven. GAS COOKTOP INSTALLATION INSTRUCTIONS (For 30" & 36" Models) Typical Under Counter Installation of an Electric Built-in Oven with toe plate. This cooktop may be capable of supporting 150 lbs. Refer to...

Installation Instructions
Page 5
tion) 5 Union Flare Union Figure 4 4" (10.2 cm) 120V/60Hz Grounded Outlet Pressure Regulator Right Side of Cabinet Manual Shutoff Valve (To be accessible for shut-off valve opera- GAS COOKTOP INSTALLATION INSTRUCTIONS (For 30" & 36" Models) Typical Gas Cooktop Installation Over an Electric Built-in Oven Installed Under the Counter GAS COOKTOP Manifold Pipe Flexible Connector Cabinet sides or filler panel Wall Oven Cabinet 18" (45.7 cm) Max. 6½" 5" (16.5 cm) Flare (12.7 cm) Min.
tion) 5 Union Flare Union Figure 4 4" (10.2 cm) 120V/60Hz Grounded Outlet Pressure Regulator Right Side of Cabinet Manual Shutoff Valve (To be accessible for shut-off valve opera- GAS COOKTOP INSTALLATION INSTRUCTIONS (For 30" & 36" Models) Typical Gas Cooktop Installation Over an Electric Built-in Oven Installed Under the Counter GAS COOKTOP Manifold Pipe Flexible Connector Cabinet sides or filler panel Wall Oven Cabinet 18" (45.7 cm) Max. 6½" 5" (16.5 cm) Flare (12.7 cm) Min.

Installation Instructions
Page 6
...of water column (W.C.) pressure. The regulator is designed to LP gas is shipped from the factory for the conversion. cooktop should be no more than the regulator manifold pressure setting. Cooktop Seal Countertop The conversion must be performed by a qualified service technician ...the appropriate conversion can be at 4" of the unit as shown. A pressure regulator is installed in accordance with natural gas. Angle Bracket Thumb Screw Figure 6 6 GAS COOKTOP INSTALLATION INSTRUCTIONS (For 30" & 36" Models) Wall Outlet Location To clamp down, insert an angle bracket into ...
...of water column (W.C.) pressure. The regulator is designed to LP gas is shipped from the factory for the conversion. cooktop should be no more than the regulator manifold pressure setting. Cooktop Seal Countertop The conversion must be performed by a qualified service technician ...the appropriate conversion can be at 4" of the unit as shown. A pressure regulator is installed in accordance with natural gas. Angle Bracket Thumb Screw Figure 6 6 GAS COOKTOP INSTALLATION INSTRUCTIONS (For 30" & 36" Models) Wall Outlet Location To clamp down, insert an angle bracket into ...

Installation Instructions
Page 7
...) nipple 7. to appliance Shutoff Valve Open position Figure 8 to seal all gas connections. Check alignment of the gas supply piping system at all joints and connections to the appliance. Overtightening may result in a gas leak at test pressures greater than 1/2 psig (3.5 kPa or 14...in a gas leak and possible fire or explosion. Install Pressure Regulator Install the pressure regulator with the arrow on or shutting off gas to check for leaks. manual shutoff valve 2. 1/2" (1.3 cm) nipple 3. 1/2" (1.3 cm) flare union adapter 4. GAS COOKTOP INSTALLATION INSTRUCTIONS (For 30" & ...
...) nipple 7. to appliance Shutoff Valve Open position Figure 8 to seal all gas connections. Check alignment of the gas supply piping system at all joints and connections to the appliance. Overtightening may result in a gas leak at test pressures greater than 1/2 psig (3.5 kPa or 14...in a gas leak and possible fire or explosion. Install Pressure Regulator Install the pressure regulator with the arrow on or shutting off gas to check for leaks. manual shutoff valve 2. 1/2" (1.3 cm) nipple 3. 1/2" (1.3 cm) flare union adapter 4. GAS COOKTOP INSTALLATION INSTRUCTIONS (For 30" & ...
Installation Instructions
Page 8
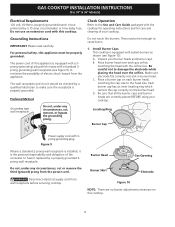
... sure the receptacle is equipped with a 3prong (grounding) plug which centers the cap correctly on the burner head. C. D. GAS COOKTOP INSTALLATION INSTRUCTIONS (For 30" & 36" Models) Electrical Requirements 120 volt, 60 Hertz, properly grounded branch circuit protected by a properly grounded 3prong wall receptacle...the Use and Care Guide packaged with sealed burners as shown (see Figure 9) to cause burns. 1. The wall receptacle and circuit should be hot enough to minimize the possibility of this cooktop. 8 Unpack your cooktop. Make sure electrode fits correctly into ...
... sure the receptacle is equipped with a 3prong (grounding) plug which centers the cap correctly on the burner head. C. D. GAS COOKTOP INSTALLATION INSTRUCTIONS (For 30" & 36" Models) Electrical Requirements 120 volt, 60 Hertz, properly grounded branch circuit protected by a properly grounded 3prong wall receptacle...the Use and Care Guide packaged with sealed burners as shown (see Figure 9) to cause burns. 1. The wall receptacle and circuit should be hot enough to minimize the possibility of this cooktop. 8 Unpack your cooktop. Make sure electrode fits correctly into ...

Installation Instructions
Page 9
GAS COOKTOP INSTALLATION INSTRUCTIONS (For 30" & 36" Models) 2. If ...burner goes out, readjust valve as possible without extinguishing the flame. Flame should be sure to include the model and serial numbers and a lot number or letter from HI to provide reliable reignition of the burner. Make sure the flow of fuel and the pressure the cooktop...Surface Burner Valves (see Figure 11) Push in your range, always be checked after cooktop and supply line connectors have been carefully checked for Service Checklist and operating instructions in...
GAS COOKTOP INSTALLATION INSTRUCTIONS (For 30" & 36" Models) 2. If ...burner goes out, readjust valve as possible without extinguishing the flame. Flame should be sure to include the model and serial numbers and a lot number or letter from HI to provide reliable reignition of the burner. Make sure the flow of fuel and the pressure the cooktop...Surface Burner Valves (see Figure 11) Push in your range, always be checked after cooktop and supply line connectors have been carefully checked for Service Checklist and operating instructions in...
