Complete Owner's Guide (English)
Page 2
... of this product may not be performed by inappropriate waste handling of this or any electrical switch; Use the laundry center only as household waste. Model Number Serial Number Purchase Date Note: The instructions appearing in the Use & Care Guide, Operating Instructions, Installation Instructions......15 Español...16-30 Product Record Read and Save These Instructions Record Your Model and Serial Numbers Record below the model and serial numbers found on the laundry center serial plate located on its packaging indicates that this product, please contact your local city...
... of this product may not be performed by inappropriate waste handling of this or any electrical switch; Use the laundry center only as household waste. Model Number Serial Number Purchase Date Note: The instructions appearing in the Use & Care Guide, Operating Instructions, Installation Instructions......15 Español...16-30 Product Record Read and Save These Instructions Record Your Model and Serial Numbers Record below the model and serial numbers found on the laundry center serial plate located on its packaging indicates that this product, please contact your local city...
Complete Owner's Guide (English)
Page 5
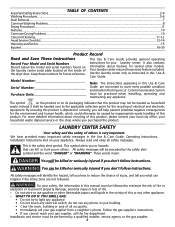
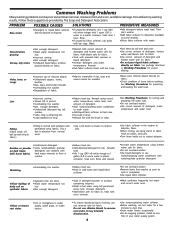
... bleach in the bleach dispenser. Pretreat stains and heavy soil. Washing Procedures Sort laundry into loads that can be washed together. Sort laundry into loads that can be washed together. For models without a bleach dispenser, dilute the recommended amount of fire, electrical shock, or... injury to persons, read and follow fabric care and laundry product labels. Place delicate items in ...
... bleach in the bleach dispenser. Pretreat stains and heavy soil. Washing Procedures Sort laundry into loads that can be washed together. Sort laundry into loads that can be washed together. For models without a bleach dispenser, dilute the recommended amount of fire, electrical shock, or... injury to persons, read and follow fabric care and laundry product labels. Place delicate items in ...
Complete Owner's Guide (English)
Page 6
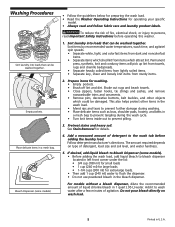
...cycle is missing or damaged. 6 Do not force open the lid during a spin, push in dispenser (see picture to balance the load. 7. Add laundry load to washer. • Dry load level should not be higher than half the total wash load. • When washing a single heavy item, add...and wait about 2-3 minutes for 2-3 minutes after the cycle has ended. Replace dispenser by fabric care label. Built-In Fabric Softener Dispenser (some models) 1. To avoid serious personal injury, do not operate washer if safety lid lock is completed. Do not overload the washer. • Do ...
...cycle is missing or damaged. 6 Do not force open the lid during a spin, push in dispenser (see picture to balance the load. 7. Add laundry load to washer. • Dry load level should not be higher than half the total wash load. • When washing a single heavy item, add...and wait about 2-3 minutes for 2-3 minutes after the cycle has ended. Replace dispenser by fabric care label. Built-In Fabric Softener Dispenser (some models) 1. To avoid serious personal injury, do not operate washer if safety lid lock is completed. Do not overload the washer. • Do ...
Complete Owner's Guide (English)
Page 8
... whites, use rust remover safe for fabric. Wash. •Add detergent before washing. Then start washer. •Add fabric softener to dispenser (available on some models). •Dilute fabric softener with lint brush or roller. water temperature, water level, and preparing the wash load. •Overloading the washer. temperature and water...
... whites, use rust remover safe for fabric. Wash. •Add detergent before washing. Then start washer. •Add fabric softener to dispenser (available on some models). •Dilute fabric softener with lint brush or roller. water temperature, water level, and preparing the wash load. •Overloading the washer. temperature and water...
Complete Owner's Guide (English)
Page 9
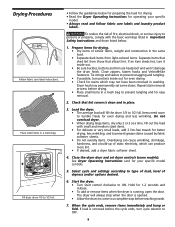
...Operating Instructions for even drying and less wrinkling. Prepare items for better drying, less wrinkling, and to tumble freely for operating your specific model controls. 5. Dryer heat may not have been removed in Important Safety Instructions and those that lint screen is removed before reaching inside....drum to come to a complete stop when the door is running, open the door. Hold for your specific model. • Always read and follow fabric care labels and laundry product labels. The dryer will fill the drum 1/3 to ON. When the cycle ends, remove items immediately and...
...Operating Instructions for even drying and less wrinkling. Prepare items for better drying, less wrinkling, and to tumble freely for operating your specific model controls. 5. Dryer heat may not have been removed in Important Safety Instructions and those that lint screen is removed before reaching inside....drum to come to a complete stop when the door is running, open the door. Hold for your specific model. • Always read and follow fabric care labels and laundry product labels. The dryer will fill the drum 1/3 to ON. When the cycle ends, remove items immediately and...
Complete Owner's Guide (English)
Page 10
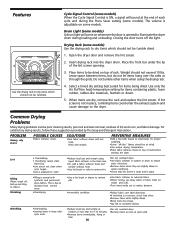
... opening. 3. Lint • Overloading. • Overdrying causes static •Reduce load size and rewash using the drying rack. 4. Drying Rack (some models. If lint screen is clean and in dryer after cycle ends. •Reduce load size and tumble at the end of each cycle and during...rinse. •Use fabric softener in place, tumbling items could enter the exhaust system and cause damage to the dryer. Cycle Signal Control (some models). Hang or fold. 10 •Do not overload dryer. •Remove items as soon as cycle ends. Place items to be tumbled. ...
... opening. 3. Lint • Overloading. • Overdrying causes static •Reduce load size and rewash using the drying rack. 4. Drying Rack (some models. If lint screen is clean and in dryer after cycle ends. •Reduce load size and tumble at the end of each cycle and during...rinse. •Use fabric softener in place, tumbling items could enter the exhaust system and cause damage to the dryer. Cycle Signal Control (some models). Hang or fold. 10 •Do not overload dryer. •Remove items as soon as cycle ends. Place items to be tumbled. ...
Complete Owner's Guide (English)
Page 14
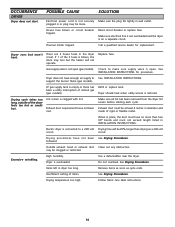
... securely Make sure the plug fits tightly in or plug may be clogged or restricted. Replace fuse. support the burner flame (gas models). Exhaust duct requirements have not been See Drying Procedures. Electric dryer is on a 240 volt circuit. Call a qualified service dealer .... Excessive wrinkling. Remove items as soon as cycle ends. Follow fabric care label instructions. 14 Gas supply valve is open (gas models). Refill or replace tank. Do not overload. Drying temperature too high. House fuse blown or circuit breaker tripped. Use a dehumidifier ...
... securely Make sure the plug fits tightly in or plug may be clogged or restricted. Replace fuse. support the burner flame (gas models). Exhaust duct requirements have not been See Drying Procedures. Electric dryer is on a 240 volt circuit. Call a qualified service dealer .... Excessive wrinkling. Remove items as soon as cycle ends. Follow fabric care label instructions. 14 Gas supply valve is open (gas models). Refill or replace tank. Do not overload. Drying temperature too high. House fuse blown or circuit breaker tripped. Use a dehumidifier ...
Operating Instructions (Operating Instructions)
Page 3
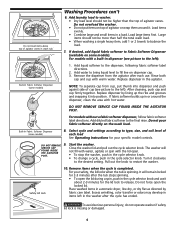
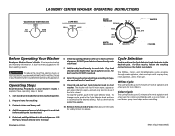
LAUNDRY CENTER WASHER OPERATING INSTRUCTIONS WASH/RINSE TEMPERATURE COLD WARM WARM * COLD • COLD COLD HOT COLD WARM COLD LOAD SLIOZEAD(WSAIZTER LEVEL) SMALL (LOW) MEDIUM LARGE (FULL) RESET * * SOME MODELS SOAK/ PREWASH PREWASH 15 12 8 4 REGULAR/WHITES SOAK FINAL SPIN RINSE KNITS/ DELICATES RINSE FINAL SPIN 12... agitator vanes. Prepare items for best washing results. To stop the washer, push in your Washer Owner's Guide before adding the laundry load. 5. To change a cycle, push in the Cycle Selector knob and turn the Cycle Selector knob clockwise to the desired ...
LAUNDRY CENTER WASHER OPERATING INSTRUCTIONS WASH/RINSE TEMPERATURE COLD WARM WARM * COLD • COLD COLD HOT COLD WARM COLD LOAD SLIOZEAD(WSAIZTER LEVEL) SMALL (LOW) MEDIUM LARGE (FULL) RESET * * SOME MODELS SOAK/ PREWASH PREWASH 15 12 8 4 REGULAR/WHITES SOAK FINAL SPIN RINSE KNITS/ DELICATES RINSE FINAL SPIN 12... agitator vanes. Prepare items for best washing results. To stop the washer, push in your Washer Owner's Guide before adding the laundry load. 5. To change a cycle, push in the Cycle Selector knob and turn the Cycle Selector knob clockwise to the desired ...


