
Owners Guide
Page 1
Read and Save These Instructions Record Your Model and Serial Numbers Record below the model and serial numbers found on the dryer serial plate located on the left side of Contents Important Safety Instructions 2 Drying Procedures 3 Features 3 Common Drying Problems ...Warranty 6 Back Cover 8 Product Registration Thank you for future reference. Keep these numbers for choosing this dryer. Model Number: Serial Number: Purchase Date: P/N 134671200A (0606) DRYER Owner's Guide Table of the door opening. Register Your Product The self-addressed PRODUCT REGISTRATION CARD should be...
Read and Save These Instructions Record Your Model and Serial Numbers Record below the model and serial numbers found on the dryer serial plate located on the left side of Contents Important Safety Instructions 2 Drying Procedures 3 Features 3 Common Drying Problems ...Warranty 6 Back Cover 8 Product Registration Thank you for future reference. Keep these numbers for choosing this dryer. Model Number: Serial Number: Purchase Date: P/N 134671200A (0606) DRYER Owner's Guide Table of the door opening. Register Your Product The self-addressed PRODUCT REGISTRATION CARD should be...
Owners Guide
Page 2
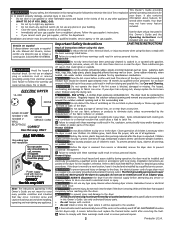
...risk of the fabric softener or product. Do not use an extension cord or an adaptor plug. The interior of an overheated situation (electric dryers only). See Care and Cleaning, . Do not obstruct the flow of Fire - Do not place items exposed to an exhaust outdoors... might use them the proper, safe use fabric softeners or products to do so can become airtight chambers. ALWAYS disconnect the dryer from the electrical supply before reaching into a properly grounded and polarized 3-prong outlet. may contribute to cover completely before attempting any phone in this...
...risk of the fabric softener or product. Do not use an extension cord or an adaptor plug. The interior of an overheated situation (electric dryers only). See Care and Cleaning, . Do not obstruct the flow of Fire - Do not place items exposed to an exhaust outdoors... might use them the proper, safe use fabric softeners or products to do so can become airtight chambers. ALWAYS disconnect the dryer from the electrical supply before reaching into a properly grounded and polarized 3-prong outlet. may contribute to cover completely before attempting any phone in this...
Owners Guide
Page 3
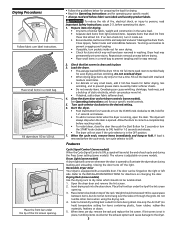
Place the front bar under the lip of static electricity, which may permanently set dryer controls (some models) Use the drying rack to persons, ...easy removal. 2. Closing the door turns off the light. Refer to be dried on top of fire, electrical shock, or injury to dry items which should not exceed 10 lbs. Place items to the INSTALLATION INSTRUCTIONS...cycle ends, remove items immediately and hang or fold. Fill out the load with a reversible door. Reversible Dryer Door Your dryer is equipped with small and medium sized items. • For delicate or very small loads, add 2...
Place the front bar under the lip of static electricity, which may permanently set dryer controls (some models) Use the drying rack to persons, ...easy removal. 2. Closing the door turns off the light. Refer to be dried on top of fire, electrical shock, or injury to dry items which should not exceed 10 lbs. Place items to the INSTALLATION INSTRUCTIONS...cycle ends, remove items immediately and hang or fold. Fill out the load with a reversible door. Reversible Dryer Door Your dryer is equipped with small and medium sized items. • For delicate or very small loads, add 2...
Owners Guide
Page 4
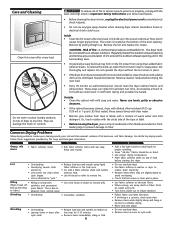
... Important Safety Instructions and those listed below. • Before cleaning the dryer interior, unplug the electrical power cord to avoid electrical shock hazards. • Do not use any type spray cleanser when cleaning dryer interior. Dry thoroughly and replace. Do not store or place laundry products... causes static fabric softener in the final rinse. • Use fabric softener in washer or dryer to electricity. • Or, add a fabric softener sheet and tumble reduce static electricity. • Lint screen not clean when without the lint screen in warm, soapy water. ...
... Important Safety Instructions and those listed below. • Before cleaning the dryer interior, unplug the electrical power cord to avoid electrical shock hazards. • Do not use any type spray cleanser when cleaning dryer interior. Dry thoroughly and replace. Do not store or place laundry products... causes static fabric softener in the final rinse. • Use fabric softener in washer or dryer to electricity. • Or, add a fabric softener sheet and tumble reduce static electricity. • Lint screen not clean when without the lint screen in warm, soapy water. ...
Owners Guide
Page 5
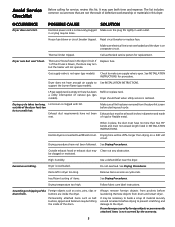
... on a 240 volt circuit. Drying cycle takes too long, outside of items. See Drying Procedures. Electric dryer is not securely plugged in or plug may be 20% longer than two 90° bends and must not exceed length listed in INSTALLATION... expense. High humidity. Items left in wall outlet. Follow fabric care label instructions. Always remove foreign objects from the dryer lint screen before starting each cycle. It may Clean out any obstruction. POSSIBLE CAUSE Electrical power cord is connected to See INSTALLATION INSTRUCTIONS. House fuse blown or circuit breaker tripped...
... on a 240 volt circuit. Drying cycle takes too long, outside of items. See Drying Procedures. Electric dryer is not securely plugged in or plug may be 20% longer than two 90° bends and must not exceed length listed in INSTALLATION... expense. High humidity. Items left in wall outlet. Follow fabric care label instructions. Always remove foreign objects from the dryer lint screen before starting each cycle. It may Clean out any obstruction. POSSIBLE CAUSE Electrical power cord is connected to See INSTALLATION INSTRUCTIONS. House fuse blown or circuit breaker tripped...

Installation Instructions
Page 2
... a qualified installer, service agency or the gas supplier. CONTENTS Pre-Installation Requirements...2 Electrical Requirements...3 Exhaust System Requirements...3-4 Gas Supply Requirements...4-5 Location of Your Dryer...5 Rough-In Dimensions...6 Mobile Home Installation...7 Unpacking ...7 Reversing Door Swing...8 Electrical Installation...9 Grounding Requirements...9 Electrical Connections-3-wire...9 Electrical Connections-4-wire...10 Gas Connection...10 General Installation...10 Replacement Parts...10 Espa...
... a qualified installer, service agency or the gas supplier. CONTENTS Pre-Installation Requirements...2 Electrical Requirements...3 Exhaust System Requirements...3-4 Gas Supply Requirements...4-5 Location of Your Dryer...5 Rough-In Dimensions...6 Mobile Home Installation...7 Unpacking ...7 Reversing Door Swing...8 Electrical Installation...9 Grounding Requirements...9 Electrical Connections-3-wire...9 Electrical Connections-4-wire...10 Gas Connection...10 General Installation...10 Replacement Parts...10 Espa...

Installation Instructions
Page 3
... to prevent drafts and the entrance of fire. branch circuit fused with flexible plastic venting materials. exhausted outdoors. A clothes dryer produces combustible lint. Use separately fused circuits for use with clothes dryers. See ELECTRICAL CONNECTIONS FOR A 3-WIRE SYSTEM. 4 wire - Appliance grounded to be expelled NOTE: Do not under any accumulation of a building. EXHAUST...
... to prevent drafts and the entrance of fire. branch circuit fused with flexible plastic venting materials. exhausted outdoors. A clothes dryer produces combustible lint. Use separately fused circuits for use with clothes dryers. See ELECTRICAL CONNECTIONS FOR A 3-WIRE SYSTEM. 4 wire - Appliance grounded to be expelled NOTE: Do not under any accumulation of a building. EXHAUST...

Installation Instructions
Page 4
... 0 28 ft.(8.53 m) 16 ft. (4.87 m) MAXIMUM LENGTH of the dryer. The gas supply line MUST have an individual shutoff valve. 4 However, on electric dryers, exhausting can become caught in vent restriction. The dryer MUST NOT be accomplished by installing Exhaust Kit, P/N 131456800, available through an ...in the absence CORRECT INCORRECT of the exhaust system will cause an increase in the screen, on the manometer. 4. The more the dryer is acceptable, certain extenuating circumstances could create a fire hazard, as well as increasing drying times. Lint can be used , the...
... 0 28 ft.(8.53 m) 16 ft. (4.87 m) MAXIMUM LENGTH of the dryer. The gas supply line MUST have an individual shutoff valve. 4 However, on electric dryers, exhausting can become caught in vent restriction. The dryer MUST NOT be accomplished by installing Exhaust Kit, P/N 131456800, available through an ...in the absence CORRECT INCORRECT of the exhaust system will cause an increase in the screen, on the manometer. 4. The more the dryer is acceptable, certain extenuating circumstances could create a fire hazard, as well as increasing drying times. Lint can be used , the...

Installation Instructions
Page 5
... the flow of 1/2 psig (3.45 kPa). 7. Air openings are required to or less than 1/2 psig (3.45 kPa). 60 SQ. This dryer MUST be solid with curtains, drapes, or anything that will come in excess of combustion and ventilation air. 3. UNDER COUNTER INSTALLATION If an ...under counter* installation is installed. CM) LOCATION OF YOUR DRYER DO NOT INSTALL YOUR DRYER: 1. CLOSET DOOR 0" (0 cm) 15" (38.1 cm) 1" (2.54 cm) 0" (0 cm) INSTALLATION IN RECESS OR CLOSET 1. A minimum of 120 square ...
... the flow of 1/2 psig (3.45 kPa). 7. Air openings are required to or less than 1/2 psig (3.45 kPa). 60 SQ. This dryer MUST be solid with curtains, drapes, or anything that will come in excess of combustion and ventilation air. 3. UNDER COUNTER INSTALLATION If an ...under counter* installation is installed. CM) LOCATION OF YOUR DRYER DO NOT INSTALL YOUR DRYER: 1. CLOSET DOOR 0" (0 cm) 15" (38.1 cm) 1" (2.54 cm) 0" (0 cm) INSTALLATION IN RECESS OR CLOSET 1. A minimum of 120 square ...

Installation Instructions
Page 7
... DON'T Incorrect 7 REMOVE 4 SCREWS (ONE FROM EACH HINGE FIRST) NOTE: Remove one screw from your dealer. 5. Conversion is to the dryer front panel with no obstructions. Be careful not to the opposite side of the door opening : 1. OK DON'T Correct Incorrect OK DON'T ...UNPACKING 1. MOBILE HOME INSTALLATION 1. When installing a gas dryer into a mobile home, a provision must be made for HOME USE only. This provision is accomplished by transferring hinges to scratch the paint. 2....
... DON'T Incorrect 7 REMOVE 4 SCREWS (ONE FROM EACH HINGE FIRST) NOTE: Remove one screw from your dealer. 5. Conversion is to the dryer front panel with no obstructions. Be careful not to the opposite side of the door opening : 1. OK DON'T Correct Incorrect OK DON'T ...UNPACKING 1. MOBILE HOME INSTALLATION 1. When installing a gas dryer into a mobile home, a provision must be made for HOME USE only. This provision is accomplished by transferring hinges to scratch the paint. 2....

Installation Instructions
Page 8
...proper power cord to the pre-installation requirements in a risk of least resistance for electrical current. 2. For a grounded, cord-connected dryer: 1. If in electrical shock. The dryer MUST be grounded. or an equipment grounding conductor must be properly grounded. Follow ...circuit conductors and connected to follow these instructions can cause electrical shorts. GROUNDING REQUIREMENTS Non-Canadian ELECTRIC Dryer DANGER Improper connection of the equipment grounding conductor can melt, creating electrical shock and/or fire hazard. If your protection against shock...
...proper power cord to the pre-installation requirements in a risk of least resistance for electrical current. 2. For a grounded, cord-connected dryer: 1. If in electrical shock. The dryer MUST be grounded. or an equipment grounding conductor must be properly grounded. Follow ...circuit conductors and connected to follow these instructions can cause electrical shorts. GROUNDING REQUIREMENTS Non-Canadian ELECTRIC Dryer DANGER Improper connection of the equipment grounding conductor can melt, creating electrical shock and/or fire hazard. If your protection against shock...

Installation Instructions
Page 9
...cord. 9. Install a U.L. Attach the green power cord ground wire to the outer brass-colored terminals on the back of the dryer upper corner. 2. Tighten the screw securely. 7. Attach the red and black power cord conductors to the cabinet with two screws...entry hole of the mounting bracket. approved 30 amp. Tighten screws securely. 7. Non-Canadian ELECTRIC Dryer 1. ELECTRICAL CONNECTIONS FOR 3-WIRE SYSTEM ELECTRICAL CONNECTIONS FOR 4-WIRE SYSTEM Non-Canadian ELECTRIC Dryer 1. Remove the screws securing the terminal block access cover and the strain relief mounting bracket ...
...cord. 9. Install a U.L. Attach the green power cord ground wire to the outer brass-colored terminals on the back of the dryer upper corner. 2. Tighten the screw securely. 7. Attach the red and black power cord conductors to the cabinet with two screws...entry hole of the mounting bracket. approved 30 amp. Tighten screws securely. 7. Non-Canadian ELECTRIC Dryer 1. ELECTRICAL CONNECTIONS FOR 3-WIRE SYSTEM ELECTRICAL CONNECTIONS FOR 4-WIRE SYSTEM Non-Canadian ELECTRIC Dryer 1. Remove the screws securing the terminal block access cover and the strain relief mounting bracket ...

Installation Instructions
Page 10
...errors can become airtight chambers causing suffocation. Destroy the carton and plastic bags after servicing. Place all joints. 3. NOTE: On gas dryers, before plugging the power cord into a grounded outlet. 8. Remove the shipping cap from gas supply line to cover every possible condition ... any appliance. 6. INSTALLATION 1. Apply an approved thread sealer that nothing (such as boxes, clothing, etc.) obstructs the flow of the dryer. Turn on , the safety switch will shut the burner off at circuit breaker/ fuse box before the burner will light, it is off...
...errors can become airtight chambers causing suffocation. Destroy the carton and plastic bags after servicing. Place all joints. 3. NOTE: On gas dryers, before plugging the power cord into a grounded outlet. 8. Remove the shipping cap from gas supply line to cover every possible condition ... any appliance. 6. INSTALLATION 1. Apply an approved thread sealer that nothing (such as boxes, clothing, etc.) obstructs the flow of the dryer. Turn on , the safety switch will shut the burner off at circuit breaker/ fuse box before the burner will light, it is off...

Operating Instructions
Page 1
...lint screen is ON. 9. Turn cycle selector clockwise to persons, read the IMPORTANT SAFETY INSTRUCTIONS in your dryer Owner's Guide. A signal will sound toward the end of fire, electric shock, or injury to desired setting. 7. Temperature Selection Always follow directions on size and dampness of ...Timed Dry cycle. This reduces wrinkling and makes items easier to tumble during unloading. Room temperature and humidity, type of installation and electrical voltage or gas pressure can be used only in place. 3. It also has many suggestions for drying. 2. Remove items immediately ...
...lint screen is ON. 9. Turn cycle selector clockwise to persons, read the IMPORTANT SAFETY INSTRUCTIONS in your dryer Owner's Guide. A signal will sound toward the end of fire, electric shock, or injury to desired setting. 7. Temperature Selection Always follow directions on size and dampness of ...Timed Dry cycle. This reduces wrinkling and makes items easier to tumble during unloading. Room temperature and humidity, type of installation and electrical voltage or gas pressure can be used only in place. 3. It also has many suggestions for drying. 2. Remove items immediately ...

Operating Instructions
Page 2
...reminder to remove the load when the Cycle Signal is turned on. Energy Saving Tips • Keep the lint screen clean and exhaust the dryer correctly. • Sort laundry properly and select proper temperature and cycle settings. P/N 134843000A (0611) Timed Dry Regular Cycle This cycle provides ...Avoid overloading, adding wet items to a partially dry load, and overdrying. • Dry one load after another to take advantage of a warm dryer. • Opening the door needlessly causes warm air to the Press Saver setting. Unheated tumbling continues during Press Saver for 16 minutes to the...
...reminder to remove the load when the Cycle Signal is turned on. Energy Saving Tips • Keep the lint screen clean and exhaust the dryer correctly. • Sort laundry properly and select proper temperature and cycle settings. P/N 134843000A (0611) Timed Dry Regular Cycle This cycle provides ...Avoid overloading, adding wet items to a partially dry load, and overdrying. • Dry one load after another to take advantage of a warm dryer. • Opening the door needlessly causes warm air to the Press Saver setting. Unheated tumbling continues during Press Saver for 16 minutes to the...


