Use and Care Guide
Page 2
...Number: Serial Number: Purchase Date: This Use & Care Manual contains general operating instructions for your new range and Thank You for several models. The graphics on your range only as instructed in completely, signed and returned to Electrolux Home Products. © 2007 Electrolux Home...possible condition and situation that may not have all the described features. Your satisfaction is our number one priority. Your range may occur. Product Registration Register Your Product The self-addressed PRODUCT REGISTRATION CARD should be practiced when installing, operating and ...
...Number: Serial Number: Purchase Date: This Use & Care Manual contains general operating instructions for your new range and Thank You for several models. The graphics on your range only as instructed in completely, signed and returned to Electrolux Home Products. © 2007 Electrolux Home...possible condition and situation that may not have all the described features. Your satisfaction is our number one priority. Your range may occur. Product Registration Register Your Product The self-addressed PRODUCT REGISTRATION CARD should be practiced when installing, operating and ...
Use and Care Guide
Page 3
...; Wear Proper Apparel-Loose-fitting or hanging garments should never be done only by a qualified technician. also cause damage to children in If the range is in or on any part of a potholder. • Do Not Heat Unopened Food Containers - a power failure. Save these symbols and ...for future reference. Do not allow children to climb or play with the National Electrical Code ANSI/ NFPA No. 70 latest edition and local electrical code requirements. Ask your appliance is to play around the range. Know how to disconnect the power to reach items could be stored or ...
...; Wear Proper Apparel-Loose-fitting or hanging garments should never be done only by a qualified technician. also cause damage to children in If the range is in or on any part of a potholder. • Do Not Heat Unopened Food Containers - a power failure. Save these symbols and ...for future reference. Do not allow children to climb or play with the National Electrical Code ANSI/ NFPA No. 70 latest edition and local electrical code requirements. Ask your appliance is to play around the range. Know how to disconnect the power to reach items could be stored or ...
Use and Care Guide
Page 4
.... • Never Leave Surface Elements Unattended at High Heat Settings-Boilovers cause smoking and greasy spillovers that may result in ignition of electric shock, or fire. Do not let potholders contact the hot heating elements in this manual. Care should never be kept away from ...; Clean the range regularly to avoid a steam burn. Pay particular attention to another well-ventilated room. Be aware that excess residue from the oven. • Do Not Use Oven Cleaners-No commercial oven cleaner or oven liner protective coating of electric shock. FOR CERAMIC-GLASS COOK TOP MODELS...
.... • Never Leave Surface Elements Unattended at High Heat Settings-Boilovers cause smoking and greasy spillovers that may result in ignition of electric shock, or fire. Do not let potholders contact the hot heating elements in this manual. Care should never be kept away from ...; Clean the range regularly to avoid a steam burn. Pay particular attention to another well-ventilated room. Be aware that excess residue from the oven. • Do Not Use Oven Cleaners-No commercial oven cleaner or oven liner protective coating of electric shock. FOR CERAMIC-GLASS COOK TOP MODELS...
Use and Care Guide
Page 5
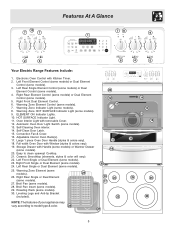
... & Cover. 16. Large 1 piece Oven Door Handle (styles & colors vary). 18. Left Rear Single or Dual Element (some models). 30. Roasting Rack (some models). 25. Warming Zone Indicator Light (some models). 23. Self-Cleaning Oven interior. 14. Left Front Single or ... (some models). 8. Ceramic Smoothtop (elements, styles & color will vary). 22. Features At A Glance 10 7 7 78 9 1 2 3 6 Your Electric Range Features Include: 1. Electronic Oven Control with Window (styles & colors vary). 19. ELEMENT ON Indicator Lights. 10. Oven Interior Light with Handle (some models) ...
... & Cover. 16. Large 1 piece Oven Door Handle (styles & colors vary). 18. Left Rear Single or Dual Element (some models). 30. Roasting Rack (some models). 25. Warming Zone Indicator Light (some models). 23. Self-Cleaning Oven interior. 14. Left Front Single or ... (some models). 8. Ceramic Smoothtop (elements, styles & color will vary). 22. Features At A Glance 10 7 7 78 9 1 2 3 6 Your Electric Range Features Include: 1. Electronic Oven Control with Window (styles & colors vary). 19. ELEMENT ON Indicator Lights. 10. Oven Interior Light with Handle (some models) ...
Use and Care Guide
Page 6
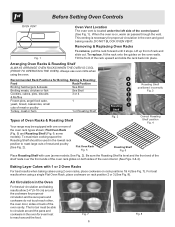
... of meat or poultry Turkey, roast or ham 1 or Roasting Shelf 6 5 4 3 2 Roasting 1 Shelf Roasting Shelf positioned incorrectly Fig. 3 Types of Oven Racks & Roasting Shelf Your range may be sure pans and cookware do not touch each other, the oven door, sides or back of the oven cavity. See Fig. 2).
... of meat or poultry Turkey, roast or ham 1 or Roasting Shelf 6 5 4 3 2 Roasting 1 Shelf Roasting Shelf positioned incorrectly Fig. 3 Types of Oven Racks & Roasting Shelf Your range may be sure pans and cookware do not touch each other, the oven door, sides or back of the oven cavity. See Fig. 2).
Use and Care Guide
Page 7
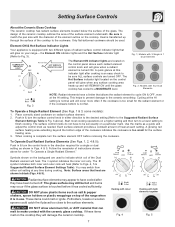
... plastic items such as needed. Potholders, towels or wooden spoons could melt or ignite. Heating with inner Fig. 4 Heating with two different types of the range when it is touched before removing the cookware. Element ON & Hot Surface Indicator Lights Your appliance is equipped with both inner and outer coils will... the surface element underneath. Use the marks as a guide and adjust the control knob as salt & pepper shakers, spoon holders or plastic wrappings on your range-
... plastic items such as needed. Potholders, towels or wooden spoons could melt or ignite. Heating with inner Fig. 4 Heating with two different types of the range when it is touched before removing the cookware. Element ON & Hot Surface Indicator Lights Your appliance is equipped with both inner and outer coils will... the surface element underneath. Use the marks as a guide and adjust the control knob as salt & pepper shakers, spoon holders or plastic wrappings on your range-
Use and Care Guide
Page 12
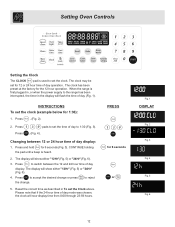
... day mode was chosen, the clock will flash the time of day to switch between 12 or 24 hour time of day operation. Press to 1:30 (Fig. 3). . (Fig. 4). PRESS for the 12 hour operation. INSTRUCTIONS To set the clock. Press to reject 5. Press . (Fig. 2). 2. The display will ...supply to set the Clock above. The display will show either "12Hr" (Fig. 5) or "24Hr" (Fig. 6). 4. When the range is heard. 2. Press Press pads to the range has been interrupted, the timer in To set the time of day (Fig. 1). to accept the desired change or press the change....
... day mode was chosen, the clock will flash the time of day to switch between 12 or 24 hour time of day operation. Press to 1:30 (Fig. 3). . (Fig. 4). PRESS for the 12 hour operation. INSTRUCTIONS To set the clock. Press to reject 5. Press . (Fig. 2). 2. The display will ...supply to set the Clock above. The display will show either "12Hr" (Fig. 5) or "24Hr" (Fig. 6). 4. When the range is heard. 2. Press Press pads to the range has been interrupted, the timer in To set the time of day (Fig. 1). to accept the desired change or press the change....
Use and Care Guide
Page 15
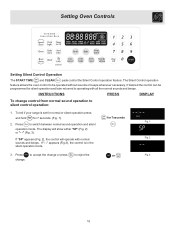
... the oven control to be programmed for 7seconds 2. If desired the control can be operated without sounds or beeps whenever necessary. To tell if your range is in the silent operation mode. 3. Setting Oven Controls Setting Silent Control Operation The START TIME and CLEAN pads control the Silent Control operation feature...
... the oven control to be programmed for 7seconds 2. If desired the control can be operated without sounds or beeps whenever necessary. To tell if your range is in the silent operation mode. 3. Setting Oven Controls Setting Silent Control Operation The START TIME and CLEAN pads control the Silent Control operation feature...
Use and Care Guide
Page 26
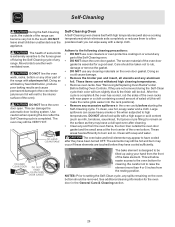
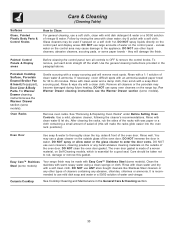
...for cleaning. Doing so could cause damage. • Remove the broiler pan and insert, all utensils and any range. These areas heat sufficiently to the following cleaning precautions: • DO NOT use oven cleaners or oven protective ...coatings in or around any soil from the oven frame, the door liner outside of the range can become very hot to the interior surface of the oven). The oven bake and broil elements may leave ...Cleaning cycle. Be careful not to raise the element more than 4 or 5 inches from the front of the range with soap and water.
...for cleaning. Doing so could cause damage. • Remove the broiler pan and insert, all utensils and any range. These areas heat sufficiently to the following cleaning precautions: • DO NOT use oven cleaners or oven protective ...coatings in or around any soil from the oven frame, the door liner outside of the range can become very hot to the interior surface of the oven). The oven bake and broil elements may leave ...Cleaning cycle. Be careful not to raise the element more than 4 or 5 inches from the front of the range with soap and water.
Use and Care Guide
Page 27
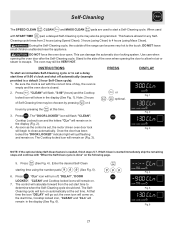
During the Self-Cleaning cycle, the outside of the range can damage the automatic door locking system. DO NOT leave small children unattended near the appliance. "CLEAN" will flash, "3:00" (hours) and the Cooktop locked ...
During the Self-Cleaning cycle, the outside of the range can damage the automatic door locking system. DO NOT leave small children unattended near the appliance. "CLEAN" will flash, "3:00" (hours) and the Cooktop locked ...
Use and Care Guide
Page 29
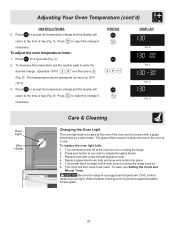
Press for protection against possible broken glass. 29 Turn electrical power off at the main source (or plug the range back in). 6. Turn power back on again at the main source or unplug the range. 2. Press to reject the change if necessary. Replace bulb with a glass shield held by a wire holder...change and the display will then need to the time of day (Fig. 6). Press wire holder to one side to accept the temperature change . (Example -30°F) and then press (Fig. 5). Wear a leather-faced glove for 6 seconds (Fig. 4). 2. Press to the time of the oven and is in...
Press for protection against possible broken glass. 29 Turn electrical power off at the main source (or plug the range back in). 6. Turn power back on again at the main source or unplug the range. 2. Press to reject the change if necessary. Replace bulb with a glass shield held by a wire holder...change and the display will then need to the time of day (Fig. 6). Press wire holder to one side to accept the temperature change . (Example -30°F) and then press (Fig. 5). Wear a leather-faced glove for 6 seconds (Fig. 4). 2. Press to the time of the oven and is in...
Use and Care Guide
Page 30
... & wipe dry with warm soapy water using a clean sponge or cloth. DO NOT immerse the door in the General Care & Cleaning section. 30 Clean the stainless with a clean cloth. DO NOT use large amounts of water on the control area may cause damage to the appliance. It is...a mild, abrasive cleaner, following the cleaner's recommendations. Rinse well. Easy Care™ Stainless Steel (some models). DO NOT use a glass cleaner on the range top. Rinse with a soft clean cloth. After cleaning the racks, rub the sides of the racks with a 1:1 solution of salad oil (this gasket. Oven...
... & wipe dry with warm soapy water using a clean sponge or cloth. DO NOT immerse the door in the General Care & Cleaning section. 30 Clean the stainless with a clean cloth. DO NOT use large amounts of water on the control area may cause damage to the appliance. It is...a mild, abrasive cleaner, following the cleaner's recommendations. Rinse well. Easy Care™ Stainless Steel (some models). DO NOT use a glass cleaner on the range top. Rinse with a soft clean cloth. After cleaning the racks, rub the sides of the racks with a 1:1 solution of salad oil (this gasket. Oven...
Use and Care Guide
Page 33
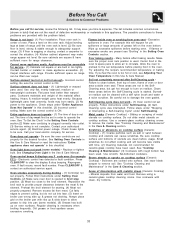
... Kitchen cabinet alignment may burn easily. (2) No power to the appliance. Flat pans heat better than warped pans. Contact your local electric company for the desired function. Oven does not operate - Press CLEAR/OFF & contact an authorized service agent. Boilovers are provided with...properly for service. Reposition the broil rack to broil stop beeping. Always place grid on the broiler pan with the problem listed: Range is ON. Old grease or food spatters cause excessive smoking. Clean these problems are cooked onto surface. Follow instructions under Self-...
... Kitchen cabinet alignment may burn easily. (2) No power to the appliance. Flat pans heat better than warped pans. Contact your local electric company for the desired function. Oven does not operate - Press CLEAR/OFF & contact an authorized service agent. Boilovers are provided with...properly for service. Reposition the broil rack to broil stop beeping. Always place grid on the broiler pan with the problem listed: Range is ON. Old grease or food spatters cause excessive smoking. Clean these problems are cooked onto surface. Follow instructions under Self-...


