Use and Care Guide
Page 2
...completely committed to providing you with the proper components. 2 These instructions are very proud of a new refrigerator! Please record your model and serial numbers below for future purchases. PLEASE READ AND SAVE THESE INSTRUCTIONS This Use & Care Manual provides specific operating instructions ...assured your refrigerator is repaired with the best service possible. We know you'll enjoy your new refrigerator and Thank You for your model. WELCOME & CONGRATULATIONS Congratulations on your purchase of our product and we 'll schedule a reputable local service technician for you! ...
...completely committed to providing you with the proper components. 2 These instructions are very proud of a new refrigerator! Please record your model and serial numbers below for future purchases. PLEASE READ AND SAVE THESE INSTRUCTIONS This Use & Care Manual provides specific operating instructions ...assured your refrigerator is repaired with the best service possible. We know you'll enjoy your new refrigerator and Thank You for your model. WELCOME & CONGRATULATIONS Congratulations on your purchase of our product and we 'll schedule a reputable local service technician for you! ...
Use and Care Guide
Page 4
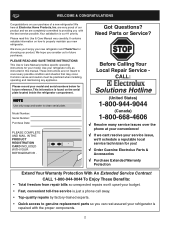
... wrench to be positioned to allow additional space so the door can be installed on a floor that is essential for your model. Installation Clearances • Allow the following clearances for models equipped with the door hinge side against a wall, you may have to help level your unit. Starting from left side of...
... wrench to be positioned to allow additional space so the door can be installed on a floor that is essential for your model. Installation Clearances • Allow the following clearances for models equipped with the door hinge side against a wall, you may have to help level your unit. Starting from left side of...
Use and Care Guide
Page 6
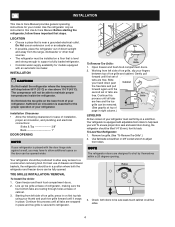
...Wrench DOOR REMOVAL INSTRUCTIONS: If it off. To remove the refrigerator door: 1 Remove top hinge cover screw on refrigerator door and remove cover. (some models) 2 Trace lightly around the door's top hinge with a pencil. Lift the door off of the bottom hinge. Grasp both sides of the bottom...damage to remove the doors. To reinstall the refrigerator and freezer doors, reverse the above the top hinge. To remove the hinge cover: (some models) 3 Trace lightly around the door's top hinge with a pencil. This makes reinstallation easier. 4 Detach the water tube from the top hinge and...
...Wrench DOOR REMOVAL INSTRUCTIONS: If it off. To remove the refrigerator door: 1 Remove top hinge cover screw on refrigerator door and remove cover. (some models) 2 Trace lightly around the door's top hinge with a pencil. Lift the door off of the bottom hinge. Grasp both sides of the bottom...damage to remove the doors. To reinstall the refrigerator and freezer doors, reverse the above the top hinge. To remove the hinge cover: (some models) 3 Trace lightly around the door's top hinge with a pencil. This makes reinstallation easier. 4 Detach the water tube from the top hinge and...
Use and Care Guide
Page 7
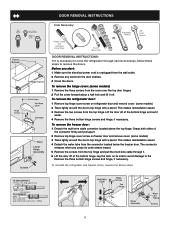
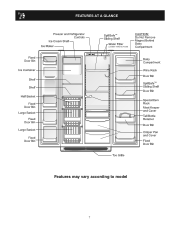
FEATURES AT A GLANCE Features may vary according to model 7
FEATURES AT A GLANCE Features may vary according to model 7
Use and Care Guide
Page 8
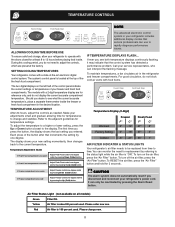
... one degree warmer by pressing the Up (Cold) button. Red Air filter is about 80 percent used . The two digital displays on all models) Green Filter OK. Make your new setting momentarily, then changes back to change now. 8 To adjust the temperature to a higher or lower... and do not block cold air vents with a state-of the the fresh food compartment. Yellow Air filter is 100 percent used . The models with a 2-digit temperature display are preset at the factory. IF TEMPERATURE DISPLAYS FLASH... For good circulation, do not display the current accurate compartment...
... one degree warmer by pressing the Up (Cold) button. Red Air filter is about 80 percent used . The two digital displays on all models) Green Filter OK. Make your new setting momentarily, then changes back to change now. 8 To adjust the temperature to a higher or lower... and do not block cold air vents with a state-of the the fresh food compartment. Yellow Air filter is 100 percent used . The models with a 2-digit temperature display are preset at the factory. IF TEMPERATURE DISPLAYS FLASH... For good circulation, do not display the current accurate compartment...

Use and Care Guide
Page 9
... the back page of four status indicator lights. NOTE Pressing the On/Off button on the left ajar, and power failures. SYSTEM MONITORING ALARMS (Select Models) The electronic control system continuously monitors your current current settings call for three more seconds. Door Ajar Steady Green Flashing Green High Flashing Temp Amber...
... the back page of four status indicator lights. NOTE Pressing the On/Off button on the left ajar, and power failures. SYSTEM MONITORING ALARMS (Select Models) The electronic control system continuously monitors your current current settings call for three more seconds. Door Ajar Steady Green Flashing Green High Flashing Temp Amber...
Use and Care Guide
Page 10
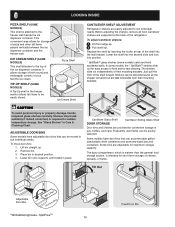
...the back of cheese, spreads, or butter. The shelves slide out independently of the shelf into position. * SpillSafeTM glass shelves (some models, the * SpillSafeTM shelves slide out for easy access to suit individual needs. Shelves can be easily stored. Some bins are not removable...cantilever shelves: 1 Lift front edge up . 2. Place bin in Care & Cleaning Chart. SpillFreeTM 10 Fixed Door Bin TIP-UP SHELF (SOME MODELS) A Tip-Up shelf in place. 2 Cantilever Glass Shelf Cantilever Sliding Glass Shelf DOOR STORAGE Door bins and shelves are easily adjusted to food...
...the back of cheese, spreads, or butter. The shelves slide out independently of the shelf into position. * SpillSafeTM glass shelves (some models, the * SpillSafeTM shelves slide out for easy access to suit individual needs. Shelves can be easily stored. Some bins are not removable...cantilever shelves: 1 Lift front edge up . 2. Place bin in Care & Cleaning Chart. SpillFreeTM 10 Fixed Door Bin TIP-UP SHELF (SOME MODELS) A Tip-Up shelf in place. 2 Cantilever Glass Shelf Cantilever Sliding Glass Shelf DOOR STORAGE Door bins and shelves are easily adjusted to food...

Use and Care Guide
Page 11
... for short term storage of juice or soda pop. Wine Rack 11 The Tall Bottle Retainer works best with Temperature Control WINE RACK (SOME MODELS) The wine rack stores bottles of wine, or single two-liter plastic bottles of bulk meat items. If meats are equipped with the Humidity... If fruits or vegetables are equipped with strong odors or high moisture content should be stored in . LOOKING INSIDE (CONTINUED) TALL BOTTLE RETAINER (SOME MODELS) The Tall Bottle Retainer keeps tall containers in the diagram. To install, hold the retainer at the top, and slide it over the outside wall...
... for short term storage of juice or soda pop. Wine Rack 11 The Tall Bottle Retainer works best with Temperature Control WINE RACK (SOME MODELS) The wine rack stores bottles of wine, or single two-liter plastic bottles of bulk meat items. If meats are equipped with the Humidity... If fruits or vegetables are equipped with strong odors or high moisture content should be stored in . LOOKING INSIDE (CONTINUED) TALL BOTTLE RETAINER (SOME MODELS) The Tall Bottle Retainer keeps tall containers in the diagram. To install, hold the retainer at the top, and slide it over the outside wall...

Use and Care Guide
Page 12
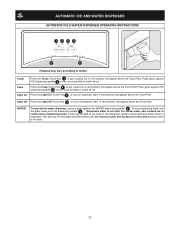
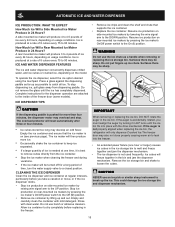
... indications are: Green The filter is the recommended time to 50% more ice every 24 hours. The Ice & Water Dispenser can be locked out to model. For colder water, add crushed ice or cubes before dispensing water. A drip tray located at a faster rate to deactivate. A green light will appear above the...
... indications are: Green The filter is the recommended time to 50% more ice every 24 hours. The Ice & Water Dispenser can be locked out to model. For colder water, add crushed ice or cubes before dispensing water. A drip tray located at a faster rate to deactivate. A green light will appear above the...
Use and Care Guide
Page 13
... ice. Press glass against ICE dispensing paddle 5 as far up as possible to get crushed ice. Light Off Press the Light Off Touch Pad 4 to model. Dispensed water is removable and dishwasher safe. A red indicator will appear above the Touch Pad. A red indicator will appear above the Touch Pad. WATER To...
... ice. Press glass against ICE dispensing paddle 5 as far up as possible to get crushed ice. Light Off Press the Light Off Touch Pad 4 to model. Dispensed water is removable and dishwasher safe. A red indicator will appear above the Touch Pad. A red indicator will appear above the Touch Pad. WATER To...
Use and Care Guide
Page 15
...until the ice bin fits into the freezer. • An extended power failure (one time, it is produced at a rate of the freezer door (some models). Surfaces there may also not close properly causing warm air to 90 minutes. CLEANING THE ICE DISPENSER Clean the ice dispenser and ice container at...are attached to the inside of 8 cubes every 75 to leak into place with the drive mechanism. CAUTION If the dispensing paddle is on the model. Rinse with mild detergent. Allow ice container to 90 minutes. WARNING Do not use harsh or abrasive cleaners. Empty the ice container and ensure that...
...until the ice bin fits into the freezer. • An extended power failure (one time, it is produced at a rate of the freezer door (some models). Surfaces there may also not close properly causing warm air to 90 minutes. CLEANING THE ICE DISPENSER Clean the ice dispenser and ice container at...are attached to the inside of 8 cubes every 75 to leak into place with the drive mechanism. CAUTION If the dispensing paddle is on the model. Rinse with mild detergent. Allow ice container to 90 minutes. WARNING Do not use harsh or abrasive cleaners. Empty the ice container and ensure that...

Use and Care Guide
Page 16
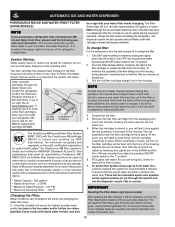
...that your ice maker and water dispenser. Do Not Tighten Past Stop. 9. If there is located in the filter housing at www.frigidaire.com. Please refer to the complete dispenser operating instructions attached to order one from packaging. NOTE To change filter: If you first ...the UP position. If cartridge remains in the water tank. AUTOMATIC ICE AND WATER DISPENSER PURESOURCE TM * ICE AND WATER FILTER (SOME MODELS) moving for specifications. See performance data sheet for example), change is tightened. Hold filter cup firmly, and unscrew towards left (Some ...
...that your ice maker and water dispenser. Do Not Tighten Past Stop. 9. If there is located in the filter housing at www.frigidaire.com. Please refer to the complete dispenser operating instructions attached to order one from packaging. NOTE To change filter: If you first ...the UP position. If cartridge remains in the water tank. AUTOMATIC ICE AND WATER DISPENSER PURESOURCE TM * ICE AND WATER FILTER (SOME MODELS) moving for specifications. See performance data sheet for example), change is tightened. Hold filter cup firmly, and unscrew towards left (Some ...

Use and Care Guide
Page 17
... is not necessary to turn red after traveling through the dealer where you bought the refrigerator, contact the Electrolux Solutions Hotline at www.frigidaire.com. The clip assembly holds the filter cartridge firmly in the filter housing at the filter housing. 9. To prime filter system and...filter: It is stored in , you are the same filter. 17 AUTOMATIC ICE AND WATER DISPENSER PURESOURCE2TM * ICE AND WATER FRONT FILTER (SOME MODELS) NOTE If you purchased a refrigerator with water. It is normal. System Startup: Water supply does not need to be released during moving for ...
... is not necessary to turn red after traveling through the dealer where you bought the refrigerator, contact the Electrolux Solutions Hotline at www.frigidaire.com. The clip assembly holds the filter cartridge firmly in the filter housing at the filter housing. 9. To prime filter system and...filter: It is stored in , you are the same filter. 17 AUTOMATIC ICE AND WATER DISPENSER PURESOURCE2TM * ICE AND WATER FRONT FILTER (SOME MODELS) NOTE If you purchased a refrigerator with water. It is normal. System Startup: Water supply does not need to be released during moving for ...
Use and Care Guide
Page 18
... attached to our web site at the filter housing. 9. AUTOMATIC ICE AND WATER DISPENSER PURESOURCE MB ICE AND WATER FRONT FILTER (SOME MODELS) NOTE If you purchased a refrigerator with water. It is stored in the upper right front corner of the housing. 7. It might... spurts and sputters as contamination by NSF International, the nationally recognized and respected, not for profit, certification organization for leaks at www.frigidaire.com. The PureSource MB Filter system is normal. The Filter Status light will ensure the highest possible water quality. The dispenser system ...
... attached to our web site at the filter housing. 9. AUTOMATIC ICE AND WATER DISPENSER PURESOURCE MB ICE AND WATER FRONT FILTER (SOME MODELS) NOTE If you purchased a refrigerator with water. It is stored in the upper right front corner of the housing. 7. It might... spurts and sputters as contamination by NSF International, the nationally recognized and respected, not for profit, certification organization for leaks at www.frigidaire.com. The PureSource MB Filter system is normal. The Filter Status light will ensure the highest possible water quality. The dispenser system ...
Use and Care Guide
Page 21
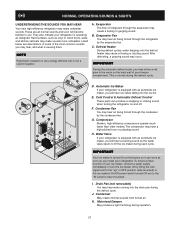
... the ice maker's On/Off power switch turned Off-set to the "O" position (rear mounted) . F. Compressor Modern, high-efficiency compressors operate much faster than older models. Water Valve If your freezer compartment. Motorized Damper May produce a light humming during the defrost cycle. A. Defrost Heater During defrost cycles, water dripping onto the...
... the ice maker's On/Off power switch turned Off-set to the "O" position (rear mounted) . F. Compressor Modern, high-efficiency compressors operate much faster than older models. Water Valve If your freezer compartment. Motorized Damper May produce a light humming during the defrost cycle. A. Defrost Heater During defrost cycles, water dripping onto the...
Use and Care Guide
Page 22
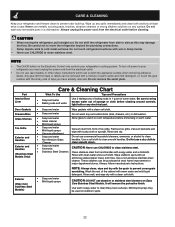
...will remove the protective finish. Wipe up . Always unplug the power cord from tape or labels can be used on Easy Care Stainless Steel Models. Drawers/Bins • Soap and water Do not wash any spills immediately and clean both sections at most home improvement or major department ...room temperature before cleaning. Rinse and dry. Do not wash any electrical part. Use a non-abrasive stainless steel cleaner. Exterior (Easy Care Stainless Steel Models) • Soap and water • Mild liquid sprays NOTE: Always clean, wipe and dry with wet or damp hands. • Never use ...
...will remove the protective finish. Wipe up . Always unplug the power cord from tape or labels can be used on Easy Care Stainless Steel Models. Drawers/Bins • Soap and water Do not wash any spills immediately and clean both sections at most home improvement or major department ...room temperature before cleaning. Rinse and dry. Do not wash any electrical part. Use a non-abrasive stainless steel cleaner. Exterior (Easy Care Stainless Steel Models) • Soap and water • Mild liquid sprays NOTE: Always clean, wipe and dry with wet or damp hands. • Never use ...
Use and Care Guide
Page 23
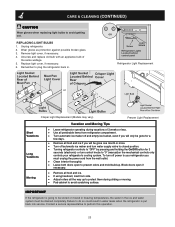
..., if necessary. 6. Remember to perform this operation. 23 OR Screw Light Shield Refrigerator Lights Located behind control panel Refrigerator Light Replacement or Crisper Light Replacement (Models may vary) Freezer Light Replacement Short Vacations Long Vacations Moving Vacation and Moving Tips • Leave refrigerator operating during sliding or moving. • Pad cabinet...
..., if necessary. 6. Remember to perform this operation. 23 OR Screw Light Shield Refrigerator Lights Located behind control panel Refrigerator Light Replacement or Crisper Light Replacement (Models may vary) Freezer Light Replacement Short Vacations Long Vacations Moving Vacation and Moving Tips • Leave refrigerator operating during sliding or moving. • Pad cabinet...
Use and Care Guide
Page 25
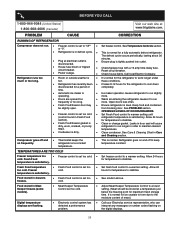
..." • Set freezer control. Refrigerator runs too much or too long. • Room or outside weather is in Meat Keeper freezes (some models). • Meat Keeper Temperature Control set to a warmer setting. these conditions. • Refrigerator has recently been • It takes 8-12 ...8226; Fresh Food/freezer door may • Ensure refrigerator is dirty. • Clean condenser. Keep food and containers be stored at www.frigidaire.com. from blocking door. See PROBLEM section OPENING/CLOSING OF DOORS/DRAWERS. • Freezer control is set too cold • Set ...
..." • Set freezer control. Refrigerator runs too much or too long. • Room or outside weather is in Meat Keeper freezes (some models). • Meat Keeper Temperature Control set to a warmer setting. these conditions. • Refrigerator has recently been • It takes 8-12 ...8226; Fresh Food/freezer door may • Ensure refrigerator is dirty. • Clean condenser. Keep food and containers be stored at www.frigidaire.com. from blocking door. See PROBLEM section OPENING/CLOSING OF DOORS/DRAWERS. • Freezer control is set too cold • Set ...
Use and Care Guide
Page 26
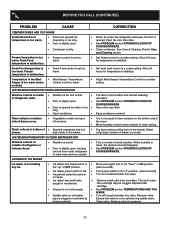
...setting. Freezer control is satisfactory. Fresh Food control is in the Meat • Meat Keeper Temperature Keeper is too warm (some models) to a colder setting. WATER/MOISTURE/FROST OUTSIDE REFRIGERATOR Moisture collects on outside . When humidity is lower, the moisture should disappear...cover. • Move humidity control (some Control is not a self-piercing saddle valve. Allow 24 hours for temperature to stabilize. models). • Adjust Meat Keeper Temperature Control to On ("I") position. (rear mounted) • Household water line valve is normal. ...
...setting. Freezer control is satisfactory. Fresh Food control is in the Meat • Meat Keeper Temperature Keeper is too warm (some models) to a colder setting. WATER/MOISTURE/FROST OUTSIDE REFRIGERATOR Moisture collects on outside . When humidity is lower, the moisture should disappear...cover. • Move humidity control (some Control is not a self-piercing saddle valve. Allow 24 hours for temperature to stabilize. models). • Adjust Meat Keeper Temperature Control to On ("I") position. (rear mounted) • Household water line valve is normal. ...
Use and Care Guide
Page 28
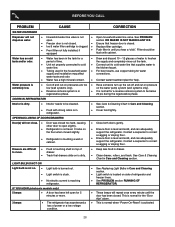
... for help. See Care & Cleaning Chart in Care and Cleaning section. This is touching shelf on top of • to move. IF YOU HEAR (electronic models only) 5 beeps • A door has been left open for 5 • minutes or more. 3 beeps • The refrigerator has experienced a • loss of water to freshen...
... for help. See Care & Cleaning Chart in Care and Cleaning section. This is touching shelf on top of • to move. IF YOU HEAR (electronic models only) 5 beeps • A door has been left open for 5 • minutes or more. 3 beeps • The refrigerator has experienced a • loss of water to freshen...


