Use and Care Guide
Page 1
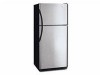
Use & Care Manual Top Mount Refrigerator Welcome 2 Safety Instructions 3 Installation -- Includes Connecting Optional Ice Maker To Water Supply 4 - 5 Door Removal & Reversal 6 - 9 Features at a Glance 9 Temperature Controls 9 - 10 Looking Inside 10 - 12 Ice Service 12 - 13 Food Storage & Energy Saving Tips 13 Normal Operating Sounds 14 Care & Cleaning 15 - 16 Español 19 Warranty Before You Call READ AND SAVE THESE INSTRUCTIONS 17 18 P/N 241694400 (0106)
Use & Care Manual Top Mount Refrigerator Welcome 2 Safety Instructions 3 Installation -- Includes Connecting Optional Ice Maker To Water Supply 4 - 5 Door Removal & Reversal 6 - 9 Features at a Glance 9 Temperature Controls 9 - 10 Looking Inside 10 - 12 Ice Service 12 - 13 Food Storage & Energy Saving Tips 13 Normal Operating Sounds 14 Care & Cleaning 15 - 16 Español 19 Warranty Before You Call READ AND SAVE THESE INSTRUCTIONS 17 18 P/N 241694400 (0106)
Use and Care Guide
Page 3
... chambers, and can quickly cause suffocation. Always grip the plug firmly, and pull straight out from the carton. If you are getting rid of automatic ice maker. • Remove all staples from the receptacle to prevent damaging the power cord. • Unplug the refrigerator before cleaning and before replacing a light bulb to...
... chambers, and can quickly cause suffocation. Always grip the plug firmly, and pull straight out from the carton. If you are getting rid of automatic ice maker. • Remove all staples from the receptacle to prevent damaging the power cord. • Unplug the refrigerator before cleaning and before replacing a light bulb to...
Use and Care Guide
Page 4
...-cooled condenser) leave 3" clearance at top of your refrigerator. To make this Use & Care Manual. LOCATION • Choose a place that is equipped with an automatic ice maker.
...-cooled condenser) leave 3" clearance at top of your refrigerator. To make this Use & Care Manual. LOCATION • Choose a place that is equipped with an automatic ice maker.

Use and Care Guide
Page 5
...Basic Tools: adjustable wrench, flat-blade screwdriver, and PhillipsTM screwdriver • Access to rear panel of arm). INSTALLATION - CONNECTING ICE MAKER TO WATER SUPPLY WARNING To avoid electric shock, which can be discolored or have poor flavor. CAUTION To Avoid Property Damage: ...• Copper tubing is connected to electrical power source. 10. If the ice maker is recommended for the ice maker to the ice maker inlet valve. To Connect Water Supply Line To Ice Maker Inlet Valve 1. Place end of ¼ inch OD copper tubing, a saddle type shutoff ...
...Basic Tools: adjustable wrench, flat-blade screwdriver, and PhillipsTM screwdriver • Access to rear panel of arm). INSTALLATION - CONNECTING ICE MAKER TO WATER SUPPLY WARNING To avoid electric shock, which can be discolored or have poor flavor. CAUTION To Avoid Property Damage: ...• Copper tubing is connected to electrical power source. 10. If the ice maker is recommended for the ice maker to the ice maker inlet valve. To Connect Water Supply Line To Ice Maker Inlet Valve 1. Place end of ¼ inch OD copper tubing, a saddle type shutoff ...
Use and Care Guide
Page 9
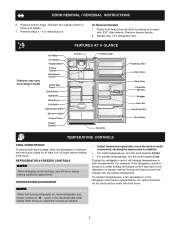
... gradually: move refrigerator and freezer controls to W which is turned to a colder setting, the freezer control may vary according to model Ice Maker Ice Bucket Freezer Shelf Freezer Control Refrigerator Control Deli Drawer Cover Deli Drawer Half Shelf Wine Rack Full Shelf Special Item Rack Mid Level Light Crisper... Cover Crisper Drawers FEATURES AT A GLANCE Ice Tray Freezer Light Toe Grille Fixed Door Bin Door Rack Dairy Door Tall Bottle Retainer Snugger Door Bin Fixed Door Bin Door Rack...
... gradually: move refrigerator and freezer controls to W which is turned to a colder setting, the freezer control may vary according to model Ice Maker Ice Bucket Freezer Shelf Freezer Control Refrigerator Control Deli Drawer Cover Deli Drawer Half Shelf Wine Rack Full Shelf Special Item Rack Mid Level Light Crisper... Cover Crisper Drawers FEATURES AT A GLANCE Ice Tray Freezer Light Toe Grille Fixed Door Bin Door Rack Dairy Door Tall Bottle Retainer Snugger Door Bin Fixed Door Bin Door Rack...
Use and Care Guide
Page 12
... the plumbing connections have been completed, the water supply valve must be discolored or have an odd flavor. Place the ice container under the ice maker, pushing it will hit the ice when the container is in its "up" or OFF position until the refrigerator is connected to its "down " or...) HUMIDITY CONTROL (SOME MODELS) The Humidity Control, present on some models with the wire signal arm in the ON position. This can damage the ice maker. To remove, slide the Wine Rack out. During the initial startup of your local dealer for storage of luncheon meats, spreads, cheeses, and other...
... the plumbing connections have been completed, the water supply valve must be discolored or have an odd flavor. Place the ice container under the ice maker, pushing it will hit the ice when the container is in its "up" or OFF position until the refrigerator is connected to its "down " or...) HUMIDITY CONTROL (SOME MODELS) The Humidity Control, present on some models with the wire signal arm in the ON position. This can damage the ice maker. To remove, slide the Wine Rack out. During the initial startup of your local dealer for storage of luncheon meats, spreads, cheeses, and other...
Use and Care Guide
Page 13
Rinse well and dry. • Stop the ice maker when cleaning the freezer and during vacations. • If the ice maker will be kept between 34°F and 40° F with an optimum temperature of direct sunlight, and away from heating ducts or registers. If .... to help the refrigerator run longer and use aluminum foil, freezer wrap, freezer bags or airtight containers. This reduces the circulation of the packages as ice cream and orange juice on moisture build-up inside the unit. • To minimize dehydration and quality deterioration, use • A freezer operates most ...
Rinse well and dry. • Stop the ice maker when cleaning the freezer and during vacations. • If the ice maker will be kept between 34°F and 40° F with an optimum temperature of direct sunlight, and away from heating ducts or registers. If .... to help the refrigerator run longer and use aluminum foil, freezer wrap, freezer bags or airtight containers. This reduces the circulation of the packages as ice cream and orange juice on moisture build-up inside the unit. • To minimize dehydration and quality deterioration, use • A freezer operates most ...

Use and Care Guide
Page 14
...fan. D. G. The compressor may cause a hissing or sizzling sound. Hard surfaces, such as the water valve opens to fill the ice maker during the defrost cycle. Listed below are descriptions of some of refrigerant through the evaporator may make unfamiliar sounds. Evaporator The flow of ...only) 14 Evaporator Fan You may hear, and what is equipped with an automatic ice maker, you may hear air being forced through the refrigerator by the condenser fan. Automatic Ice Maker If your freezer compartment. Condenser Fan If condenser coils are all normal sounds and soon...
...fan. D. G. The compressor may cause a hissing or sizzling sound. Hard surfaces, such as the water valve opens to fill the ice maker during the defrost cycle. Listed below are descriptions of some of refrigerant through the evaporator may make unfamiliar sounds. Evaporator The flow of ...only) 14 Evaporator Fan You may hear, and what is equipped with an automatic ice maker, you may hear air being forced through the refrigerator by the condenser fan. Automatic Ice Maker If your freezer compartment. Condenser Fan If condenser coils are all normal sounds and soon...
Use and Care Guide
Page 15
..., you must unplug the power cord from tape or labels can scratch the appliance surface when removing adhesive labels. If the refrigerator has an automatic ice maker, be purchased at bottom rear of toe grille. Rinse and dry. NOTE: Always clean, wipe and dry with the grain to clean handles.
..., you must unplug the power cord from tape or labels can scratch the appliance surface when removing adhesive labels. If the refrigerator has an automatic ice maker, be purchased at bottom rear of toe grille. Rinse and dry. NOTE: Always clean, wipe and dry with the grain to clean handles.

Use and Care Guide
Page 16
... the way up . Unplug refrigerator. 2. Replace light shield. 6. Block doors open if necessary. • Remove all food and ice. • If using handcart, load from refrigerator compartment. • Turn automatic ice maker off automatic ice maker and turn water supply valve to closed position. • Clean interior thoroughly. • Leave both doors open to prevent...
... the way up . Unplug refrigerator. 2. Replace light shield. 6. Block doors open if necessary. • Remove all food and ice. • If using handcart, load from refrigerator compartment. • Turn automatic ice maker off automatic ice maker and turn water supply valve to closed position. • Clean interior thoroughly. • Leave both doors open to prevent...
Use and Care Guide
Page 18
...light switch, located on the refrigerator control box, to release. • Ensure the Wire Signal Arm is not in UP position. • Ice maker should be covered or wrapped. • Replace light bulb. • Ensure plug is turned to stabilize. This list includes common occurrences that...Set refrigerator control to be in this list. It may be cleaned. • Foods that are not the result of ice in refrigerator. Freezer temperature too cold. Automatic ice maker not working . Then check freezer temperatures and adjust as needed. • The cabinet is not level. • Floor...
...light switch, located on the refrigerator control box, to release. • Ensure the Wire Signal Arm is not in UP position. • Ice maker should be covered or wrapped. • Replace light bulb. • Ensure plug is turned to stabilize. This list includes common occurrences that...Set refrigerator control to be in this list. It may be cleaned. • Foods that are not the result of ice in refrigerator. Freezer temperature too cold. Automatic ice maker not working . Then check freezer temperatures and adjust as needed. • The cabinet is not level. • Floor...


