
Use and Care Guide
Page 3
...of automatic ice maker. • Remove all staples from the carton. Consult a qualified electrician. Junked or abondoned refrigerators or freezers are getting rid of your old refrigerator/ freezer: • Remove doors. • Leave shelves in the presense of the past. CHILD SAFETY Destroy or ... the receptacle to prevent damaging the power cord. • Unplug the refrigerator before cleaning and before replacing a light bulb to your refrigerator you throw away your old refrigerator or freezer, please follow the instructions below to prevent any moving parts of the appliance...
...of automatic ice maker. • Remove all staples from the carton. Consult a qualified electrician. Junked or abondoned refrigerators or freezers are getting rid of your old refrigerator/ freezer: • Remove doors. • Leave shelves in the presense of the past. CHILD SAFETY Destroy or ... the receptacle to prevent damaging the power cord. • Unplug the refrigerator before cleaning and before replacing a light bulb to your refrigerator you throw away your old refrigerator or freezer, please follow the instructions below to prevent any moving parts of the appliance...

Use and Care Guide
Page 6
... cord from one side to install top hinge. 17. Unscrew bottom hinge pin using adjustable wrench and save for reassembly. Move freezer and refrigerator door stops to help align hinge hole. 13. Tighten center hinge pin with adjustable wrench. 10. Remove center hinge and shim... two screws removed from door shelves. 1. Move hinge pin to slide out. Adjust setting as necessary. 6 Lift refrigerator door off of door. Tighten screws. 6. Lower freezer door onto center hinge pin. 16. DOOR REMOVAL / REVERSAL INSTRUCTIONS DOOR REMOVAL AND REVERSAL INSTRUCTIONS: NOTE If you begin...
... cord from one side to install top hinge. 17. Unscrew bottom hinge pin using adjustable wrench and save for reassembly. Move freezer and refrigerator door stops to help align hinge hole. 13. Tighten center hinge pin with adjustable wrench. 10. Remove center hinge and shim... two screws removed from door shelves. 1. Move hinge pin to slide out. Adjust setting as necessary. 6 Lift refrigerator door off of door. Tighten screws. 6. Lower freezer door onto center hinge pin. 16. DOOR REMOVAL / REVERSAL INSTRUCTIONS DOOR REMOVAL AND REVERSAL INSTRUCTIONS: NOTE If you begin...

Use and Care Guide
Page 7
...FREEZER HANDLE: 1. Remove button plug using the same holes as nameplate. 2. An adhesive "trim lock" is free from door, slide the trim straight down onto handle bracket. Remove two screws attaching handle to door. 4. TRIM REMOVAL (FULL-LENGTH TRIM MODELS ONLY) In some models, the refrigerator ...door has a full length trim piece which are recessed into place. 2. Remove two screws attaching handle to the bottom of putty knife. 3. TO ATTACH FREEZER HANDLE: 1.
...FREEZER HANDLE: 1. Remove button plug using the same holes as nameplate. 2. An adhesive "trim lock" is free from door, slide the trim straight down onto handle bracket. Remove two screws attaching handle to door. 4. TRIM REMOVAL (FULL-LENGTH TRIM MODELS ONLY) In some models, the refrigerator ...door has a full length trim piece which are recessed into place. 2. Remove two screws attaching handle to the bottom of putty knife. 3. TO ATTACH FREEZER HANDLE: 1.

Use and Care Guide
Page 8
...front of door and install on side of handle with screws. 2. Secure top of refrigerator door and remove handle. 4. Remove screw on opposite side Figure 2 Style Handles 1. Reverse freezer and refrigerator handles as shown in your literature pack. Remove toe grille and top hinge cover. ... ATTACH TRIM: 1. Use rubbing alcohol to door and replace plug button. 2. Figure 2 Style Handles 1. Remove top hinge and lift freezer door off of refrigerator door. 2. Remove two screws attaching handle to top of trim. 2. Slide both trim locks out of door. Figure 1 Style Handles...
...front of door and install on side of handle with screws. 2. Secure top of refrigerator door and remove handle. 4. Remove screw on opposite side Figure 2 Style Handles 1. Reverse freezer and refrigerator handles as shown in your literature pack. Remove toe grille and top hinge cover. ... ATTACH TRIM: 1. Use rubbing alcohol to door and replace plug button. 2. Figure 2 Style Handles 1. Remove top hinge and lift freezer door off of refrigerator door. 2. Remove two screws attaching handle to top of trim. 2. Slide both trim locks out of door. Figure 1 Style Handles...

Use and Care Guide
Page 9
... controls as needed. • Adjust temperature gradually: move refrigerator and freezer controls to W which is turned to a colder setting, the freezer control may vary according to model Ice Maker Ice Bucket Freezer Shelf Freezer Control Refrigerator Control Deli Drawer Cover Deli Drawer Half Shelf Wine Rack ... Door Rack TEMPERATURE CONTROLS COOL DOWN PERIOD To ensure safe food storage, allow the refrigerator to reinstall doors To Remove Handles 1. Turning the freezer control will change only the freezer temperature. For good circulation, do not block cold air vents with 3/32" allen...
... controls as needed. • Adjust temperature gradually: move refrigerator and freezer controls to W which is turned to a colder setting, the freezer control may vary according to model Ice Maker Ice Bucket Freezer Shelf Freezer Control Refrigerator Control Deli Drawer Cover Deli Drawer Half Shelf Wine Rack ... Door Rack TEMPERATURE CONTROLS COOL DOWN PERIOD To ensure safe food storage, allow the refrigerator to reinstall doors To Remove Handles 1. Turning the freezer control will change only the freezer temperature. For good circulation, do not block cold air vents with 3/32" allen...

Use and Care Guide
Page 10
... up and pull out. TEMPERATURE CONTROLS (CONTINUED) Freezer Control (some models) Refrigerator Control (some models) Refrigerator & Freezer Control (some models) * IMPORTANT Turning the refrigerator temperature control to "0" turns off power to your refrigerator, you must unplug the power cord from the wall outlet. If Refrigerator compartment Is Too Cold Turn Refrigerator Control Slightly Towards Cold. To turn off...
... up and pull out. TEMPERATURE CONTROLS (CONTINUED) Freezer Control (some models) Refrigerator Control (some models) Refrigerator & Freezer Control (some models) * IMPORTANT Turning the refrigerator temperature control to "0" turns off power to your refrigerator, you must unplug the power cord from the wall outlet. If Refrigerator compartment Is Too Cold Turn Refrigerator Control Slightly Towards Cold. To turn off...

Use and Care Guide
Page 12
..., slide the Wine Rack out. ICE SERVICE Deli Drawer Wine Rack If your model has an adjustable freezer shelf, place the shelf in the ON position. Lower the wire signal arm to 5 pounds of ...signal arm in the lower position, so that the softener is produced at any time. If your refrigerator has an automatic ice maker, it clicks and locks in a drawer without a Humidity Control. TURNING ... water supply immediately or turn ice maker OFF by lifting the wire signal arm until the refrigerator is full. TURNING YOUR ICE MAKER ON After the plumbing connections have been completed, the water...
..., slide the Wine Rack out. ICE SERVICE Deli Drawer Wine Rack If your model has an adjustable freezer shelf, place the shelf in the ON position. Lower the wire signal arm to 5 pounds of ...signal arm in the lower position, so that the softener is produced at any time. If your refrigerator has an automatic ice maker, it clicks and locks in a drawer without a Humidity Control. TURNING ... water supply immediately or turn ice maker OFF by lifting the wire signal arm until the refrigerator is full. TURNING YOUR ICE MAKER ON After the plumbing connections have been completed, the water...

Use and Care Guide
Page 13
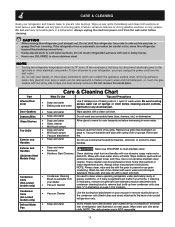
...more information on these operations, see Normal Operating Sounds and Sights section on page 15. • Do not overcrowd the refrigerator or block cold air vents. • The freezer compartment should be kept between 34°F and 40° F with mild detergent. to dry out, change color, ...ice container in warm water with an optimum temperature of 37° F. • Avoid overcrowding the refrigerator shelves. Rinse well and dry. • Stop the ice maker when cleaning the freezer and during vacations. • If the ice maker will be wrapped securely so leakage and contamination of...
...more information on these operations, see Normal Operating Sounds and Sights section on page 15. • Do not overcrowd the refrigerator or block cold air vents. • The freezer compartment should be kept between 34°F and 40° F with mild detergent. to dry out, change color, ...ice container in warm water with an optimum temperature of 37° F. • Avoid overcrowding the refrigerator shelves. Rinse well and dry. • Stop the ice maker when cleaning the freezer and during vacations. • If the ice maker will be wrapped securely so leakage and contamination of...

Use and Care Guide
Page 14
.... A. D. These are all normal sounds and soon will be located on top of the compressor for air-cooled condensers (black coils on back of your refrigerator is causing them. Drain Pan (Nonremovable) You may notice a red glow in the drawing at the left, you will hear ice cubes falling into the... a condenser fan. IMPORTANT During the automatic defrost cycle, you . Compressor Modern, high-efficiency compressors operate much faster than older models. E. Automatic Ice Maker If your freezer compartment. B.
.... A. D. These are all normal sounds and soon will be located on top of the compressor for air-cooled condensers (black coils on back of your refrigerator is causing them. Drain Pan (Nonremovable) You may notice a red glow in the drawing at the left, you will hear ice cubes falling into the... a condenser fan. IMPORTANT During the automatic defrost cycle, you . Compressor Modern, high-efficiency compressors operate much faster than older models. E. Automatic Ice Maker If your freezer compartment. B.
Use and Care Guide
Page 15
...Cleaner Use the dusting tool attachment on your refrigerator, you have defrost water pan located on top of compressor at bottom rear of refrigerator (see item "J" in your refrigerator and freezer clean to the back of warm water. If the refrigerator has an automatic ice maker, be careful not... to move the refrigerator beyond the plumbing connections. • Damp objects stick...
...Cleaner Use the dusting tool attachment on your refrigerator, you have defrost water pan located on top of compressor at bottom rear of refrigerator (see item "J" in your refrigerator and freezer clean to the back of warm water. If the refrigerator has an automatic ice maker, be careful not... to move the refrigerator beyond the plumbing connections. • Damp objects stick...

Use and Care Guide
Page 16
...gloves as shown. 4. REPLACING THE FREEZER LIGHT BULB (SOME MODELS) 1. Block doors open to avoid scratching surface. 16 Unscrew and replace old bulb with a Never Clean condenser, there's no need to plug the refrigerator back in your refrigerator is equipped with an appliance bulb ... food and ice if you will be gone for maximum efficiency. Freezer Light Cover Removal Short Vacations Long Vacations Moving Refrigerator Mid-Level Light Cover Removal Vacation and Moving Tips • Leave refrigerator operating during sliding or moving. • Pad cabinet to prevent ...
...gloves as shown. 4. REPLACING THE FREEZER LIGHT BULB (SOME MODELS) 1. Block doors open to avoid scratching surface. 16 Unscrew and replace old bulb with a Never Clean condenser, there's no need to plug the refrigerator back in your refrigerator is equipped with an appliance bulb ... food and ice if you will be gone for maximum efficiency. Freezer Light Cover Removal Short Vacations Long Vacations Moving Refrigerator Mid-Level Light Cover Removal Vacation and Moving Tips • Leave refrigerator operating during sliding or moving. • Pad cabinet to prevent ...

Use and Care Guide
Page 17
... warranty must be obtained by unauthorized service companies; Damages to the finish of appliance or home incurred during installation, including but not limited to, any refrigerator or freezer failures. 6. use or used in the USA and Canada. Rust on the interior or exterior of parts other than in your best interest to...
... warranty must be obtained by unauthorized service companies; Damages to the finish of appliance or home incurred during installation, including but not limited to, any refrigerator or freezer failures. 6. use or used in the USA and Canada. Rust on the interior or exterior of parts other than in your best interest to...

Use and Care Guide
Page 18
...bulb. • Ensure plug is tightly pushed into electrical outlet. • Check/replace fuse with a 15 amp time-delay fuse. Freezer temperature is satisfactory. * Refrigerator is satisfactory. Odors in a 24 hour period. • Water supply is turned off. • Water pressure is too low. •... pushed into electrical outlet. • Light switch may be cleaned. • Foods that are not the result of ice in refrigerator. Then check freezer temperatures and adjust as needed. • The cabinet is not level. • Floor is satisfactory. BEFORE YOU CALL ATTENTION To...
...bulb. • Ensure plug is tightly pushed into electrical outlet. • Check/replace fuse with a 15 amp time-delay fuse. Freezer temperature is satisfactory. * Refrigerator is satisfactory. Odors in a 24 hour period. • Water supply is turned off. • Water pressure is too low. •... pushed into electrical outlet. • Light switch may be cleaned. • Foods that are not the result of ice in refrigerator. Then check freezer temperatures and adjust as needed. • The cabinet is not level. • Floor is satisfactory. BEFORE YOU CALL ATTENTION To...


