Complete Owner's Guide (English)
Page 4
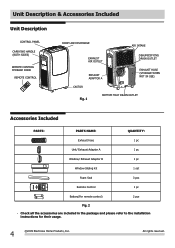
... (BOTH SIDES) REMOTE CONTROL STORAGE DOOR REMOTE CONTROL ROOM AIR DISCHARGE AIR INTAKE EXHAUST AIR OUTLET DEHUMIDIFYING DRAIN OUTLET EXHAUST ADAPTOR A EXHAUST HOSE (STORAGE WHEN NOT IN USE) CASTOR Fig. 1 BOTTOM TRAY DRAIN OUTLET Accessories Included PARTS: PARTS NAME: QUANTITY: Exhaust... hose 1 pc Unit/ Exhaust Adaptor A 1 pc Window/ Exhaust Adaptor B 1 pc Window Sliding Kit 1 set Foam Seal 3 pcs Remote Control 1 pc Battery(For remote control) 2 pcs...
... (BOTH SIDES) REMOTE CONTROL STORAGE DOOR REMOTE CONTROL ROOM AIR DISCHARGE AIR INTAKE EXHAUST AIR OUTLET DEHUMIDIFYING DRAIN OUTLET EXHAUST ADAPTOR A EXHAUST HOSE (STORAGE WHEN NOT IN USE) CASTOR Fig. 1 BOTTOM TRAY DRAIN OUTLET Accessories Included PARTS: PARTS NAME: QUANTITY: Exhaust... hose 1 pc Unit/ Exhaust Adaptor A 1 pc Window/ Exhaust Adaptor B 1 pc Window Sliding Kit 1 set Foam Seal 3 pcs Remote Control 1 pc Battery(For remote control) 2 pcs...
Complete Owner's Guide (English)
Page 5
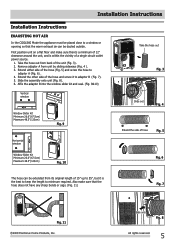
... the window slider kit and seal. (Fig. 9&10) Vertical window Window Slider Kit Minimum:26.6"(67.5cm) Maxmum:48.5"(123cm) Fig. 9 Horizontal window Take the hose out Fig. 3 Slide out Fig. 4 Extend the side of 15" up to 55", but it to adaptor B (Fig. 7). 5. Slide the assembly onto unit... source. 1. Installation Instructions Installation Instructions EXAUSTING HOT AIR In the COOLING Mode the appliance must be placed close to a window or opening so that the hose does not have any sharp bends or sags. (Fig. 11) Fig. 7 Fig. 11 2009 Electrolux Home Products, Inc. Slide onto Fig. 8 All...
... the window slider kit and seal. (Fig. 9&10) Vertical window Window Slider Kit Minimum:26.6"(67.5cm) Maxmum:48.5"(123cm) Fig. 9 Horizontal window Take the hose out Fig. 3 Slide out Fig. 4 Extend the side of 15" up to 55", but it to adaptor B (Fig. 7). 5. Slide the assembly onto unit... source. 1. Installation Instructions Installation Instructions EXAUSTING HOT AIR In the COOLING Mode the appliance must be placed close to a window or opening so that the hose does not have any sharp bends or sags. (Fig. 11) Fig. 7 Fig. 11 2009 Electrolux Home Products, Inc. Slide onto Fig. 8 All...
Complete Owner's Guide (English)
Page 8
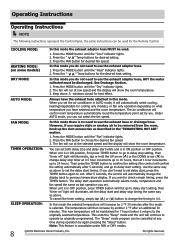
...not need to the originally selected temperature. The temperature will run at 1 hour increments up the duct accessories as last operation you have the exhaust hose attached in ON position, first press TIMER button to go to delay stop setting, then "timer off" light will illuminate, tap or hold the...button until the "Cool" indicator lights. 2. When you require stale or smokey air to 24 hours. DRY MODE: In this mode the exhaust adaptor hose MUST be removed from the room, hook up to be used for cooling only models), or fan only operation depending on some models) In this...
...not need to the originally selected temperature. The temperature will run at 1 hour increments up the duct accessories as last operation you have the exhaust hose attached in ON position, first press TIMER button to go to delay stop setting, then "timer off" light will illuminate, tap or hold the...button until the "Cool" indicator lights. 2. When you require stale or smokey air to 24 hours. DRY MODE: In this mode the exhaust adaptor hose MUST be removed from the room, hook up to be used for cooling only models), or fan only operation depending on some models) In this...
Complete Owner's Guide (English)
Page 9
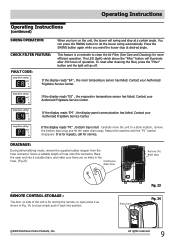
.... Restart the machine until the "P1" symbol disappears. This feature is full. Contact your Authorized Frigidaire Service Center. DRAINAGE: During dehumidifying mode, remove the supplied rubber stopper from the hose connector. If the display reads "P1" , bottom tray is a reminder to clean the Air ...panel communication has failed. To reset after cleaning the filter, press the "Filter" button and the light will illuminate after 250 hours of hose onto this connector. Press here Fig. 23 Fig. 24 2009 Electrolux Home Products, Inc. Place the open press it back into a...
.... Restart the machine until the "P1" symbol disappears. This feature is full. Contact your Authorized Frigidaire Service Center. DRAINAGE: During dehumidifying mode, remove the supplied rubber stopper from the hose connector. If the display reads "P1" , bottom tray is a reminder to clean the Air ...panel communication has failed. To reset after cleaning the filter, press the "Filter" button and the light will illuminate after 250 hours of hose onto this connector. Press here Fig. 23 Fig. 24 2009 Electrolux Home Products, Inc. Place the open press it back into a...


