
Complete Owner's Guide (English)
Page 4
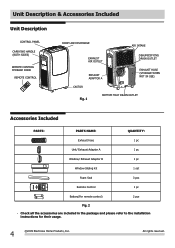
... WHEN NOT IN USE) CASTOR Fig. 1 BOTTOM TRAY DRAIN OUTLET Accessories Included PARTS: PARTS NAME: QUANTITY: Exhaust hose 1 pc Unit/ Exhaust Adaptor A 1 pc Window/ Exhaust Adaptor B 1 pc Window Sliding Kit 1 set Foam Seal 3 pcs Remote Control 1 pc Battery(For remote control) 2 pcs Fig. 2 Check all the accessories are included in the package and...
... WHEN NOT IN USE) CASTOR Fig. 1 BOTTOM TRAY DRAIN OUTLET Accessories Included PARTS: PARTS NAME: QUANTITY: Exhaust hose 1 pc Unit/ Exhaust Adaptor A 1 pc Window/ Exhaust Adaptor B 1 pc Window Sliding Kit 1 set Foam Seal 3 pcs Remote Control 1 pc Battery(For remote control) 2 pcs Fig. 2 Check all the accessories are included in the package and...

Complete Owner's Guide (English)
Page 5
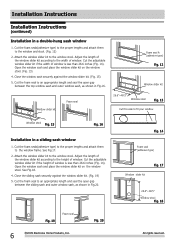
...(Fig. 3). 2. Affix the adaptor B into the window slider kit and seal. (Fig. 9&10) Vertical window Window Slider Kit Minimum:26.6"(67.5cm) Maxmum:48.5"(123cm) Fig. 9 Horizontal window Take the hose out Fig. 3 Slide out Fig.... 4 Extend the side of hose Fig. 5 Window Slider Kit Minimum:26.6"(67.5cm) Maxmum:48.5"(123cm) Fig. 10 Fig. 6 The ...4. Installation Instructions Installation Instructions EXAUSTING HOT AIR In the COOLING Mode the appliance must be placed close to a window or opening so that the hose does not have any sharp bends or sags. (Fig. 11) Fig. 7...
...(Fig. 3). 2. Affix the adaptor B into the window slider kit and seal. (Fig. 9&10) Vertical window Window Slider Kit Minimum:26.6"(67.5cm) Maxmum:48.5"(123cm) Fig. 9 Horizontal window Take the hose out Fig. 3 Slide out Fig.... 4 Extend the side of hose Fig. 5 Window Slider Kit Minimum:26.6"(67.5cm) Maxmum:48.5"(123cm) Fig. 10 Fig. 6 The ...4. Installation Instructions Installation Instructions EXAUSTING HOT AIR In the COOLING Mode the appliance must be placed close to a window or opening so that the hose does not have any sharp bends or sags. (Fig. 11) Fig. 7...
Complete Owner's Guide (English)
Page 6
... 26.6 inches (Fig. 14). See Fig.18. 4. Cut the adjustable window slider kit if the width of window. Open the window sash and place the window slider kit on the window stool. See Fig.17. 2. Attach the window slider kit to the window frame. Cut the foam seal to fit your window Window stool Fig. 15 Fig. 16 Installation in Fig.16...
... 26.6 inches (Fig. 14). See Fig.18. 4. Cut the adjustable window slider kit if the width of window. Open the window sash and place the window slider kit on the window stool. See Fig.17. 2. Attach the window slider kit to the window frame. Cut the foam seal to fit your window Window stool Fig. 15 Fig. 16 Installation in Fig.16...

