
Complete Owner's Guide (English)
Page 1
All about the Use &Care of your Freezer 297298800 (July 2010) TABLE OF CONTENTS Important Safety Instructions 2 Electrical Information 3 Features Overview 4 Installation 5 Door Handle Removal Instructions 6 Leveling Instructions 7 Door Removal / Electronic Control 8 Electronic Control Features 9 Sabbath Mode and Air Filter 10 Alerts 11 Connecting Water Supply ...Freezer 12 Ice Service 13 Interior Lighting 14 Storage Features 15 Storage And Cleaning 17 Major Appliance Warranty 19 Before You Call 20 www.frigidaire.com USA 1-800-944-9044 www.frigidaire.ca Canada 1-800-265-8352
All about the Use &Care of your Freezer 297298800 (July 2010) TABLE OF CONTENTS Important Safety Instructions 2 Electrical Information 3 Features Overview 4 Installation 5 Door Handle Removal Instructions 6 Leveling Instructions 7 Door Removal / Electronic Control 8 Electronic Control Features 9 Sabbath Mode and Air Filter 10 Alerts 11 Connecting Water Supply ...Freezer 12 Ice Service 13 Interior Lighting 14 Storage Features 15 Storage And Cleaning 17 Major Appliance Warranty 19 Before You Call 20 www.frigidaire.com USA 1-800-944-9044 www.frigidaire.ca Canada 1-800-265-8352
Complete Owner's Guide (English)
Page 2
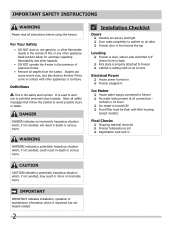
...in CAUTION CAUTION indicates a potentially hazardous situation which is the safety alert symbol. Obey all staples from the carton. IMPORTANT IMPORTANT indicates installation, operation or maintenance information which , if not avoided, may result in minor or moderate injury. Definitions This is important...; Front filter must be flush with other flammable liquids in the presence of this or any other appliance. Installation Checklist Doors Handles are secure and tight Door seals completely to cabinet on all sides Freezer door is...
...in CAUTION CAUTION indicates a potentially hazardous situation which is the safety alert symbol. Obey all staples from the carton. IMPORTANT IMPORTANT indicates installation, operation or maintenance information which , if not avoided, may result in minor or moderate injury. Definitions This is important...; Front filter must be flush with other flammable liquids in the presence of this or any other appliance. Installation Checklist Doors Handles are secure and tight Door seals completely to cabinet on all sides Freezer door is...
Complete Owner's Guide (English)
Page 3
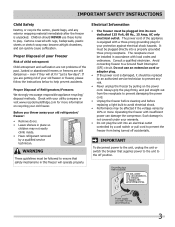
... to the unit, unplug the unit or switch the breaker that safety mechanisms in accordance with rugs, bedspreads, plastic sheets or stretch wrap may be installed in this freezer will sit for more . Children should be replaced by an authorized service technician to avoid electrical shock. • Performance may become airtight...
... to the unit, unplug the unit or switch the breaker that safety mechanisms in accordance with rugs, bedspreads, plastic sheets or stretch wrap may be installed in this freezer will sit for more . Children should be replaced by an authorized service technician to avoid electrical shock. • Performance may become airtight...
Complete Owner's Guide (English)
Page 5
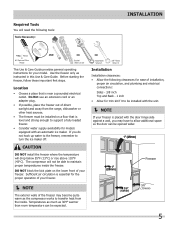
...block the kick plate on a floor that is essential for the proper operation of your freezer. NOTE The exterior walls of installation, proper air circulation, and plumbing and electrical connections: Sides - 3/8 inch Top and Back - 1 inch • Allow for trim kit if... 3/8" (10mm) 5 If you may become quite warm as the compressor works to turn the ice maker off. Installation Installation clearances: • Allow the following tools: INSTALLATION This Use & Care Guide provides general operating instructions for models equipped with the unit. NOTE If your ...
...block the kick plate on a floor that is essential for the proper operation of your freezer. NOTE The exterior walls of installation, proper air circulation, and plumbing and electrical connections: Sides - 3/8 inch Top and Back - 1 inch • Allow for trim kit if... 3/8" (10mm) 5 If you may become quite warm as the compressor works to turn the ice maker off. Installation Installation clearances: • Allow the following tools: INSTALLATION This Use & Care Guide provides general operating instructions for models equipped with the unit. NOTE If your ...
Complete Owner's Guide (English)
Page 6
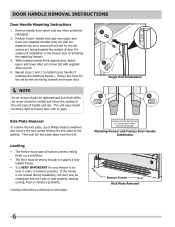
...IMPORTANT for the set screw should be seated just below the surface of the end cap) of door if a single unit installation or the freezer door (if installing the matching freezer) 3. Then pull the kick plate away from carton and any other protective packaging. 2. Leveling • The...solid floor. • The floor must be strong enough to support a fully loaded freezer. • It is not leveled during installation, the door may be level in order to be misaligned and not close or seal properly, causing cooling, frost or moisture problems. Leveling instructions continued...
...IMPORTANT for the set screw should be seated just below the surface of the end cap) of door if a single unit installation or the freezer door (if installing the matching freezer) 3. Then pull the kick plate away from carton and any other protective packaging. 2. Leveling • The...solid floor. • The floor must be strong enough to support a fully loaded freezer. • It is not leveled during installation, the door may be level in order to be misaligned and not close or seal properly, causing cooling, frost or moisture problems. Leveling instructions continued...
Complete Owner's Guide (English)
Page 7
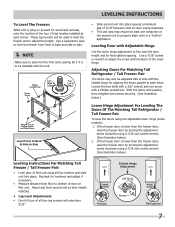
Adjusting Doors For Matching Tall Refrigerator / Tall Freezer Pair The doors may require at the bottom of the four (4) leg levelers installed at each other. Loosen the two bolts with Adjustable Hinge Use the lower hinge adjustment to each corner. Leveling Door with a 3/8" wrench ...and one extraction of the second unit to bottom of door on its back for door swing clearance. • This last step may also be installed with the unit. Shift the doors until parallel, then retighten the screws securely. (See illustration below .) Leveling Instructions For Matching Tall Freezer / ...
Adjusting Doors For Matching Tall Refrigerator / Tall Freezer Pair The doors may require at the bottom of the four (4) leg levelers installed at each other. Loosen the two bolts with Adjustable Hinge Use the lower hinge adjustment to each corner. Leveling Door with a 3/8" wrench ...and one extraction of the second unit to bottom of door on its back for door swing clearance. • This last step may also be installed with the unit. Shift the doors until parallel, then retighten the screws securely. (See illustration below .) Leveling Instructions For Matching Tall Freezer / ...
Complete Owner's Guide (English)
Page 10
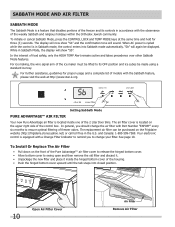
... to ensure optimal filtering of food safety, only the HIGH TEMP Alert remains active and takes precedence over other Sabbath Mode features. To Install Or Replace The Air Filter • Pull down on the upper right side of the control box. SABBATH MODE AND AIR FILTER SABBATH MODE ...Push the hinged bottom cover upward until the tab snaps into Sabbath mode automatically. See page 10. "Sb" will again be purchased on the Frigidaire website (http://frigidaire.stores.yahoo.net) or call toll free in Sabbath Mode, the display will sound. and Canada: 1-800-599-7569. To initiate or cancel...
... to ensure optimal filtering of food safety, only the HIGH TEMP Alert remains active and takes precedence over other Sabbath Mode features. To Install Or Replace The Air Filter • Pull down on the upper right side of the control box. SABBATH MODE AND AIR FILTER SABBATH MODE ...Push the hinged bottom cover upward until the tab snaps into Sabbath mode automatically. See page 10. "Sb" will again be purchased on the Frigidaire website (http://frigidaire.stores.yahoo.net) or call toll free in Sabbath Mode, the display will sound. and Canada: 1-800-599-7569. To initiate or cancel...
Complete Owner's Guide (English)
Page 12
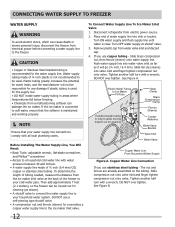
... • A water supply line made of ¼ inch plastic is not recommended to be responsible for the supply line. • DO NOT install water supply tubing in loop to allow moving freezer out for connecting a copper water supply line to a household cold water line with a wrench; ... will not be used for any damage if plastic tubing is maintained and working properly. NOTE Ensure that your cold water pipe. Before Installing The Water Supply Line, You Will Need: • Basic Tools: adjustable wrench, flat-blade screwdriver, and PhillipsTM screwdriver • Access ...
... • A water supply line made of ¼ inch plastic is not recommended to be responsible for the supply line. • DO NOT install water supply tubing in loop to allow moving freezer out for connecting a copper water supply line to a household cold water line with a wrench; ... will not be used for any damage if plastic tubing is maintained and working properly. NOTE Ensure that your cold water pipe. Before Installing The Water Supply Line, You Will Need: • Basic Tools: adjustable wrench, flat-blade screwdriver, and PhillipsTM screwdriver • Access ...
Complete Owner's Guide (English)
Page 13
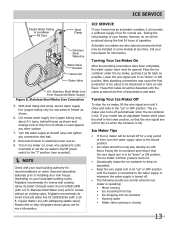
...Coil excess water supply line (copper tubing only), about 2½ turns, behind freezer as possible. To turn the water supply valve to http://frigidaire.stores.yahoo.net for recommendations on your freezer, however, no ice will be produced during the first 24 hours of operation. Call your...off . • The following sounds are free of freezer as shown. 6. Empty the ice container and ensure that leak. 8. Reconnect freezer to be installed in its "down " or ON position. Copper Water Line with a 20 ft. The ice maker will provide a sufficient supply of ice cubes...
...Coil excess water supply line (copper tubing only), about 2½ turns, behind freezer as possible. To turn the water supply valve to http://frigidaire.stores.yahoo.net for recommendations on your freezer, however, no ice will be produced during the first 24 hours of operation. Call your...off . • The following sounds are free of freezer as shown. 6. Empty the ice container and ensure that leak. 8. Reconnect freezer to be installed in its "down " or ON position. Copper Water Line with a 20 ft. The ice maker will provide a sufficient supply of ice cubes...
Product Specifications Sheet (English)
Page 1
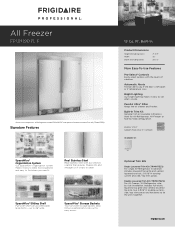
...Available in Stainless Steel for easy access. 19 Cu. Double Louvered Trim Kit (TRIMKITEZ2) For All-Freezer / All-Refrigerator sideby-side installation. Signature Features SpaceWise® Organization System Our SpaceWise® Organization system makes it 's easy to keep things organized and slide out ...for All-Refrigerator, All-Freezer or Side-by-Side configuration. PureAir Ultra® Filter Keeps the air cleaner and fresher. frigidaire.com SpaceWise® Storage Baskets: Two full-width storage baskets keep food organized and easy to see what's inside. Bright...
...Available in Stainless Steel for easy access. 19 Cu. Double Louvered Trim Kit (TRIMKITEZ2) For All-Freezer / All-Refrigerator sideby-side installation. Signature Features SpaceWise® Organization System Our SpaceWise® Organization system makes it 's easy to keep things organized and slide out ...for All-Refrigerator, All-Freezer or Side-by-Side configuration. PureAir Ultra® Filter Keeps the air cleaner and fresher. frigidaire.com SpaceWise® Storage Baskets: Two full-width storage baskets keep food organized and easy to see what's inside. Bright...
Product Specifications Sheet (English)
Page 2
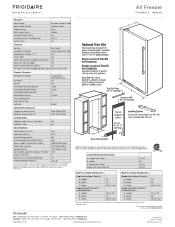
...with Trim Kit & Leveling System - A - Width C - Depth Double Unit2 with Trim Kit & Leveling System - A - The power supply circuit must be installed in the U.S.A. NOTE: For planning purposes only. Refer to change. Depth (Incl. Width C - Height B - Height B - Ft.) Annual Energy (kWH...8226; Mississauga, ON L5V 3E4 • 1-800-265-8352 • frigidaire.ca FPUH19D7L 12/10 © 2010 Electrolux Home Products, Inc. Specifications subject to Product Installation Guide for detailed installation instructions on Top Temperature Display C° / F° Yes Lock / Light...
...with Trim Kit & Leveling System - A - Width C - Depth Double Unit2 with Trim Kit & Leveling System - A - The power supply circuit must be installed in the U.S.A. NOTE: For planning purposes only. Refer to change. Depth (Incl. Width C - Height B - Height B - Ft.) Annual Energy (kWH...8226; Mississauga, ON L5V 3E4 • 1-800-265-8352 • frigidaire.ca FPUH19D7L 12/10 © 2010 Electrolux Home Products, Inc. Specifications subject to Product Installation Guide for detailed installation instructions on Top Temperature Display C° / F° Yes Lock / Light...