
Complete Owner's Guide (English)
Page 2
... is level, side-to-side and tilted 1/4" (6mm) front-to-back Kick plate is properly attached to refrigerator Cabinet is used to alert you to avoid possible injury or death. WARNING WARNING indicates a potentially hazardous situation which , if not avoided, may... result in death or serious injury. Installation Checklist Doors Handles are secure and tight Door seals completely to cabinet on all corners Electrical Power House power turned on Refrigerator plugged in Final Checks Shipping material removed ...
... is level, side-to-side and tilted 1/4" (6mm) front-to-back Kick plate is properly attached to refrigerator Cabinet is used to alert you to avoid possible injury or death. WARNING WARNING indicates a potentially hazardous situation which , if not avoided, may... result in death or serious injury. Installation Checklist Doors Handles are secure and tight Door seals completely to cabinet on all corners Electrical Power House power turned on Refrigerator plugged in Final Checks Shipping material removed ...

Complete Owner's Guide (English)
Page 6
... the freezer door (if installing the matching freezer) 3. The end caps should be drawn tight to function properly. While holding the kick plate to the cabinet. A B Single Unit Installation Kick Plate Removal To remove the kick plate, use a Phillips head screwdriver and remove the two screws holding handle firmly against...
... the freezer door (if installing the matching freezer) 3. The end caps should be drawn tight to function properly. While holding the kick plate to the cabinet. A B Single Unit Installation Kick Plate Removal To remove the kick plate, use a Phillips head screwdriver and remove the two screws holding handle firmly against...

Complete Owner's Guide (English)
Page 7
... and side to side. NOTE Make sure to allow for aligning the doors parallel to bottom of door on its back for final cabinet spacing. Freezer Slotted Hinge Adjustment 3/8" Bolts Screw Refrigerator 7 Use a carpenter's level to level the refrigerator from floor to each corner. LEVELING INSTRUCTIONS To Level...
... and side to side. NOTE Make sure to allow for aligning the doors parallel to bottom of door on its back for final cabinet spacing. Freezer Slotted Hinge Adjustment 3/8" Bolts Screw Refrigerator 7 Use a carpenter's level to level the refrigerator from floor to each corner. LEVELING INSTRUCTIONS To Level...
Complete Owner's Guide (English)
Page 8
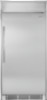
... display will run continuously for colder temperature on the front of 46F° (8C°) shows in place while removing the top hinge from the cabinet. • Remove the two 3/8" hex head bolts from the top hinge with a 3/8" wrench or socket. • Lift the door upwards and pull ...up and away from the cabinet. CAUTION Doors are heavy. However, the temperature control is factory preset to cool down completely. It is located inside the refrigerator. The refrigerator can be...
... display will run continuously for colder temperature on the front of 46F° (8C°) shows in place while removing the top hinge from the cabinet. • Remove the two 3/8" hex head bolts from the top hinge with a 3/8" wrench or socket. • Lift the door upwards and pull ...up and away from the cabinet. CAUTION Doors are heavy. However, the temperature control is factory preset to cool down completely. It is located inside the refrigerator. The refrigerator can be...

Complete Owner's Guide (English)
Page 9
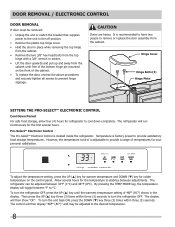
This safety feature will aid in the display) and the cabinet temperature (°F or °C illuminates) every ½ second. Adjust UP Key ELECTRONIC CONTROL FEATURES Air Filter Reset Key Temp Mode Key Alarm Reset Key °F ... (1) hour, the display alternates between showing the power failure duration (Hours and DURATION LED illuminate in determining what food spoilage action to a power failure, the cabinet temperature exceeded 55°F (13°C). If the power failure lasted more than one second. To unlock the control, press the CONTROL LOCK key for...
This safety feature will aid in the display) and the cabinet temperature (°F or °C illuminates) every ½ second. Adjust UP Key ELECTRONIC CONTROL FEATURES Air Filter Reset Key Temp Mode Key Alarm Reset Key °F ... (1) hour, the display alternates between showing the power failure duration (Hours and DURATION LED illuminate in determining what food spoilage action to a power failure, the cabinet temperature exceeded 55°F (13°C). If the power failure lasted more than one second. To unlock the control, press the CONTROL LOCK key for...

Complete Owner's Guide (English)
Page 11
...will then enter a mode that runs the refrigerator in a manner that maintains the factory set cabinet temperature until the cabinet temperature is shown in a manner that maintains the factory set cabinet temperature. The LED and temperature alert will sound until the door is closed. If the door...½ second intervals. ALERTS ALERTS There are four possible conditions that a problem exists with 4 short beeps every ½ second, and the cabinet temperature is below 55ºF (13ºC). The audible alert can be turned off by pressing the Alert RESET key. 11 The display will ...
...will then enter a mode that runs the refrigerator in a manner that maintains the factory set cabinet temperature until the cabinet temperature is shown in a manner that maintains the factory set cabinet temperature. The LED and temperature alert will sound until the door is closed. If the door...½ second intervals. ALERTS ALERTS There are four possible conditions that a problem exists with 4 short beeps every ½ second, and the cabinet temperature is below 55ºF (13ºC). The audible alert can be turned off by pressing the Alert RESET key. 11 The display will ...

Complete Owner's Guide (English)
Page 16
... already removed. Do not remove the serial plate. Rinse with clean water and a soft cloth. • Wipe stubborn spots with the sticky side of the cabinet with non-abrasive soapy water and a dishcloth. Use a non-abrasive stainless steel cleaner. Any glue left from tape or labels can be removed with a mixture...
... already removed. Do not remove the serial plate. Rinse with clean water and a soft cloth. • Wipe stubborn spots with the sticky side of the cabinet with non-abrasive soapy water and a dishcloth. Use a non-abrasive stainless steel cleaner. Any glue left from tape or labels can be removed with a mixture...
Complete Owner's Guide (English)
Page 19
... when it cools the interior. * This is touching the wall. * Re-level refrigerator or move refrigerator slightly. It rocks on * This condition can force the cabinet out of square and misalign the floor when it is on inside refrigerator walls. * Weather is hot and humid, which increases internal rate of...
... when it cools the interior. * This is touching the wall. * Re-level refrigerator or move refrigerator slightly. It rocks on * This condition can force the cabinet out of square and misalign the floor when it is on inside refrigerator walls. * Weather is hot and humid, which increases internal rate of...

Product Specifications Sheet (English)
Page 2
...ON L5V 3E4 • 1-800-265-8352 • frigidaire.ca FPRH19D7L 12/10 © 2010 Electrolux Home Products, Inc. Width C - Depth Double Unit2 with grounded three-prong receptacle is required. Height B - Depth (Incl. Features Door Design Door Handle Design Cabinet Finish Door Hinge Covers Automatic Door Closer Leveling System / ...Ft. Width C - Door) B - Overall Exterior Dimensions A - A - Printed in accordance with Trim Kit & Leveling System - A - Depth Single Unit with current edition of Controls Inside Cabinet, on the web at frigidaire.com. Height B -
...ON L5V 3E4 • 1-800-265-8352 • frigidaire.ca FPRH19D7L 12/10 © 2010 Electrolux Home Products, Inc. Width C - Depth Double Unit2 with grounded three-prong receptacle is required. Height B - Depth (Incl. Features Door Design Door Handle Design Cabinet Finish Door Hinge Covers Automatic Door Closer Leveling System / ...Ft. Width C - Door) B - Overall Exterior Dimensions A - A - Printed in accordance with Trim Kit & Leveling System - A - Depth Single Unit with current edition of Controls Inside Cabinet, on the web at frigidaire.com. Height B -

