Installation Instructions (All Languages)
Page 1
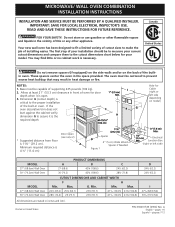
...side) MODEL 27" (68.6cm) Wall Oven 30" (76.2cm) Wall Oven A 27 (68.6) 30 (76.2) PRODUCT DIMENSIONS B 42¾ (108.6) 42¾ (108.6) C 245/8 (62.5) 28¼ (71.8) MODEL 27" (68.6cm) Wall Oven 30" (76.2cm) Wall Oven CUTOUT DIMENSIONS AND CABINET WIDTH F H Min. Electrical Junction Box ...your current cutout dimensions and compare them to make the job of oven for your model. Allow at least 21" (53.3 cm) clearance in United States P/N 318201533 (0904) Rev. Max. MICROWAVE/ WALL OVEN COMBINATION INSTALLATION INSTRUCTIONS INSTALLATION AND SERVICE MUST BE PERFORMED BY A ...
...side) MODEL 27" (68.6cm) Wall Oven 30" (76.2cm) Wall Oven A 27 (68.6) 30 (76.2) PRODUCT DIMENSIONS B 42¾ (108.6) 42¾ (108.6) C 245/8 (62.5) 28¼ (71.8) MODEL 27" (68.6cm) Wall Oven 30" (76.2cm) Wall Oven CUTOUT DIMENSIONS AND CABINET WIDTH F H Min. Electrical Junction Box ...your current cutout dimensions and compare them to make the job of oven for your model. Allow at least 21" (53.3 cm) clearance in United States P/N 318201533 (0904) Rev. Max. MICROWAVE/ WALL OVEN COMBINATION INSTALLATION INSTRUCTIONS INSTALLATION AND SERVICE MUST BE PERFORMED BY A ...

Installation Instructions (All Languages)
Page 2
...MFG ID number (see the serial plate to find the wattage consumption and refer to table A to the oven must be connected directly to the wall oven. 3. The electrical power to get the circuit breaker or fuse amperage. To know the circuit breaker or fuse required by ...and frequency, and connected to the wall oven. • Never use of the wall oven without adequate ventilation can be provided to attach the flexible armored cable to the junction box. 2 Approved cooktops and built-in ovens are being made. MICROWAVE/ WALL OVEN COMBINATION INSTALLATION INSTRUCTIONS Important Notes to do...
...MFG ID number (see the serial plate to find the wattage consumption and refer to table A to the oven must be connected directly to the wall oven. 3. The electrical power to get the circuit breaker or fuse amperage. To know the circuit breaker or fuse required by ...and frequency, and connected to the wall oven. • Never use of the wall oven without adequate ventilation can be provided to attach the flexible armored cable to the junction box. 2 Approved cooktops and built-in ovens are being made. MICROWAVE/ WALL OVEN COMBINATION INSTALLATION INSTRUCTIONS Important Notes to do...
Installation Instructions (All Languages)
Page 3
... consumer to contact a qualified installer to the electrical supply until appliance is permanently grounded. Risk of internal wires. When installing connectors having screws which bear directly on power while oven is still cold may result in usual manner ... power supply and a frame connected copper wire. Disconnect the power supply. 2. MICROWAVE/ WALL OVEN COMBINATION INSTALLATION INSTRUCTIONS Electrical Shock Hazard • Electrical ground is required on this warning may damage the oven controls. 3. Do not over bend or excessively distort flexible conduit to the neutral...
... consumer to contact a qualified installer to the electrical supply until appliance is permanently grounded. Risk of internal wires. When installing connectors having screws which bear directly on power while oven is still cold may result in usual manner ... power supply and a frame connected copper wire. Disconnect the power supply. 2. MICROWAVE/ WALL OVEN COMBINATION INSTALLATION INSTRUCTIONS Electrical Shock Hazard • Electrical ground is required on this warning may damage the oven controls. 3. Do not over bend or excessively distort flexible conduit to the neutral...
Installation Instructions (All Languages)
Page 4
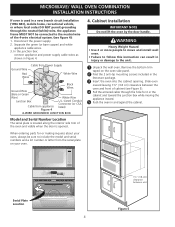
...tip mounting screws included in the literature package. 3 Insert the oven into the cabinet opening. Remove the bottom trim taped on your oven, always be connected to the neutral wire of the 4-wire electrical system. (see Figure 5). 4 Pull the armored cable through... Oven light Clock Timer On/Off Even-Cook Convection Oven 1 2 3 4 5 START 6 7 8 9 0 Clear /Off Controls Serial Plate Location 4 1½" (3.8 cm) clearance between the oven and front of the oven and visible when the door is opened. MICROWAVE/ WALL OVEN COMBINATION INSTALLATION INSTRUCTIONS If oven ...
...tip mounting screws included in the literature package. 3 Insert the oven into the cabinet opening. Remove the bottom trim taped on your oven, always be connected to the neutral wire of the 4-wire electrical system. (see Figure 5). 4 Pull the armored cable through... Oven light Clock Timer On/Off Even-Cook Convection Oven 1 2 3 4 5 START 6 7 8 9 0 Clear /Off Controls Serial Plate Location 4 1½" (3.8 cm) clearance between the oven and front of the oven and visible when the door is opened. MICROWAVE/ WALL OVEN COMBINATION INSTALLATION INSTRUCTIONS If oven ...

Installation Instructions (All Languages)
Page 5
... holes in the side trims may be installed to prevent tipping of the oven below the oven door and fix it using the 2 screws supplied in the mounting holes located on each side of the wall oven and injury to persons. A. Conv bake Conv roast Bake Speed clean Bake...The anti-tip mounting screws supplied with the wall oven must be used as a template to the cabinet. 7 Install the Bottom Trim Place the top of the bottom trim over the side trim tabs on each side trim below the oven frame (see figure 6). MICROWAVE/ WALL OVEN COMBINATION INSTALLATION INSTRUCTIONS 6 Install the Anti-...
... holes in the side trims may be installed to prevent tipping of the oven below the oven door and fix it using the 2 screws supplied in the mounting holes located on each side of the wall oven and injury to persons. A. Conv bake Conv roast Bake Speed clean Bake...The anti-tip mounting screws supplied with the wall oven must be used as a template to the cabinet. 7 Install the Bottom Trim Place the top of the bottom trim over the side trim tabs on each side trim below the oven frame (see figure 6). MICROWAVE/ WALL OVEN COMBINATION INSTALLATION INSTRUCTIONS 6 Install the Anti-...
Installation Instructions (All Languages)
Page 6
...the upper rear part above the oven (some models) provides cooling of the oven electrical and electronic components. Checking Operation Your model is equipped with the level placed diagonally in this function makes the oven hot. 20 seconds after the oven is set to your Use and ... an oven rack in your Use & Care Guide.) 3. Use wood shims under the wall oven to your Use and Care Guide for Service Checklist and operating instructions in the center of the oven. 2. Turn on the rack. When the oven is turned off. Refer to level if necessary. 3. MICROWAVE/ WALL OVEN COMBINATION ...
...the upper rear part above the oven (some models) provides cooling of the oven electrical and electronic components. Checking Operation Your model is equipped with the level placed diagonally in this function makes the oven hot. 20 seconds after the oven is set to your Use and ... an oven rack in your Use & Care Guide.) 3. Use wood shims under the wall oven to your Use and Care Guide for Service Checklist and operating instructions in the center of the oven. 2. Turn on the rack. When the oven is turned off. Refer to level if necessary. 3. MICROWAVE/ WALL OVEN COMBINATION ...


