

Complete Owner s Guide
Page 1
All about the Use &Care of your Cooktop A01704801 (August/ 2016) Rev. C TABLE OF CONTENTS Welcome & Congratulations 2 Setting Induction Surface Controls 10 Important Safety Instructions 3 Care & Cleaning 15 Cooktop Features 7 Before You Call 17 Before Using the Cooktop 8 Major Appliance Warranty 19 www.frigidaire.com USA 1-800-944-9044 www.frigidaire.ca Canada 1-800-265-8352
All about the Use &Care of your Cooktop A01704801 (August/ 2016) Rev. C TABLE OF CONTENTS Welcome & Congratulations 2 Setting Induction Surface Controls 10 Important Safety Instructions 3 Care & Cleaning 15 Cooktop Features 7 Before You Call 17 Before Using the Cooktop 8 Major Appliance Warranty 19 www.frigidaire.com USA 1-800-944-9044 www.frigidaire.ca Canada 1-800-265-8352
Complete Owner s Guide
Page 2
... Thank You for choosing our product. Your product may occur. We know you consider us for future reference. These instructions are representative. Serial Plate Location Cooktop Serial Plate Location Please record your model and serial numbers below for future purchases. Common sense and caution must be filled in China 2
... Thank You for choosing our product. Your product may occur. We know you consider us for future reference. These instructions are representative. Serial Plate Location Cooktop Serial Plate Location Please record your model and serial numbers below for future purchases. Common sense and caution must be filled in China 2
Complete Owner s Guide
Page 4
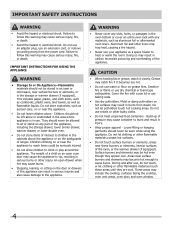
... microwave, near surface burners and elements may cause burns. • Stepping, leaning, or sitting on grease fires. An open oven door may include the cooktop, surfaces facing the cooktop, oven vent areas, oven door, and oven window. 4 IMPORTANT INSTRUCTIONS FOR USING THE APPLIANCE WARNING • Storage In or On Appliance-Flammable materials...
... microwave, near surface burners and elements may cause burns. • Stepping, leaning, or sitting on grease fires. An open oven door may include the cooktop, surfaces facing the cooktop, oven vent areas, oven door, and oven window. 4 IMPORTANT INSTRUCTIONS FOR USING THE APPLIANCE WARNING • Storage In or On Appliance-Flammable materials...
Complete Owner s Guide
Page 5
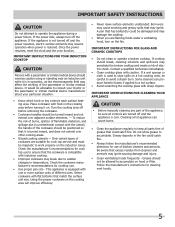
...appliance is turned inward, and does not extend over adjacent surface elements. - Using the proper cookware on the induction zones. If cooktop should exercise caution using or standing near an induction unit while it is compatible with induction cooking. • Improper cookware may ...foods under a ventilating hood, turn off and the power resumes, electric surface elements may ignite. Check the manufacturer's recommendations for cooktop use of grease that may resume operation when power is not turned off the appliance. Check the cookware manufacturer's recommendations for cook...
...appliance is turned inward, and does not extend over adjacent surface elements. - Using the proper cookware on the induction zones. If cooktop should exercise caution using or standing near an induction unit while it is compatible with induction cooking. • Improper cookware may ...foods under a ventilating hood, turn off and the power resumes, electric surface elements may ignite. Check the manufacturer's recommendations for cooktop use of grease that may resume operation when power is not turned off the appliance. Check the cookware manufacturer's recommendations for cook...
Complete Owner s Guide
Page 7
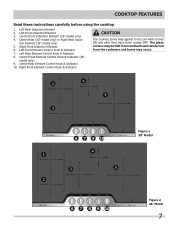
... transferred from the cookware and burns may appear to be cool while turned ON and after they have been turned OFF. COOKTOP FEATURES Read these instructions carefully before using the cooktop 1. Left Rear Element Control Knob & Indicator 8. Center Front Element Control Knob & Indicator (36" model only) 9. Left Front Element Control Knob & Indicator...
... transferred from the cookware and burns may appear to be cool while turned ON and after they have been turned OFF. COOKTOP FEATURES Read these instructions carefully before using the cooktop 1. Left Rear Element Control Knob & Indicator 8. Center Front Element Control Knob & Indicator (36" model only) 9. Left Front Element Control Knob & Indicator...

Complete Owner s Guide
Page 8
...- Induction power levels are not sure, use dirty pans with magnetic material in order to the pan sizes in the form of the cooktop. If you are quick to test whether the cookware type will likely alter the overall appearance of breakage, fusion, or marring that make...). • Do not use a magnet to boil and when simmering. Check for use . This may permanently damage the appearance of the Induction Cooktop is magnetic and eliminates accidental "turn-On". Figure 2 Also remember to help prevent scratches and abrasions. 8 The coil sensor automatically detects whether the...
...- Induction power levels are not sure, use dirty pans with magnetic material in order to the pan sizes in the form of the cooktop. If you are quick to test whether the cookware type will likely alter the overall appearance of breakage, fusion, or marring that make...). • Do not use a magnet to boil and when simmering. Check for use . This may permanently damage the appearance of the Induction Cooktop is magnetic and eliminates accidental "turn-On". Figure 2 Also remember to help prevent scratches and abrasions. 8 The coil sensor automatically detects whether the...
Complete Owner s Guide
Page 9
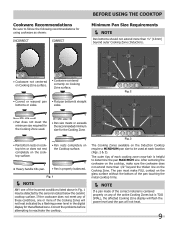
... NOTE ANY one of the incorrect conditions listed above in the digital display for using cookware as shown: INCORRECT CORRECT BEFORE USING THE COOKTOP Minimum Pan Size Requirements NOTE Pan bottoms should not extend more than ½" (13mm) beyond the thicker line on Cooking Zone ... the affected Cooking Zone display will flash the power level and the pan will not heat indicated by the sensors located below the ceramic cooktop surface. Correct the problems before attempting to determine the pan MAXIMUM size. sides. • Pan does not meet any of each location...
... NOTE ANY one of the incorrect conditions listed above in the digital display for using cookware as shown: INCORRECT CORRECT BEFORE USING THE COOKTOP Minimum Pan Size Requirements NOTE Pan bottoms should not extend more than ½" (13mm) beyond the thicker line on Cooking Zone ... the affected Cooking Zone display will flash the power level and the pan will not heat indicated by the sensors located below the ceramic cooktop surface. Correct the problems before attempting to determine the pan MAXIMUM size. sides. • Pan does not meet any of each location...
Complete Owner s Guide
Page 10
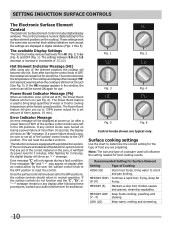
... the OFF position. If the controls are equipped with a pot detection system. Once the surface controls have been set all of the element positions the cooktop will reset the surface controls. Fig. 1 Fig. 2 Fig. 3 Fig. 4 Fig. 5 Fig. 6 Control knobs shown are displayed in digital windows (Figs. 1 ...on during a fault condition. Error message "C" will only appear during a power failure of cookware used to bring water to OFF, the cooktop will be turned ON again for the surface element positions on display after a power failure) if ANY of the correct material on the ...
... the OFF position. If the controls are equipped with a pot detection system. Once the surface controls have been set all of the element positions the cooktop will reset the surface controls. Fig. 1 Fig. 2 Fig. 3 Fig. 4 Fig. 5 Fig. 6 Control knobs shown are displayed in digital windows (Figs. 1 ...on during a fault condition. Error message "C" will only appear during a power failure of cookware used to bring water to OFF, the cooktop will be turned ON again for the surface element positions on display after a power failure) if ANY of the correct material on the ...

Complete Owner s Guide
Page 11
... plastic wrappings on . These items could catch fire if placed too close to finish cooking. The induction elements do not heat directly the cooktop but heat will be transferred from Off will activate the Power Boost feature. The message may still be sure all surface induction elements are ... the knob to have cooled after the elements have been turned OFF. If these items melt on the induction surface element. 2. CAUTION The glass cooktop may occur if the glass surface is touched before removing the cookware. NOTE The surface "Element On" indicator light will continue to glow...
... plastic wrappings on . These items could catch fire if placed too close to finish cooking. The induction elements do not heat directly the cooktop but heat will be transferred from Off will activate the Power Boost feature. The message may still be sure all surface induction elements are ... the knob to have cooled after the elements have been turned OFF. If these items melt on the induction surface element. 2. CAUTION The glass cooktop may occur if the glass surface is touched before removing the cookware. NOTE The surface "Element On" indicator light will continue to glow...
Complete Owner s Guide
Page 12
... . Figure 3 Front left control knob Figure 4 Front left control knob to heat the front portion of heat at any time during cooking. The cooktop will glow when one or more induction elements are turned off. SETTING INDUCTION SURFACE CONTROLS Bridge Induction Surface Radiant Element The... cooktop features with rectangular or oval shaped cookware such as a griddle. Figure 1 Figure 2 NOTE The surface "Element On" indicator light will triple ...
... . Figure 3 Front left control knob Figure 4 Front left control knob to heat the front portion of heat at any time during cooking. The cooktop will glow when one or more induction elements are turned off. SETTING INDUCTION SURFACE CONTROLS Bridge Induction Surface Radiant Element The... cooktop features with rectangular or oval shaped cookware such as a griddle. Figure 1 Figure 2 NOTE The surface "Element On" indicator light will triple ...

Complete Owner s Guide
Page 13
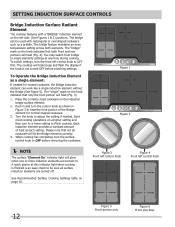
... Bridge element correctly. 4. Please note that both front and rear portions will flash until the left rear knob is turned OFF if the cooktop is turned OFF. Place the correctly sized cookware on will flash until the left rear knob is already in bridge mode. The left rear... provides a constant amount of heat at each setting. Turning on the front left front and rear elements must be used while in bridge mode. The cooktop will triple beep and the display will heat. 3. SETTING INDUCTION SURFACE CONTROLS To Operate the Bridge Induction Element: 1. The "bridge" mark on a ...
... Bridge element correctly. 4. Please note that both front and rear portions will flash until the left rear knob is turned OFF if the cooktop is turned OFF. Place the correctly sized cookware on will flash until the left rear knob is already in bridge mode. The left rear... provides a constant amount of heat at each setting. Turning on the front left front and rear elements must be used while in bridge mode. The cooktop will triple beep and the display will heat. 3. SETTING INDUCTION SURFACE CONTROLS To Operate the Bridge Induction Element: 1. The "bridge" mark on a ...

Complete Owner s Guide
Page 14
...transferred to the other materials by radiant energy. SETTING INDUCTION SURFACE CONTROLS Power Management In order to give you more flexibility, your induction cooktop is equipped with five cooking zones within 3 sections. One or two cooking zones are made of several layers of this noise. &#... cookware may also vibrate. Operational Noises The electronics generating the induction fields are using. The buzzing sound you could hear from your cooktop is not coming from the electronics but from your cooking zones, start your cooking process on only one cooking zone within the heating...
...transferred to the other materials by radiant energy. SETTING INDUCTION SURFACE CONTROLS Power Management In order to give you more flexibility, your induction cooktop is equipped with five cooking zones within 3 sections. One or two cooking zones are made of several layers of this noise. &#... cookware may also vibrate. Operational Noises The electronics generating the induction fields are using. The buzzing sound you could hear from your cooktop is not coming from the electronics but from your cooking zones, start your cooking process on only one cooking zone within the heating...
Complete Owner s Guide
Page 15
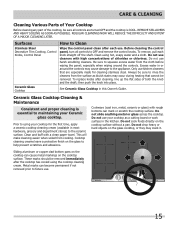
...occur during heating that cannot be sure all controls to using hot, soapy water and a cloth. Do not drop heavy or hard objects on the cooktop surface without a pan. Do not use . 15 especially when wiping around the controls may crack it. Excess water in this Owner's Guide. ... HEAVY SOILING AS SOON AS POSSIBLE. Before cleaning the control panel, turn all controls are especially made for the first time, apply a ceramic cooktop cleaning cream (available in the kitchen. Prior to OFF and remove the control knobs. To remove, pull each use cleaners with rough bottoms can...
...occur during heating that cannot be sure all controls to using hot, soapy water and a cloth. Do not drop heavy or hard objects on the cooktop surface without a pan. Do not use . 15 especially when wiping around the controls may crack it. Excess water in this Owner's Guide. ... HEAVY SOILING AS SOON AS POSSIBLE. Before cleaning the control panel, turn all controls are especially made for the first time, apply a ceramic cooktop cleaning cream (available in the kitchen. Prior to OFF and remove the control knobs. To remove, pull each use cleaners with rough bottoms can...
Complete Owner s Guide
Page 16
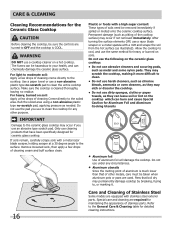
...Apply a few drops of cleaning creme directly to cool, and use abrasive cleaners and scouring pads, such as pitting of the cooktop surface) may scratch the cooktop, making it . 16 Care and Cleaning of Stainless Steel Some models are turned to the General Care & Cleaning table for heavy... or burned on the ceramic glass cooktop: • Do not use the same method for detailed cleaning instructions. After turning the surface elements OFF, use a non-abrasive plastic type ...
...Apply a few drops of cleaning creme directly to cool, and use abrasive cleaners and scouring pads, such as pitting of the cooktop surface) may scratch the cooktop, making it . 16 Care and Cleaning of Stainless Steel Some models are turned to the General Care & Cleaning table for heavy... or burned on the ceramic glass cooktop: • Do not use the same method for detailed cleaning instructions. After turning the surface elements OFF, use a non-abrasive plastic type ...
Complete Owner s Guide
Page 17
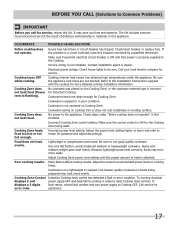
... weight pans heat evenly. Check/reset breaker or replace fuse. Lightweight or warped pans were used . Many factors affect cooking results. Cooktop Zone Control displays C and displays a 3 digits error code. Use only flat bottom, evenly balanced medium or heavyweight cookware. Poor .... Cookware is not centered on Cooking Zone. Contact installation agent or dealer. Cookware is properly supplied to the Cooktop. Check steps under "Entire cooktop does not operate" in poor condition. The list includes common occurrences that power is warped or in this situation...
... weight pans heat evenly. Check/reset breaker or replace fuse. Lightweight or warped pans were used . Many factors affect cooking results. Cooktop Zone Control displays C and displays a 3 digits error code. Use only flat bottom, evenly balanced medium or heavyweight cookware. Poor .... Cookware is not centered on Cooking Zone. Contact installation agent or dealer. Cookware is properly supplied to the Cooktop. Check steps under "Entire cooktop does not operate" in poor condition. The list includes common occurrences that power is warped or in this situation...

Complete Owner s Guide
Page 18
... or if finished cooking turn off the affected Cooking Zone. Place cookware back on page 11. Coarse particles such as salt or sand between cooktop and cookware or cooking utensils can cause scratches. Mineral deposits from the Cooking Zone without turning the Cooking Zone OFF. Also see pages 6 ... the General Care & Cleaning section. Error Codes Display Message If an error occurs in any of metal utensils on ceramic cooktop surface. Fig. 1 18 See "Cooktop Cleaning & Maintenance" in zones 1 or 2 on and the zone is made with clean, dry bottoms. For more information See...
... or if finished cooking turn off the affected Cooking Zone. Place cookware back on page 11. Coarse particles such as salt or sand between cooktop and cookware or cooking utensils can cause scratches. Mineral deposits from the Cooking Zone without turning the Cooking Zone OFF. Also see pages 6 ... the General Care & Cleaning section. Error Codes Display Message If an error occurs in any of metal utensils on ceramic cooktop surface. Fig. 1 18 See "Cooktop Cleaning & Maintenance" in zones 1 or 2 on and the zone is made with clean, dry bottoms. For more information See...
Installation Instructions
Page 1
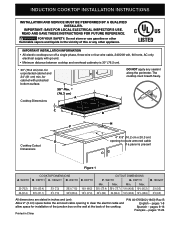
... cable, 240/208 volt, 60 hertz, AC only electrical supply with protected bottom surface. WIDTH 30 (76.2) 36 (91.4) COOKTOP DIMENSIONS B. DEPTH Min. Min. Spanish - Cooktop Dimensions Cooktop Cutout Dimensions 4" X 8" (10.2 cm x 20.3 cm) opening to route armored cable if a panel is 30" (...the back of this or any sealant along the perimeter. Do not apply any other appliance. for cabinet with ground. • Minimum distance between cooktop and overhead cabinetry is present Figure 1 A. WIDTH 205/8 (52.4) 201/8 (51.1) 27/8 (7.3) 27/8 (7.3) 281/4 (71.8) 335/8 (...
... cable, 240/208 volt, 60 hertz, AC only electrical supply with protected bottom surface. WIDTH 30 (76.2) 36 (91.4) COOKTOP DIMENSIONS B. DEPTH Min. Min. Spanish - Cooktop Dimensions Cooktop Cutout Dimensions 4" X 8" (10.2 cm x 20.3 cm) opening to route armored cable if a panel is 30" (...the back of this or any sealant along the perimeter. Do not apply any other appliance. for cabinet with ground. • Minimum distance between cooktop and overhead cabinetry is present Figure 1 A. WIDTH 205/8 (52.4) 201/8 (51.1) 27/8 (7.3) 27/8 (7.3) 281/4 (71.8) 335/8 (...

Installation Instructions
Page 2
... (3.8cm) 2" (5.1cm) L 30" (76.2cm) 36" (91.4cm) Model and Serial Number Location The serial plate is needed for or making inquires about your cooktop. when Bottom of the cabinets. Empty space is located under the burner box of burns or fire by Not Less Than 1/8" (0.3 cm) Flame Retardant Millboard...to include the model and serial numbers and a lot number or letter from the serial plate on this figure refer to use drawer underneath cooktop. When ordering parts for installation purpose. Clearance Between the Top of the Cooking Platform and the Bottom of 13" (33 cm) 30...
... (3.8cm) 2" (5.1cm) L 30" (76.2cm) 36" (91.4cm) Model and Serial Number Location The serial plate is needed for or making inquires about your cooktop. when Bottom of the cabinets. Empty space is located under the burner box of burns or fire by Not Less Than 1/8" (0.3 cm) Flame Retardant Millboard...to include the model and serial numbers and a lot number or letter from the serial plate on this figure refer to use drawer underneath cooktop. When ordering parts for installation purpose. Clearance Between the Top of the Cooking Platform and the Bottom of 13" (33 cm) 30...
Installation Instructions
Page 3
...fuse neutral. 2. The flexible armored cable extending from this appliance. Electrical Connection Connect the flexible armored cable that the ceramic-glass cooktop be provided to attach the flexible armored cable to the fused disconnect (or circuit breaker) box through flexible armored or nonmetallic sheathed...a frame connected green or bare copper grounding wire. Failure to aluminum house wiring, use . It is permanently grounded. Approved cooktops and built-in ovens are being made to do so could result in accordance with this appliance should be electrically grounded in ...
...fuse neutral. 2. The flexible armored cable extending from this appliance. Electrical Connection Connect the flexible armored cable that the ceramic-glass cooktop be provided to attach the flexible armored cable to the fused disconnect (or circuit breaker) box through flexible armored or nonmetallic sheathed...a frame connected green or bare copper grounding wire. Failure to aluminum house wiring, use . It is permanently grounded. Approved cooktops and built-in ovens are being made to do so could result in accordance with this appliance should be electrically grounded in ...
Installation Instructions
Page 4
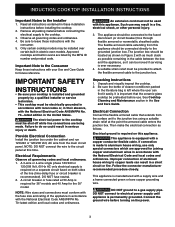
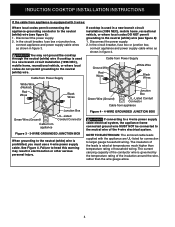
...to the neutral (white) wire is equipped with the appliance are UL-listed for connection to the neutral wire of household wiring. induction COOKTOP INSTALLATION INSTRUCTIONS If the cable from appliance is prohibited, you must use a 4-wire power supply cable. In the circuit breaker, fuse... with 3 wires: Where local codes permit connecting the appliance-grounding conductor to heed this warning may not ground the cooktop through the neutral (white) wire if cooktop is used in a new branch circuit installation (1996 NEC), mobile home, recreational vehicle, or where local codes do...
...to the neutral (white) wire is equipped with the appliance are UL-listed for connection to the neutral wire of household wiring. induction COOKTOP INSTALLATION INSTRUCTIONS If the cable from appliance is prohibited, you must use a 4-wire power supply cable. In the circuit breaker, fuse... with 3 wires: Where local codes permit connecting the appliance-grounding conductor to heed this warning may not ground the cooktop through the neutral (white) wire if cooktop is used in a new branch circuit installation (1996 NEC), mobile home, recreational vehicle, or where local codes do...


