Use and Care Manual
Page 2
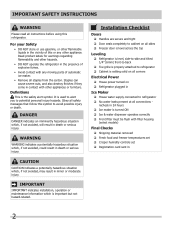
... (6mm) front-to-back Toe grille is properly attached to refrigerator Cabinet is turned ON Ice & water dispenser operates correctly Front filter must be flush with filter housing (select models) Final Checks Shipping material removed Fresh food and freezer... Handles are secure and tight Door seals completely to cabinet on Refrigerator plugged in contact with any other hazards. • DO NOT operate the refrigerator in death or serious injury. Staples can cause severe cuts, and also destroy finishes if they ...
... (6mm) front-to-back Toe grille is properly attached to refrigerator Cabinet is turned ON Ice & water dispenser operates correctly Front filter must be flush with filter housing (select models) Final Checks Shipping material removed Fresh food and freezer... Handles are secure and tight Door seals completely to cabinet on Refrigerator plugged in contact with any other hazards. • DO NOT operate the refrigerator in death or serious injury. Staples can cause severe cuts, and also destroy finishes if they ...
Use and Care Manual
Page 4
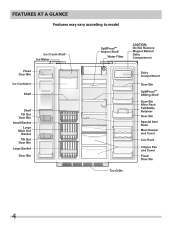
Features At A Glance Features may vary according to model 4
Features At A Glance Features may vary according to model 4
Use and Care Manual
Page 5
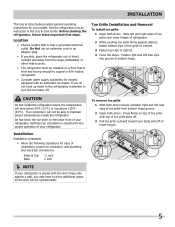
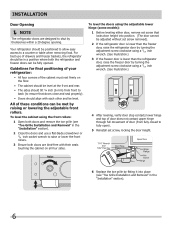
... Allow the following clearances for your model. Installation This Use & Care Guide provides general operating instructions for ease of installation, proper air circulation, and plumbing and electrical connections: Sides & Top Back 3/8 inch 1 inch NOTE If your refrigerator is placed with an automatic ice maker... toe grille on a floor that is essential for models equipped with the door hinge side against cabinet, fasten bottom clips of toe grille to cabinet. 3 Fasten top clips to cabinet. 4 Close the doors. Use the refrigerator only as instructed in this Use & Care Guide....
... Allow the following clearances for your model. Installation This Use & Care Guide provides general operating instructions for ease of installation, proper air circulation, and plumbing and electrical connections: Sides & Top Back 3/8 inch 1 inch NOTE If your refrigerator is placed with an automatic ice maker... toe grille on a floor that is essential for models equipped with the door hinge side against cabinet, fasten bottom clips of toe grille to cabinet. 3 Fasten top clips to cabinet. 4 Close the doors. Use the refrigerator only as instructed in this Use & Care Guide....
Use and Care Manual
Page 6
... to fully open). 5 Reinstall set screw, locking the door height. 6 Replace the toe grille by raising or lowering the adjustable front rollers. Your refrigerator should be level. To level the doors using a 7/16 inch wrench. (See illustration.) 4 After leveling, verify door stop contacts lower hinge and ... be in a position where both doors are designed to shut by turning the adjustment screw clockwise using the adjustable lower hinge (some models): 1 Before leveling either door, remove set screw that doors close and seal properly). • Doors should align with their seals ...
... to fully open). 5 Reinstall set screw, locking the door height. 6 Replace the toe grille by raising or lowering the adjustable front rollers. Your refrigerator should be level. To level the doors using a 7/16 inch wrench. (See illustration.) 4 After leveling, verify door stop contacts lower hinge and ... be in a position where both doors are designed to shut by turning the adjustment screw clockwise using the adjustable lower hinge (some models): 1 Before leveling either door, remove set screw that doors close and seal properly). • Doors should align with their seals ...
Use and Care Manual
Page 7
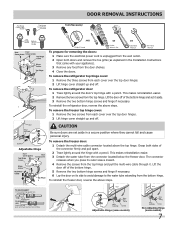
...models) 7 Press outer ring against face of the bottom hinge. 5 Remove the two bottom hinge screws and hinge if necessary. 6 Lay the door on its outer sleeve inward. 4 Remove the screws from the door shelves. 4 Close the doors. Pull to the water tube extending from the bottom hinge. To remove the refrigerator... cover over the top door hinges. 2 Lift hinge cover straight up and off . To reinstall the refrigerator door, reverse the above steps. TO DISCONNECT 1. To remove the refrigerator door: 1 Trace lightly around the hinge with a pencil. To remove the freezer top hinge cover: ...
...models) 7 Press outer ring against face of the bottom hinge. 5 Remove the two bottom hinge screws and hinge if necessary. 6 Lay the door on its outer sleeve inward. 4 Remove the screws from the door shelves. 4 Close the doors. Pull to the water tube extending from the bottom hinge. To remove the refrigerator... cover over the top door hinges. 2 Lift hinge cover straight up and off . To reinstall the refrigerator door, reverse the above steps. TO DISCONNECT 1. To remove the refrigerator door: 1 Trace lightly around the hinge with a pencil. To remove the freezer top hinge cover: ...
Use and Care Manual
Page 10
...icon reset. For further assistance, guidelines for about 10 minutes. In the Sabbath Mode, the High Temp alarm is active for five seconds. The refrigerator will function normally once the door is closed , until the Sabbath mode is activated during this time, for example due to display, even if the... door is closed , without any violation of models with the Sabbath feature, please visit the web at http:\\www.star-k.org. NOTE Although you have entered the Sabbath mode, the ice ...
...icon reset. For further assistance, guidelines for about 10 minutes. In the Sabbath Mode, the High Temp alarm is active for five seconds. The refrigerator will function normally once the door is closed , until the Sabbath mode is activated during this time, for example due to display, even if the... door is closed , without any violation of models with the Sabbath feature, please visit the web at http:\\www.star-k.org. NOTE Although you have entered the Sabbath mode, the ice ...
Use and Care Manual
Page 11
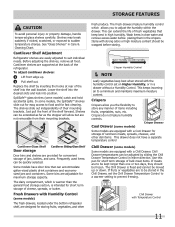
...the desired slots and lock into the wall bracket. Some models have a separate temperature control Chill Drawer (some models) Some models are equipped with Humidity Control (some models) The fresh drawers, located under the bottom refrigerator shelf, are to prevent freezing. The fresh drawers feature...11 Crispers do not feature humidity controls. Chill Drawer temperatures can be moved up . 2 Pull shelf out. Cantilever Shelf Adjustment Refrigerator shelves are adjustable for short term storage of items including fruits, vegetables, nuts, etc. Before adjusting the shelves, remove all...
...the desired slots and lock into the wall bracket. Some models have a separate temperature control Chill Drawer (some models) Some models are equipped with Humidity Control (some models) The fresh drawers, located under the bottom refrigerator shelf, are to prevent freezing. The fresh drawers feature...11 Crispers do not feature humidity controls. Chill Drawer temperatures can be moved up . 2 Pull shelf out. Cantilever Shelf Adjustment Refrigerator shelves are adjustable for short term storage of items including fruits, vegetables, nuts, etc. Before adjusting the shelves, remove all...
Use and Care Manual
Page 12
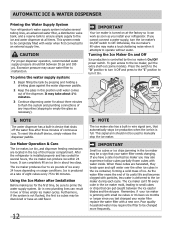
... recommended water supply pressure should not be a sign that can get caught between 30 psi and 100 psi. After the refrigerator is installed properly and has cooled for several tubing lines, an advanced water filter, a distribution valve bank, and a ... hollow cubes partially frozen cubes with a new one. Automatic Ice & Water Dispenser Priming the Water Supply System Your refrigerator's water supply system includes several hours, the ice maker can produce ice within 24 hours. This system needs to be...may require the filter to the ice maker, pull the extra shelf out (some models).
... recommended water supply pressure should not be a sign that can get caught between 30 psi and 100 psi. After the refrigerator is installed properly and has cooled for several tubing lines, an advanced water filter, a distribution valve bank, and a ... hollow cubes partially frozen cubes with a new one. Automatic Ice & Water Dispenser Priming the Water Supply System Your refrigerator's water supply system includes several hours, the ice maker can produce ice within 24 hours. This system needs to be...may require the filter to the ice maker, pull the extra shelf out (some models).
Use and Care Manual
Page 17
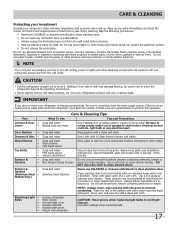
...8226; • • Toe Grille • • • Exterior & • Handles • Exterior & • Handles (Stainless Steel • Models Only) Replacing Light • Bulbs • • • • • Care & Cleaning Tips What To Use Tips and Precautions Soap and water Baking...the following precautions: • Never use razor blades or other electrical components will continue until you store or move the refrigerator beyond the plumbing connections. • Damp objects stick to clean stainless steel. • Do not wash any removable parts...
...8226; • • Toe Grille • • • Exterior & • Handles • Exterior & • Handles (Stainless Steel • Models Only) Replacing Light • Bulbs • • • • • Care & Cleaning Tips What To Use Tips and Precautions Soap and water Baking...the following precautions: • Never use razor blades or other electrical components will continue until you store or move the refrigerator beyond the plumbing connections. • Damp objects stick to clean stainless steel. • Do not wash any removable parts...
Use and Care Manual
Page 19
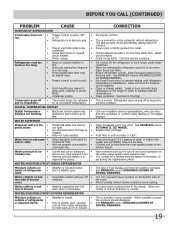
... unit to cold water line that supplies water to run more. Move humidity control (some models) to keep temperature constant. a period of drawer. WATER/MOISTURE/FROST OUTSIDE REFRIGERATOR Moisture collects on the bottom side of drawer moisture. Reset circuit breaker. It's normal for...8226; Freezer control is set to "OF" • or "0". • Refrigerator is in defrost cycle. • Refrigerator runs too much or too long. • Plug at a constant temperature. Call your Frigidaire service representative, who can interpret any messages or number codes flashing on pressures &#...
... unit to cold water line that supplies water to run more. Move humidity control (some models) to keep temperature constant. a period of drawer. WATER/MOISTURE/FROST OUTSIDE REFRIGERATOR Moisture collects on the bottom side of drawer moisture. Reset circuit breaker. It's normal for...8226; Freezer control is set to "OF" • or "0". • Refrigerator is in defrost cycle. • Refrigerator runs too much or too long. • Plug at a constant temperature. Call your Frigidaire service representative, who can interpret any messages or number codes flashing on pressures &#...


