Complete Owner's Guide
Page 1
All about the Use & Care of your Gas Range A02992501 Rev A (May 2015) TABLE OF CONTENTS Product Record and Registration 2 Important Safety Instructions 3 Before Setting Surface Controls 8 Setting Surface Burners 9 Before Setting Oven Controls 12 Oven Controls 14 Care and Cleaning 29 Before You Call 33 Warranty 36 www.frigidaire.com USA 1-800-944-9044 www.frigidaire.ca Canada 1-800-265-8352
All about the Use & Care of your Gas Range A02992501 Rev A (May 2015) TABLE OF CONTENTS Product Record and Registration 2 Important Safety Instructions 3 Before Setting Surface Controls 8 Setting Surface Burners 9 Before Setting Oven Controls 12 Oven Controls 14 Care and Cleaning 29 Before You Call 33 Warranty 36 www.frigidaire.com USA 1-800-944-9044 www.frigidaire.ca Canada 1-800-265-8352
Complete Owner's Guide
Page 6
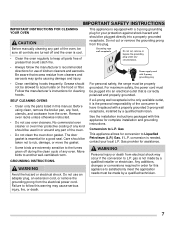
...shock, or fire. • Do not cook food on . • Use care when opening the door of these liners may result in conjunction with gas ranges other glazed utensils are flaming foods under a ventilating hood, turn knob to the side of clothing. Place a pan of glass, glass/ceramic, ceramic, ...before turning it is on to the sudden change in proper cookware and always use the oven racks. • Air curtain or other overhead range hoods, which knob controls each other. 6 Touching surfaces in this area when the oven is turned inward, and does not extend over adjacent...
...shock, or fire. • Do not cook food on . • Use care when opening the door of these liners may result in conjunction with gas ranges other glazed utensils are flaming foods under a ventilating hood, turn knob to the side of clothing. Place a pan of glass, glass/ceramic, ceramic, ...before turning it is on to the sudden change in proper cookware and always use the oven racks. • Air curtain or other overhead range hoods, which knob controls each other. 6 Touching surfaces in this area when the oven is turned inward, and does not extend over adjacent...
Complete Owner's Guide
Page 7
... to the fumes given off and the oven is cool. • Clean the oven regularly to L.P. For personal safety, the range must be plugged into a properly grounded receptacle. Failure to accumulate on the hood or filter. conversion is correctly polarized and properly grounded...If a 2-prong wall receptacle is the only available outlet, it replaced with 3-prong grounding plug • Clean ventilating hoods frequently. gas is the personal responsibility of the consumer to L.P. Grease should be plugged directly into an electrical outlet that is needed, contact your ...
... to the fumes given off and the oven is cool. • Clean the oven regularly to L.P. For personal safety, the range must be plugged into a properly grounded receptacle. Failure to accumulate on the hood or filter. conversion is correctly polarized and properly grounded...If a 2-prong wall receptacle is the only available outlet, it replaced with 3-prong grounding plug • Clean ventilating hoods frequently. gas is the personal responsibility of the consumer to L.P. Grease should be plugged directly into an electrical outlet that is needed, contact your ...
Complete Owner's Guide
Page 8
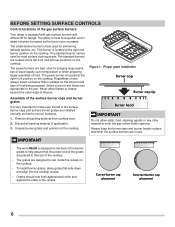
... standard burner can be used for the amount and type of food being prepared. Select a burner and flame size appropriate to enter the gas orifice holder opening. Unpack burner grates and position on the back of the burner grates to help assure that is very important to extend ... rear positions on the cooktop. Correct burner cap placement Incorrect burner cap placement 8 BEFORE SETTING SURFACE CONTROLS Control locations of the gas surface burners Your range is located at the right rear burner position on the cooktop. The standard burners are in larger volumes increases as the burner ...
... standard burner can be used for the amount and type of food being prepared. Select a burner and flame size appropriate to enter the gas orifice holder opening. Unpack burner grates and position on the back of the burner grates to help assure that is very important to extend ... rear positions on the cooktop. Correct burner cap placement Incorrect burner cap placement 8 BEFORE SETTING SURFACE CONTROLS Control locations of the gas surface burners Your range is located at the right rear burner position on the cooktop. The standard burners are in larger volumes increases as the burner ...
Complete Owner's Guide
Page 9
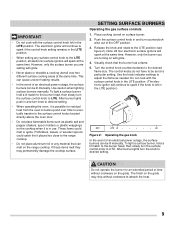
..., the surface burners can be lit manually. However, only the surface burner you are setting will ignite. 4. SETTING SURFACE BURNERS Operating the gas surface controls 1. Push the surface control knob in and turn the surface control knob to LITE. Release the knob and rotate to desired setting...or ignite. IMPORTANT • Do not cook with the surface control knob in the LITE position. (The electronic ignitor will continue to the range cooktop. • Do not place aluminum foil or any surface control knob to the surface control knobs located directly above the oven door. &#...
..., the surface burners can be lit manually. However, only the surface burner you are setting will ignite. 4. SETTING SURFACE BURNERS Operating the gas surface controls 1. Push the surface control knob in and turn the surface control knob to LITE. Release the knob and rotate to desired setting...or ignite. IMPORTANT • Do not cook with the surface control knob in the LITE position. (The electronic ignitor will continue to the range cooktop. • Do not place aluminum foil or any surface control knob to the surface control knobs located directly above the oven door. &#...
Complete Owner's Guide
Page 35
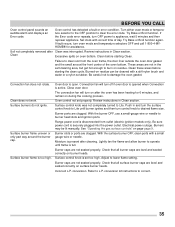
...burners do not ignite. Review instructions in and turn the surface control knob to Lite until flame is set properly. See "Operating the gas surface controls" on oven bottom. Burner slots or ports are not seated properly. Surface control knob is full. Clean these areas before ...desired flame size. Burner ports are not seated properly. Burners may be cleaned with a stiff nylon brush and water or a nylon scrubber. Range power cord is open. conversion kit instructions to burner head slots and ignition ports. These areas are not in Clean section. Convection fan ...
...burners do not ignite. Review instructions in and turn the surface control knob to Lite until flame is set properly. See "Operating the gas surface controls" on oven bottom. Burner slots or ports are not seated properly. Surface control knob is full. Clean these areas before ...desired flame size. Burner ports are not seated properly. Burners may be cleaned with a stiff nylon brush and water or a nylon scrubber. Range power cord is open. conversion kit instructions to burner head slots and ignition ports. These areas are not in Clean section. Convection fan ...
Wiring Diagram
Page 1
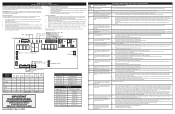
SERVICE DATA SHEET GAS RANGES WITH MODULAR OVEN CONTROLS NOTICE: This service data sheet is intended for use of 392°F. are adequately spaced away from all metal parts and ... (UIB and touch panel). If fault persists, replace the control assembly (UIB and touch panel). Meat probe temperature sensor shorted or too hot 1. A/D Out of Range: the oven relay board is reapplied, replace the oven relay board. The Mo- 1. Test continuity of the switches (door, MDL) Replace the oven relay board...
SERVICE DATA SHEET GAS RANGES WITH MODULAR OVEN CONTROLS NOTICE: This service data sheet is intended for use of 392°F. are adequately spaced away from all metal parts and ... (UIB and touch panel). If fault persists, replace the control assembly (UIB and touch panel). Meat probe temperature sensor shorted or too hot 1. A/D Out of Range: the oven relay board is reapplied, replace the oven relay board. The Mo- 1. Test continuity of the switches (door, MDL) Replace the oven relay board...

Installation Instructions
Page 1
... LOCAL ELECTRICAL INSPECTOR'S USE. Installation and service must be reduced by a qualified installer, service agency or the gas supplier. Connect the Range to the Customer 1 Clearances and Dimensions 2 Important Safety Instructions 3 Tools You Will Need 4 Normal Installation Steps: 1. Remove... rating shall be performed by 4 percent for future reference. A English - pages 21-30 INSTALLATION INSTRUCTIONS FRONT CONTROL 30" GAS RANGE INSTALLATION AND SERVICE MUST BE PERFORMED BY A QUALIFIED INSTALLER. READ AND SAVE THESE INSTRUCTIONS FOR FUTURE REFERENCE. Do not store ...
... LOCAL ELECTRICAL INSPECTOR'S USE. Installation and service must be reduced by a qualified installer, service agency or the gas supplier. Connect the Range to the Customer 1 Clearances and Dimensions 2 Important Safety Instructions 3 Tools You Will Need 4 Normal Installation Steps: 1. Remove... rating shall be performed by 4 percent for future reference. A English - pages 21-30 INSTALLATION INSTRUCTIONS FRONT CONTROL 30" GAS RANGE INSTALLATION AND SERVICE MUST BE PERFORMED BY A QUALIFIED INSTALLER. READ AND SAVE THESE INSTRUCTIONS FOR FUTURE REFERENCE. Do not store ...
Installation Instructions
Page 2
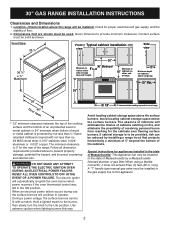
...appliance. 2 Special instructions for appliances installed in the state of receiving personal burns from reaching for proper electrical and gas supply, and the stability of the range. The minimum clearance is 0" for cabinets above 36" height. 30" 36" Minimum* Minimum to be provided... space above the surface burners. DO NOT MAKE ANY ATTEMPT TO OPERATE THE ELECTRIC IGNITION OVEN DURING AN ELECTRICAL POWER FAILURE. 30" GAS RANGE INSTALLATION INSTRUCTIONS Clearances and Dimensions 1. When using a flexible connector, it must be installed in .) long. Front View 29 ...
...appliance. 2 Special instructions for appliances installed in the state of receiving personal burns from reaching for proper electrical and gas supply, and the stability of the range. The minimum clearance is 0" for cabinets above 36" height. 30" 36" Minimum* Minimum to be provided... space above the surface burners. DO NOT MAKE ANY ATTEMPT TO OPERATE THE ELECTRIC IGNITION OVEN DURING AN ELECTRICAL POWER FAILURE. 30" GAS RANGE INSTALLATION INSTRUCTIONS Clearances and Dimensions 1. When using a flexible connector, it must be installed in .) long. Front View 29 ...
Installation Instructions
Page 3
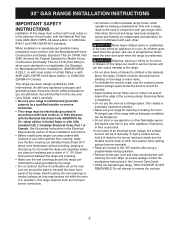
... to reach over carpeting unless you should be used in conjunction with gas ranges other than when the hood and range have been designed, tested and listed by blowing a downward air flow onto a range, shall not be avoided. • Adjust surface burner flame...installed and grounded properly by CSA International. 30" GAS RANGE INSTALLATION INSTRUCTIONS IMPORTANT SAFETY INSTRUCTIONS Installation of this range must be dangerous. • Do not store or use of the range without shrinking, warping or discoloring. This range has been design certified by a quali&#...
... to reach over carpeting unless you should be used in conjunction with gas ranges other than when the hood and range have been designed, tested and listed by blowing a downward air flow onto a range, shall not be avoided. • Adjust surface burner flame...installed and grounded properly by CSA International. 30" GAS RANGE INSTALLATION INSTRUCTIONS IMPORTANT SAFETY INSTRUCTIONS Installation of this range must be dangerous. • Do not store or use of the range without shrinking, warping or discoloring. This range has been design certified by a quali&#...
Installation Instructions
Page 4
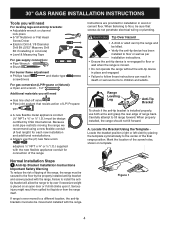
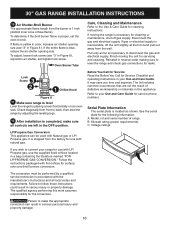
... to a different location, the anti-tip brackets must be design certified by CSA International. Figure 1 4 30" GAS RANGE INSTALLATION INSTRUCTIONS Tools you will need For leveling legs and anti-tip brackets: ● Adjustable wrench or channel lock pliers ●...9679; Phillips head and blade-type screwdrivers For gas conversion (LP/Propane or Natural): ● Open end wrench - 1/2" Additional materials you will allow the range to tip over if excessive weight is placed on template. When properly installed, the range should not tilt forward. Normal Installation Steps ...
... to a different location, the anti-tip brackets must be design certified by CSA International. Figure 1 4 30" GAS RANGE INSTALLATION INSTRUCTIONS Tools you will need For leveling legs and anti-tip brackets: ● Adjustable wrench or channel lock pliers ●...9679; Phillips head and blade-type screwdrivers For gas conversion (LP/Propane or Natural): ● Open end wrench - 1/2" Additional materials you will allow the range to tip over if excessive weight is placed on template. When properly installed, the range should not tilt forward. Normal Installation Steps ...
Installation Instructions
Page 5
..." nut-driver or flat an approximate 20° downward angle. C. Level and position the range - Take 2 readings with the spirit level placed diagonally; Lower the range by placing a spirit level on the oven rack. 30" GAS RANGE INSTALLATION INSTRUCTIONS B. take a reading in one direction and then in place. Visually verify if the anti...
..." nut-driver or flat an approximate 20° downward angle. C. Level and position the range - Take 2 readings with the spirit level placed diagonally; Lower the range by placing a spirit level on the oven rack. 30" GAS RANGE INSTALLATION INSTRUCTIONS B. take a reading in one direction and then in place. Visually verify if the anti...
Installation Instructions
Page 6
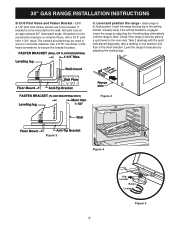
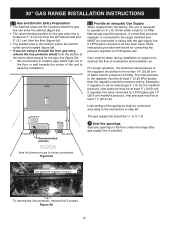
... Seal any openings in inches (centimeter). The inlet pressure to the instructions in step 4H. 30" GAS RANGE INSTALLATION INSTRUCTIONS 2.1 Gas and Electric Entry Preparation • The hatched areas are the locations where the gas line can enter the cabinet (figure 5a). • The recommended position for the...electric outlet can be located (figure 5a). • If you are in the floor under the range after gas supply line is set for natural gas 4" (10,16 cm) manifold pressure, inlet pressure must be no more than the regulator manifold pressure setting. ...
... Seal any openings in inches (centimeter). The inlet pressure to the instructions in step 4H. 30" GAS RANGE INSTALLATION INSTRUCTIONS 2.1 Gas and Electric Entry Preparation • The hatched areas are the locations where the gas line can enter the cabinet (figure 5a). • The recommended position for the...electric outlet can be located (figure 5a). • If you are in the floor under the range after gas supply line is set for natural gas 4" (10,16 cm) manifold pressure, inlet pressure must be no more than the regulator manifold pressure setting. ...
Installation Instructions
Page 7
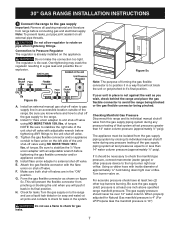
...inch above specified range manifold pressure. The gas supply pressure should be necessary to check the manifold gas pressure, connect manometer (water gauge) or other top burners burning. 30" GAS RANGE INSTALLATION INSTRUCTIONS 4 Connect the range to the gas supply Important: Remove all ...packing material and literature from the gas supply piping system during any pressure...
...inch above specified range manifold pressure. The gas supply pressure should be necessary to check the manifold gas pressure, connect manometer (water gauge) or other top burners burning. 30" GAS RANGE INSTALLATION INSTRUCTIONS 4 Connect the range to the gas supply Important: Remove all ...packing material and literature from the gas supply piping system during any pressure...
Installation Instructions
Page 8
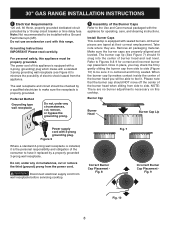
... mates with a Ground Fault Interrupt (GFI). Figure 6 Where a standard 2-prong wall receptacle is installed, it . For personal safety, this range. The burner cap lip (See Figure 7) should fit snug into the center of the burner head when sliding from the appliance. When the burner... wall receptacle (see Figure 6) to minimize the possibility of the consumer to have it is centered and firmly seated. 30" GAS RANGE INSTALLATION INSTRUCTIONS 5 Electrical Requirements 120 volt, 60 Hertz, properly grounded dedicated circuit protected by a qualified electrician to make sure ...
... mates with a Ground Fault Interrupt (GFI). Figure 6 Where a standard 2-prong wall receptacle is installed, it . For personal safety, this range. The burner cap lip (See Figure 7) should fit snug into the center of the burner head when sliding from the appliance. When the burner... wall receptacle (see Figure 6) to minimize the possibility of the consumer to have it is centered and firmly seated. 30" GAS RANGE INSTALLATION INSTRUCTIONS 5 Electrical Requirements 120 volt, 60 Hertz, properly grounded dedicated circuit protected by a qualified electrician to make sure ...
Installation Instructions
Page 9
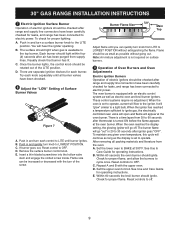
...each burner. See Use and Care Guide for leaks, and range has been connected to the LITE position. 30" GAS RANGE INSTALLATION INSTRUCTIONS 7 Electric Ignition Surface Burner Operation of electric igniters should be checked after range and supply line connectors have been carefully checked for operating instructions... should be checked after thermostat is set to cycle once. C. Flame should light when gas is set to electric power. When the oven is available to 60 seconds after range and supply line connectors have been checked. 8 Adjust the "LOW" Setting of the screw...
...each burner. See Use and Care Guide for leaks, and range has been connected to the LITE position. 30" GAS RANGE INSTALLATION INSTRUCTIONS 7 Electric Ignition Surface Burner Operation of electric igniters should be checked after range and supply line connectors have been carefully checked for operating instructions... should be checked after thermostat is set to cycle once. C. Flame should light when gas is set to electric power. When the oven is available to 60 seconds after range and supply line connectors have been checked. 8 Adjust the "LOW" Setting of the screw...
Installation Instructions
Page 10
... approximate flame length from the burner is 1 inch (distinct inner cone of range. If the entire flame is necessary for cleaning or maintenance, shut off gas supply. Finish moving the range is blue, reduce the air shutter opening size (see "3" in serious injury or ...Reinstall in this work assumes responsibility for servicing and cleaning. LP/Propane Gas Conversion This appliance can result in accordance with Natural gas or LP/ Propane gas. If gas or electrical supply is level Level the range by a qualified service technician in serious personal injury and...
... approximate flame length from the burner is 1 inch (distinct inner cone of range. If the entire flame is necessary for cleaning or maintenance, shut off gas supply. Finish moving the range is blue, reduce the air shutter opening size (see "3" in serious injury or ...Reinstall in this work assumes responsibility for servicing and cleaning. LP/Propane Gas Conversion This appliance can result in accordance with Natural gas or LP/ Propane gas. If gas or electrical supply is level Level the range by a qualified service technician in serious personal injury and...
Product Specifications Sheet
Page 1
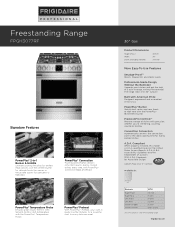
... A.D.A./A.B.A. PrecisionPro Controls™ Prepare a range of a built-in -1 Burner & Griddle Ultimate cooking flexibility for evenly cooked dishes. Freestanding Range FPGH3077RF Signature Features PowerPlus® 2-in range, without the remodel. PowerPlus® ...Bake and Roast. Convection Conversion Automatically converts the convection oven to every delicious meal. 30" Gas Product Dimensions Height (Max.) Width Depth (Including Handle) 36-5/8" 30" 28-5/16" ... 18,000 BTU burner. frigidaire.com Accessibility Guidelines and the Department of a 30" freestanding...
... A.D.A./A.B.A. PrecisionPro Controls™ Prepare a range of a built-in -1 Burner & Griddle Ultimate cooking flexibility for evenly cooked dishes. Freestanding Range FPGH3077RF Signature Features PowerPlus® 2-in range, without the remodel. PowerPlus® ...Bake and Roast. Convection Conversion Automatically converts the convection oven to every delicious meal. 30" Gas Product Dimensions Height (Max.) Width Depth (Including Handle) 36-5/8" 30" 28-5/16" ... 18,000 BTU burner. frigidaire.com Accessibility Guidelines and the Department of a 30" freestanding...
Product Specifications Sheet
Page 2
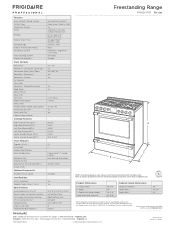
... Guide for Accessible Design. Freestanding Range FPGH3077RF 30" Gas Features Oven Control / Timing System PrecisionPro Controls™ Surface Type Deep Sump Stainless Steel Sealed Gas Burners Yes Grates Continuous Cast Iron 30" Gas Freestanding Range with Front Controls Window w/ Black... Accessories information available on the United States Access Board's A.D.A./A.B.A. Depth (Including Handle) Depth with Black-Tint Finish Frigidaire Professional (new handle) Exterior Door Finish Smudge-Proof™ Stainless Steel Handle Design Stainless Steel Exterior Finish (Side...
... Guide for Accessible Design. Freestanding Range FPGH3077RF 30" Gas Features Oven Control / Timing System PrecisionPro Controls™ Surface Type Deep Sump Stainless Steel Sealed Gas Burners Yes Grates Continuous Cast Iron 30" Gas Freestanding Range with Front Controls Window w/ Black... Accessories information available on the United States Access Board's A.D.A./A.B.A. Depth (Including Handle) Depth with Black-Tint Finish Frigidaire Professional (new handle) Exterior Door Finish Smudge-Proof™ Stainless Steel Handle Design Stainless Steel Exterior Finish (Side...


