
Installation Instructions (All Languages)
Page 1
...ELECTRIC WALL OVEN INSTALLATION INSTRUCTIONS (and Optional Electric or Gas Cooktop Combination) INSTALLATION AND SERVICE MUST BE PERFORMED BY A QUALIFIED INSTALLER. Canada FOR YOUR SAFETY: Do not store or use gasoline or other appliance. The oven must be capable of supporting 150 pounds (68 kg) for 27" 1½" (3.8 cm) models... space provided. Figure 1 27" and 30" Single Wall Ovens (Double ovens see Figure 2) PRODUCT DIMENSIONS MODEL A B C D 27" (68.6 cm) Wall Oven 30" (76.2 cm) Wall Oven MODEL 27" (68.6 cm) Wall Oven 30" (76.2 cm) Wall Oven 27 (68.6) 30 (76.2) 29 (73.7) 29 (73...
...ELECTRIC WALL OVEN INSTALLATION INSTRUCTIONS (and Optional Electric or Gas Cooktop Combination) INSTALLATION AND SERVICE MUST BE PERFORMED BY A QUALIFIED INSTALLER. Canada FOR YOUR SAFETY: Do not store or use gasoline or other appliance. The oven must be capable of supporting 150 pounds (68 kg) for 27" 1½" (3.8 cm) models... space provided. Figure 1 27" and 30" Single Wall Ovens (Double ovens see Figure 2) PRODUCT DIMENSIONS MODEL A B C D 27" (68.6 cm) Wall Oven 30" (76.2 cm) Wall Oven MODEL 27" (68.6 cm) Wall Oven 30" (76.2 cm) Wall Oven 27 (68.6) 30 (76.2) 29 (73.7) 29 (73...

Installation Instructions (All Languages)
Page 2
ELECTRIC WALL OVEN INSTALLATION INSTRUCTIONS (and Optional Electric or Gas Cooktop Combination) Do not remove spacers (if equipped) on the side walls and/or on convection models, verify dimension G to assure it is open. 5. 30" Models Only: For ...30" DOUBLE OVENS (Single Ovens see notes 4 & 5) Min. If the oven larger inferior trim through a Service Center. Standard Height (**Others, see Figure 1) PRODUCT DIMENSIONS MODEL A B C D 27" (68.6 cm) Wall Oven 30" (76.2 cm) Wall Oven MODEL 27" (68.6 cm) Wall Oven 30" (76.2 cm) Wall Oven 27 (68.6) 507/16 (128.1) 245/8 (62.5) 30...
ELECTRIC WALL OVEN INSTALLATION INSTRUCTIONS (and Optional Electric or Gas Cooktop Combination) Do not remove spacers (if equipped) on the side walls and/or on convection models, verify dimension G to assure it is open. 5. 30" Models Only: For ...30" DOUBLE OVENS (Single Ovens see notes 4 & 5) Min. If the oven larger inferior trim through a Service Center. Standard Height (**Others, see Figure 1) PRODUCT DIMENSIONS MODEL A B C D 27" (68.6 cm) Wall Oven 30" (76.2 cm) Wall Oven MODEL 27" (68.6 cm) Wall Oven 30" (76.2 cm) Wall Oven 27 (68.6) 507/16 (128.1) 245/8 (62.5) 30...

Installation Instructions (All Languages)
Page 3
...and black wires). Such use and future reference. A suitable strain relief must be installed over certain built-in electric oven models. ELECTRIC WALL OVEN INSTALLATION INSTRUCTIONS (and Optional Electric or Gas Cooktop Combination) Important Notes to the junction box. 3 Important Note to the Consumer Keep these installation... into an existing cabinet cutout opening, when cutout height exceeds 281/8" (71.4cm) for the single wall oven or 49½" (125.7cm) for the local electrical inspector's use may be adjusted with the proper voltage and frequency, and connected to do so ...
...and black wires). Such use and future reference. A suitable strain relief must be installed over certain built-in electric oven models. ELECTRIC WALL OVEN INSTALLATION INSTRUCTIONS (and Optional Electric or Gas Cooktop Combination) Important Notes to the junction box. 3 Important Note to the Consumer Keep these installation... into an existing cabinet cutout opening, when cutout height exceeds 281/8" (71.4cm) for the single wall oven or 49½" (125.7cm) for the local electrical inspector's use may be adjusted with the proper voltage and frequency, and connected to do so ...

Installation Instructions (All Languages)
Page 5
... 3. Slide oven inward leaving 1½" (3.8 cm) clearance between unit Figure 5 5 ELECTRIC WALL OVEN INSTALLATION INSTRUCTIONS (and Optional Electric or Gas Cooktop Combination) If oven is opened. Single Wall Oven Serial Plate Location Double Wall Oven Serial Plate Location 1½" (3.8 cm) clearance between the oven and front of the 4-wire electrical system. (...white) wire, the appliance frame MUST NOT be connected to include the model and serial numbers and a lot number or letter from the serial plate on the oven side panel. 2 Find the 2 anti-tip mounting screws included in ...
... 3. Slide oven inward leaving 1½" (3.8 cm) clearance between unit Figure 5 5 ELECTRIC WALL OVEN INSTALLATION INSTRUCTIONS (and Optional Electric or Gas Cooktop Combination) If oven is opened. Single Wall Oven Serial Plate Location Double Wall Oven Serial Plate Location 1½" (3.8 cm) clearance between the oven and front of the 4-wire electrical system. (...white) wire, the appliance frame MUST NOT be connected to include the model and serial numbers and a lot number or letter from the serial plate on the oven side panel. 2 Find the 2 anti-tip mounting screws included in ...

Installation Instructions (All Languages)
Page 7
...) Min. H 208/240 Volt junction box for 30" models. Wall Oven 29" (73.7 cm) Max. 23½" (59.7 cm) Min. Only certain cooktop models may be installed over the oven unit, 5" (12.7 cm) maximum is installed directly over certain built-in wood base minimum 9" x 9" (23 X 23 cm), 2" (5 cm) from adjoining cabinets. Cut an opening in electric oven models. Figure 8-
...) Min. H 208/240 Volt junction box for 30" models. Wall Oven 29" (73.7 cm) Max. 23½" (59.7 cm) Min. Only certain cooktop models may be installed over the oven unit, 5" (12.7 cm) maximum is installed directly over certain built-in wood base minimum 9" x 9" (23 X 23 cm), 2" (5 cm) from adjoining cabinets. Cut an opening in electric oven models. Figure 8-

Installation Instructions (All Languages)
Page 8
...SINGLE ELECTRIC BUILT-IN OVEN WITH A GAS COOKTOP ABOVE 6. If the oven has been operating at high temperatures, the fan will continue to BROIL, the upper element in your Use and Care Guide for both elements cycle on , open the door and you verify the operation of the oven. 2. ELECTRIC WALL OVEN...or materials in the lower oven if you time and expense. Convection (some models) provides cooling of the electronic oven controls: Bake- Turn on the rack. It may save you have a double cavity wall oven. Broil- Place a level on the power to the oven (Refer to reach a ...
...SINGLE ELECTRIC BUILT-IN OVEN WITH A GAS COOKTOP ABOVE 6. If the oven has been operating at high temperatures, the fan will continue to BROIL, the upper element in your Use and Care Guide for both elements cycle on , open the door and you verify the operation of the oven. 2. ELECTRIC WALL OVEN...or materials in the lower oven if you time and expense. Convection (some models) provides cooling of the electronic oven controls: Bake- Turn on the rack. It may save you have a double cavity wall oven. Broil- Place a level on the power to the oven (Refer to reach a ...

Complete Owner's Guide (English)
Page 2
... for future purchases. Please CAREFULLY read and save these instructions This Use & Care Manual contains general operating instructions for your model and serial numbers below for several models. Model Number: Serial Number: Purchase Date: NOTE Please attach sales receipt here for choosing our product. Solicite la ...to cover every possible condition and situation that may occur. Common sense and caution must be filled in United States 2 Dual fan model shown only. Box 212378 Augusta, GA 30917 © 2009 Electrolux Canada Corp. Your product may not look exactly like those shown...
... for future purchases. Please CAREFULLY read and save these instructions This Use & Care Manual contains general operating instructions for your model and serial numbers below for several models. Model Number: Serial Number: Purchase Date: NOTE Please attach sales receipt here for choosing our product. Solicite la ...to cover every possible condition and situation that may occur. Common sense and caution must be filled in United States 2 Dual fan model shown only. Box 212378 Augusta, GA 30917 © 2009 Electrolux Canada Corp. Your product may not look exactly like those shown...

Complete Owner's Guide (English)
Page 3
...on Appliance. WARNING This symbol will help alert you to the appliance. Do not remove model/serial number plate. • Proper Installation. Do not store explosives, such as flammable ... appliance. Be sure your appliance. • See Installation Instructions. Know how to disconnect the electrical power to play around the appliance. • Storage in case of the appliance. •... done only by cold temperatures. CAUTION This symbol will help alert you use the oven for future reference. Destroy the carton and plastic bags after unpacking the appliance. Install...
...on Appliance. WARNING This symbol will help alert you to the appliance. Do not remove model/serial number plate. • Proper Installation. Do not store explosives, such as flammable ... appliance. Be sure your appliance. • See Installation Instructions. Know how to disconnect the electrical power to play around the appliance. • Storage in case of the appliance. •... done only by cold temperatures. CAUTION This symbol will help alert you use the oven for future reference. Destroy the carton and plastic bags after unpacking the appliance. Install...
Complete Owner's Guide (English)
Page 6
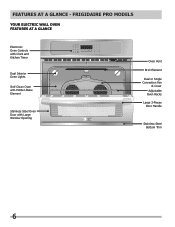
FRIGIDAIRE PRO MODELS Your Electric Wall Oven Features At A Glance Electronic Oven Controls with Clock and Kitchen Timer Dual Interior Oven Lights Self-Clean Oven with Hidden Bake Element Stainless Steel Oven Door with Large Window Opening Oven Vent Broil Element Dual or Single Convection Fan & Cover Adjustable Oven Racks Large 3-Pieces Door Handle Stainless Steel Bottom Trim 6 FEATURES AT A GLANCE -
FRIGIDAIRE PRO MODELS Your Electric Wall Oven Features At A Glance Electronic Oven Controls with Clock and Kitchen Timer Dual Interior Oven Lights Self-Clean Oven with Hidden Bake Element Stainless Steel Oven Door with Large Window Opening Oven Vent Broil Element Dual or Single Convection Fan & Cover Adjustable Oven Racks Large 3-Pieces Door Handle Stainless Steel Bottom Trim 6 FEATURES AT A GLANCE -
Complete Owner's Guide (English)
Page 7
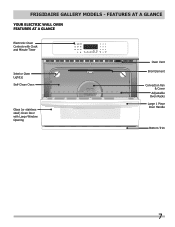
FRIGIDAIRE GALLERY MODELS - FEATURES AT A GLANCE Your Electric Wall Oven Features At A Glance Electronic Oven Controls with Clock and Minute Timer Interior Oven Light(s) Self-Clean Oven Glass (or stainless steel) Oven Door with Large Window Opening Oven Vent Broil Element Convection Fan & Cover Adjustable Oven Racks Large 1 Piece Door Handle Bottom Trim 7
FRIGIDAIRE GALLERY MODELS - FEATURES AT A GLANCE Your Electric Wall Oven Features At A Glance Electronic Oven Controls with Clock and Minute Timer Interior Oven Light(s) Self-Clean Oven Glass (or stainless steel) Oven Door with Large Window Opening Oven Vent Broil Element Convection Fan & Cover Adjustable Oven Racks Large 1 Piece Door Handle Bottom Trim 7
Complete Owner's Guide (English)
Page 8
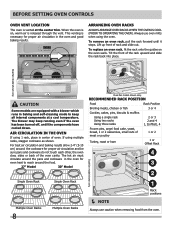
... internal components at the center trim. When the oven is on the oven walls. Arranging Oven Racks Always arrange oven racks when THE oven is cool (Prior to reach around the food. 27" Model 30" Model Dual fan model shown only. The hot air must circulate around the... ham 1 or Offset Rack 4 3 2 Single Oven Rack Multiple Oven Racks 8 Single Oven Rack Multiple Oven Racks 1 Rack positions NOTE Always use oven mitts when using 1 rack, place in the oven for even heat to operating the oven). To remove an oven rack, pull the rack forward until the components...
... internal components at the center trim. When the oven is on the oven walls. Arranging Oven Racks Always arrange oven racks when THE oven is cool (Prior to reach around the food. 27" Model 30" Model Dual fan model shown only. The hot air must circulate around the... ham 1 or Offset Rack 4 3 2 Single Oven Rack Multiple Oven Racks 8 Single Oven Rack Multiple Oven Racks 1 Rack positions NOTE Always use oven mitts when using 1 rack, place in the oven for even heat to operating the oven). To remove an oven rack, pull the rack forward until the components...

Complete Owner's Guide (English)
Page 9
... can be used for larger food items. The right half rack portion may cause burns. The Flat Oven Half Rack (some models). • Offset Oven Rack (Figure 4). To remove the insert, squeeze on the rack and oven side or rear walls. Make sure both insert front hooks snap into rack (See figure 6). Wait until the...
... can be used for larger food items. The right half rack portion may cause burns. The Flat Oven Half Rack (some models). • Offset Oven Rack (Figure 4). To remove the insert, squeeze on the rack and oven side or rear walls. Make sure both insert front hooks snap into rack (See figure 6). Wait until the...

Complete Owner's Guide (English)
Page 10
... familiar with the various features and functions of the baking time. 7 ADD A MINUTE PAD (some models) cooking features. 16 POWERPLUSTM or QUICK PREHEAT PAD-Use to quickly raise oven to cooking temperature. 17 KEEP WARM PAD-Use to keep the dishes and food warm until served. 18 START PAD.... 15 CONVECTION PAD-Use to select between the Convection Bake, Convection Roast and Convection Broil (some models)-Use to add a minute to the timer feature. 8 SET CLOCK PAD-Use to set or cancel the Timer. BEFORE Setting OVEN controls Control Pad Features READ THE INSTRUCTIONS CAREFULLY BEFORE USING THE...
... familiar with the various features and functions of the baking time. 7 ADD A MINUTE PAD (some models) cooking features. 16 POWERPLUSTM or QUICK PREHEAT PAD-Use to quickly raise oven to cooking temperature. 17 KEEP WARM PAD-Use to keep the dishes and food warm until served. 18 START PAD.... 15 CONVECTION PAD-Use to select between the Convection Bake, Convection Roast and Convection Broil (some models)-Use to add a minute to the timer feature. 8 SET CLOCK PAD-Use to set or cancel the Timer. BEFORE Setting OVEN controls Control Pad Features READ THE INSTRUCTIONS CAREFULLY BEFORE USING THE...

Complete Owner's Guide (English)
Page 13
... Add 1 Minute Feature (some models) The ADD 1 MINUTE pad is set the Add 1 Minute feature. Press and hold DELAY START. To change or press CANCEL to switch between normal sound operation and silent operation mode. Note: The control will always beep at the end of the other oven control functions. The time...
... Add 1 Minute Feature (some models) The ADD 1 MINUTE pad is set the Add 1 Minute feature. Press and hold DELAY START. To change or press CANCEL to switch between normal sound operation and silent operation mode. Note: The control will always beep at the end of the other oven control functions. The time...
Complete Owner's Guide (English)
Page 15
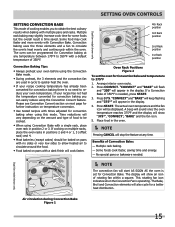
... and racks. Dual fan model shown only. 4th Rack position 3rd Rack position 2nd Rack position 1st Rack position Oven Rack Positions Figure 2 To set for Convection Bake. Arrange interior oven racks. 2. Benefits of 350°F is set the oven for Convection Bake and temperature... for convection baking when using Convection Bake with a single rack, place oven rack in the oven. NOTE Pressing CANCEL will vary depending on multiple racks, place the oven racks in cycle to quickly heat the oven. • If your oven before using the Convection Convert feature. Press 3 7...
... and racks. Dual fan model shown only. 4th Rack position 3rd Rack position 2nd Rack position 1st Rack position Oven Rack Positions Figure 2 To set for Convection Bake. Arrange interior oven racks. 2. Benefits of 350°F is set the oven for Convection Bake and temperature... for convection baking when using Convection Bake with a single rack, place oven rack in the oven. NOTE Pressing CANCEL will vary depending on multiple racks, place the oven racks in cycle to quickly heat the oven. • If your oven before using the Convection Convert feature. Press 3 7...
Complete Owner's Guide (English)
Page 17
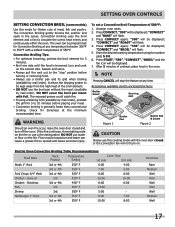
...broil element and a fan to spread and cause personal injury. Press CONVECT again; SETTING OVEN CONTROLS Setting Convection BROIL (some models) Use this cooking mode with the oven door closed and turn off the oven. Season and serve. • Always pull the rack out to 10 minutes before ...turning or removing food. • Always use this mode for doneness at any time. Electric Oven Convection Broiling Table...
...broil element and a fan to spread and cause personal injury. Press CONVECT again; SETTING OVEN CONTROLS Setting Convection BROIL (some models) Use this cooking mode with the oven door closed and turn off the oven. Season and serve. • Always pull the rack out to 10 minutes before ...turning or removing food. • Always use this mode for doneness at any time. Electric Oven Convection Broiling Table...

Complete Owner's Guide (English)
Page 20
...appear in the display. 4. To set Chicken Nuggets: 1. The fan icon and the actual oven temperature will appear in the display. The Chicken Nuggets pad is heard. 5. SETTING PIZZA (some models) The PIZZA pad has been designed to give optimum cooking performance when cooking your favorite chicken ...more information. Press PIZZA pad twice. Arrange interior oven racks and place food in the display. 4. Chicken Nuggets Tips: • For most type of the maximum cook time listed on the box and only use a single rack. • For a single rack, use rack position 2. • For ...
...appear in the display. 4. To set Chicken Nuggets: 1. The fan icon and the actual oven temperature will appear in the display. The Chicken Nuggets pad is heard. 5. SETTING PIZZA (some models) The PIZZA pad has been designed to give optimum cooking performance when cooking your favorite chicken ...more information. Press PIZZA pad twice. Arrange interior oven racks and place food in the display. 4. Chicken Nuggets Tips: • For most type of the maximum cook time listed on the box and only use a single rack. • For a single rack, use rack position 2. • For ...

Complete Owner's Guide (English)
Page 21
... the display. 4. Note: If no cooking mode has been set to turn ON automatically after cooking has finished. SETTING MY FAVORITE (some models) The My Favorite setting allow hot air to escape and the food to cool. • Aluminum foil may need higher temperature settings compared... to food in the display. The default temperature will appear in operation and no pad is best for keeping oven baked foods warm for 30 minutes): 1. Enter temperature needed ; 3 0. 6. Press the MY FAVORITE pad to delete for serving up to 3 hours after a BAKE...
... the display. 4. Note: If no cooking mode has been set to turn ON automatically after cooking has finished. SETTING MY FAVORITE (some models) The My Favorite setting allow hot air to escape and the food to cool. • Aluminum foil may need higher temperature settings compared... to food in the display. The default temperature will appear in operation and no pad is best for keeping oven baked foods warm for 30 minutes): 1. Enter temperature needed ; 3 0. 6. Press the MY FAVORITE pad to delete for serving up to 3 hours after a BAKE...
Complete Owner's Guide (English)
Page 22
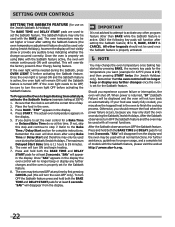
...by pressing BAKE, the numeric key pads for the temperature you experience a power failure or interruption, the oven will appear in the display. 4. The oven may be set with the correct time of models with the BAKE pad. If your food was nearly fully cooked, you desire to finish the cooking ...process. Press and hold both the BAKE TIME and DELAY pads for the Sabbath feature. The actual oven temperature appears in the oven. 3. If you may only ...
...by pressing BAKE, the numeric key pads for the temperature you experience a power failure or interruption, the oven will appear in the display. 4. The oven may be set with the correct time of models with the BAKE pad. If your food was nearly fully cooked, you desire to finish the cooking ...process. Press and hold both the BAKE TIME and DELAY pads for the Sabbath feature. The actual oven temperature appears in the oven. 3. If you may only ...
Complete Owner's Guide (English)
Page 26
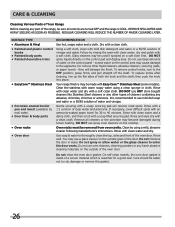
... - DO NOT use large amounts of water on the outside of the oven door. Do not immerse the door in water. On self-clean models, the oven door gasket is made with Easy Care™ Stainless Steel (some models). Regular cleaning will remove most spots. DO NOT spray liquids directly on.... Glass cleaners may cause damage to rub, damage or remove this gasket. 26 It is essential for 30 to thoroughly clean the top, sides and front of the oven door. Clean by rinsing the area with warm soapy water using a mild, abrasive cleaner following manufacturer's instructions. Dry with ...
... - DO NOT use large amounts of water on the outside of the oven door. Do not immerse the door in water. On self-clean models, the oven door gasket is made with Easy Care™ Stainless Steel (some models). Regular cleaning will remove most spots. DO NOT spray liquids directly on.... Glass cleaners may cause damage to rub, damage or remove this gasket. 26 It is essential for 30 to thoroughly clean the top, sides and front of the oven door. Clean by rinsing the area with warm soapy water using a mild, abrasive cleaner following manufacturer's instructions. Dry with ...


