Installation Instructions (All Languages)
Page 1
... this or any other appliance. From Cutout Opening 24" Min. (61 cm) Min. páginas 11-20 Français - CUTOUT WIDTH*** (Countertop and cabinet) 30±1/16" (76,2±0,15 cm) F. with backguard G. 30" ELECTRIC SLIDE-IN RANGE INSTALLATION INSTRUCTIONS United States INSTALLATION AND SERVICE MUST BE PERFORMED BY A QUALIFIED...
... this or any other appliance. From Cutout Opening 24" Min. (61 cm) Min. páginas 11-20 Français - CUTOUT WIDTH*** (Countertop and cabinet) 30±1/16" (76,2±0,15 cm) F. with backguard G. 30" ELECTRIC SLIDE-IN RANGE INSTALLATION INSTRUCTIONS United States INSTALLATION AND SERVICE MUST BE PERFORMED BY A QUALIFIED...

Installation Instructions (All Languages)
Page 2
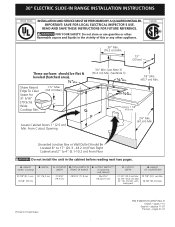
...Note 4) 1 1/8" (2,86 cm) E FRONT OF CABINET F Ref. WIDTH 30" (76,2 cm) C. IMPORTANT: Cabinet and countertop width should match the cutout width. TOTAL DEPTH TO FRONT OF RANGE 28 5/16" (71,9 cm) E. Do not seal the range to the side cabinets. 3. 24" (61 cm) minimum clearance between the... in the counter and then level. HEIGHT OF COUNTERTOP 35 7/8" (91,1 cm) Min. 36 5/8" (93 cm) Max. 2 30" ELECTRIC SLIDE-IN RANGE INSTALLATION INSTRUCTIONS NOTES: 1. Do not pinch the power supply cord or the flexible gas conduit between the cooktop and the bottom of the cabinet when...
...Note 4) 1 1/8" (2,86 cm) E FRONT OF CABINET F Ref. WIDTH 30" (76,2 cm) C. IMPORTANT: Cabinet and countertop width should match the cutout width. TOTAL DEPTH TO FRONT OF RANGE 28 5/16" (71,9 cm) E. Do not seal the range to the side cabinets. 3. 24" (61 cm) minimum clearance between the... in the counter and then level. HEIGHT OF COUNTERTOP 35 7/8" (91,1 cm) Min. 36 5/8" (93 cm) Max. 2 30" ELECTRIC SLIDE-IN RANGE INSTALLATION INSTRUCTIONS NOTES: 1. Do not pinch the power supply cord or the flexible gas conduit between the cooktop and the bottom of the cabinet when...
Installation Instructions (All Languages)
Page 3
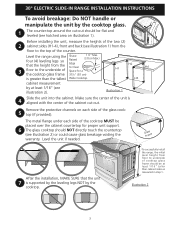
... cooktop. Remove the protective channels on each side of cooktop glass frame should be flat and leveled (see illustration 2). 30" ELECTRIC SLIDE-IN RANGE INSTALLATION INSTRUCTIONS To avoid breakage: Do NOT handle or manipulate the unit by the cooktop glass. 1 The counter-top around the cut ...-out. Level the range using the Shave four (4) leveling legs so Raised 1 ½" Max. (3.8 cm Max.) that the unit 7 is ...
... cooktop. Remove the protective channels on each side of cooktop glass frame should be flat and leveled (see illustration 2). 30" ELECTRIC SLIDE-IN RANGE INSTALLATION INSTRUCTIONS To avoid breakage: Do NOT handle or manipulate the unit by the cooktop glass. 1 The counter-top around the cut ...-out. Level the range using the Shave four (4) leveling legs so Raised 1 ½" Max. (3.8 cm Max.) that the unit 7 is ...

Installation Instructions (All Languages)
Page 4
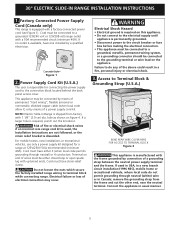
.... FOR MODELS WITH SELF-CLEAN FEATURE: • Remove oven racks, broiler pan, food and other synthetic floor covering, make sure the range is to the range. 3. The serial plate is unattended. 30" ELECTRIC SLIDE-IN RANGE INSTALLATION INSTRUCTIONS Important Notes to the appliance. • Be sure your Owner's Guide for at least 90°F (32.2°C) above room...
.... FOR MODELS WITH SELF-CLEAN FEATURE: • Remove oven racks, broiler pan, food and other synthetic floor covering, make sure the range is to the range. 3. The serial plate is unattended. 30" ELECTRIC SLIDE-IN RANGE INSTALLATION INSTRUCTIONS Important Notes to the appliance. • Be sure your Owner's Guide for at least 90°F (32.2°C) above room...
Installation Instructions (All Languages)
Page 5
... through neutral (white) wire or in usual manner. 5 30" ELECTRIC SLIDE-IN RANGE INSTALLATION INSTRUCTIONS 1. Factory Connected Power Supply Cord (Canada only) This range is manufactured with 1 1/8" (2.9 cm) dia. Terminal on figure 4. Cord must be connected to terminal block while connecting range. Electrical failure or loss of wires must have one installed by means of the above could result in...
... through neutral (white) wire or in usual manner. 5 30" ELECTRIC SLIDE-IN RANGE INSTALLATION INSTRUCTIONS 1. Factory Connected Power Supply Cord (Canada only) This range is manufactured with 1 1/8" (2.9 cm) dia. Terminal on figure 4. Cord must be connected to terminal block while connecting range. Electrical failure or loss of wires must have one installed by means of the above could result in...
Installation Instructions (All Languages)
Page 6
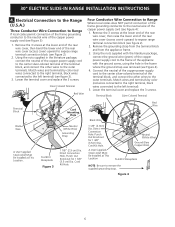
Electrical Connection to the Range (U.S.A.) Three Conductor Wire Connection to Range If local codes permit connection of the frame grounding conductor to the neutral wire of the rear wire cover (access cover) upward to expose range terminal connection block (see Figure 4): 1. Using the nuts supplied ...) Ground (Bare Copper Wire) To 240 V Receptacle NOTE: Be sure to the outer terminals. Direct Connection Hole. 30" ELECTRIC SLIDE-IN RANGE INSTALLATION INSTRUCTIONS 4. Connect the neutral of the copper power supply cord to the center silver-colored terminal of the terminal block, and...
Electrical Connection to the Range (U.S.A.) Three Conductor Wire Connection to Range If local codes permit connection of the frame grounding conductor to the neutral wire of the rear wire cover (access cover) upward to expose range terminal connection block (see Figure 4): 1. Using the nuts supplied ...) Ground (Bare Copper Wire) To 240 V Receptacle NOTE: Be sure to the outer terminals. Direct Connection Hole. 30" ELECTRIC SLIDE-IN RANGE INSTALLATION INSTRUCTIONS 4. Connect the neutral of the copper power supply cord to the center silver-colored terminal of the terminal block, and...
Installation Instructions (All Languages)
Page 7
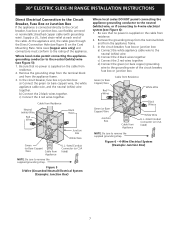
30" ELECTRIC SLIDE-IN RANGE INSTALLATION INSTRUCTIONS Direct Electrical Connection to the Circuit Breaker, Fuse Box or Junction Box If the appliance is supplied on the cable from residence. 2. Cable from Residence Neutral (white) ... each end of the appliance. b) Connect the 2 black wires together. d) Connect the green (or bare copper) grounding wire to the neutral (white) wire. Figure 6 - 4-Wire Electrical System (Example: Junction Box) 7 Where local codes permit connecting the appliancegrounding conductor to the rating of the cable. In the circuit breaker, fuse box or...
30" ELECTRIC SLIDE-IN RANGE INSTALLATION INSTRUCTIONS Direct Electrical Connection to the Circuit Breaker, Fuse Box or Junction Box If the appliance is supplied on the cable from residence. 2. Cable from Residence Neutral (white) ... each end of the appliance. b) Connect the 2 black wires together. d) Connect the green (or bare copper) grounding wire to the neutral (white) wire. Figure 6 - 4-Wire Electrical System (Example: Junction Box) 7 Where local codes permit connecting the appliancegrounding conductor to the rating of the cable. In the circuit breaker, fuse box or...
Installation Instructions (All Languages)
Page 8
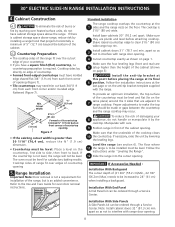
... Countertop Preparation • The cooktop sides of the range fit over edges of the range, but is required. Proper adjustments to make the top flat should be increased to back. 30" ELECTRIC SLIDE-IN RANGE INSTALLATION INSTRUCTIONS 4. apart so as shown on the anti-tip ...bracket template supplied with range door opening . IMPORTANT If Accessories Needed : Installation With Backguard The cutout depth of the countertop must be level. Follow the installation instructions at front...
... Countertop Preparation • The cooktop sides of the range fit over edges of the range, but is required. Proper adjustments to make the top flat should be increased to back. 30" ELECTRIC SLIDE-IN RANGE INSTALLATION INSTRUCTIONS 4. apart so as shown on the anti-tip ...bracket template supplied with range door opening . IMPORTANT If Accessories Needed : Installation With Backguard The cutout depth of the countertop must be level. Follow the installation instructions at front...

Installation Instructions (All Languages)
Page 9
... serial plate is opened during the preheat portion of the functions has been factory checked before installation in one direction and then the other. Check Operation Refer to order parts. 2. 30" ELECTRIC SLIDE-IN RANGE INSTALLATION INSTRUCTIONS 6. Leveling the Range Level the range and set to 350°F (177°C) for Service Read the Before you call or write...
... serial plate is opened during the preheat portion of the functions has been factory checked before installation in one direction and then the other. Check Operation Refer to order parts. 2. 30" ELECTRIC SLIDE-IN RANGE INSTALLATION INSTRUCTIONS 6. Leveling the Range Level the range and set to 350°F (177°C) for Service Read the Before you call or write...
Installation Instructions (All Languages)
Page 10
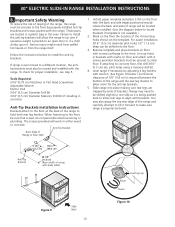
...first drill 3/16" (0.5 cm) dia. For easier installation, 3/16" (0.5 cm) diameter pilot holes 1/2" (1.3 cm) deep can be sure that screws do not penetrate electrical wiring or plumbing. 30" ELECTRIC SLIDE-IN RANGE INSTALLATION INSTRUCTIONS 8. When fastening to tip over if excessive weight ...is properly anchored. Brackets must be moved and installed with 4 screws provided. If attaching to solid floor. ...
...first drill 3/16" (0.5 cm) dia. For easier installation, 3/16" (0.5 cm) diameter pilot holes 1/2" (1.3 cm) deep can be sure that screws do not penetrate electrical wiring or plumbing. 30" ELECTRIC SLIDE-IN RANGE INSTALLATION INSTRUCTIONS 8. When fastening to tip over if excessive weight ...is properly anchored. Brackets must be moved and installed with 4 screws provided. If attaching to solid floor. ...
Complete Owner's Guide (English)
Page 2
... cover every possible condition and situation that may occur. Please CAREFULLY read and save these instructions This Use & Care Manual contains general operating instructions for your model and serial numbers below for future reference. The graphics shown are not ...for choosing our product. These instructions are representative. Model Number: Serial Number: Purchase Date: © 2009 Electrolux Canada Corp. Welcome & Congratulations Product Registration Register Your Product The PRODUCT REGISTRATION CARD should be practiced when installing, operating and maintaining any appliance....
... cover every possible condition and situation that may occur. Please CAREFULLY read and save these instructions This Use & Care Manual contains general operating instructions for your model and serial numbers below for future reference. The graphics shown are not ...for choosing our product. These instructions are representative. Model Number: Serial Number: Purchase Date: © 2009 Electrolux Canada Corp. Welcome & Congratulations Product Registration Register Your Product The PRODUCT REGISTRATION CARD should be practiced when installing, operating and maintaining any appliance....

Complete Owner's Guide (English)
Page 3
... symbol to the Installation Instructions for storage. • Storage in serious burns or other injury. Refer to avoid possible injury or death. Destroy the carton and plastic bags after unpacking the appliance. Know how to disconnect the electrical power to recommend ... package for future reference. Install only per installation instructions provided in the cabinets above the appliance. Do not store explosives, such as flammable liquids. Important Safety Instructions Read all tape and packaging wrap before using the appliance. Save these instructions for this range.
... symbol to the Installation Instructions for storage. • Storage in serious burns or other injury. Refer to avoid possible injury or death. Destroy the carton and plastic bags after unpacking the appliance. Know how to disconnect the electrical power to recommend ... package for future reference. Install only per installation instructions provided in the cabinets above the appliance. Do not store explosives, such as flammable liquids. Important Safety Instructions Read all tape and packaging wrap before using the appliance. Save these instructions for this range.
Complete Owner's Guide (English)
Page 18
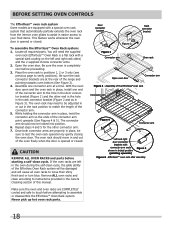
...this manual. Place the oven rack in positions 1, 2 or 3 only (see previous page to instructions provided in the Care & Cleaning section of the Effortless Oven Rack system will be adjusted in or ...arm point upwards (See Figures 4 & 5). The connector arm should move in and out of the range and pointing towards oven bottom (See Figure 2). 4. CAUTION REMOVE ALL OVEN RACKS and parts before attempting... will cause all required parts. With the oven door open and the oven rack in place, install one connector arm at the rear of the oven freely when the door is completely cool before proceeding...
...this manual. Place the oven rack in positions 1, 2 or 3 only (see previous page to instructions provided in the Care & Cleaning section of the Effortless Oven Rack system will be adjusted in or ...arm point upwards (See Figures 4 & 5). The connector arm should move in and out of the range and pointing towards oven bottom (See Figure 2). 4. CAUTION REMOVE ALL OVEN RACKS and parts before attempting... will cause all required parts. With the oven door open and the oven rack in place, install one connector arm at the rear of the oven freely when the door is completely cool before proceeding...
Complete Owner's Guide (English)
Page 41
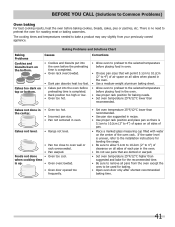
... rack overcrowded. • Dark pan absorbs heat too fast. • Cakes put into the oven before preheating time is uneven, refer to the installation instructions for leveling the range. • Be sure to allow 5.1cm to 10.2cm (2" to 4") of clearance on all sides of each pan in the oven. •...you call (Solutions to oven wall or rack overcrowded. • Pan warped. Foods not done • Oven too cool. Cakes not level. • Range not level. • Pan too close to Common Problems) Oven baking For best cooking results, heat the oven before baking cookies, breads, cakes, pies or...
... rack overcrowded. • Dark pan absorbs heat too fast. • Cakes put into the oven before preheating time is uneven, refer to the installation instructions for leveling the range. • Be sure to allow 5.1cm to 10.2cm (2" to 4") of clearance on all sides of each pan in the oven. •...you call (Solutions to oven wall or rack overcrowded. • Pan warped. Foods not done • Oven too cool. Cakes not level. • Range not level. • Pan too close to Common Problems) Oven baking For best cooking results, heat the oven before baking cookies, breads, cakes, pies or...
Complete Owner's Guide (English)
Page 44
...are not covered by unauthorized service companies; Some states and provinces do not involve malfunction or defects in accordance with the provided instructions. USA 1.800.944.9044 Electrolux Major Appliances North America P.O. Product that have other appropriate payment record to any obligations under ...ordinary household use your receipt, delivery slip, or some other rights that prove to be product repair or replacement as -is installed, used in the USA and Canada. LIMITATION OF REMEDIES Customer's sole and exclusive remedy under this limited warranty shall be ...
...are not covered by unauthorized service companies; Some states and provinces do not involve malfunction or defects in accordance with the provided instructions. USA 1.800.944.9044 Electrolux Major Appliances North America P.O. Product that have other appropriate payment record to any obligations under ...ordinary household use your receipt, delivery slip, or some other rights that prove to be product repair or replacement as -is installed, used in the USA and Canada. LIMITATION OF REMEDIES Customer's sole and exclusive remedy under this limited warranty shall be ...
Product Specifications Sheet (English)
Page 2
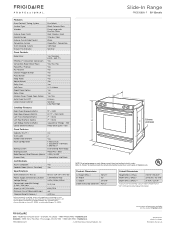
... Range FPES3085K F 30" Electric Features Oven Control / Timing System Surface Type Window Exterior Door Finish Handle Design Exterior Finish (Side Panels) Convection System Oven Cleaning System Drawer Functionality Pro-Select® Black Ceramic Glass Slide-In Electric Ranges Extra-Large with optional backguard installed. Always consult local and national electric codes. Accessories information available on the web at frigidaire...
... Range FPES3085K F 30" Electric Features Oven Control / Timing System Surface Type Window Exterior Door Finish Handle Design Exterior Finish (Side Panels) Convection System Oven Cleaning System Drawer Functionality Pro-Select® Black Ceramic Glass Slide-In Electric Ranges Extra-Large with optional backguard installed. Always consult local and national electric codes. Accessories information available on the web at frigidaire...
Product Specifications Sheet (English)
Page 3
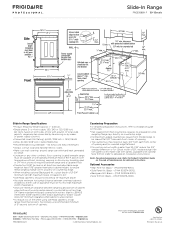
... with smaller side trim panels, available with optional Side Trim Kit (refer to change. Accessories information available on the web at frigidaire.com Specifications subject to detailed kit installation instructions). 30" Electric Slide-In Range Professional Slide-In Range FPES3085K F 30" Electric Slide-In Range Specifications • Product Shipping Weight (approx.) - 240 Lbs. • Single phase 3- Insulating pad or 1/4"-thick plywood required between...
... with smaller side trim panels, available with optional Side Trim Kit (refer to change. Accessories information available on the web at frigidaire.com Specifications subject to detailed kit installation instructions). 30" Electric Slide-In Range Professional Slide-In Range FPES3085K F 30" Electric Slide-In Range Specifications • Product Shipping Weight (approx.) - 240 Lbs. • Single phase 3- Insulating pad or 1/4"-thick plywood required between...
Product Specifications Sheet (English)
Page 4
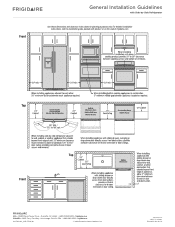
... installation instructions, refer to change. Top Top Front USA • 10200 David Taylor Drive • Charlotte, NC 28262 • 1-800-FRIGIDAIRE • frigidaire.com CANADA • 5855 Terry Fox Way • Mississauga, ON L5V 3E4 • 1-800-265-8352 • frigidaire.ca INSTGDLNS_SSR FR 10/10 © 2010 Electrolux Home Products, Inc. Specifications subject to installation...
... installation instructions, refer to change. Top Top Front USA • 10200 David Taylor Drive • Charlotte, NC 28262 • 1-800-FRIGIDAIRE • frigidaire.com CANADA • 5855 Terry Fox Way • Mississauga, ON L5V 3E4 • 1-800-265-8352 • frigidaire.ca INSTGDLNS_SSR FR 10/10 © 2010 Electrolux Home Products, Inc. Specifications subject to installation...
Product Specifications Sheet (English)
Page 5
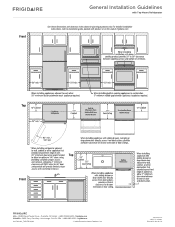
For detailed installation instructions, refer to change. Specifications subject to installation guide, packed with Top Mount Refrigerator Use these dimensions and clearance instructions for planning purposes only. Printed in the U.S.A. Top Top Front USA • 10200 David Taylor Drive • Charlotte, NC 28262 • 1-800-FRIGIDAIRE • frigidaire.com CANADA • 5855 Terry Fox Way • Mississauga...
For detailed installation instructions, refer to change. Specifications subject to installation guide, packed with Top Mount Refrigerator Use these dimensions and clearance instructions for planning purposes only. Printed in the U.S.A. Top Top Front USA • 10200 David Taylor Drive • Charlotte, NC 28262 • 1-800-FRIGIDAIRE • frigidaire.com CANADA • 5855 Terry Fox Way • Mississauga...

Parts Catalog
Page 1
... Home Products, Inc. All rights reserved. FPES3085KFB 37957376L95S2 Series 30" slide-in Color stainless Market North America Wiring Diagram 318550103 Owner's Guide 318205803 Installation Instructions 318201616 Service Data Sheet 318127057 30-INCH SLIDE-IN FPES3085KF.jpg CFPES3085KFA.eps BFPES3085KFB.eps DFPGS3085KFA.eps 318550103-1.eps 318550103-2.eps TFPES3085KFB.epsELECTRIC RANGE Electrolux Major Appliances North & Latin America P.O. Product No. BOX...
... Home Products, Inc. All rights reserved. FPES3085KFB 37957376L95S2 Series 30" slide-in Color stainless Market North America Wiring Diagram 318550103 Owner's Guide 318205803 Installation Instructions 318201616 Service Data Sheet 318127057 30-INCH SLIDE-IN FPES3085KF.jpg CFPES3085KFA.eps BFPES3085KFB.eps DFPGS3085KFA.eps 318550103-1.eps 318550103-2.eps TFPES3085KFB.epsELECTRIC RANGE Electrolux Major Appliances North & Latin America P.O. Product No. BOX...


