Installation Instructions
Page 11
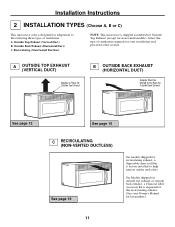
Recirculating (Non-Vented Ductless) NOTE: This microwave is factory installed to help remove smoke and odors. A OUTSIDE TOP EXHAUST (VERTICAL DUCT) Adaptor ...Outside Back Exhaust (Horizontal Duct) C. Select the type of ventilation: A. Installation Instructions 2 INSTALLATION TYPES (Choose A, B or C) This microwave oven is required for the recirculating exhaust. (See your installation and proceed to the Back for Outside Back Exhaust See page 12 See page ... is designed for adaptation to the following three types of ventilation required for your Owner's Manual for kit number.) 11
Recirculating (Non-Vented Ductless) NOTE: This microwave is factory installed to help remove smoke and odors. A OUTSIDE TOP EXHAUST (VERTICAL DUCT) Adaptor ...Outside Back Exhaust (Horizontal Duct) C. Select the type of ventilation: A. Installation Instructions 2 INSTALLATION TYPES (Choose A, B or C) This microwave oven is required for the recirculating exhaust. (See your installation and proceed to the Back for Outside Back Exhaust See page 12 See page ... is designed for adaptation to the following three types of ventilation required for your Owner's Manual for kit number.) 11
Installation Instructions
Page 14
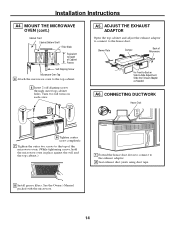
... top cabinet holes. CONNECTING DUCTWORK House Duct 6 Tighten center screw completely. 7 Tighten the outer two screws to the top of Microwave For Front-to-Back or Side-to the exhaust adaptor. 2 Seal exhaust duct joints using duct tape. 8 Install grease filters. A5. See... the Owner's Manual packed with the microwave. 14 Installation Instructions A4. Blower Plate Damper Back of the microwave oven. (While tightening screws, hold the microwave oven in place against the wall and the top cabinet.) 1 Extend the house ...
... top cabinet holes. CONNECTING DUCTWORK House Duct 6 Tighten center screw completely. 7 Tighten the outer two screws to the top of Microwave For Front-to-Back or Side-to the exhaust adaptor. 2 Seal exhaust duct joints using duct tape. 8 Install grease filters. A5. See... the Owner's Manual packed with the microwave. 14 Installation Instructions A4. Blower Plate Damper Back of the microwave oven. (While tightening screws, hold the microwave oven in place against the wall and the top cabinet.) 1 Extend the house ...
Installation Instructions
Page 18
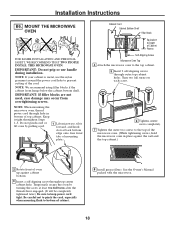
... damage may occur from overtightening screws. Be careful not to pinch the cord, especially when mounting flush to the top of the microwave oven. (While tightening screws, hold the microwave oven in bottom of top cabinet. NOTE: If your cabinet is metal, use handle during installation. Keep it forward, and hook slots... screw through outer top cabinet holes. NOTE: We recommend using filler blocks if the cabinet front hangs below the cabinet bottom shelf. See the Owner's Manual packed with the microwave. 18
... damage may occur from overtightening screws. Be careful not to pinch the cord, especially when mounting flush to the top of the microwave oven. (While tightening screws, hold the microwave oven in bottom of top cabinet. NOTE: If your cabinet is metal, use handle during installation. Keep it forward, and hook slots... screw through outer top cabinet holes. NOTE: We recommend using filler blocks if the cabinet front hangs below the cabinet bottom shelf. See the Owner's Manual packed with the microwave. 18
Installation Instructions
Page 22
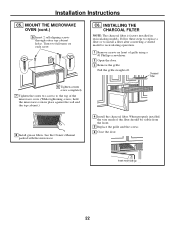
...factory installed in place against the wall and the top cabinet.) 8 Install grease filters. Installation Instructions C5. See the Owner's Manual packed with the microwave. 4 Install the charcoal filter. When properly installed, the wire mesh of grille using a #1 Phillips screwdriver. 2 Open the... to replace a filter or to install a filter after converting a vented model to the top of the microwave oven. (While tightening screws, hold the microwave oven in recirculating models. Charcoal Filter 6 Tighten center screw completely. 7 Tighten the outer two screws to recirculating...
...factory installed in place against the wall and the top cabinet.) 8 Install grease filters. Installation Instructions C5. See the Owner's Manual packed with the microwave. 4 Install the charcoal filter. When properly installed, the wire mesh of grille using a #1 Phillips screwdriver. 2 Open the... to replace a filter or to install a filter after converting a vented model to the top of the microwave oven. (While tightening screws, hold the microwave oven in recirculating models. Charcoal Filter 6 Tighten center screw completely. 7 Tighten the outer two screws to recirculating...

Installation Instructions
Page 23
Replace house fuse or turn breaker back on. 7. Installation Instructions BEFORE YOU USE YOUR MICROWAVE 1. Plug power cord into a dedicated 15- ININSSTTARLULCATTIIOONNS 5. Ensure proper ground exists before use 23 ININSSTTARLULCATTIIOONNS 6. Read the Owner's Manual. KEEP INSTALLATION INSTRUCTIONS FOR THE LOCAL INSPECTOR'S USE. Install turntable and ring in cavity. 4. OMWANNEURA'SL 2. to instructions. Make sure the microwave oven has been installed according to 20-amp electrical outlet. Remove all packing material from the microwave oven. 3.
Replace house fuse or turn breaker back on. 7. Installation Instructions BEFORE YOU USE YOUR MICROWAVE 1. Plug power cord into a dedicated 15- ININSSTTARLULCATTIIOONNS 5. Ensure proper ground exists before use 23 ININSSTTARLULCATTIIOONNS 6. Read the Owner's Manual. KEEP INSTALLATION INSTRUCTIONS FOR THE LOCAL INSPECTOR'S USE. Install turntable and ring in cavity. 4. OMWANNEURA'SL 2. to instructions. Make sure the microwave oven has been installed according to 20-amp electrical outlet. Remove all packing material from the microwave oven. 3.


