
Installation Instructions
Page 2
... C Recirculating 19-22 Attach Mounting Plate to Wall 19 Preparation of Top Cabinet 19 Check Microwave Assembly 20 Adapting Microwave Blower for Recirculation 20, 21 Mount the Microwave Oven ..........21, 22 Installing the Charcoal Filter 22 Before You Use Your Microwave 23 2 Installation Instructions CONTENTS General information Important Safety Instructions 3 Electrical Requirements 3 Hood Exhaust 4, 5 Damage...
... C Recirculating 19-22 Attach Mounting Plate to Wall 19 Preparation of Top Cabinet 19 Check Microwave Assembly 20 Adapting Microwave Blower for Recirculation 20, 21 Mount the Microwave Oven ..........21, 22 Installing the Charcoal Filter 22 Before You Use Your Microwave 23 2 Installation Instructions CONTENTS General information Important Safety Instructions 3 Electrical Requirements 3 Hood Exhaust 4, 5 Damage...
Installation Instructions
Page 6
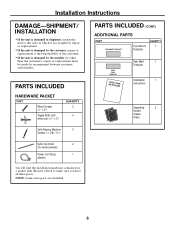
... 2 4 PARTS INCLUDED (CONT.) ADDITIONAL PARTS PART TOP CABINET TEMPLATE Top Cabinet Template QUANTITY 1 REAR WALL TEMPLATE ININSSTTRAULCLTAITOIONNS Rear Wall 1 Template Installation 1 Instructions Separately 2 Packed Grease Filters Self-Aligning Machine 3 Screws (1⁄4"-28 x 31⁄4") Nylon Grommet 2 (for metal cabinets) Power Cord Strap 1 (plastic) You will find the installation hardware contained in...
... 2 4 PARTS INCLUDED (CONT.) ADDITIONAL PARTS PART TOP CABINET TEMPLATE Top Cabinet Template QUANTITY 1 REAR WALL TEMPLATE ININSSTTRAULCLTAITOIONNS Rear Wall 1 Template Installation 1 Instructions Separately 2 Packed Grease Filters Self-Aligning Machine 3 Screws (1⁄4"-28 x 31⁄4") Nylon Grommet 2 (for metal cabinets) Power Cord Strap 1 (plastic) You will find the installation hardware contained in...
Installation Instructions
Page 8
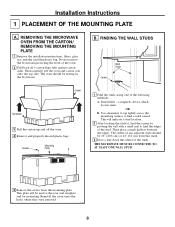
a magnetic device which locates nails. THE MICROWAVE MUST BE CONNECTED TO AT LEAST ONE WALL STUD. 5 Remove the screws from this mark. 3 Draw a line down the center of the studs. FINDING THE ... wall with a small nail to find the edges of any adjacent studs should be used as the rear wall template and for mounting. REMOVING THE MICROWAVE OVEN FROM THE CARTON/ REMOVING THE MOUNTING PLATE 1 Remove the installation instructions, filters, glass tray and the small hardware bag.
a magnetic device which locates nails. THE MICROWAVE MUST BE CONNECTED TO AT LEAST ONE WALL STUD. 5 Remove the screws from this mark. 3 Draw a line down the center of the studs. FINDING THE ... wall with a small nail to find the edges of any adjacent studs should be used as the rear wall template and for mounting. REMOVING THE MICROWAVE OVEN FROM THE CARTON/ REMOVING THE MOUNTING PLATE 1 Remove the installation instructions, filters, glass tray and the small hardware bag.
Installation Instructions
Page 11
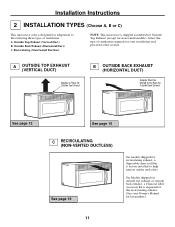
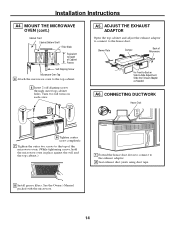
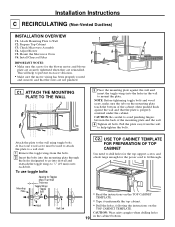
...ventilation required for your Owner's Manual for kit number.) 11 Select the type of ventilation: A. Recirculating (Non-Vented Ductless) NOTE: This microwave is factory installed to that section. A OUTSIDE TOP EXHAUST (VERTICAL DUCT) Adaptor in Place for Outside Top Exhaust B OUTSIDE BACK EXHAUST... 12 See page 15 C RECIRCULATING (NON-VENTED DUCTLESS) See page 19 On models shipped for recirculating exhaust, a disposable charcoal filter is shipped assembled for Outside Top Exhaust (except for the recirculating exhaust. (See your installation and proceed to help remove smoke ...
...ventilation required for your Owner's Manual for kit number.) 11 Select the type of ventilation: A. Recirculating (Non-Vented Ductless) NOTE: This microwave is factory installed to that section. A OUTSIDE TOP EXHAUST (VERTICAL DUCT) Adaptor in Place for Outside Top Exhaust B OUTSIDE BACK EXHAUST... 12 See page 15 C RECIRCULATING (NON-VENTED DUCTLESS) See page 19 On models shipped for recirculating exhaust, a disposable charcoal filter is shipped assembled for Outside Top Exhaust (except for the recirculating exhaust. (See your installation and proceed to help remove smoke ...
Installation Instructions
Page 14
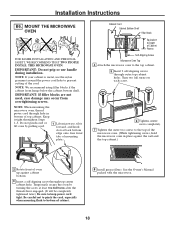
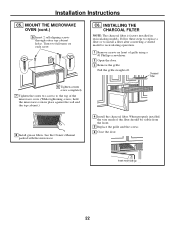
... to the exhaust adaptor. 2 Seal exhaust duct joints using duct tape. 8 Install grease filters. See the Owner's Manual packed with the microwave. 14 MOUNT THE MICROWAVE OVEN (cont.) Cabinet Front Cabinet Bottom Shelf Filler Block Equivalent to Depth of Microwave For Front-to-Back or Side-to the top cabinet. 5 Insert 2 self-aligning screws...
... to the exhaust adaptor. 2 Seal exhaust duct joints using duct tape. 8 Install grease filters. See the Owner's Manual packed with the microwave. 14 MOUNT THE MICROWAVE OVEN (cont.) Cabinet Front Cabinet Bottom Shelf Filler Block Equivalent to Depth of Microwave For Front-to-Back or Side-to the top cabinet. 5 Insert 2 self-aligning screws...
Installation Instructions
Page 18
... cutting of cabinet. 8 Install grease filters. Turn two full turns on each screw. 6 Tighten center screw completely. 7 Tighten the outer two screws to the top of the microwave oven. (While tightening screws, hold the microwave oven in bottom of Cabinet Recess Self-Aligning Screw Microwave Oven Top 4 Attach the microwave oven to Depth of top...
... cutting of cabinet. 8 Install grease filters. Turn two full turns on each screw. 6 Tighten center screw completely. 7 Tighten the outer two screws to the top of the microwave oven. (While tightening screws, hold the microwave oven in bottom of Cabinet Recess Self-Aligning Screw Microwave Oven Top 4 Attach the microwave oven to Depth of top...
Installation Instructions
Page 19
Mount the Microwave Oven C6. Check Microwave Assembly C4. At least one wood screw must be used to attach the plate to a wall stud. 1 Remove the toggle wings from the wall to ...; Drill the holes, following the instructions on the mounting plate touch the bottom of the mounting plate and the wall. 4 Tighten all bolts. Install Charcoal Filter IMPORTANT NOTES: • Make sure the screws for Toggles More Than Wall Thickness Toggle Wings Toggle Bolt Wall Bolt End C2. CAUTION: Be careful to...
Mount the Microwave Oven C6. Check Microwave Assembly C4. At least one wood screw must be used to attach the plate to a wall stud. 1 Remove the toggle wings from the wall to ...; Drill the holes, following the instructions on the mounting plate touch the bottom of the mounting plate and the wall. 4 Tighten all bolts. Install Charcoal Filter IMPORTANT NOTES: • Make sure the screws for Toggles More Than Wall Thickness Toggle Wings Toggle Bolt Wall Bolt End C2. CAUTION: Be careful to...
Installation Instructions
Page 22
... in recirculating models. Insert mesh-side up 22 MOUNT THE MICROWAVE OVEN (cont.) 5 Insert 2 self-aligning screws through outer top cabinet holes. C6. Pull the grille straight off. Installation Instructions C5. Charcoal Filter 6 Tighten center screw completely. 7 Tighten the outer two screws to recirculating operation. 1 Remove screws on each screw. INSTALLING THE...
... in recirculating models. Insert mesh-side up 22 MOUNT THE MICROWAVE OVEN (cont.) 5 Insert 2 self-aligning screws through outer top cabinet holes. C6. Pull the grille straight off. Installation Instructions C5. Charcoal Filter 6 Tighten center screw completely. 7 Tighten the outer two screws to recirculating operation. 1 Remove screws on each screw. INSTALLING THE...


