User Manual
Page 2
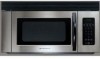
...This Use & Care Manual provides specific operating instructions for several models. Model Number: Serial Number: Purchase Date: © 2007 Electrolux Home Products, Inc. Be sure to record your product. Your microwave may not look exactly like those shown. The self-addressed ...microwave may not have all the described features. Please record your new microwave and Thank You for future purchases. Welcome & Congratulations Product Registration Be sure to register your model and serial number. We know you'll enjoy your model and serial number and date of the microwave oven...
...This Use & Care Manual provides specific operating instructions for several models. Model Number: Serial Number: Purchase Date: © 2007 Electrolux Home Products, Inc. Be sure to record your product. Your microwave may not look exactly like those shown. The self-addressed ...microwave may not have all the described features. Please record your new microwave and Thank You for future purchases. Welcome & Congratulations Product Registration Be sure to register your model and serial number. We know you'll enjoy your model and serial number and date of the microwave oven...
Installation Instructions
Page 11
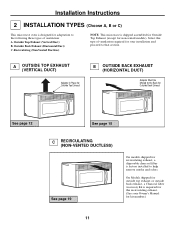
... for the recirculating exhaust. (See your installation and proceed to help remove smoke and odors. Installation Instructions 2 INSTALLATION TYPES (Choose A, B or C) This microwave oven is designed for kit number.) 11 Recirculating (Non-Vented Ductless) NOTE: This microwave is shipped assembled for Outside Top Exhaust (except for non-vented models). Outside Back Exhaust (Horizontal Duct) C.
... for the recirculating exhaust. (See your installation and proceed to help remove smoke and odors. Installation Instructions 2 INSTALLATION TYPES (Choose A, B or C) This microwave oven is designed for kit number.) 11 Recirculating (Non-Vented Ductless) NOTE: This microwave is shipped assembled for Outside Top Exhaust (except for non-vented models). Outside Back Exhaust (Horizontal Duct) C.
Installation Instructions
Page 20
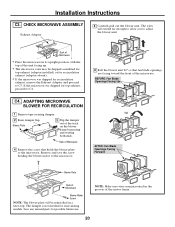
... shipped for top exhaust, proceed to C5. Save any unused parts for recirculating models. Back of Microwave • Place the microwave in its upright position, with the top of the unit facing up. • The microwave oven may be reinstalled in the grooves of the track on the blower frame by ...pressing and twisting both ends. Blower Plate 3 Slip the damper out of the motor frame. 20 CHECK MICROWAVE ASSEMBLY Exhaust Adaptor 5 Carefully pull out the blower ...
... shipped for top exhaust, proceed to C5. Save any unused parts for recirculating models. Back of Microwave • Place the microwave in its upright position, with the top of the unit facing up. • The microwave oven may be reinstalled in the grooves of the track on the blower frame by ...pressing and twisting both ends. Blower Plate 3 Slip the damper out of the motor frame. 20 CHECK MICROWAVE ASSEMBLY Exhaust Adaptor 5 Carefully pull out the blower ...
Installation Instructions
Page 22
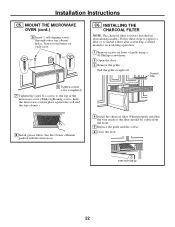
.... Follow these steps to replace a filter or to install a filter after converting a vented model to the top of the microwave oven. (While tightening screws, hold the microwave oven in recirculating models. Pull the grille straight off. Insert mesh-side up 22 MOUNT THE MICROWAVE OVEN (cont.) 5 Insert 2 self-aligning screws through outer top cabinet holes. INSTALLING THE CHARCOAL...
.... Follow these steps to replace a filter or to install a filter after converting a vented model to the top of the microwave oven. (While tightening screws, hold the microwave oven in recirculating models. Pull the grille straight off. Insert mesh-side up 22 MOUNT THE MICROWAVE OVEN (cont.) 5 Insert 2 self-aligning screws through outer top cabinet holes. INSTALLING THE CHARCOAL...


