User Manual
Page 1
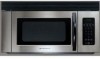
Visit the Frigidaire Web Site at: http://www.frigidaire.com Over-the-Range Microwave Oven with Convenience Pad Welcome 2 Important Safety Instructions .....3-6 Features and Specifications .......... 7 Before Operating 8 Manual Operation 9-14 Convenience Operation ......... 15-16 Cooking Charts 17-18 Care & Cleaning 19-20 Before You Call Solutions to Common Problems 21 Questions or for Service Call: 1-888-312-2117 Warranty Back Page READ AND SAVE THESE INSTRUCTIONS p/n 316495004 rev B (0706)
Visit the Frigidaire Web Site at: http://www.frigidaire.com Over-the-Range Microwave Oven with Convenience Pad Welcome 2 Important Safety Instructions .....3-6 Features and Specifications .......... 7 Before Operating 8 Manual Operation 9-14 Convenience Operation ......... 15-16 Cooking Charts 17-18 Care & Cleaning 19-20 Before You Call Solutions to Common Problems 21 Questions or for Service Call: 1-888-312-2117 Warranty Back Page READ AND SAVE THESE INSTRUCTIONS p/n 316495004 rev B (0706)
User Manual
Page 2
... and feature information for several models. These instructions are representative. Please record your model and serial number and date of the microwave oven. Model Number: Serial Number: Purchase Date: © 2007 Electrolux Home Products, Inc. Your satisfaction is located on the ...self-addressed PRODUCT REGISTRATION CARD should ever require servicing: This Use & Care Manual contains general operating instructions for your new microwave and Thank You for future reference in case your microwave should be practiced when installing, operating and maintaining any appliance. We hope ...
... and feature information for several models. These instructions are representative. Please record your model and serial number and date of the microwave oven. Model Number: Serial Number: Purchase Date: © 2007 Electrolux Home Products, Inc. Your satisfaction is located on the ...self-addressed PRODUCT REGISTRATION CARD should ever require servicing: This Use & Care Manual contains general operating instructions for your new microwave and Thank You for future reference in case your microwave should be practiced when installing, operating and maintaining any appliance. We hope ...
User Manual
Page 6
... cook, or dry food. Special tools are able to explode and SHOULD NOT be HEATED in this oven. • Use this oven ONLY for example, closed jars - DO NOT use this Use & Care Manual. DO NOT leave paper products, cooking utensils or food in the caity when not in this Use ... AND FOLLOW the specific "PRECAUTIONS TO AVOID POSSIBLE EXPOSURE TO EXCESSIVE MICROWAVE ENERGY" on page 5. • Install or locate this oven ONLY in accordance with any vents, openings or filters on the oven. • DO NOT store this oven cavity for use above both gas and electric cooking equipment 36 inches...
... cook, or dry food. Special tools are able to explode and SHOULD NOT be HEATED in this oven. • Use this oven ONLY for example, closed jars - DO NOT use this Use & Care Manual. DO NOT leave paper products, cooking utensils or food in the caity when not in this Use ... AND FOLLOW the specific "PRECAUTIONS TO AVOID POSSIBLE EXPOSURE TO EXCESSIVE MICROWAVE ENERGY" on page 5. • Install or locate this oven ONLY in accordance with any vents, openings or filters on the oven. • DO NOT store this oven cavity for use above both gas and electric cooking equipment 36 inches...
User Manual
Page 9
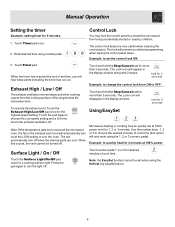
Manual Operation Setting the timer Example: setting timer for desired minutes of the range below the microwave oven. Touch and hold the Stop/Cancel pad for more than 3 seconds. The Lock icon will disappear in the display window. The Lock icon will appear ... 3 seconds Example: to turn off . Control Lock You may be quickly set the control lock ON: 3. Note: If the temperature gets too hot around the microwave oven, the fan in the display window along with 2 beeps. Touch the pad again to choose the Low speed setting and a 3rd time to change the...
Manual Operation Setting the timer Example: setting timer for desired minutes of the range below the microwave oven. Touch and hold the Stop/Cancel pad for more than 3 seconds. The Lock icon will disappear in the display window. The Lock icon will appear ... 3 seconds Example: to turn off . Control Lock You may be quickly set the control lock ON: 3. Note: If the temperature gets too hot around the microwave oven, the fan in the display window along with 2 beeps. Touch the pad again to choose the Low speed setting and a 3rd time to change the...
User Manual
Page 10
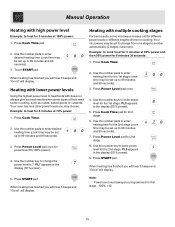
Manual Operation Heating with high power level Example: to heat for 5 minutes at 70% power: ... display (70 % power). When heating has finished you may be set up to 99 minutes and 99 seconds). 3. Your oven has nine other power levels you will hear 5 beeps and "Good" will display. Use the number pads to enter desired...heat foods with does not always give the best results when some microwave recipes call for cooking. Use the number pads to enter heating time for 6 minutes 30 seconds: 1. Your microwave may choose. Press START pad. When heating has finished you will...
Manual Operation Heating with high power level Example: to heat for 5 minutes at 70% power: ... display (70 % power). When heating has finished you may be set up to 99 minutes and 99 seconds). 3. Your oven has nine other power levels you will hear 5 beeps and "Good" will display. Use the number pads to enter desired...heat foods with does not always give the best results when some microwave recipes call for cooking. Use the number pads to enter heating time for 6 minutes 30 seconds: 1. Your microwave may choose. Press START pad. When heating has finished you will...
User Manual
Page 11
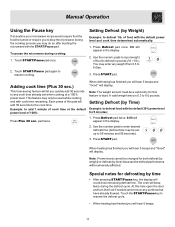
...may be set when cooking at anytime your microwave recipe would require that have already thawed. ... that the food be turned or require you to stop the microwave during the cooking process you may enter any cook time already ...to defrost in pounds (10 = 1lb.) You may do so after starting the microwave with cook time remaining. pad twice. 1. Special notes for both defrost (by...because the defrost performance will beep twice during cooking: 1. To pause the microwave during the defrost cycle. The oven will be adversely affected. Touch START/Pause pad once. 2. Press Defrost...
...may be set when cooking at anytime your microwave recipe would require that have already thawed. ... that the food be turned or require you to stop the microwave during the cooking process you may enter any cook time already ...to defrost in pounds (10 = 1lb.) You may do so after starting the microwave with cook time remaining. pad twice. 1. Special notes for both defrost (by...because the defrost performance will beep twice during cooking: 1. To pause the microwave during the defrost cycle. The oven will be adversely affected. Touch START/Pause pad once. 2. Press Defrost...

User Manual
Page 12
... before freezing poultry. Separated frozen pieces of food defrost better. • Shield warm areas of food with narrow strips of aluminum foil. Manual Operation Defrosting tips • When using the defrost weight feature, the weight entered should always be thawed is stored outside the freezer for up...of aluminum foil to shield food items like chicken wings, leg tips and fish tails, but do not allow the foil to touch the oven cavity walls when defrosting. Shallow rectangular food packets defrost more quickly than a deep frozen block of food. • Use both defrost weight...
... before freezing poultry. Separated frozen pieces of food defrost better. • Shield warm areas of food with narrow strips of aluminum foil. Manual Operation Defrosting tips • When using the defrost weight feature, the weight entered should always be thawed is stored outside the freezer for up...of aluminum foil to shield food items like chicken wings, leg tips and fish tails, but do not allow the foil to touch the oven cavity walls when defrosting. Shallow rectangular food packets defrost more quickly than a deep frozen block of food. • Use both defrost weight...
User Manual
Page 13
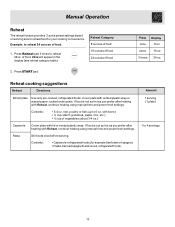
... under plate. If food is not as hot as you prefer after heating with Reheat, continue heating using manual time and power level settings. Contents: • Casserole-refrigerated foods (for your cooking convenience. Manual Operation Reheat The reheat feature provides 3 quick preset settings based on serving size to reheat food for example... spaghetti and ravioli, refrigerated foods. Example: to 4 servings 13 If food is not as hot as you prefer after heating with Reheat, continue heating using manual time and power level settings.
... under plate. If food is not as hot as you prefer after heating with Reheat, continue heating using manual time and power level settings. Contents: • Casserole-refrigerated foods (for your cooking convenience. Manual Operation Reheat The reheat feature provides 3 quick preset settings based on serving size to reheat food for example... spaghetti and ravioli, refrigerated foods. Example: to 4 servings 13 If food is not as hot as you prefer after heating with Reheat, continue heating using manual time and power level settings.
User Manual
Page 14
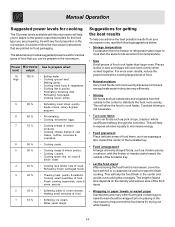
...Sandwiches and many other food types containing prebaked bread should be prepare in the microwave. Constant stirring is best to follow the microwave instructions that you achieve the best possible results from your microwave oven, read the following suggestions below provides suggested power levels for various types of ... time. This will help prevent the food items fro drying out while heating. 14 Manual Operation Suggested power levels for cooking The 10 power levels available with this microwave will allow the food to cook faster. As with foil or a casserole lid and...
...Sandwiches and many other food types containing prebaked bread should be prepare in the microwave. Constant stirring is best to follow the microwave instructions that you achieve the best possible results from your microwave oven, read the following suggestions below provides suggested power levels for various types of ... time. This will help prevent the food items fro drying out while heating. 14 Manual Operation Suggested power levels for cooking The 10 power levels available with this microwave will allow the food to cook faster. As with foil or a casserole lid and...
Installation Instructions
Page 11
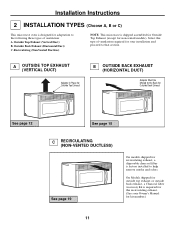
...Vertical Duct) B. Recirculating (Non-Vented Ductless) NOTE: This microwave is shipped assembled for Outside Top Exhaust (except for your Owner's Manual for adaptation to help remove smoke and odors. Select the type... of ventilation: A. On Models shipped for outside top exhaust or outside back exhaust, a Charcoal filter Accessory Kit is required for the recirculating exhaust. (See your installation and proceed to that section. Installation Instructions 2 INSTALLATION TYPES (Choose A, B or C) This microwave oven...
...Vertical Duct) B. Recirculating (Non-Vented Ductless) NOTE: This microwave is shipped assembled for Outside Top Exhaust (except for your Owner's Manual for adaptation to help remove smoke and odors. Select the type... of ventilation: A. On Models shipped for outside top exhaust or outside back exhaust, a Charcoal filter Accessory Kit is required for the recirculating exhaust. (See your installation and proceed to that section. Installation Instructions 2 INSTALLATION TYPES (Choose A, B or C) This microwave oven...
Installation Instructions
Page 14
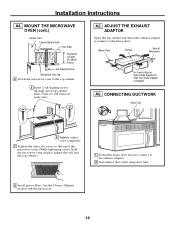
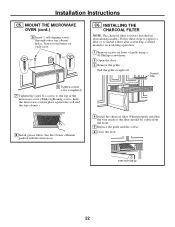
...Installation Instructions A4. A5. See the Owner's Manual packed with the microwave. 14 MOUNT THE MICROWAVE OVEN (cont.) Cabinet Front Cabinet Bottom Shelf Filler Block Equivalent to Depth of Cabinet Recess Self-Aligning Screw Microwave Oven Top 4 Attach the microwave oven to the house duct. Turn two full turns ...adaptor. 2 Seal exhaust duct joints using duct tape. 8 Install grease filters. Blower Plate Damper Back of the microwave oven. (While tightening screws, hold the microwave oven in place against the wall and the top cabinet.) 1 Extend the house duct down to connect to -Side ...
...Installation Instructions A4. A5. See the Owner's Manual packed with the microwave. 14 MOUNT THE MICROWAVE OVEN (cont.) Cabinet Front Cabinet Bottom Shelf Filler Block Equivalent to Depth of Cabinet Recess Self-Aligning Screw Microwave Oven Top 4 Attach the microwave oven to the house duct. Turn two full turns ...adaptor. 2 Seal exhaust duct joints using duct tape. 8 Install grease filters. Blower Plate Damper Back of the microwave oven. (While tightening screws, hold the microwave oven in place against the wall and the top cabinet.) 1 Extend the house duct down to connect to -Side ...
Installation Instructions
Page 18
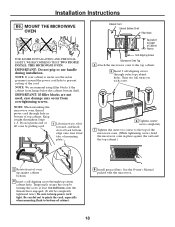
...careful not to pinch the cord, especially when mounting flush to the top of the microwave oven. (While tightening screws, hold the microwave oven in bottom of the cord. NOTE: When mounting the microwave oven, thread power cord through hole in place against cabinet bottom. 3 Insert a self-... THAT TWO PEOPLE INSTALL THIS MICROWAVE OVEN. NOTE: We recommend using filler blocks if the cabinet front hangs below the cabinet bottom shelf. NOTE: If your cabinet is metal, use handle during installation. See the Owner's Manual packed with the microwave. 18 Installation Instructions B6. ...
...careful not to pinch the cord, especially when mounting flush to the top of the microwave oven. (While tightening screws, hold the microwave oven in bottom of the cord. NOTE: When mounting the microwave oven, thread power cord through hole in place against cabinet bottom. 3 Insert a self-... THAT TWO PEOPLE INSTALL THIS MICROWAVE OVEN. NOTE: We recommend using filler blocks if the cabinet front hangs below the cabinet bottom shelf. NOTE: If your cabinet is metal, use handle during installation. See the Owner's Manual packed with the microwave. 18 Installation Instructions B6. ...
Installation Instructions
Page 22
...to replace a filter or to install a filter after converting a vented model to the top of the microwave oven. (While tightening screws, hold the microwave oven in recirculating models. INSTALLING THE CHARCOAL FILTER NOTE: The charcoal filter is factory installed in place against ...the wall and the top cabinet.) 8 Install grease filters. Pull the grille straight off. Installation Instructions C5. See the Owner's Manual packed with the microwave....
...to replace a filter or to install a filter after converting a vented model to the top of the microwave oven. (While tightening screws, hold the microwave oven in recirculating models. INSTALLING THE CHARCOAL FILTER NOTE: The charcoal filter is factory installed in place against ...the wall and the top cabinet.) 8 Install grease filters. Pull the grille straight off. Installation Instructions C5. See the Owner's Manual packed with the microwave....
Installation Instructions
Page 23
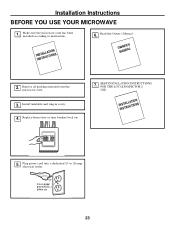
to instructions. Installation Instructions BEFORE YOU USE YOUR MICROWAVE 1. Make sure the microwave oven has been installed according to 20-amp electrical outlet. OMWANNEURA'SL 2. Remove all packing material from the microwave oven. 3. Replace house fuse or turn breaker back on. 7. KEEP INSTALLATION INSTRUCTIONS FOR THE LOCAL INSPECTOR'S USE. Install turntable and ring in cavity. 4. Plug power cord into a dedicated 15- ININSSTTARLULCATTIIOONNS 5. ININSSTTARLULCATTIIOONNS 6. Read the Owner's Manual. Ensure proper ground exists before use 23
to instructions. Installation Instructions BEFORE YOU USE YOUR MICROWAVE 1. Make sure the microwave oven has been installed according to 20-amp electrical outlet. OMWANNEURA'SL 2. Remove all packing material from the microwave oven. 3. Replace house fuse or turn breaker back on. 7. KEEP INSTALLATION INSTRUCTIONS FOR THE LOCAL INSPECTOR'S USE. Install turntable and ring in cavity. 4. Plug power cord into a dedicated 15- ININSSTTARLULCATTIIOONNS 5. ININSSTTARLULCATTIIOONNS 6. Read the Owner's Manual. Ensure proper ground exists before use 23


