User Manual
Page 1
Visit the Frigidaire Web Site at: http://www.frigidaire.com Over-the-Range Microwave Oven with Convenience Pad Welcome 2 Important Safety Instructions .....3-6 Features and Specifications .......... 7 Before Operating 8 Manual Operation 9-14 Convenience Operation ......... 15-16 Cooking Charts 17-18 Care & Cleaning 19-20 Before You Call Solutions to Common Problems 21 Questions or for Service Call: 1-888-312-2117 Warranty Back Page READ AND SAVE THESE INSTRUCTIONS p/n 316495004 rev B (0706)
Visit the Frigidaire Web Site at: http://www.frigidaire.com Over-the-Range Microwave Oven with Convenience Pad Welcome 2 Important Safety Instructions .....3-6 Features and Specifications .......... 7 Before Operating 8 Manual Operation 9-14 Convenience Operation ......... 15-16 Cooking Charts 17-18 Care & Cleaning 19-20 Before You Call Solutions to Common Problems 21 Questions or for Service Call: 1-888-312-2117 Warranty Back Page READ AND SAVE THESE INSTRUCTIONS p/n 316495004 rev B (0706)
User Manual
Page 2
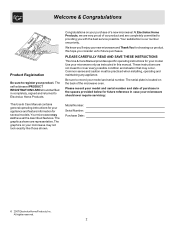
...installing, operating and maintaining any appliance. Your satisfaction is located on the back of our product and are very proud of the microwave oven. Be sure to providing you consider us for several models. Model Number: Serial Number: Purchase Date: © 2007 Electrolux ...Home Products, Inc. Congratulations on your model and serial number and date of a new microwave! The graphics shown are not meant to register your appliance and feature information for future purchases. Welcome & Congratulations Product Registration Be ...
...installing, operating and maintaining any appliance. Your satisfaction is located on the back of our product and are very proud of the microwave oven. Be sure to providing you consider us for several models. Model Number: Serial Number: Purchase Date: © 2007 Electrolux ...Home Products, Inc. Congratulations on your model and serial number and date of a new microwave! The graphics shown are not meant to register your appliance and feature information for future purchases. Welcome & Congratulations Product Registration Be ...
User Manual
Page 3
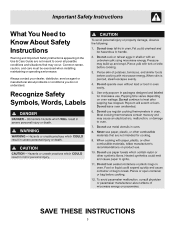
Always contact your dealer, distributor, service agent or manufacturer about problems or conditions you do not understand. Common sense, caution, and care must be exercised when installing, maintaining or operating a microwave. Important Safety Instructions What You Need to Know About Safety Instructions Warning and Important Safety Instructions appearing in the Use & Care Guide are not meant to cover all possible conditions and situations that may occur. Recognize Safety Symbols, Words, Labels SAVE THESE INSTRUCTIONS 3
Always contact your dealer, distributor, service agent or manufacturer about problems or conditions you do not understand. Common sense, caution, and care must be exercised when installing, maintaining or operating a microwave. Important Safety Instructions What You Need to Know About Safety Instructions Warning and Important Safety Instructions appearing in the Use & Care Guide are not meant to cover all possible conditions and situations that may occur. Recognize Safety Symbols, Words, Labels SAVE THESE INSTRUCTIONS 3
User Manual
Page 5
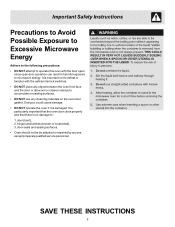
...defeat or tampler with the door open since open door operation can result in harmful exposure to microwave energy. hinges and latches (broken or loosended), 3. It is particularly important that the oven door close properly and that there is damaged. door (bent), 2. door seals and sealing ... Safety Instructions Precautions to Avoid Possible Exposure to Excessive Microwave Energy Adhere to the following precautions: • DO NOT attempt to operate this oven with the safety interlock switches. • DO NOT place any object between the oven front face and the door or allow soil or ...
...defeat or tampler with the door open since open door operation can result in harmful exposure to microwave energy. hinges and latches (broken or loosended), 3. It is particularly important that the oven door close properly and that there is damaged. door (bent), 2. door seals and sealing ... Safety Instructions Precautions to Avoid Possible Exposure to Excessive Microwave Energy Adhere to the following precautions: • DO NOT attempt to operate this oven with the safety interlock switches. • DO NOT place any object between the oven front face and the door or allow soil or ...
User Manual
Page 6
...or injury to persons or exposure to excessive microvave energy. • READ ALL instructions before using oven. • READ AND FOLLOW the specific "PRECAUTIONS TO AVOID POSSIBLE EXPOSURE TO EXCESSIVE MICROWAVE ENERGY" on the hood or filters. • Use care when cleaning the ventilating hood filters. ...for example, near a kitchen sink, in the oven cavity: injury to persons or exposure to service oven. This type of fir in a wet ...
...or injury to persons or exposure to excessive microvave energy. • READ ALL instructions before using oven. • READ AND FOLLOW the specific "PRECAUTIONS TO AVOID POSSIBLE EXPOSURE TO EXCESSIVE MICROWAVE ENERGY" on the hood or filters. • Use care when cleaning the ventilating hood filters. ...for example, near a kitchen sink, in the oven cavity: injury to persons or exposure to service oven. This type of fir in a wet ...
User Manual
Page 7
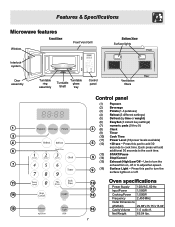
... to the cook time. (13) START/Pause 8 (14) Stop/Cancel (15) Exhaust (High/Low/Off ~ Use to cook time. Features & Specifications Microwave features Front View Window Front Vent Grill Bottom View Surface lights Front Interlock system Door assembly 1 2 4 6 7 11 14 15 Turntable ring assembly Turntable Turntable... 9 (16) Surface Light ~ Press this pad to add 30 seconds to turn the surface lights on , off . 10 12 13 16 7 Oven specifications Power Supply 120VAC, 60 Hz Input Power 1,550W Cooking Power 1,000W Frequency 2,450 MHz Outer Dimensions (WxHxD) 29.88"x15.75"x 15.04"...
... to the cook time. (13) START/Pause 8 (14) Stop/Cancel (15) Exhaust (High/Low/Off ~ Use to cook time. Features & Specifications Microwave features Front View Window Front Vent Grill Bottom View Surface lights Front Interlock system Door assembly 1 2 4 6 7 11 14 15 Turntable ring assembly Turntable Turntable... 9 (16) Surface Light ~ Press this pad to add 30 seconds to turn the surface lights on , off . 10 12 13 16 7 Oven specifications Power Supply 120VAC, 60 Hz Input Power 1,550W Cooking Power 1,000W Frequency 2,450 MHz Outer Dimensions (WxHxD) 29.88"x15.75"x 15.04"...
User Manual
Page 8
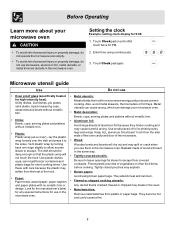
...8226; Brown paper: Avoid using number pads. 3. They absorb heat and can damage your microwave oven Setting the clock Example: setting clock display for short cooking times. Before Operating Learn more about your microwave oven. • Metal decoration: Bowls, cups, serving plates and platters without metallic trim. •...PM. • To avoid risk of personal injury or property damage, do not use in the oven. • Metal twist ties: Remove metal twist ties from microwave energy and produces uneven cooking. lay the plastic wrap loosely over the dish and press it to ...
...8226; Brown paper: Avoid using number pads. 3. They absorb heat and can damage your microwave oven Setting the clock Example: setting clock display for short cooking times. Before Operating Learn more about your microwave oven. • Metal decoration: Bowls, cups, serving plates and platters without metallic trim. •...PM. • To avoid risk of personal injury or property damage, do not use in the oven. • Metal twist ties: Remove metal twist ties from microwave energy and produces uneven cooking. lay the plastic wrap loosely over the dish and press it to ...
User Manual
Page 9
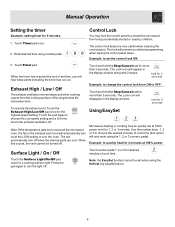
... other cooking vapors from being accidentally started or used by weight) feature. 9 Note: If the temperature gets too hot around the microwave oven, the fan in the exhaust vent hood will disappear in the display window along with 2 beeps. hold the Stop/Cancel pad for... more than 3 seconds. Use the number keys 1, 2 or 3 to choose the desired minutes of the range below the microwave oven. Touch Timer pad. When this option will prevent accidental programming when wiping the control panel clean. Touch Timer pad once. 2. Touch and hold...
... other cooking vapors from being accidentally started or used by weight) feature. 9 Note: If the temperature gets too hot around the microwave oven, the fan in the exhaust vent hood will disappear in the display window along with 2 beeps. hold the Stop/Cancel pad for... more than 3 seconds. Use the number keys 1, 2 or 3 to choose the desired minutes of the range below the microwave oven. Touch Timer pad. When this option will prevent accidental programming when wiping the control panel clean. Touch Timer pad once. 2. Touch and hold...
User Manual
Page 10
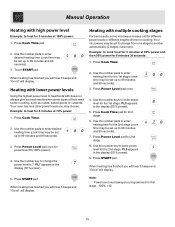
... number keys to enter power level for the 2nd stage. Press START pad. Note: Power level must always be set up to 7. Touch STARTpad. Your oven has nine other power levels you will hear 5 beeps and "Good" will display. 5. PL7 appears in the display (80 % power). 5. Press Power ... Power Level pad once for first stage - 100% =10. 10 Manual Operation Heating with does not always give the best results when some microwave recipes call for different power levels or different lengths of food need slower cooking, such as roasts, baked goods or custards. Use the number pads...
... number keys to enter power level for the 2nd stage. Press START pad. Note: Power level must always be set up to 7. Touch STARTpad. Your oven has nine other power levels you will hear 5 beeps and "Good" will display. 5. PL7 appears in the display (80 % power). 5. Press Power ... Power Level pad once for first stage - 100% =10. 10 Manual Operation Heating with does not always give the best results when some microwave recipes call for different power levels or different lengths of food need slower cooking, such as roasts, baked goods or custards. Use the number pads...
User Manual
Page 11
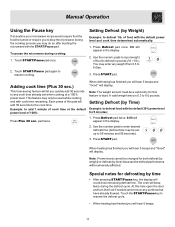
....) This time-saving feature will hear 5 beeps. 11 Manual Operation Using the Pause key If at anytime your microwave recipe would require that have already thawed. The oven will count down remaining defrost time. Touch START/Pause pad again to the cook time. Setting Defrost (by time... • After pressing START/Pause key, the display will beep twice during cooking: 1. To pause the microwave during the defrost cycle. Special...
....) This time-saving feature will hear 5 beeps. 11 Manual Operation Using the Pause key If at anytime your microwave recipe would require that have already thawed. The oven will count down remaining defrost time. Touch START/Pause pad again to the cook time. Setting Defrost (by time... • After pressing START/Pause key, the display will beep twice during cooking: 1. To pause the microwave during the defrost cycle. Special...
User Manual
Page 14
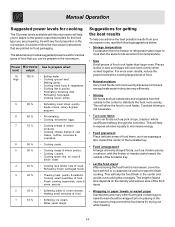
...chicken pieces or salmon, with the thicker or meatier parts toward the outside to the center to distribute the heat more evenly because microwave energy heats water molecules very efficiently. • Stirring Stir foods such as pork chops, roasts or whole cauliflower halfway through the ...and many other food types containing prebaked bread should be prepare in size and shape will help you achieve the best possible results from your microwave oven, read the following suggestions below provides suggested power levels for various types of food. 1 10 % • Softening ice cream. &#...
...chicken pieces or salmon, with the thicker or meatier parts toward the outside to the center to distribute the heat more evenly because microwave energy heats water molecules very efficiently. • Stirring Stir foods such as pork chops, roasts or whole cauliflower halfway through the ...and many other food types containing prebaked bread should be prepare in size and shape will help you achieve the best possible results from your microwave oven, read the following suggestions below provides suggested power levels for various types of food. 1 10 % • Softening ice cream. &#...
User Manual
Page 15
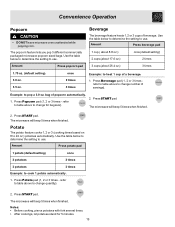
...3 cups (about 26.4 oz.) 3 times 1.75 oz. (default setting) 3.0 oz. 3.5 oz. refer to table above to pop a 3.0 oz. The microwave will beep 5 times when finished. Amount Press potato pad 1 potato (default setting) once 2 potatoes 2 times 3 potatoes 3 times Example: to use. Press ...START pad. Convenience Operation Popcorn • DO NOT leave micowave oven unattended while popping corn. Amount Press popcorn pad Beverage The beverage feature heats 1, 2 or 3 cups of popcorn automatically. 1. Use the...
...3 cups (about 26.4 oz.) 3 times 1.75 oz. (default setting) 3.0 oz. 3.5 oz. refer to table above to pop a 3.0 oz. The microwave will beep 5 times when finished. Amount Press potato pad 1 potato (default setting) once 2 potatoes 2 times 3 potatoes 3 times Example: to use. Press ...START pad. Convenience Operation Popcorn • DO NOT leave micowave oven unattended while popping corn. Amount Press popcorn pad Beverage The beverage feature heats 1, 2 or 3 cups of popcorn automatically. 1. Use the...
User Manual
Page 16
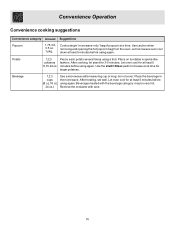
...potato several times using again. After cooking, let stand for at least 5 minutes before using again. Let oven cool for larger potatoes. Let microwave oven cool down at least 5 minutes before (8 oz,16 oz, using again. Potato 1,2,3 potatoes 8,16,24 oz.... Beverage 1,2,3 Use a microwave-safe measuring cup or mug; Place the beverage in spoke-like fashion. Let oven cool for 3-5 minutes. After heating, stir well. Convenience Operation Convenience cooking suggestions Convenience category Amount ...
...potato several times using again. After cooking, let stand for at least 5 minutes before using again. Let oven cool for larger potatoes. Let microwave oven cool down at least 5 minutes before (8 oz,16 oz, using again. Potato 1,2,3 potatoes 8,16,24 oz.... Beverage 1,2,3 Use a microwave-safe measuring cup or mug; Place the beverage in spoke-like fashion. Let oven cool for 3-5 minutes. After heating, stir well. Convenience Operation Convenience cooking suggestions Convenience category Amount ...
User Manual
Page 17
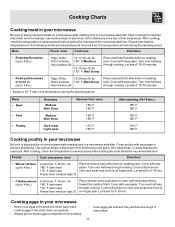
... 170° F (Well Done) Place roast beef fat-side down on roasting rack. they can explode. • Always pierce whole eggs to keep them from oven 150° F 160° F After standing (10-15 min.) 150° F 160° F • Pork Medium Well Done 150° F 160° F .... they will rise during the standing period. Turn over half way through cooking. Turn over half way through cooking. Cooking eggs in your microwave • Never cook eggs in the shell and never warm hardcooked eggs in several places before letting the meat stand the recommended time. for...
... 170° F (Well Done) Place roast beef fat-side down on roasting rack. they can explode. • Always pierce whole eggs to keep them from oven 150° F 160° F After standing (10-15 min.) 150° F 160° F • Pork Medium Well Done 150° F 160° F .... they will rise during the standing period. Turn over half way through cooking. Turn over half way through cooking. Cooking eggs in your microwave • Never cook eggs in the shell and never warm hardcooked eggs in several places before letting the meat stand the recommended time. for...
User Manual
Page 18
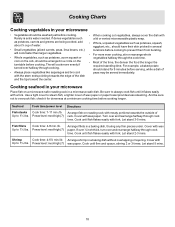
...it flakes easily with meaty portions towards the edge of peas may be sure not to 1½ lbs. Arrange fish on a microwave-safe roasting rack in a microwave-safe dish. Turn over and rearrange halfway through cook time. Let stand 3-5 mins. Cover with wax paper. Cooking seafood in ...steaks Cook time: 7-11 min./lb. Fish fillets Cook time: 4-8 min./lb. Let stand 5 mins. 18 Cooking Charts Cooking vegetables in your microwave Place fish on roasting rack with a fork. Rarely is extra water needed. If dense vegetables such as potatoes, carrots and greens are being cooked...
...it flakes easily with meaty portions towards the edge of peas may be sure not to 1½ lbs. Arrange fish on a microwave-safe roasting rack in a microwave-safe dish. Turn over and rearrange halfway through cook time. Let stand 3-5 mins. Cover with wax paper. Cooking seafood in ...steaks Cook time: 7-11 min./lb. Fish fillets Cook time: 4-8 min./lb. Let stand 5 mins. 18 Cooking Charts Cooking vegetables in your microwave Place fish on roasting rack with a fork. Rarely is extra water needed. If dense vegetables such as potatoes, carrots and greens are being cooked...
User Manual
Page 19
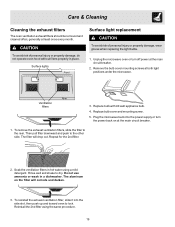
... filter. 2. To reinstall the exhaust ventilation filter, slide it into the power supply or turn off power at both light positions under the microwave. Reinstall the 2nd filter using a mild detergent. Surface lights Front Surface light replacement To avoid risk of personal injury or property damage, do...to dry. The aluminum on at least once every month. Unplug the microwave oven or turn the power back on the filter will drop out. Plug the microwave back into the side slot, then push up and toward oven to the other side. Remove the bulb cover mounting screws at the...
... filter. 2. To reinstall the exhaust ventilation filter, slide it into the power supply or turn off power at both light positions under the microwave. Reinstall the 2nd filter using a mild detergent. Surface lights Front Surface light replacement To avoid risk of personal injury or property damage, do...to dry. The aluminum on at least once every month. Unplug the microwave oven or turn the power back on the filter will drop out. Plug the microwave back into the side slot, then push up and toward oven to the other side. Remove the bulb cover mounting screws at the...
User Manual
Page 20
...Food particles and spilled liquids can stick to the oven walls, causing the oven to leave a cup of the oven clean. To prevent the glass turntable from the oven when cleaning the oven cavity or tray. Wipe the microwave oven inside the oven when it in the oven cavity; You may wish to work less efficiently.... damage the magnetron tube or glass tray. Let stand in a 4 cup measuring glass at High power for your microwave oven weekly or more often, if needed. • Wash the oven door window with a clean soft cloth. To prevent damage to the operating parts of 1 lemon if you desire ...
...Food particles and spilled liquids can stick to the oven walls, causing the oven to leave a cup of the oven clean. To prevent the glass turntable from the oven when cleaning the oven cavity or tray. Wipe the microwave oven inside the oven when it in the oven cavity; You may wish to work less efficiently.... damage the magnetron tube or glass tray. Let stand in a 4 cup measuring glass at High power for your microwave oven weekly or more often, if needed. • Wash the oven door window with a clean soft cloth. To prevent damage to the operating parts of 1 lemon if you desire ...
User Manual
Page 21
...• If the outlet is controlled by other small appliances, such as hair dryers. The oven display works, but the oven will not operate, have a qualified electrician repair the outlet. • Plug the microwave into the power outlet. Operating another appliance on . • Press the STOP/cancel pad ...minutes at least one inch between the foil and the interior oven walls. wait 10 seconds, then plug the microwave in again. • Reset the household circuit breaker or replace any blown fuses. Please note : If the oven is on a seperate 20 amp circuit line. The turntable makes...
...• If the outlet is controlled by other small appliances, such as hair dryers. The oven display works, but the oven will not operate, have a qualified electrician repair the outlet. • Plug the microwave into the power outlet. Operating another appliance on . • Press the STOP/cancel pad ...minutes at least one inch between the foil and the interior oven walls. wait 10 seconds, then plug the microwave in again. • Reset the household circuit breaker or replace any blown fuses. Please note : If the oven is on a seperate 20 amp circuit line. The turntable makes...
Installation Instructions
Page 1
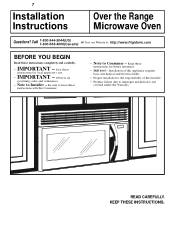
7 Installation Instructions Over the Range Microwave Oven Questions? READ CAREFULLY. Call 1-800-944-9044(US) 1-800-668-4606(Canada) or Visit our Website at: http://www.frigidaire.com BEFORE YOU BEGIN Read these instructions with the Consumer. • Note to Consumer - Observe all governing codes and ordinances. • Note to improper installation ...
7 Installation Instructions Over the Range Microwave Oven Questions? READ CAREFULLY. Call 1-800-944-9044(US) 1-800-668-4606(Canada) or Visit our Website at: http://www.frigidaire.com BEFORE YOU BEGIN Read these instructions with the Consumer. • Note to Consumer - Observe all governing codes and ordinances. • Note to improper installation ...
Installation Instructions
Page 2
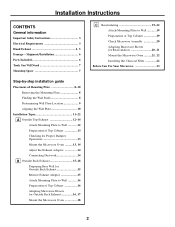
...-14 Attach Mounting Plate to Wall 12 Preparation of Top Cabinet 13 Checking for Proper Damper Operation 13 Mount the Microwave Oven ..........13, 14 Adjust the Exhaust Adaptor 14 Connecting Ductwork 14 B Outside Back Exhaust 15-18 Preparing Rear Wall ... Mounting Plate to Wall 19 Preparation of Top Cabinet 19 Check Microwave Assembly 20 Adapting Microwave Blower for Recirculation 20, 21 Mount the Microwave Oven ..........21, 22 Installing the Charcoal Filter 22 Before You Use Your Microwave 23 2 Installation Instructions CONTENTS General information Important Safety Instructions 3 ...
...-14 Attach Mounting Plate to Wall 12 Preparation of Top Cabinet 13 Checking for Proper Damper Operation 13 Mount the Microwave Oven ..........13, 14 Adjust the Exhaust Adaptor 14 Connecting Ductwork 14 B Outside Back Exhaust 15-18 Preparing Rear Wall ... Mounting Plate to Wall 19 Preparation of Top Cabinet 19 Check Microwave Assembly 20 Adapting Microwave Blower for Recirculation 20, 21 Mount the Microwave Oven ..........21, 22 Installing the Charcoal Filter 22 Before You Use Your Microwave 23 2 Installation Instructions CONTENTS General information Important Safety Instructions 3 ...


