
Installation Instructions (All Languages)
Page 2
Installation Instructions CONTENTS General information Important Safety Instructions 3 Electrical Requirements 3 Damage - Shipment/Installation 4 Parts Included 4 Tools You Will Need 5 Mounting Space 5 Step-by-step installation guide Placement of The Mounting Plate 6-8 Removing the Mounting Plate 6 ...Back Exhaust 16 Remove Blower Plate 16 Attach Mounting Plate to Wall 17 Preparation of Top Cabinet 17 Adapting Microwave Blower for Outside Back Exhaust 17-18 Mount the Microwave Oven 19 C Recirculating 20 -22 Attach Mounting Plate to Wall 20 Preparation of Top Cabinet 20 Check ...
Installation Instructions CONTENTS General information Important Safety Instructions 3 Electrical Requirements 3 Damage - Shipment/Installation 4 Parts Included 4 Tools You Will Need 5 Mounting Space 5 Step-by-step installation guide Placement of The Mounting Plate 6-8 Removing the Mounting Plate 6 ...Back Exhaust 16 Remove Blower Plate 16 Attach Mounting Plate to Wall 17 Preparation of Top Cabinet 17 Adapting Microwave Blower for Outside Back Exhaust 17-18 Mount the Microwave Oven 19 C Recirculating 20 -22 Attach Mounting Plate to Wall 20 Preparation of Top Cabinet 20 Check ...
Installation Instructions (All Languages)
Page 4
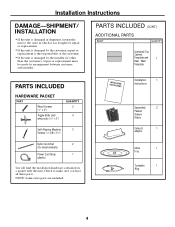
...Cord Strap 1 (plastic) You will find the installation hardware contained in a packet with the unit. NOTE: Some extra parts are included. ININSSTTRAULCLTAITOIONNS Installation 1 Instructions Separately 2 Packed Grease Filters Exhaust 1 adaptor Glass 1 Tray Turntable 1 Ring 4...is damaged in shipment, return the unit to make sure you have all these parts. PARTS INCLUDED (CONT.) ADDITIONAL PARTS PART QUANTITY Combined Top Cabinet Template and 1 Rear Wall Template PARTS INCLUDED HARDWARE PACKET PART Wood Screws (1⁄4" x 2") Toggle Bolts (and wing nuts) (3⁄...
...Cord Strap 1 (plastic) You will find the installation hardware contained in a packet with the unit. NOTE: Some extra parts are included. ININSSTTRAULCLTAITOIONNS Installation 1 Instructions Separately 2 Packed Grease Filters Exhaust 1 adaptor Glass 1 Tray Turntable 1 Ring 4...is damaged in shipment, return the unit to make sure you have all these parts. PARTS INCLUDED (CONT.) ADDITIONAL PARTS PART QUANTITY Combined Top Cabinet Template and 1 Rear Wall Template PARTS INCLUDED HARDWARE PACKET PART Wood Screws (1⁄4" x 2") Toggle Bolts (and wing nuts) (3⁄...

Wiring Diagram (All Languages)
Page 1
... wires at the sensing interlock Switch. Door sensing Interlock Disconnect the wires at the Primary Interlock Switch. Check from microwave parts. Make all wire leads are not intended to show a complete circuit, they represent the position of centigrade temperature...."DOOR OPEN" and "DOOR CLOSED". (continuity checks only) OUTPUT POWER OF MAGNETRON CAUTION MICROWAVE RADIATION PERSONNEL SHOULD NOT ALLOW EXPOSURE TO MICROWAVE RADIATION FROM MICROWAVE GENERATOR OTHER PARTS CONDUCTING MICROWAVE ENERGY. The output power is finished, stir the water again with thermometer, and record ...
... wires at the sensing interlock Switch. Door sensing Interlock Disconnect the wires at the Primary Interlock Switch. Check from microwave parts. Make all wire leads are not intended to show a complete circuit, they represent the position of centigrade temperature...."DOOR OPEN" and "DOOR CLOSED". (continuity checks only) OUTPUT POWER OF MAGNETRON CAUTION MICROWAVE RADIATION PERSONNEL SHOULD NOT ALLOW EXPOSURE TO MICROWAVE RADIATION FROM MICROWAVE GENERATOR OTHER PARTS CONDUCTING MICROWAVE ENERGY. The output power is finished, stir the water again with thermometer, and record ...
Complete Owner's Guide (English)
Page 9
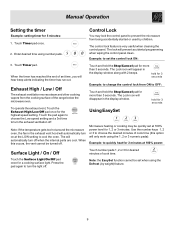
... feature is very useful when cleaning the control panel. The lock will appear in the exhaust vent hood will automatically turn off when the internal parts are cool. Example: to quickly heat for 2 minutes at 100% power: Surface Light / On / Off Touch the Surface Light/On/Off pad once ... for 5 minutes: 1. The Lock icon will hear beep alerts indicating the timer has run out. Note: If the temperature gets too hot around the microwave oven, the fan in the display window along with 2 beeps. The will automatically turn on at 100% power level for the highest speed setting. Manual...
... feature is very useful when cleaning the control panel. The lock will appear in the exhaust vent hood will automatically turn off when the internal parts are cool. Example: to quickly heat for 2 minutes at 100% power: Surface Light / On / Off Touch the Surface Light/On/Off pad once ... for 5 minutes: 1. The Lock icon will hear beep alerts indicating the timer has run out. Note: If the temperature gets too hot around the microwave oven, the fan in the display window along with 2 beeps. The will automatically turn on at 100% power level for the highest speed setting. Manual...

Complete Owner's Guide (English)
Page 14
...for various types of food. 1 10 % • Softening ice cream. • Raise yeast dough. This will help to expose all sides equally to microwave energy. • Food placement Place delicate areas of food items, such as asparagus tips, toward the center of the turntable tray. • Food arrangement ...Arrange unevenly shaped foods, such as chicken pieces or salmon, with the thicker or meatier parts toward the outside to the center to placing in size and shape will cook more evenly. This will help the food finish in the center...
...for various types of food. 1 10 % • Softening ice cream. • Raise yeast dough. This will help to expose all sides equally to microwave energy. • Food placement Place delicate areas of food items, such as asparagus tips, toward the center of the turntable tray. • Food arrangement ...Arrange unevenly shaped foods, such as chicken pieces or salmon, with the thicker or meatier parts toward the outside to the center to placing in size and shape will cook more evenly. This will help the food finish in the center...
Complete Owner's Guide (English)
Page 20
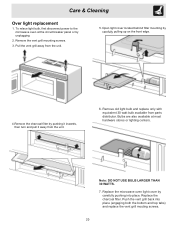
Replace the microwave oven light cover by carefully pushing into place (engaging both the bottom and top tabs) and replace the vent grill mouting screws. 20 Bulbs are also available at the circuit breaker panel or by pushing it inwards, then turn and pull it away from parts distributor. Note: DO NOT USE... available from the unit. 6. Replace the charcoal filter. Pull the vent grill away from the unit. 5. To relace light bulb, first disconnect power to the microwave oven at most hardware stores or lighting centers. Push the vent grill back into place.
Replace the microwave oven light cover by carefully pushing into place (engaging both the bottom and top tabs) and replace the vent grill mouting screws. 20 Bulbs are also available at the circuit breaker panel or by pushing it inwards, then turn and pull it away from parts distributor. Note: DO NOT USE... available from the unit. 6. Replace the charcoal filter. Pull the vent grill away from the unit. 5. To relace light bulb, first disconnect power to the microwave oven at most hardware stores or lighting centers. Push the vent grill back into place.
Complete Owner's Guide (English)
Page 21
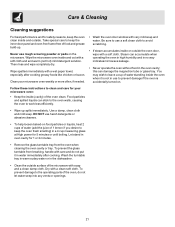
this can stick to the oven walls, causing the oven to the operating parts of the microwave with a soft cloth. Follow these instructions to clean and care for your microwave oven weekly or more often, if needed. • Wash the oven door window with very mild soap and water. To prevent the ... damage if the oven is not in the oven cavity; Steam can accumulate when operating the oven in high humidity and in no way indicates microwave leakage. • Never operate the oven without food in use a soft clean cloth to avoid scratching. • If steam accumulates inside (cavity) of...
this can stick to the oven walls, causing the oven to the operating parts of the microwave with a soft cloth. Follow these instructions to clean and care for your microwave oven weekly or more often, if needed. • Wash the oven door window with very mild soap and water. To prevent the ... damage if the oven is not in the oven cavity; Steam can accumulate when operating the oven in high humidity and in no way indicates microwave leakage. • Never operate the oven without food in use a soft clean cloth to avoid scratching. • If steam accumulates inside (cavity) of...
Complete Owner's Guide (English)
Page 24
...warranted by a one year from the factory. 10. If service is performed, it is installed, used other than genuine Electrolux parts or parts obtained from its original owner to be required. Service under this warranty. Obligations for service calls to remote areas, including the... the appliance when it is covered by Electrolux Major Appliances North America, a division of Alaska. 12. Service calls which are not a part of purchase, Electrolux will pay all receipts. This warranty only applies in a commercial setting. 7. Service calls to repair or replace appliance...
...warranted by a one year from the factory. 10. If service is performed, it is installed, used other than genuine Electrolux parts or parts obtained from its original owner to be required. Service under this warranty. Obligations for service calls to remote areas, including the... the appliance when it is covered by Electrolux Major Appliances North America, a division of Alaska. 12. Service calls which are not a part of purchase, Electrolux will pay all receipts. This warranty only applies in a commercial setting. 7. Service calls to repair or replace appliance...


