
Installation Instructions (All Languages)
Page 1
...tubing is the distance To avoid property damage: • Use copper tubing for the water supply line (plastic tubing is available for choosing Frigidaire. 8 Installation Checkoff List Doors Door seals completely to cabinet on all sides Doors are ready to begin ...all connections - Arrange coiled tubing to raise or lower the front rollers. (See illustration 2.) 7/16" Wrench and 3/32" Hex Key (some models) Final Checks Shipping material removed Fresh Food and Freezer temperatures set Crisper Humidity controls set screw) 1 If the ...
...tubing is the distance To avoid property damage: • Use copper tubing for the water supply line (plastic tubing is available for choosing Frigidaire. 8 Installation Checkoff List Doors Door seals completely to cabinet on all sides Doors are ready to begin ...all connections - Arrange coiled tubing to raise or lower the front rollers. (See illustration 2.) 7/16" Wrench and 3/32" Hex Key (some models) Final Checks Shipping material removed Fresh Food and Freezer temperatures set Crisper Humidity controls set screw) 1 If the ...
Complete Owner's Guide (English)
Page 2
... indicates installation, operation or maintenance information which , if not avoided, may result in the presence of explosive fumes. • Avoid contact with filter housing (select models) Final Checks Shipping material removed Fresh food and freezer temperatures set Crisper humidity controls set Registration card sent in death or...
... indicates installation, operation or maintenance information which , if not avoided, may result in the presence of explosive fumes. • Avoid contact with filter housing (select models) Final Checks Shipping material removed Fresh food and freezer temperatures set Crisper humidity controls set Registration card sent in death or...

Complete Owner's Guide (English)
Page 4
Features At A Glance Features may vary according to model SpillSafe® Adjustable Shelf SpillSafe® Adjustable Shelf 4
Features At A Glance Features may vary according to model SpillSafe® Adjustable Shelf SpillSafe® Adjustable Shelf 4
Complete Owner's Guide (English)
Page 5
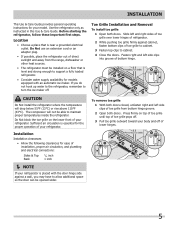
... Pull toe grille outward toward your body and off . Do Not block the toe grille on a floor that is essential for your model. Toe Grille Installation and Removal To install toe grille 1 Open both doors. Before starting the refrigerator, follow these important first steps. ...front of bottom hinge. Sufficient air circulation is near a grounded electrical outlet. Installation Installation clearances • Allow the following clearances for models equipped with the door hinge side against cabinet, fasten bottom clips of toe grille to cabinet. 3 Fasten top clips to maintain ...
... Pull toe grille outward toward your body and off . Do Not block the toe grille on a floor that is essential for your model. Toe Grille Installation and Removal To install toe grille 1 Open both doors. Before starting the refrigerator, follow these important first steps. ...front of bottom hinge. Sufficient air circulation is near a grounded electrical outlet. Installation Installation clearances • Allow the following clearances for models equipped with the door hinge side against cabinet, fasten bottom clips of toe grille to cabinet. 3 Fasten top clips to maintain ...
Complete Owner's Guide (English)
Page 6
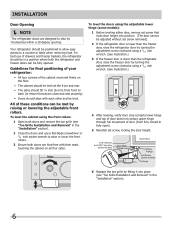
...be in a position where both the refrigerator and freezer doors can be fully opened. To level the cabinet using the adjustable lower hinge (some models) Hinge 6 Replace the toe grille by fitting it into position. (The door cannot be adjusted without set screw removed). 2 If the ... to fully open). 5 Reinstall set screw, locking the door height. 7/16" Wrench and 3/32" Hex Key (some models) Door Stop Flange Open Door Hinge Flange Set Screw (some models): 1 Before leveling either door, remove set screw that locks door height into place (see "Toe Grille Installation and Removal...
...be in a position where both the refrigerator and freezer doors can be fully opened. To level the cabinet using the adjustable lower hinge (some models) Hinge 6 Replace the toe grille by fitting it into position. (The door cannot be adjusted without set screw removed). 2 If the ... to fully open). 5 Reinstall set screw, locking the door height. 7/16" Wrench and 3/32" Hex Key (some models) Door Stop Flange Open Door Hinge Flange Set Screw (some models): 1 Before leveling either door, remove set screw that locks door height into place (see "Toe Grille Installation and Removal...
Complete Owner's Guide (English)
Page 7
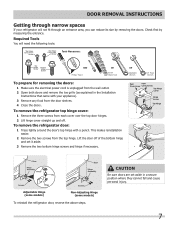
.... CAUTION Be sure doors are set it aside. 3 Remove the two bottom hinge screws and hinge if necessary. 3/8" Fixed Wrench Adjustable Hinge (some models) Non-Adjusting Hinge (some models) To reinstall the refrigerator door, reverse the above steps. Lift the door off . Door Removal Instructions Getting through an entrance area, you can...
.... CAUTION Be sure doors are set it aside. 3 Remove the two bottom hinge screws and hinge if necessary. 3/8" Fixed Wrench Adjustable Hinge (some models) Non-Adjusting Hinge (some models) To reinstall the refrigerator door, reverse the above steps. Lift the door off . Door Removal Instructions Getting through an entrance area, you can...
Complete Owner's Guide (English)
Page 8
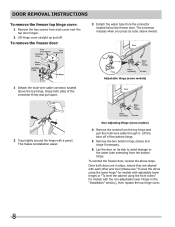
The connector releases when you press its side to avoid damage to the water tube extending from the bottom hinge. Non-Adjusting Hinge (some models) 2 Trace lightly around the hinge with a pencil. To reinstall the freezer door, reverse the above the top hinge. Grasp both doors are ...top door hinges. 2 Lift hinge cover straight up and off of the connector firmly and pull apart. This makes reinstallation easier. Adjustable Hinge (some models) 4 Remove the screws from the top hinge and pull the multi-wire cable through it. Lift the door off . Once both sides of the...
The connector releases when you press its side to avoid damage to the water tube extending from the bottom hinge. Non-Adjusting Hinge (some models) 2 Trace lightly around the hinge with a pencil. To reinstall the freezer door, reverse the above the top hinge. Grasp both doors are ...top door hinges. 2 Lift hinge cover straight up and off of the connector firmly and pull apart. This makes reinstallation easier. Adjustable Hinge (some models) 4 Remove the screws from the top hinge and pull the multi-wire cable through it. Lift the door off . Once both sides of the...
Complete Owner's Guide (English)
Page 12
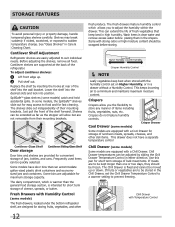
...cheese, spreads, or butter. Before adjusting the shelves, remove all food. Cantilever shelves are equipped with Humidity Control (some models) Some models are supported at rear of fresh vegetables that can be kept longer than the general food storage section, is fixed and ... warmer setting to suit individual needs. Crisper Humidity Control NOTE Leafy vegetables keep best in either direction. Cool Drawer (some models) catch and hold accidental spills. Chill Drawer temperatures can be wrapped before placing them in Care & Cleaning Chart. Chill Drawer with ...
...cheese, spreads, or butter. Before adjusting the shelves, remove all food. Cantilever shelves are equipped with Humidity Control (some models) Some models are supported at rear of fresh vegetables that can be kept longer than the general food storage section, is fixed and ... warmer setting to suit individual needs. Crisper Humidity Control NOTE Leafy vegetables keep best in either direction. Cool Drawer (some models) catch and hold accidental spills. Chill Drawer temperatures can be wrapped before placing them in Care & Cleaning Chart. Chill Drawer with ...
Complete Owner's Guide (English)
Page 13
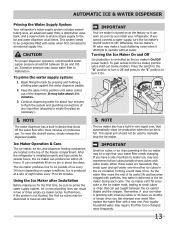
After the refrigerator is delivered to the ice maker, pull the extra shelf out (some models). Air in new plumbing lines can 't fill every cube in the ice maker mold, leading to small cubes or chips that automatically stops ice production ...
After the refrigerator is delivered to the ice maker, pull the extra shelf out (some models). Air in new plumbing lines can 't fill every cube in the ice maker mold, leading to small cubes or chips that automatically stops ice production ...
Complete Owner's Guide (English)
Page 17
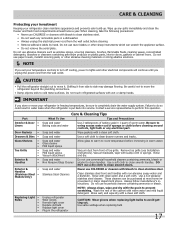
... Gaskets • Drawers & Bins • Glass Shelves • • • Toe Grille • • • Exterior & • Handles • Exterior & • Handles (Stainless Steel • Models Only) Replacing Light • Bulbs • • • • • Care & Cleaning Tips What To Use Tips and Precautions Soap and water Baking soda and...
... Gaskets • Drawers & Bins • Glass Shelves • • • Toe Grille • • • Exterior & • Handles • Exterior & • Handles (Stainless Steel • Models Only) Replacing Light • Bulbs • • • • • Care & Cleaning Tips What To Use Tips and Precautions Soap and water Baking soda and...
Complete Owner's Guide (English)
Page 19
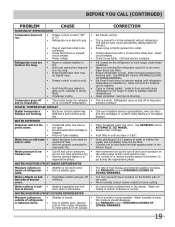
...in the drawer. The defrost cycle occurs periodically, lasting about 30 minutes. Open doors less often. Clean or change gasket. Call your Frigidaire service representative, who can interpret any messages or number codes flashing on bot- • Vegetables contain and give off • tom ... The rate of water to work longer under these conditions. See PROBLEM column OPENING/CLOSING OF DOORS/DRAWERS. Move humidity control (some models) to the kitchen faucet. Water collecting in humid weather. This is lower, the moisture should disappear. When humidity is normal in bottom...
...in the drawer. The defrost cycle occurs periodically, lasting about 30 minutes. Open doors less often. Clean or change gasket. Call your Frigidaire service representative, who can interpret any messages or number codes flashing on bot- • Vegetables contain and give off • tom ... The rate of water to work longer under these conditions. See PROBLEM column OPENING/CLOSING OF DOORS/DRAWERS. Move humidity control (some models) to the kitchen faucet. Water collecting in humid weather. This is lower, the moisture should disappear. When humidity is normal in bottom...
Wiring Diagram (All Languages)
Page 1
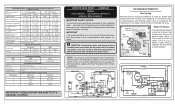
... plastic liner. PERFORMANCE DATA NO LOAD & NO DOOR OPENINGS AT MID-POINT CONTROL SETTING Type A with an Electronic Defrost Control. AUTOMATIC DEFROST SIDE BY SIDE MODELS important safety notice The information provided herein is replaced, the fill volume must be checked. Excessive heat will change the fill time. Disconnect power cord...
... plastic liner. PERFORMANCE DATA NO LOAD & NO DOOR OPENINGS AT MID-POINT CONTROL SETTING Type A with an Electronic Defrost Control. AUTOMATIC DEFROST SIDE BY SIDE MODELS important safety notice The information provided herein is replaced, the fill volume must be checked. Excessive heat will change the fill time. Disconnect power cord...


