Complete Owner's Guide (English)
Page 5
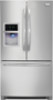
... best use an extension cord or an adapter plug. • If possible, place the refrigerator out of your model. Installation • Allow the following tools: Installation This Use & Care Guide provides general installation and operating instructions for your refrigerator. Sufficient air circulation is near a grounded, non-GFCI, electrical outlet. Do Not use of...
... best use an extension cord or an adapter plug. • If possible, place the refrigerator out of your model. Installation • Allow the following tools: Installation This Use & Care Guide provides general installation and operating instructions for your refrigerator. Sufficient air circulation is near a grounded, non-GFCI, electrical outlet. Do Not use of...
Complete Owner's Guide (English)
Page 6
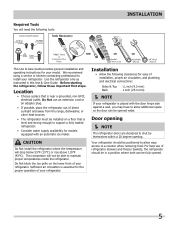
This is not sealed, open freezer drawer. Level Refrigerator & Adjust Doors (if necessary) Guidelines for final positioning of your refrigerator: • All four corners of the cabinet must rest firmly on the floor. • The sides should tilt 1/4 inch (6 mm) from...from front to back (to rotate. Most of freezer drawer. 3 If gasket is a factory adjustment. To level the cabinet using the front rollers (select models): 1 Slightly open drawer and slightly loosen four (4) drawer screws (two (2) on the gasket (A). To lower: turn adjustment screw counterclockwise. 2 Ensure both ...
This is not sealed, open freezer drawer. Level Refrigerator & Adjust Doors (if necessary) Guidelines for final positioning of your refrigerator: • All four corners of the cabinet must rest firmly on the floor. • The sides should tilt 1/4 inch (6 mm) from...from front to back (to rotate. Most of freezer drawer. 3 If gasket is a factory adjustment. To level the cabinet using the front rollers (select models): 1 Slightly open drawer and slightly loosen four (4) drawer screws (two (2) on the gasket (A). To lower: turn adjustment screw counterclockwise. 2 Ensure both ...

Complete Owner's Guide (English)
Page 7
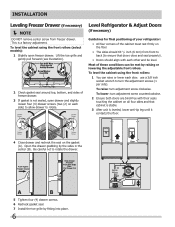
Installation 5 Re-tighten screw. To level the doors using the adjustable lower hinge (select models): 1 Remove all food items from door bins on door being adjusted. 2 Open doors to desired location. B Loosen or Remove Screw Adjusting Door 4 Rotate door stop ... degrees. 3 Loosen or remove screw. Re-tighten Screw 6 Ensure door stops in desired location before resuming normal use. A Open Door 90 degrees Bottom of the refrigerator door. To adjust the door stop: Door stop until it makes contact with rollers. 7
Installation 5 Re-tighten screw. To level the doors using the adjustable lower hinge (select models): 1 Remove all food items from door bins on door being adjusted. 2 Open doors to desired location. B Loosen or Remove Screw Adjusting Door 4 Rotate door stop ... degrees. 3 Loosen or remove screw. Re-tighten Screw 6 Ensure door stops in desired location before resuming normal use. A Open Door 90 degrees Bottom of the refrigerator door. To adjust the door stop: Door stop until it makes contact with rollers. 7
Complete Owner's Guide (English)
Page 15
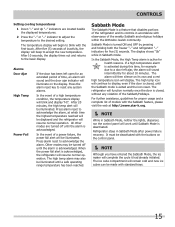
... the alarm, at http:\\www.star-k.org. NOTE While in accordance with the buttons on the display. In the event of models with the Sabbath feature, please visit the web at which time the highest temperature reached will be illuminated. When the power fail alert is... health reasons. The high temp alarm may be made with the first touch. In the Sabbath Mode, the High Temp alarm is acknowledged, the refrigerator will work until Sabbath Mode is acknowledged. For further assistance, guidelines for five (5) seconds. All other modes are located beside the displayed temperatures. ...
... the alarm, at http:\\www.star-k.org. NOTE While in accordance with the buttons on the display. In the event of models with the Sabbath feature, please visit the web at which time the highest temperature reached will be illuminated. When the power fail alert is... health reasons. The high temp alarm may be made with the first touch. In the Sabbath Mode, the High Temp alarm is acknowledged, the refrigerator will work until Sabbath Mode is acknowledged. For further assistance, guidelines for five (5) seconds. All other modes are located beside the displayed temperatures. ...
Complete Owner's Guide (English)
Page 18
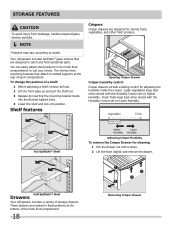
...are designed for adjusting the humidity inside the crisper. Shelf features Crispers Crisper drawers are located in the fresh food compartments to model. Opening Crisper Drawer Crisper humidity control Crisper drawers include a sliding control for storing fruits, vegetables, and other fresh produce.... To change the position of storage drawers. Your refrigerator includes SpillSafeTM glass shelves that attach to catch and hold accidental spills. Fresh fruits keep best when stored with the Humidity ...
...are designed for adjusting the humidity inside the crisper. Shelf features Crispers Crisper drawers are located in the fresh food compartments to model. Opening Crisper Drawer Crisper humidity control Crisper drawers include a sliding control for storing fruits, vegetables, and other fresh produce.... To change the position of storage drawers. Your refrigerator includes SpillSafeTM glass shelves that attach to catch and hold accidental spills. Fresh fruits keep best when stored with the Humidity ...
Complete Owner's Guide (English)
Page 19
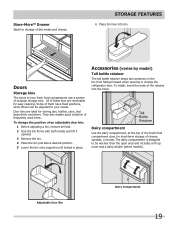
...have fixed positions, while others can be adjusted to be warmer than the open area and includes a lift-up cover and a dairy divider (select models). They also enable quick selection of frequently used items. To change the position of an adjustable door bin: 1 Before adjusting a bin, remove all ...the bin just above desired position. 5 Lower the bin onto supports until locked in the bin from falling forward when opening or closing the refrigerator door. Dairy compartment Use the dairy compartment, at the top of the fresh food compartment door, for storage of deli meats and cheese. ...
...have fixed positions, while others can be adjusted to be warmer than the open area and includes a lift-up cover and a dairy divider (select models). They also enable quick selection of frequently used items. To change the position of an adjustable door bin: 1 Before adjusting a bin, remove all ...the bin just above desired position. 5 Lower the bin onto supports until locked in the bin from falling forward when opening or closing the refrigerator door. Dairy compartment Use the dairy compartment, at the top of the fresh food compartment door, for storage of deli meats and cheese. ...
Complete Owner's Guide (English)
Page 23
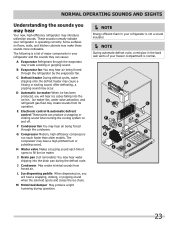
... may create a boiling or gurgling sound. G Compressor Modern, high-efficiency compressors run much faster than older models. I Drain pan (not removable) You may create sounds from forced air. Ice maker fan, water valve activation, and refrigerant gas fluid may hear water dripping into the ice bin. F Condenser fan You may introduce unfamiliar...
... may create a boiling or gurgling sound. G Compressor Modern, high-efficiency compressors run much faster than older models. I Drain pan (not removable) You may create sounds from forced air. Ice maker fan, water valve activation, and refrigerant gas fluid may hear water dripping into the ice bin. F Condenser fan You may introduce unfamiliar...
Complete Owner's Guide (English)
Page 27
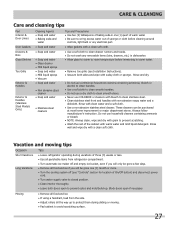
... handles with warm water and mild liquid detergent. Moving • Remove all food and ice. • If using a handcart, load from refrigerator compartment. • Turn automatic ice maker off (see Installation Instructions). • Vacuum both doors open if necessary. Rinse and dry. •... Care and cleaning tips Part Interior & Door Liners Door Gaskets Drawers & Bins Glass Shelves Toe Grille Exterior & Handles Exterior & Handles (Stainless Steel Models Only) Cleaning Agents • Soap and water • Baking soda and water • Soap and water • Soap and water • ...
... handles with warm water and mild liquid detergent. Moving • Remove all food and ice. • If using a handcart, load from refrigerator compartment. • Turn automatic ice maker off (see Installation Instructions). • Vacuum both doors open if necessary. Rinse and dry. •... Care and cleaning tips Part Interior & Door Liners Door Gaskets Drawers & Bins Glass Shelves Toe Grille Exterior & Handles Exterior & Handles (Stainless Steel Models Only) Cleaning Agents • Soap and water • Baking soda and water • Soap and water • Soap and water • ...
Complete Owner's Guide (English)
Page 28
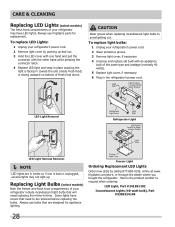
... cover by calling 877-808-4195, online at www. Some lights have LED lights. frigidaire.com/store, or through the dealer where you bought the refrigerator. Care & Cleaning Replacing LED Lights (select models) The fresh food compartments of your refrigerator include incandescent light bulbs that will need to avoid getting cut. Always use bulbs...
... cover by calling 877-808-4195, online at www. Some lights have LED lights. frigidaire.com/store, or through the dealer where you bought the refrigerator. Care & Cleaning Replacing LED Lights (select models) The fresh food compartments of your refrigerator include incandescent light bulbs that will need to avoid getting cut. Always use bulbs...
Complete Owner's Guide (English)
Page 30
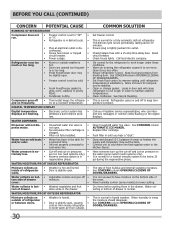
...lower, the moisture should disappear. COMMON SOLUTION Set freezer control. It's normal for a fully automatic defrost refrigerator. See Care & Cleaning. Call your Frigidaire service representative, who can interpret any messages or number codes flashing on pressures • are flashing. &#...on • Weather is hot and humid. • inside refrigerator to be slightly open . • walls. Connect unit to cold water line that supplies water to lower setting. Move humidity control (some models) to the kitchen faucet. Water collects on frequently. •...
...lower, the moisture should disappear. COMMON SOLUTION Set freezer control. It's normal for a fully automatic defrost refrigerator. See Care & Cleaning. Call your Frigidaire service representative, who can interpret any messages or number codes flashing on pressures • are flashing. &#...on • Weather is hot and humid. • inside refrigerator to be slightly open . • walls. Connect unit to cold water line that supplies water to lower setting. Move humidity control (some models) to the kitchen faucet. Water collects on frequently. •...
Installation Instructions (All Languages)
Page 1
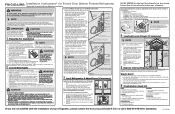
... level the cabinet using the adjustable lower hinge (select models, if necessary): 1 Open doors to 90 degrees. 2 Remove screw. 3 Lift the door while adjusting the washer. To raise the door: rotate washer clockwise. Bottom of your refrigerator. Check gasket seal around top, bottom, and sides ... the Use & Care Guide. You can register online at all sides □ Fresh food doors are ready to begin enjoying your new Frigidaire refrigerator. • For important safety instructions and to learn what to expect during typical operation. • Please register your product. culation is ...
... level the cabinet using the adjustable lower hinge (select models, if necessary): 1 Open doors to 90 degrees. 2 Remove screw. 3 Lift the door while adjusting the washer. To raise the door: rotate washer clockwise. Bottom of your refrigerator. Check gasket seal around top, bottom, and sides ... the Use & Care Guide. You can register online at all sides □ Fresh food doors are ready to begin enjoying your new Frigidaire refrigerator. • For important safety instructions and to learn what to expect during typical operation. • Please register your product. culation is ...


