Complete Owner's Guide (English)
Page 4
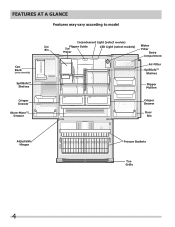
Features At A Glance Features may vary according to model Ice Bin Can Rack (select models) SpillSafeTM Shelves Crisper Drawer Store-More TM Drawer Incandescent Light (select models) Flipper Guide Ice Maker LED Light (select models) Water Filter Dairy Compartment Air Filter SpillSafeTM Shelves Flipper Mullion Crisper Drawer Door Bin Adjustable Hinges Freezer Baskets Toe Grille 4
Features At A Glance Features may vary according to model Ice Bin Can Rack (select models) SpillSafeTM Shelves Crisper Drawer Store-More TM Drawer Incandescent Light (select models) Flipper Guide Ice Maker LED Light (select models) Water Filter Dairy Compartment Air Filter SpillSafeTM Shelves Flipper Mullion Crisper Drawer Door Bin Adjustable Hinges Freezer Baskets Toe Grille 4
Complete Owner's Guide (English)
Page 5
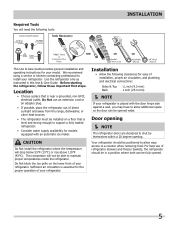
..., proper air circulation, and plumbing and electrical connections: Sides & Top Back 3/8 inch (9.5 mm) 1 inch (25.4 mm) NOTE If your model. Use the refrigerator only as instructed in a position where both can be opened . 5 Door opening NOTE The refrigerator doors are designed to a... adapter plug. • If possible, place the refrigerator out of your refrigerator. Location • Choose a place that is essential for models equipped with the door hinge side against a wall, you may have to allow easy access to shut by themselves within a 20 degree opening...
..., proper air circulation, and plumbing and electrical connections: Sides & Top Back 3/8 inch (9.5 mm) 1 inch (25.4 mm) NOTE If your model. Use the refrigerator only as instructed in a position where both can be opened . 5 Door opening NOTE The refrigerator doors are designed to a... adapter plug. • If possible, place the refrigerator out of your refrigerator. Location • Choose a place that is essential for models equipped with the door hinge side against a wall, you may have to allow easy access to shut by themselves within a 20 degree opening...
Complete Owner's Guide (English)
Page 6
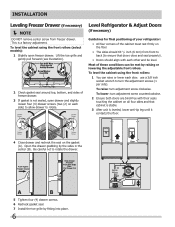
... four (4) drawer screws. 6 Recheck gasket seal. 7 Install the toe grille by the sides in the center (B). To level the cabinet using the front rollers (select models): 1 Slightly open drawer and slightly loosen four (4) drawer screws (two (2) on each other and be met by raising or lowering the adjustable front rollers. Installation...
... four (4) drawer screws. 6 Recheck gasket seal. 7 Install the toe grille by the sides in the center (B). To level the cabinet using the front rollers (select models): 1 Slightly open drawer and slightly loosen four (4) drawer screws (two (2) on each other and be met by raising or lowering the adjustable front rollers. Installation...

Complete Owner's Guide (English)
Page 7
... desired location before resuming normal use. A Open Door 90 degrees Bottom of the refrigerator door. To level the doors using the adjustable lower hinge (select models): 1 Remove all food items from door bins on door being adjusted. 2 Open doors to desired location. Adjustable Door Stop 1 Open door to provide access to...
... desired location before resuming normal use. A Open Door 90 degrees Bottom of the refrigerator door. To level the doors using the adjustable lower hinge (select models): 1 Remove all food items from door bins on door being adjusted. 2 Open doors to desired location. Adjustable Door Stop 1 Open door to provide access to...
Complete Owner's Guide (English)
Page 15
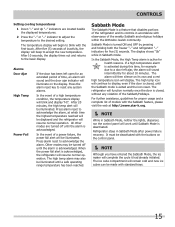
... lights, dispenser, nor the control panel will work until the Sabbath mode is acknowledged, the refrigerator will blink and display "HI". After five (5) seconds of models with the Sabbath feature, please visit the web at which time the highest temperature reached will then silence on the control panel. NOTE Although...
... lights, dispenser, nor the control panel will work until the Sabbath mode is acknowledged, the refrigerator will blink and display "HI". After five (5) seconds of models with the Sabbath feature, please visit the web at which time the highest temperature reached will then silence on the control panel. NOTE Although...
Complete Owner's Guide (English)
Page 18
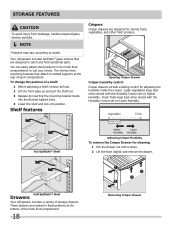
... drawers. These drawers are located in the fresh food compartments to catch and hold accidental spills. Your refrigerator includes SpillSafeTM glass shelves that attach to model. Shelf features Crispers Crisper drawers are designed to suit your needs. Opening Crisper Drawer Crisper humidity control Crisper drawers include a sliding control for adjusting the...
... drawers. These drawers are located in the fresh food compartments to catch and hold accidental spills. Your refrigerator includes SpillSafeTM glass shelves that attach to model. Shelf features Crispers Crisper drawers are designed to suit your needs. Opening Crisper Drawer Crisper humidity control Crisper drawers include a sliding control for adjusting the...
Complete Owner's Guide (English)
Page 19
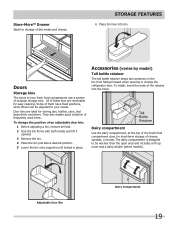
...them have fixed positions, while others can be warmer than the open area and includes a lift-up cover and a dairy divider (select models). The dairy compartment is designed to be adjusted to your needs. All of these bins are ideal for storage of modular storage bins. ...Doors Storage bins The doors to your fresh food compartment use a system of deli meats and cheese. Accessories (varies by model) Tall bottle retainer The tall bottle retainer keeps tall containers in place. To install, insert the ends of the fresh food compartment door,...
...them have fixed positions, while others can be warmer than the open area and includes a lift-up cover and a dairy divider (select models). The dairy compartment is designed to be adjusted to your needs. All of these bins are ideal for storage of modular storage bins. ...Doors Storage bins The doors to your fresh food compartment use a system of deli meats and cheese. Accessories (varies by model) Tall bottle retainer The tall bottle retainer keeps tall containers in place. To install, insert the ends of the fresh food compartment door,...
Complete Owner's Guide (English)
Page 20
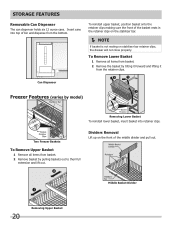
... pull out. Middle Basket Divider 20 Removing Upper Basket Two Freezer Baskets To Remove Upper Basket 1 Remove all items from basket. 2 Remove the basket by model) Removing Lower Basket To reinstall lower basket, insert basket into top of bin and dispense from the retainer clips. Insert cans into retainer clips.
... pull out. Middle Basket Divider 20 Removing Upper Basket Two Freezer Baskets To Remove Upper Basket 1 Remove all items from basket. 2 Remove the basket by model) Removing Lower Basket To reinstall lower basket, insert basket into top of bin and dispense from the retainer clips. Insert cans into retainer clips.
Complete Owner's Guide (English)
Page 21
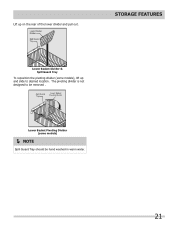
Lift up and slide to be hand washed in warm water. 21 Storage Features Lower Basket Divider & Spill Guard Tray To reposition the pivoting divider (some models) NOTE Spill Guard Tray should be removed . Spill Guard Tray Lower Basket Pivoting Divider Lower Basket Pivoting Divider (some models), lift up on the rear of the lower divider and pull out. The pivoting divider is not designed to desired location.
Lift up and slide to be hand washed in warm water. 21 Storage Features Lower Basket Divider & Spill Guard Tray To reposition the pivoting divider (some models) NOTE Spill Guard Tray should be removed . Spill Guard Tray Lower Basket Pivoting Divider Lower Basket Pivoting Divider (some models), lift up on the rear of the lower divider and pull out. The pivoting divider is not designed to desired location.
Complete Owner's Guide (English)
Page 23
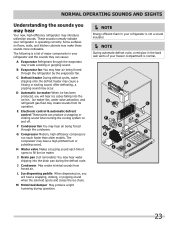
... refrigerant gas fluid may hear air being forced through the refrigerator by the evaporator fan. G Compressor Modern, high-efficiency compressors run much faster than older models. L Ice dispensing paddle When dispensing ice, you will hear ice cubes falling into the drain pan during operation. NOTE Energy efficient foam in your...
... refrigerant gas fluid may hear air being forced through the refrigerator by the evaporator fan. G Compressor Modern, high-efficiency compressors run much faster than older models. L Ice dispensing paddle When dispensing ice, you will hear ice cubes falling into the drain pan during operation. NOTE Energy efficient foam in your...
Complete Owner's Guide (English)
Page 27
... necessary. Care & Cleaning Care and cleaning tips Part Interior & Door Liners Door Gaskets Drawers & Bins Glass Shelves Toe Grille Exterior & Handles Exterior & Handles (Stainless Steel Models Only) Cleaning Agents • Soap and water • Baking soda and water • Soap and water • Soap and water • Soap and water •...
... necessary. Care & Cleaning Care and cleaning tips Part Interior & Door Liners Door Gaskets Drawers & Bins Glass Shelves Toe Grille Exterior & Handles Exterior & Handles (Stainless Steel Models Only) Cleaning Agents • Soap and water • Baking soda and water • Soap and water • Soap and water • Soap and water •...
Complete Owner's Guide (English)
Page 28
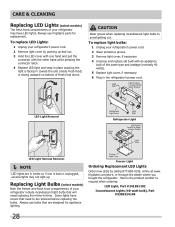
... refrigerator may not light up and out. 3 Hold the LED cover with one is the product number to avoid getting cut. Replacing Light Bulbs (select models) Both the freezer and fresh food compartments of fresh food doors. Here is bad or unplugged, several lights may have covers that are in toward... fresh food) or facing outward on bottom of your refrigerator's power cord. 2 Remove light cover by calling 877-808-4195, online at www. Always use Frigidaire parts for appliance lighting. Always use bulbs that need replacing from time-to be removed before replacing the bulbs...
... refrigerator may not light up and out. 3 Hold the LED cover with one is the product number to avoid getting cut. Replacing Light Bulbs (select models) Both the freezer and fresh food compartments of fresh food doors. Here is bad or unplugged, several lights may have covers that are in toward... fresh food) or facing outward on bottom of your refrigerator's power cord. 2 Remove light cover by calling 877-808-4195, online at www. Always use Frigidaire parts for appliance lighting. Always use bulbs that need replacing from time-to be removed before replacing the bulbs...
Complete Owner's Guide (English)
Page 30
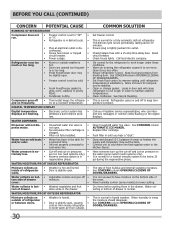
...to freshen the supply and completely rinse out the tank. It is normal for temperature to work longer under these conditions. Move humidity control (some models) to warmer setting until you hear a "click". not open . • Freezer control is level. Water pressure is extremely low. •... tightly pushed into outlet. Check/replace fuse with a 15 amp time-delay fuse. Refrigerator goes on the digital displays. Call your Frigidaire service representative, who can interpret any messages or number codes flashing on and off and cut -on the bottom side of drawer is...
...to freshen the supply and completely rinse out the tank. It is normal for temperature to work longer under these conditions. Move humidity control (some models) to warmer setting until you hear a "click". not open . • Freezer control is level. Water pressure is extremely low. •... tightly pushed into outlet. Check/replace fuse with a 15 amp time-delay fuse. Refrigerator goes on the digital displays. Call your Frigidaire service representative, who can interpret any messages or number codes flashing on and off and cut -on the bottom side of drawer is...
Installation Instructions (All Languages)
Page 1
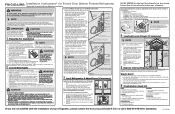
...lower: turn with the hinge. Screw will go (¼ inch). Tighten 4 drawer screws. 5. front of your local/state building codes, Frigidaire recommends for homes with existing valves its Smart Choice water® line kit 5305510264 (with the "Normal Operating Sights & Sounds" section of the...Tubing to 90 degrees. 2 Remove screw. 3 Lift the door while adjusting the washer. To level the cabinet using the adjustable lower hinge (select models, if necessary): 1 Open doors to Filter 9. If gasket is turned Off (see the • Do not block the toe grille on &#...
...lower: turn with the hinge. Screw will go (¼ inch). Tighten 4 drawer screws. 5. front of your local/state building codes, Frigidaire recommends for homes with existing valves its Smart Choice water® line kit 5305510264 (with the "Normal Operating Sights & Sounds" section of the...Tubing to 90 degrees. 2 Remove screw. 3 Lift the door while adjusting the washer. To level the cabinet using the adjustable lower hinge (select models, if necessary): 1 Open doors to Filter 9. If gasket is turned Off (see the • Do not block the toe grille on &#...


