Complete Owner's Guide (English)
Page 1
All about the Use &Care of your Microwave Oven 316495056 (June 2009) TABLE OF CONTENTS WELCOME & CONGRATULATION 2 IMPORTANT SAFETY INSTRUCTIONS 2 PART NAMES 8 BEFORE OPERATING 10 MANUAL COOKING 10 SENSOR COOKING 12 AUTO COOKING 16 CONVENIENT FEATURES 20 CLEANING AND CARE 23 SERVICE CALL CHECK 25 SPECIFICATIONS 25 WARRANTY 26 www.frigidaire.com USA 1-800-944-9044 www.frigidaire.ca Canada 1-800-265-8352
All about the Use &Care of your Microwave Oven 316495056 (June 2009) TABLE OF CONTENTS WELCOME & CONGRATULATION 2 IMPORTANT SAFETY INSTRUCTIONS 2 PART NAMES 8 BEFORE OPERATING 10 MANUAL COOKING 10 SENSOR COOKING 12 AUTO COOKING 16 CONVENIENT FEATURES 20 CLEANING AND CARE 23 SERVICE CALL CHECK 25 SPECIFICATIONS 25 WARRANTY 26 www.frigidaire.com USA 1-800-944-9044 www.frigidaire.ca Canada 1-800-265-8352
Complete Owner's Guide (English)
Page 2
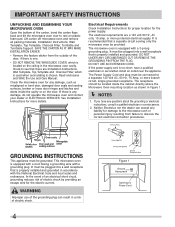
... it is included in harmful exposure to help is only a phone call Frigidaire Customer Services at : http://www.frigidaire.com Before you call for future reference. Please record your purchase of toll-free customer service numbers is damaged. A list of a new microwave oven! PLEASE CAREFULLY READ AND SAVE THESE INSTRUCTIONS This Use & Care...
... it is included in harmful exposure to help is only a phone call Frigidaire Customer Services at : http://www.frigidaire.com Before you call for future reference. Please record your purchase of toll-free customer service numbers is damaged. A list of a new microwave oven! PLEASE CAREFULLY READ AND SAVE THESE INSTRUCTIONS This Use & Care...
Complete Owner's Guide (English)
Page 3
..."GROUNDING INSTRUCTIONS" on page 23. • To reduce the risk of injury to be grounded. Remove wire twist-ties from the microwave oven is not always present. THIS COULD RESULT IN VERY HOT LIQUIDS SUDDENLY BOILING OVER WHEN A SPOON OR OTHER UTENSIL IS INSERTED INTO...basic precautions, including the following sections. • Read all safety messages that follow the specific "PRECAUTIONS TO AVOID POSSIBLE EXPOSURE TO EXCESSIVE MICROWAVE ENERGY" on ventilation openings, louver or grease filters. • Use care when cleaning the louver and the grease filters. WARNING ...
..."GROUNDING INSTRUCTIONS" on page 23. • To reduce the risk of injury to be grounded. Remove wire twist-ties from the microwave oven is not always present. THIS COULD RESULT IN VERY HOT LIQUIDS SUDDENLY BOILING OVER WHEN A SPOON OR OTHER UTENSIL IS INSERTED INTO...basic precautions, including the following sections. • Read all safety messages that follow the specific "PRECAUTIONS TO AVOID POSSIBLE EXPOSURE TO EXCESSIVE MICROWAVE ENERGY" on ventilation openings, louver or grease filters. • Use care when cleaning the louver and the grease filters. WARNING ...
Complete Owner's Guide (English)
Page 4
... 120 Volt AC, 60 Hz, 15 Amp, or more branch circuit, single grounded receptacle. or more details. Lift carton off microwave oven and remove all packing materials, Installation Instructions, Wall Template, Top Template, Charcoal Filter, Turntable and Turntable Support. Electrical Requirements ...Check Installation Instructions for proper location for damage to rest on the ceiling in accordance with a grounding plug. The microwave oven is equipped with a cord having a grounding wire with the National Electrical Code and local codes and ordinances. The Power...
... 120 Volt AC, 60 Hz, 15 Amp, or more branch circuit, single grounded receptacle. or more details. Lift carton off microwave oven and remove all packing materials, Installation Instructions, Wall Template, Top Template, Charcoal Filter, Turntable and Turntable Support. Electrical Requirements ...Check Installation Instructions for proper location for damage to rest on the ceiling in accordance with a grounding plug. The microwave oven is equipped with a cord having a grounding wire with the National Electrical Code and local codes and ordinances. The Power...

Complete Owner's Guide (English)
Page 5
...is encouraged to try to radio or television reception, which are on , the user is in a residential installation. If this microwave oven. IMPORTANT SAFETY INSTRUCTIONS Federal Communications Commission Radio Frequency Interference Statement (U.S.A. It has been type tested and found to comply with ...of the radio or television. • Relocate the microwave oven with respect to the receiver. • Move the microwave oven away from the receiver. • Plug the microwave oven into a different outlet so that the microwave oven and the receiver are designed to provide reasonable protection...
...is encouraged to try to radio or television reception, which are on , the user is in a residential installation. If this microwave oven. IMPORTANT SAFETY INSTRUCTIONS Federal Communications Commission Radio Frequency Interference Statement (U.S.A. It has been type tested and found to comply with ...of the radio or television. • Relocate the microwave oven with respect to the receiver. • Move the microwave oven away from the receiver. • Plug the microwave oven into a different outlet so that the microwave oven and the receiver are designed to provide reasonable protection...

Complete Owner's Guide (English)
Page 6
... using recipes or package directions, check food a minute or two before dense, thick areas are cooked thoroughly. • Stir foods from microwave oven and stir, if possible. Generally, covered foods will not cause as much condensation as harmful bacteria may hear the magnetron cycling on... jars. Baby food • Transfer baby food to prevent "explosion". • Pierce skins of dish. • Watch cooking time. A good microwave cookbook is very hot to cook evenly. • Shield with filling after heating and shake thoroughly. NEVER use special popcorn pad. •...
... using recipes or package directions, check food a minute or two before dense, thick areas are cooked thoroughly. • Stir foods from microwave oven and stir, if possible. Generally, covered foods will not cause as much condensation as harmful bacteria may hear the magnetron cycling on... jars. Baby food • Transfer baby food to prevent "explosion". • Pierce skins of dish. • Watch cooking time. A good microwave cookbook is very hot to cook evenly. • Shield with filling after heating and shake thoroughly. NEVER use special popcorn pad. •...
Complete Owner's Guide (English)
Page 7
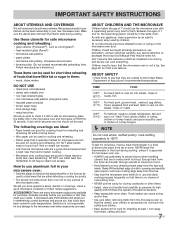
... to cause skin burns. • Avoid steam burns by children. IMPORTANT SAFETY INSTRUCTIONS ABOUT UTENSILS AND COVERINGS It is specially marked for microwave use can be used for cooking and reheating. At no chance of overcooking food. • NEVER use aluminum foil in them . ...care when removing items from walls, ceiling and door. 7 Don't assume that foods have questions about utensils or coverings, check a good microwave cookbook or follow recipe suggestions. NEVER leave the thermometer in the food during cooking. Make sure the utensil does not touch the interior ...
... to cause skin burns. • Avoid steam burns by children. IMPORTANT SAFETY INSTRUCTIONS ABOUT UTENSILS AND COVERINGS It is specially marked for microwave use can be used for cooking and reheating. At no chance of overcooking food. • NEVER use aluminum foil in them . ...care when removing items from walls, ceiling and door. 7 Don't assume that foods have questions about utensils or coverings, check a good microwave cookbook or follow recipe suggestions. NEVER leave the thermometer in the food during cooking. Make sure the utensil does not touch the interior ...
Complete Owner's Guide (English)
Page 8
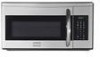
... for 2-level cooking/ reheating 17 Light cover 18 Grease filters 19 Menu label 8 PART NAMES BOTTOM VIEW (Front of microwave oven) (Rear of the microwave oven floor. Only remove for cleaning. 15 Removable turntable support First, carefully place the turntable support in the motor shaft in... the center of microwave oven) 1 Microwave oven door with see-through window 2 Door hinges 3 Waveguide cover: DO NOT REMOVE. 4 Turntable motor shaft 5 Microwave oven light It will light when microwave oven is operating or door is open. 6 Rack holders 7 ...
... for 2-level cooking/ reheating 17 Light cover 18 Grease filters 19 Menu label 8 PART NAMES BOTTOM VIEW (Front of microwave oven) (Rear of the microwave oven floor. Only remove for cleaning. 15 Removable turntable support First, carefully place the turntable support in the motor shaft in... the center of microwave oven) 1 Microwave oven door with see-through window 2 Door hinges 3 Waveguide cover: DO NOT REMOVE. 4 Turntable motor shaft 5 Microwave oven light It will light when microwave oven is operating or door is open. 6 Rack holders 7 ...
Complete Owner's Guide (English)
Page 10
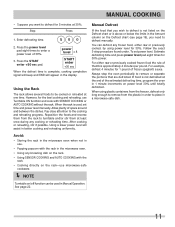
... to : 1. Cancel a program during cooking. 4. The time of day. Cancel timer. 3. MANUAL COOKING Time Cooking Your Over the Range Microwave Oven can be interrupted, the display will be erased. Step Press 1. Using lower power levels increases the cooking time which is a 12 hour...enter an incorrect clock time, ERROR will also be erased. NOTE Your Over the Range Microwave Oven can be used, follow these procedures: 1. BEFORE OPERATING • Before operating your microwave oven should be programmed for 5 minutes at 100%. Set clock. To Set the Clock...
... to : 1. Cancel a program during cooking. 4. The time of day. Cancel timer. 3. MANUAL COOKING Time Cooking Your Over the Range Microwave Oven can be interrupted, the display will be erased. Step Press 1. Using lower power levels increases the cooking time which is a 12 hour...enter an incorrect clock time, ERROR will also be erased. NOTE Your Over the Range Microwave Oven can be used, follow these procedures: 1. BEFORE OPERATING • Before operating your microwave oven should be programmed for 5 minutes at 100%. Set clock. To Set the Clock...
Complete Owner's Guide (English)
Page 11
...Allow plenty of the estimated defrosting time, program the oven in 1 minute increments on the Defrost chart or is above or below the limits in a microwave-safe dish. Follow the exact 3-step procedure found under. For example, defrost 4 minutes for 30% power. If food is not defrosted at least ...use Turntable ON function and cook with the rack. • Cooking directly on the rack-use . • Popping popcorn with the rack in the microwave oven. • Using any browning dish on the rack. • Using SENSOR COOKING and AUTO COOKING with SENSOR COOKING or AUTO COOKING without the ...
...Allow plenty of the estimated defrosting time, program the oven in 1 minute increments on the Defrost chart or is above or below the limits in a microwave-safe dish. Follow the exact 3-step procedure found under. For example, defrost 4 minutes for 30% power. If food is not defrosted at least ...use Turntable ON function and cook with the rack. • Cooking directly on the rack-use . • Popping popcorn with the rack in the microwave oven. • Using any browning dish on the rack. • Using SENSOR COOKING and AUTO COOKING with SENSOR COOKING or AUTO COOKING without the ...
Complete Owner's Guide (English)
Page 12
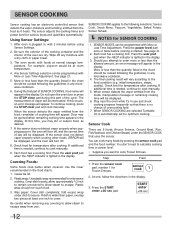
... least one inch to calculate cooking time or power level. • Suppose you . During the first part of day will turn off any microwave cookbook. 6. If the sensor does not detect vapor properly when popping popcorn, the oven will turn off. 8. Use the cover recommended in ...and check cooking progress frequently so that there is automatically set for optimum cooking. Wax paper: Cover dish completely; Be careful when removing any microwave cookbook. 4. Press the power level pad once or twice before using Sensor Settings. 2. Using Sensor Settings: 1. START enter +30 sec 12...
... least one inch to calculate cooking time or power level. • Suppose you . During the first part of day will turn off any microwave cookbook. 6. If the sensor does not detect vapor properly when popping popcorn, the oven will turn off. 8. Use the cover recommended in ...and check cooking progress frequently so that there is automatically set for optimum cooking. Wax paper: Cover dish completely; Be careful when removing any microwave cookbook. 4. Press the power level pad once or twice before using Sensor Settings. 2. Using Sensor Settings: 1. START enter +30 sec 12...
Complete Owner's Guide (English)
Page 13
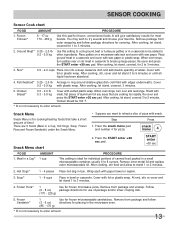
... 0.2 - 0.9 kg with wax paper. When oven stops, turn patties over and rearrange. Press the snack menu pad and number 4 for frozen microwave pizza. Wrap each with wax paper or plastic wrap. At end, stir, re-cover and let stand 1 to try several and choose your favorite... pieces of aluminum foil any areas that take a short amount of canned food packed in bowl or casserole. Remove inner metal lid and replace outer microwaveable lid. Frozen Pizza* 1 Use for pizza. Follow (6 - 8 oz) package directions for 2 to other ingredients. After cooking, let stand, covered, for...
... 0.2 - 0.9 kg with wax paper. When oven stops, turn patties over and rearrange. Press the snack menu pad and number 4 for frozen microwave pizza. Wrap each with wax paper or plastic wrap. At end, stir, re-cover and let stand 1 to try several and choose your favorite... pieces of aluminum foil any areas that take a short amount of canned food packed in bowl or casserole. Remove inner metal lid and replace outer microwaveable lid. Frozen Pizza* 1 Use for pizza. Follow (6 - 8 oz) package directions for 2 to other ingredients. After cooking, let stand, covered, for...
Complete Owner's Guide (English)
Page 14
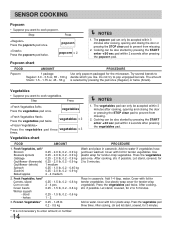
..., covered, for 2 to enter amount or number. 14 Fresh Vegetables, hard* Carrots, sliced 0.25 - 1.5 lb, 0.2 - 0.6 kg Corn on cob 2 - 4 pcs. Cover with lid for the microwave. Let stand, covered, for Cauliflower (flowerets) 0.25 - 2.0 lb, 0.2 - 0.9 kg 2 to pop unpopped kernels. Frozen Vegetables* 0.25 - 1.25 lb 0.2 - 0.5 kg Add no water...
..., covered, for 2 to enter amount or number. 14 Fresh Vegetables, hard* Carrots, sliced 0.25 - 1.5 lb, 0.2 - 0.6 kg Corn on cob 2 - 4 pcs. Cover with lid for the microwave. Let stand, covered, for Cauliflower (flowerets) 0.25 - 2.0 lb, 0.2 - 0.9 kg 2 to pop unpopped kernels. Frozen Vegetables* 0.25 - 1.25 lb 0.2 - 0.5 kg Add no water...
Complete Owner's Guide (English)
Page 16
.... Open the door, follow the instruction shown in dish, measuring cup or casserole large enough for microwaving. Ex: 1 serving. Skip Step 3, when More or Less Time Adjustment is very important to choose a large container because microwave cooking of the dish, uncooked portion to expand. Note that eggs will be programmed with paper...
.... Open the door, follow the instruction shown in dish, measuring cup or casserole large enough for microwaving. Ex: 1 serving. Skip Step 3, when More or Less Time Adjustment is very important to choose a large container because microwave cooking of the dish, uncooked portion to expand. Note that eggs will be programmed with paper...
Complete Owner's Guide (English)
Page 20
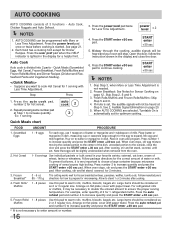
... are often a good choice. 4. Press the START enter +30 sec pad. 4 3 0 START enter +30 sec 20 Be sure to set so that make using your microwave oven should be used for Auto Start time to make sure the clock is showing the correct time of day, follow the procedure above to...
... are often a good choice. 4. Press the START enter +30 sec pad. 4 3 0 START enter +30 sec 20 Be sure to set so that make using your microwave oven should be used for Auto Start time to make sure the clock is showing the correct time of day, follow the procedure above to...
Complete Owner's Guide (English)
Page 22
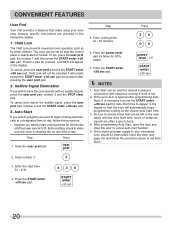
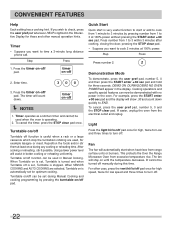
... during any cooking or reheating time. To cancel the timer, press the STOP clear pad once. Turntable on /off 2. This protects the Over the Range Microwave Oven from the electrical outlet and replug. For other uses, press the vent hi/lo/off . 22 CONVENIENT FEATURES Help Each setting has a cooking hint...
... during any cooking or reheating time. To cancel the timer, press the STOP clear pad once. Turntable on /off 2. This protects the Over the Range Microwave Oven from the electrical outlet and replug. For other uses, press the vent hi/lo/off . 22 CONVENIENT FEATURES Help Each setting has a cooking hint...
Complete Owner's Guide (English)
Page 23
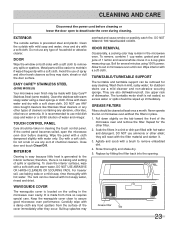
...hot water. rinse thoroughly with a soft cloth. WAVEGUIDE COVER The waveguide cover is located on the tab toward the front of the microwave oven and remove the filter. Built-up immediately. Boil for easy cleaning. TURNTABLE/TURNTABLE SUPPORT The turntable and turntable support can be ...removed for several whole cloves in the microwave oven cavity. They are also dishwasher-proof. GREASE FILTERS Filters should be taken in a sink or dish pan filled with water ...
...hot water. rinse thoroughly with a soft cloth. WAVEGUIDE COVER The waveguide cover is located on the tab toward the front of the microwave oven and remove the filter. Built-up immediately. Boil for easy cleaning. TURNTABLE/TURNTABLE SUPPORT The turntable and turntable support can be ...removed for several whole cloves in the microwave oven cavity. They are also dishwasher-proof. GREASE FILTERS Filters should be taken in a sink or dish pan filled with water ...
Complete Owner's Guide (English)
Page 24
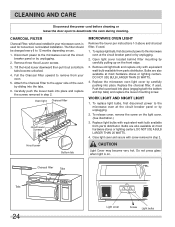
... oven. 5. Oven light Charcoal filter Hood louver Scrrews Hood louver Bottom tab MICROWAVE OVEN LIGHT Remove the louver per instructions 1-3 above and charcoal filter, if used . Replace the microwave oven light cover by carefully pulling up on . WORK LIGHT AND NIGHT LIGHT 1. To...become unlocked. 4. CHARCOAL FILTER Charcoal Filter, which was installed in step 2. To replace light bulb, first disconnect power to the microwave oven at most hardware stores or lighting centers. Bulbs are also available at most hardware stores or lighting centers. CLEANING AND CARE Disconnect...
... oven. 5. Oven light Charcoal filter Hood louver Scrrews Hood louver Bottom tab MICROWAVE OVEN LIGHT Remove the louver per instructions 1-3 above and charcoal filter, if used . Replace the microwave oven light cover by carefully pulling up on . WORK LIGHT AND NIGHT LIGHT 1. To...become unlocked. 4. CHARCOAL FILTER Charcoal Filter, which was installed in step 2. To replace light bulb, first disconnect power to the microwave oven at most hardware stores or lighting centers. Bulbs are also available at most hardware stores or lighting centers. CLEANING AND CARE Disconnect...
Complete Owner's Guide (English)
Page 25
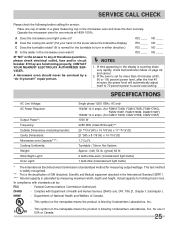
...*: Frequency: Outside Dimensions (including handle): Cavity Dimensions: Microwave oven Capacity***: Cooking Uniformity: Weight: Work/Night Light: Oven Light: Single phase 120V, 60Hz, AC only 1640W 14.0 amps. (for FGMV173KW, FGMV173KB, FGMV173KQ, FGMV174KF, FGMV174KM, DGMV174KF) 1500W 13.0 amps. (for measuring... CGMV174KF) 1000 W 2450 MHz (Class B/Group2)** 29 15/16"(W) x 16 3/8"(H) x 17 15/16"(D) 21"(W) x 8 7/8"(H) x 14 7/16"(D) 1.7 Cu.Ft. DHHS - NHW - This symbol on page 22 and cancel. 2. In compliance with Department of Health and Human Services (DHHS) rule, CFR, Title 21, ...
...*: Frequency: Outside Dimensions (including handle): Cavity Dimensions: Microwave oven Capacity***: Cooking Uniformity: Weight: Work/Night Light: Oven Light: Single phase 120V, 60Hz, AC only 1640W 14.0 amps. (for FGMV173KW, FGMV173KB, FGMV173KQ, FGMV174KF, FGMV174KM, DGMV174KF) 1500W 13.0 amps. (for measuring... CGMV174KF) 1000 W 2450 MHz (Class B/Group2)** 29 15/16"(W) x 16 3/8"(H) x 17 15/16"(D) 21"(W) x 8 7/8"(H) x 14 7/16"(D) 1.7 Cu.Ft. DHHS - NHW - This symbol on page 22 and cancel. 2. In compliance with Department of Health and Human Services (DHHS) rule, CFR, Title 21, ...
Installation Instructions (All Languages)
Page 1
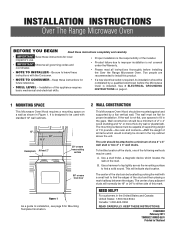
...will normally be attached to installation, see page 8 for future reference. • SKILL LEVEL - INSTALLATION INSTRUCTIONS Over The Range Microwave Oven BEFORE YOU BEGIN Read these instructions completely and carefully. • IMPORTANT Save these instructions for proper installation. See 3 ELECTRICAL ...GROUNDING INSTRUCTIONS on page 2. 1 MOUNTING SPACE This Microwave Oven/Hood requires a mounting space on a wall as shown in the top cabinet above the unit. Use a stud finder, ...
...will normally be attached to installation, see page 8 for future reference. • SKILL LEVEL - INSTALLATION INSTRUCTIONS Over The Range Microwave Oven BEFORE YOU BEGIN Read these instructions completely and carefully. • IMPORTANT Save these instructions for proper installation. See 3 ELECTRICAL ...GROUNDING INSTRUCTIONS on page 2. 1 MOUNTING SPACE This Microwave Oven/Hood requires a mounting space on a wall as shown in the top cabinet above the unit. Use a stud finder, ...


