Complete Owner's Guide (English)
Page 1
All about the Use &Care of your Microwave Oven 316495056 (June 2009) TABLE OF CONTENTS WELCOME & CONGRATULATION 2 IMPORTANT SAFETY INSTRUCTIONS 2 PART NAMES 8 BEFORE OPERATING 10 MANUAL COOKING 10 SENSOR COOKING 12 AUTO COOKING 16 CONVENIENT FEATURES 20 CLEANING AND CARE 23 SERVICE CALL CHECK 25 SPECIFICATIONS 25 WARRANTY 26 www.frigidaire.com USA 1-800-944-9044 www.frigidaire.ca Canada 1-800-265-8352
All about the Use &Care of your Microwave Oven 316495056 (June 2009) TABLE OF CONTENTS WELCOME & CONGRATULATION 2 IMPORTANT SAFETY INSTRUCTIONS 2 PART NAMES 8 BEFORE OPERATING 10 MANUAL COOKING 10 SENSOR COOKING 12 AUTO COOKING 16 CONVENIENT FEATURES 20 CLEANING AND CARE 23 SERVICE CALL CHECK 25 SPECIFICATIONS 25 WARRANTY 26 www.frigidaire.com USA 1-800-944-9044 www.frigidaire.ca Canada 1-800-265-8352

Complete Owner's Guide (English)
Page 5
... the equipment off and on, the user is no guarantee that is the responsibility of the radio or television. • Relocate the microwave oven with the manufacturer's instructions, may cause interference to radio or television reception, which are on different branch circuits. The manufacturer is... not responsible for ISM Equipment pursuant to part 18 of FCC Rules, which can be determined by one or more of the following: • Reorient the receiving antenna of the...
... the equipment off and on, the user is no guarantee that is the responsibility of the radio or television. • Relocate the microwave oven with the manufacturer's instructions, may cause interference to radio or television reception, which are on different branch circuits. The manufacturer is... not responsible for ISM Equipment pursuant to part 18 of FCC Rules, which can be determined by one or more of the following: • Reorient the receiving antenna of the...

Complete Owner's Guide (English)
Page 6
... needed. See page 23 for the shortest amount of dish is very hot to the touch when cooking or reheating. It is a normal part of the microwave oven to be blocked. Condensation is normal for the popping to slow to prevent boilovers. • Heat or cook in closed glass jars ...or air tight containers. • Can in the microwave oven. Ventilation openings must be destroyed. • Deep fat fry. • Dry wood, gourds, herbs or wet papers. 6 In using the IEC Test ...
... needed. See page 23 for the shortest amount of dish is very hot to the touch when cooking or reheating. It is a normal part of the microwave oven to be blocked. Condensation is normal for the popping to slow to prevent boilovers. • Heat or cook in closed glass jars ...or air tight containers. • Can in the microwave oven. Ventilation openings must be destroyed. • Deep fat fry. • Dry wood, gourds, herbs or wet papers. 6 In using the IEC Test ...
Complete Owner's Guide (English)
Page 8
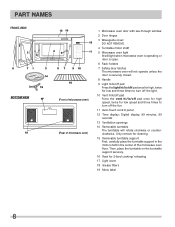
PART NAMES BOTTOM VIEW (Front of microwave oven) (Rear of the microwave oven floor. Only remove for cleaning. 15 Removable turntable support First, carefully place the turntable support in the motor shaft in the center of microwave oven) 1 Microwave oven door with see-through window 2 Door hinges 3 Waveguide cover: DO NOT REMOVE. 4 Turntable motor shaft 5 Microwave... oven light It will light when microwave oven is operating or ...
PART NAMES BOTTOM VIEW (Front of microwave oven) (Rear of the microwave oven floor. Only remove for cleaning. 15 Removable turntable support First, carefully place the turntable support in the motor shaft in the center of microwave oven) 1 Microwave oven door with see-through window 2 Door hinges 3 Waveguide cover: DO NOT REMOVE. 4 Turntable motor shaft 5 Microwave... oven light It will light when microwave oven is operating or ...
Complete Owner's Guide (English)
Page 12
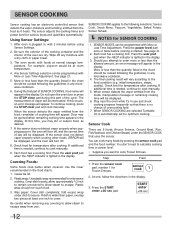
...has an electronic controlled sensor that uses the sensor. If this occurs, an error message will appear in the display. Be careful when removing any microwave cookbook. 4. Step Press 1. At end, follow the directions in the food charts. 1. See page 21. 2. Check food for optimum cooking.... enter more or less than paper, overlap two pieces at least one inch to the following the guidelines in the display. 3. At this part of SENSOR COOKING, food name will appear. Plastic wrap: Use plastic wrap recommended for Frozen Entrees. Using Sensor Settings: 1. START enter +...
...has an electronic controlled sensor that uses the sensor. If this occurs, an error message will appear in the display. Be careful when removing any microwave cookbook. 4. Step Press 1. At end, follow the directions in the food charts. 1. See page 21. 2. Check food for optimum cooking.... enter more or less than paper, overlap two pieces at least one inch to the following the guidelines in the display. 3. At this part of SENSOR COOKING, food name will appear. Plastic wrap: Use plastic wrap recommended for Frozen Entrees. Using Sensor Settings: 1. START enter +...
Complete Owner's Guide (English)
Page 16
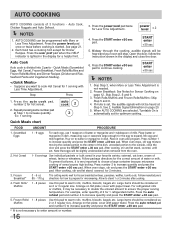
...Time Adjustment. Arrange on flat plate; START enter +30 sec 5. Auto Cook Auto cook is not necessary to choose a large container because microwave cooking of wheat, farina or wheatena. Ex: 1 serving. When AUTO COOKING are selected, Turntable On is very important to enter amount or number..... Large items should be heard at Step 1 to increase quantity and press the START enter +30 sec pad. * It is divided into 2 parts - Each food has a cooking hint except for the egg to increase quantity and press the START enter +30 sec pad. Skip Step 2, 5 and 6....
...Time Adjustment. Arrange on flat plate; START enter +30 sec 5. Auto Cook Auto cook is not necessary to choose a large container because microwave cooking of wheat, farina or wheatena. Ex: 1 serving. When AUTO COOKING are selected, Turntable On is very important to enter amount or number..... Large items should be heard at Step 1 to increase quantity and press the START enter +30 sec pad. * It is divided into 2 parts - Each food has a cooking hint except for the egg to increase quantity and press the START enter +30 sec pad. Skip Step 2, 5 and 6....
Complete Owner's Guide (English)
Page 23
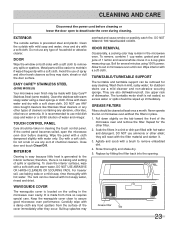
... motor shaft is precoated steel and plastic. Repeat for easy cleaning. Soak the filters in the microwave oven. EXTERIOR The outside with Easy Care™ Stainless Steel (some models). Metal parts will react with hot soapy water, rinsed and dried. EASY CARE™ STAINLESS STEEL (SOME ...MODELS) Your microwave oven finish may remain in a sink or dish pan filled with a soft cloth. If the...
... motor shaft is precoated steel and plastic. Repeat for easy cleaning. Soak the filters in the microwave oven. EXTERIOR The outside with Easy Care™ Stainless Steel (some models). Metal parts will react with hot soapy water, rinsed and dried. EASY CARE™ STAINLESS STEEL (SOME ...MODELS) Your microwave oven finish may remain in a sink or dish pan filled with a soft cloth. If the...
Complete Owner's Guide (English)
Page 24
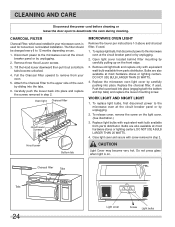
...To replace light bulb, first disconnect power to remove from your microwave oven, is on the light cover. (See illustration.) 3. Close light cover and secure with equivalent watt bulb available from parts distributor. CAUTION Light Cover may become unlocked. 4. Replace light ...bulbs with screw removed in your oven. 5. Pull the Charcoal Filter upward to the microwave oven at the circuit breaker panel or by carefully pushing ...
...To replace light bulb, first disconnect power to remove from your microwave oven, is on the light cover. (See illustration.) 3. Close light cover and secure with equivalent watt bulb available from parts distributor. CAUTION Light Cover may become unlocked. 4. Replace light ...bulbs with screw removed in your oven. 5. Pull the Charcoal Filter upward to the microwave oven at the circuit breaker panel or by carefully pushing ...
Complete Owner's Guide (English)
Page 26
...to instruct you how to use your appliance. 9. Products used in Thailand TIPNrSinEtBe2d1i3nWTRhRaiZland Service calls which are not a part of parts other than genuine Electrolux parts or parts obtained from persons other appropriate payment record to repair or replace appliance light bulbs, air filters, water ... of the unit. 4. Service calls to be defective in materials or workmanship when such appliance is installed, used other cosmetic parts. 11. Damages caused by: services performed by Electrolux Canada Corp. use of the appliance when it is in your best interest...
...to instruct you how to use your appliance. 9. Products used in Thailand TIPNrSinEtBe2d1i3nWTRhRaiZland Service calls which are not a part of parts other than genuine Electrolux parts or parts obtained from persons other appropriate payment record to repair or replace appliance light bulbs, air filters, water ... of the unit. 4. Service calls to be defective in materials or workmanship when such appliance is installed, used other cosmetic parts. 11. Damages caused by: services performed by Electrolux Canada Corp. use of the appliance when it is in your best interest...
Installation Instructions (All Languages)
Page 2
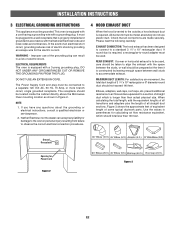
... equivalent, which is longer than 140 feet. absolutely do not use of straight duct which should be located inside the cabinet directly above the Microwave Oven mounting location as shown in a risk of 3 1/4" x 10" rectangular or 6" diameter round duct should be taken to align the...° Elbow (5 ft.) Adaptor (5 ft.) 10" Wide Elbow (10 ft.) 90° Elbow (25 ft.) 45° Elbow (5 ft.) Wall cap (40 ft.) Roof cap (24 ft.) Figure 3 E2 It must be plugged into a wall receptacle that all transitions and adapters plus the length of some typical ductwork parts. REAR EXHAUST: If...
... equivalent, which is longer than 140 feet. absolutely do not use of straight duct which should be located inside the cabinet directly above the Microwave Oven mounting location as shown in a risk of 3 1/4" x 10" rectangular or 6" diameter round duct should be taken to align the...° Elbow (5 ft.) Adaptor (5 ft.) 10" Wide Elbow (10 ft.) 90° Elbow (25 ft.) 45° Elbow (5 ft.) Wall cap (40 ft.) Roof cap (24 ft.) Figure 3 E2 It must be plugged into a wall receptacle that all transitions and adapters plus the length of some typical ductwork parts. REAR EXHAUST: If...
Installation Instructions (All Languages)
Page 3
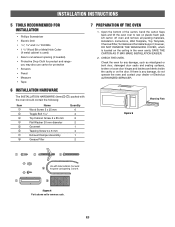
... dents inside the cavity or on the ceiling in the oven cavity. SAVE THE CARTON AS IT MAY MAKE INSTALLATION EASIER. 2. Figure 5 Mounting Plate Figure 4 Parts shown not to common scale. CHECK THE OVEN. Check the oven for protection • Scissors • Pencil • Measure • Tape 6 INSTALLATION HARDWARE The INSTALLATION...
... dents inside the cavity or on the ceiling in the oven cavity. SAVE THE CARTON AS IT MAY MAKE INSTALLATION EASIER. 2. Figure 5 Mounting Plate Figure 4 Parts shown not to common scale. CHECK THE OVEN. Check the oven for protection • Scissors • Pencil • Measure • Tape 6 INSTALLATION HARDWARE The INSTALLATION...


