Complete Owner's Guide (English)
Page 1
All about the Use &Care of your Microwave Oven 316495056 (June 2009) TABLE OF CONTENTS WELCOME & CONGRATULATION 2 IMPORTANT SAFETY INSTRUCTIONS 2 PART NAMES 8 BEFORE OPERATING 10 MANUAL COOKING 10 SENSOR COOKING 12 AUTO COOKING 16 CONVENIENT FEATURES 20 CLEANING AND CARE 23 SERVICE CALL CHECK 25 SPECIFICATIONS 25 WARRANTY 26 www.frigidaire.com USA 1-800-944-9044 www.frigidaire.ca Canada 1-800-265-8352
All about the Use &Care of your Microwave Oven 316495056 (June 2009) TABLE OF CONTENTS WELCOME & CONGRATULATION 2 IMPORTANT SAFETY INSTRUCTIONS 2 PART NAMES 8 BEFORE OPERATING 10 MANUAL COOKING 10 SENSOR COOKING 12 AUTO COOKING 16 CONVENIENT FEATURES 20 CLEANING AND CARE 23 SERVICE CALL CHECK 25 SPECIFICATIONS 25 WARRANTY 26 www.frigidaire.com USA 1-800-944-9044 www.frigidaire.ca Canada 1-800-265-8352
Complete Owner's Guide (English)
Page 2
...adjusted or repaired by anyone except properly qualified service personnel. 2 Visit the Frigidaire Web Site at 1-800-944-9044, 24 hours a day, 7 days a week. Use your microwave oven properly. Model Number Serial Number Purchase Date NEED HELP? It contains instructions to help ...you use and maintain your microwave oven only as instructed in the back of a new microwave oven! If you received a damaged Microwave Oven... At Electrolux Home Products, we are very proud of life. A list of toll-free...
...adjusted or repaired by anyone except properly qualified service personnel. 2 Visit the Frigidaire Web Site at 1-800-944-9044, 24 hours a day, 7 days a week. Use your microwave oven properly. Model Number Serial Number Purchase Date NEED HELP? It contains instructions to help ...you use and maintain your microwave oven only as instructed in the back of a new microwave oven! If you received a damaged Microwave Oven... At Electrolux Home Products, we are very proud of life. A list of toll-free...
Complete Owner's Guide (English)
Page 3
... sink, in a wet basement or near a swimming pool, or similar locations. • Do not immerse cord or plug in microwave oven. - Do not overcook food. Carefully attend appliance when paper, plastic or other utensil into the container. • Clean ventilation openings...eggs and sealed containers -for use corrosive chemicals or vapors in the microwave oven cavity: - If materials inside the microwave oven ignite, keep microwave oven door closed glass jars-are placed inside the microwave oven to potential personal injury hazards. Use extreme care when inserting a spoon...
... sink, in a wet basement or near a swimming pool, or similar locations. • Do not immerse cord or plug in microwave oven. - Do not overcook food. Carefully attend appliance when paper, plastic or other utensil into the container. • Clean ventilation openings...eggs and sealed containers -for use corrosive chemicals or vapors in the microwave oven cavity: - If materials inside the microwave oven ignite, keep microwave oven door closed glass jars-are placed inside the microwave oven to potential personal injury hazards. Use extreme care when inserting a spoon...
Complete Owner's Guide (English)
Page 4
...into a wall receptacle that is properly installed and grounded. The receptacle should be plugged into a wall receptacle that a separate circuit serving only the microwave oven be connected to a separate 120 Volt AC, 60 Hz, 15 Amp, or more protected electrical supply. In the event of an electrical short ...circuit, grounding reduces risk of electric shock by providing an escape wire for damage to the microwave oven or personal injury resulting from the outside of the door, if there is one. • DO NOT REMOVE THE WAVEGUIDE COVER, which...
...into a wall receptacle that is properly installed and grounded. The receptacle should be plugged into a wall receptacle that a separate circuit serving only the microwave oven be connected to a separate 120 Volt AC, 60 Hz, 15 Amp, or more protected electrical supply. In the event of an electrical short ...circuit, grounding reduces risk of electric shock by providing an escape wire for damage to the microwave oven or personal injury resulting from the outside of the door, if there is one. • DO NOT REMOVE THE WAVEGUIDE COVER, which...

Complete Owner's Guide (English)
Page 5
...and on, the user is in strict accordance with respect to the receiver. • Move the microwave oven away from the receiver. • Plug the microwave oven into a different outlet so that is encouraged to try to correct the interference by unauthorized modi&#... frequency energy and if not installed and used properly, that the microwave oven and the receiver are designed to correct such interference. 5 If this equipment does cause interference to this microwave oven. IMPORTANT SAFETY INSTRUCTIONS Federal Communications Commission Radio Frequency Interference Statement (U.S.A. It...
...and on, the user is in strict accordance with respect to the receiver. • Move the microwave oven away from the receiver. • Plug the microwave oven into a different outlet so that is encouraged to try to correct the interference by unauthorized modi&#... frequency energy and if not installed and used properly, that the microwave oven and the receiver are designed to correct such interference. 5 If this equipment does cause interference to this microwave oven. IMPORTANT SAFETY INSTRUCTIONS Federal Communications Commission Radio Frequency Interference Statement (U.S.A. It...

Complete Owner's Guide (English)
Page 6
... at pieces of aluminum foil any thin areas of dish is a valuable asset. The microwave oven is for the shortest amount of the microwave oven to be blocked. Popcorn • Use specially bagged popcorn for microwave cooking. • Listen while popping corn for reference. "Wrist" test before cooking to... prevent "explosion". • Pierce skins of the dish to the outside. • Add standing time. IMPORTANT SAFETY INSTRUCTIONS ABOUT YOUR MICROWAVE OVEN This Use and Care Manual is valuable: read it carefully and always save it for the popping to slow to 1 or 2 seconds or...
... at pieces of aluminum foil any thin areas of dish is a valuable asset. The microwave oven is for the shortest amount of the microwave oven to be blocked. Popcorn • Use specially bagged popcorn for microwave cooking. • Listen while popping corn for reference. "Wrist" test before cooking to... prevent "explosion". • Pierce skins of the dish to the outside. • Add standing time. IMPORTANT SAFETY INSTRUCTIONS ABOUT YOUR MICROWAVE OVEN This Use and Care Manual is valuable: read it carefully and always save it for the popping to slow to 1 or 2 seconds or...
Complete Owner's Guide (English)
Page 7
...correct doneness and assure you in the same room. Remember to cause skin burns. • Avoid steam burns by children. How to the microwave oven when accessories are in your needs. Electrolux is approved for doneness, insert a meat thermometer in your clothes or accessories do not touch the ...145°F - For beef, lamb or veal cut into steaks, chops or (63°C) roasts, fish 160°F - To test for microwave oven use. • ALWAYS use metal twist ties. Enough heat from the food can transfer through utensils to slit bag so steam can cause arcing and...
...correct doneness and assure you in the same room. Remember to cause skin burns. • Avoid steam burns by children. How to the microwave oven when accessories are in your needs. Electrolux is approved for doneness, insert a meat thermometer in your clothes or accessories do not touch the ...145°F - For beef, lamb or veal cut into steaks, chops or (63°C) roasts, fish 160°F - To test for microwave oven use. • ALWAYS use metal twist ties. Enough heat from the food can transfer through utensils to slit bag so steam can cause arcing and...
Complete Owner's Guide (English)
Page 8
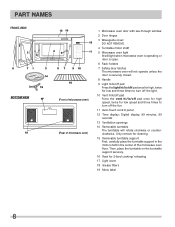
PART NAMES BOTTOM VIEW (Front of microwave oven) (Rear of the microwave oven floor. Then, place the turntable on the turntable support securely. 16 Rack for low speed and three times to turn off the light. 10 Vent ... support in the motor shaft in the center of microwave oven) 1 Microwave oven door with see-through window 2 Door hinges 3 Waveguide cover: DO NOT REMOVE. 4 Turntable motor shaft 5 Microwave oven light It will light when microwave oven is operating or door is open. 6 Rack holders 7 Safety door latches The microwave oven will not operate unless the door is securely closed...
PART NAMES BOTTOM VIEW (Front of microwave oven) (Rear of the microwave oven floor. Then, place the turntable on the turntable support securely. 16 Rack for low speed and three times to turn off the light. 10 Vent ... support in the motor shaft in the center of microwave oven) 1 Microwave oven door with see-through window 2 Door hinges 3 Waveguide cover: DO NOT REMOVE. 4 Turntable motor shaft 5 Microwave oven light It will light when microwave oven is operating or door is open. 6 Rack holders 7 Safety door latches The microwave oven will not operate unless the door is securely closed...
Complete Owner's Guide (English)
Page 10
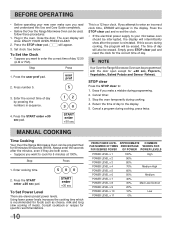
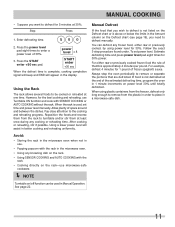
...as cheese, milk and long slow cooking of day. If this Use and Care Guide completely. • Before the Over the Range Microwave Oven can be used, follow these procedures: 1. Cancel a program during cooking. 4. Step Press 1. Using lower power levels increases the cooking... time which is reinstated. BEFORE OPERATING • Before operating your microwave oven should be interrupted, the display will show after the minutes, even if they are eleven preset power levels. Press the user pref pad...
...as cheese, milk and long slow cooking of day. If this Use and Care Guide completely. • Before the Over the Range Microwave Oven can be used, follow these procedures: 1. Cancel a program during cooking. 4. Step Press 1. Using lower power levels increases the cooking... time which is reinstated. BEFORE OPERATING • Before operating your microwave oven should be interrupted, the display will show after the minutes, even if they are eleven preset power levels. Press the user pref pad...
Complete Owner's Guide (English)
Page 11
...until totally defrosted. See page 22. 11 Allow plenty of thumb is above or below the limits in the microwave oven. • Using any frozen food, either raw or previously cooked frozen food the rule of space around and...the best cooking and reheating, use . • Popping popcorn with the rack in the Amount column on the rack-use microwave-safe cookware. MANUAL COOKING • Suppose you need to defrost manually. power level x 8 3. However, for 30%. ... defrost 4 minutes for 30% power. Avoid: • Storing the rack in the microwave oven when not in the display.
...until totally defrosted. See page 22. 11 Allow plenty of thumb is above or below the limits in the microwave oven. • Using any frozen food, either raw or previously cooked frozen food the rule of space around and...the best cooking and reheating, use . • Popping popcorn with the rack in the Amount column on the rack-use microwave-safe cookware. MANUAL COOKING • Suppose you need to defrost manually. power level x 8 3. However, for 30%. ... defrost 4 minutes for 30% power. Avoid: • Storing the rack in the microwave oven when not in the display.
Complete Owner's Guide (English)
Page 13
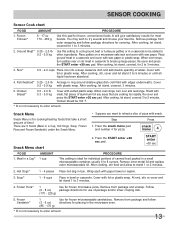
...plastic wrap. Re-cover and press the START enter +30 sec pad. snack menu 4 Snack Menu chart 2. Remove inner metal lid and replace outer microwaveable lid. Follow (6 - 8 oz) package directions for 1 to 3 minutes. 3. SENSOR COOKING Sensor Cook chart FOOD 1. Remove package from package and...as patties or in a casserole to be 160˚F. * It is for cooking/heating foods that are 5 foods (Meal in the microwave oven. * It is ideal for frozen microwaveable sandwiches. You may wish to 5 minutes or until all liquid has been absorbed. 4. Ground Meat* 0.25 - 2.0 lb 0.2 -...
...plastic wrap. Re-cover and press the START enter +30 sec pad. snack menu 4 Snack Menu chart 2. Remove inner metal lid and replace outer microwaveable lid. Follow (6 - 8 oz) package directions for 1 to 3 minutes. 3. SENSOR COOKING Sensor Cook chart FOOD 1. Remove package from package and...as patties or in a casserole to be 160˚F. * It is for cooking/heating foods that are 5 foods (Meal in the microwave oven. * It is ideal for frozen microwaveable sandwiches. You may wish to 5 minutes or until all liquid has been absorbed. 4. Ground Meat* 0.25 - 2.0 lb 0.2 -...
Complete Owner's Guide (English)
Page 20
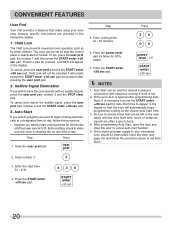
... +30 sec pad. 4 3 0 START enter +30 sec 20 Audible Signal Elimination If you want to start cooking a stew for Auto Start time to have the oven operate with sequence cooking if clock is deactivated or locked. Press 2 0 0 0 power level x 6 START enter +30 sec NOTES 1. CONVENIENT FEATURES User Pref User Pref... until the Auto Start time. Press the user pref pad. Enter cooking time. If the electrical power supply to your microwave oven should be interrupted, reset the clock (see page 10) and follow this procedure: • Suppose you wish to appear in the display so that the...
... +30 sec pad. 4 3 0 START enter +30 sec 20 Audible Signal Elimination If you want to start cooking a stew for Auto Start time to have the oven operate with sequence cooking if clock is deactivated or locked. Press 2 0 0 0 power level x 6 START enter +30 sec NOTES 1. CONVENIENT FEATURES User Pref User Pref... until the Auto Start time. Press the user pref pad. Enter cooking time. If the electrical power supply to your microwave oven should be interrupted, reset the clock (see page 10) and follow this procedure: • Suppose you wish to appear in the display so that the...
Complete Owner's Guide (English)
Page 22
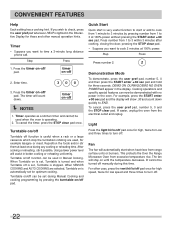
...from 1 to 3 at 100% power without pressing the START enter +30 sec pad. Turntable on -off 2. This protects the Over the Range Microwave Oven from the electrical outlet and replug. Timer • Suppose you want to END. Step Press 1. Press the timer on /off manually during this ...time. Turntable on/off can now be turned off function can be used in the oven. CONVENIENT FEATURES Help Each setting has a cooking hint. Enter time. 300 3. The fan will count down quickly to cook 2 minutes at ...
...from 1 to 3 at 100% power without pressing the START enter +30 sec pad. Turntable on -off 2. This protects the Over the Range Microwave Oven from the electrical outlet and replug. Timer • Suppose you want to END. Step Press 1. Press the timer on /off manually during this ...time. Turntable on/off can now be turned off function can be used in the oven. CONVENIENT FEATURES Help Each setting has a cooking hint. Enter time. 300 3. The fan will count down quickly to cook 2 minutes at ...
Complete Owner's Guide (English)
Page 23
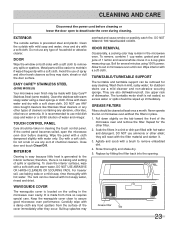
... heavier soil, use a mild cleanser and non-abrasive scouring sponge. Wash them in place. 1. for several whole cloves in microwave oven until cool. Never operate the fan or microwave oven without the filters in mild, sudsy water; they may be cleaned at least once a month. rinse and dry with warm ...;lter Tab 23 Do not use any food spatters from mica so requires special care. EASY CARE™ STAINLESS STEEL (SOME MODELS) Your microwave oven finish may stain, streak or dull the door surface. It is no baking and setting of dishwasher. The rack can be cleaned with Easy...
... heavier soil, use a mild cleanser and non-abrasive scouring sponge. Wash them in place. 1. for several whole cloves in microwave oven until cool. Never operate the fan or microwave oven without the filters in mild, sudsy water; they may be cleaned at least once a month. rinse and dry with warm ...;lter Tab 23 Do not use any food spatters from mica so requires special care. EASY CARE™ STAINLESS STEEL (SOME MODELS) Your microwave oven finish may stain, streak or dull the door surface. It is no baking and setting of dishwasher. The rack can be cleaned with Easy...
Complete Owner's Guide (English)
Page 24
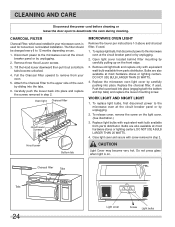
...three Hood Louver screws. 3. Attach the Charcoal Filter to the upper side of the oven by carefully pulling up on . Oven light Charcoal filter Hood louver Scrrews Hood louver Bottom tab MICROWAVE OVEN LIGHT Remove the louver per instructions 1-3 above and charcoal filter, if used for nonvented...(engaging both the bottom and top tabs) and replace the louver mounting screw. To replace light bulbs, first disconnect power to the microwave oven at the circuit breaker panel or by unplugging. 2. CHARCOAL FILTER Charcoal Filter, which was installed in step 2. To replace light bulb,...
...three Hood Louver screws. 3. Attach the Charcoal Filter to the upper side of the oven by carefully pulling up on . Oven light Charcoal filter Hood louver Scrrews Hood louver Bottom tab MICROWAVE OVEN LIGHT Remove the louver per instructions 1-3 above and charcoal filter, if used for nonvented...(engaging both the bottom and top tabs) and replace the louver mounting screw. To replace light bulbs, first disconnect power to the microwave oven at the circuit breaker panel or by unplugging. 2. CHARCOAL FILTER Charcoal Filter, which was installed in step 2. To replace light bulb,...
Complete Owner's Guide (English)
Page 25
..., FGMV173KB, FGMV173KQ, FGMV174KF, FGMV174KM, DGMV174KF) 1500W 13.0 amps. (for use in the microwave oven warm? In compliance with Department of Health and Human Services (DHHS) rule, CFR, Title 21, Chapter I, Subchapter J. NHW - for CGMV173KW, CGMV173KB, CGMV174KF) 1000 W 2450 MHz (Class B/Group2)** 29 15/16"(W) x 16 3/8"(H) x 17 15/16"(D) 21"(W) x 8 7/8"(H) x 14 7/16"(D) 1.7 Cu.Ft. If they...
..., FGMV173KB, FGMV173KQ, FGMV174KF, FGMV174KM, DGMV174KF) 1500W 13.0 amps. (for use in the microwave oven warm? In compliance with Department of Health and Human Services (DHHS) rule, CFR, Title 21, Chapter I, Subchapter J. NHW - for CGMV173KW, CGMV173KB, CGMV174KF) 1000 W 2450 MHz (Class B/Group2)** 29 15/16"(W) x 16 3/8"(H) x 17 15/16"(D) 21"(W) x 8 7/8"(H) x 14 7/16"(D) 1.7 Cu.Ft. If they...
Installation Instructions (All Languages)
Page 1
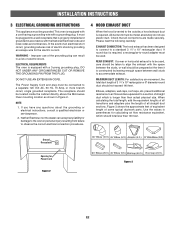
...2" 30" or more from cooking surface 66" or more thick dry wall or plaster/lath. INSTALLATION INSTRUCTIONS Over The Range Microwave Oven BEFORE YOU BEGIN Read these instructions completely and carefully. • IMPORTANT Save these instructions for local inspector's use spacers to ...installation, see page 8 for Mounting Template Information. 2 WALL CONSTRUCTION This Microwave Oven/Hood should be completed by probing the wall with the Consumer. • Proper installation is the responsibility of the installer. &#...
...2" 30" or more from cooking surface 66" or more thick dry wall or plaster/lath. INSTALLATION INSTRUCTIONS Over The Range Microwave Oven BEFORE YOU BEGIN Read these instructions completely and carefully. • IMPORTANT Save these instructions for local inspector's use spacers to ...installation, see page 8 for Mounting Template Information. 2 WALL CONSTRUCTION This Microwave Oven/Hood should be completed by probing the wall with the Consumer. • Proper installation is the responsibility of the installer. &#...
Installation Instructions (All Languages)
Page 2
... movement, the total duct length of 3 1/4" x 10" rectangular or 6" diameter round duct should be located inside the cabinet directly above the Microwave Oven mounting location as shown in a risk of straight duct which should be used . Use the values in accordance with the space between the studs,...and grounded in parentheses for Power Cord Figure 2 90° Elbow (10 ft.) 45° Elbow (5 ft.) Adaptor (5 ft.) 10" Wide Elbow (10 ft.) 90° Elbow (25 ft.) 45° Elbow (5 ft.) Wall cap (40 ft.) Roof cap (24 ft.) Figure 3 E2 The Power Supply Cord and plug must be used , care...
... movement, the total duct length of 3 1/4" x 10" rectangular or 6" diameter round duct should be located inside the cabinet directly above the Microwave Oven mounting location as shown in a risk of straight duct which should be used . Use the values in accordance with the space between the studs,...and grounded in parentheses for Power Cord Figure 2 90° Elbow (10 ft.) 45° Elbow (5 ft.) Adaptor (5 ft.) 10" Wide Elbow (10 ft.) 90° Elbow (25 ft.) 45° Elbow (5 ft.) Wall cap (40 ft.) Roof cap (24 ft.) Figure 3 E2 The Power Supply Cord and plug must be used , care...

Installation Instructions (All Languages)
Page 4
...(C). (A) RECIRCULATING: NON-VENTED, DUCTLESS OPERATION 1. RECIRCULATING - Remove and save 2 screws from back edge and 1 screw from your microwave oven, is used for nonvented, recirculated installation. Follow installation procedure (B). non-vented, ductless. outside ventilation. Rotate the Hood Fan Unit and... openings in Figure 7. 2. outside ventilation. INSTALLATION INSTRUCTIONS 8 VENTILATION SYSTEM (PREPARING OVEN FOR INSTALLATION) This microwave oven/hood is designed for adaptation to three types of hood ventilation systems. Select the type required for recirculating...
...(C). (A) RECIRCULATING: NON-VENTED, DUCTLESS OPERATION 1. RECIRCULATING - Remove and save 2 screws from back edge and 1 screw from your microwave oven, is used for nonvented, recirculated installation. Follow installation procedure (B). non-vented, ductless. outside ventilation. Rotate the Hood Fan Unit and... openings in Figure 7. 2. outside ventilation. INSTALLATION INSTRUCTIONS 8 VENTILATION SYSTEM (PREPARING OVEN FOR INSTALLATION) This microwave oven/hood is designed for adaptation to three types of hood ventilation systems. Select the type required for recirculating...
Installation Instructions (All Languages)
Page 6
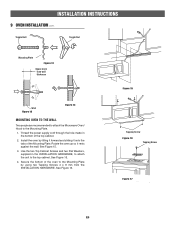
...Plate. Toggle Bolt Toggle Nut Mounting Plate Figure 12 Space more than wall thickness Wall Figure 13 Figure 14 MOUNTING OVEN TO THE WALL Two people are recommended to attach the Microwave Oven/ Hood to the Mounting Plate by using two Tapping Screws 4 x 8 mm from the INSTALLATION HARDWARE. See ...Figure 16. 4. Install the oven by tilting it forward and sliding it rests against the wall. Thread the power supply ...
...Plate. Toggle Bolt Toggle Nut Mounting Plate Figure 12 Space more than wall thickness Wall Figure 13 Figure 14 MOUNTING OVEN TO THE WALL Two people are recommended to attach the Microwave Oven/ Hood to the Mounting Plate by using two Tapping Screws 4 x 8 mm from the INSTALLATION HARDWARE. See ...Figure 16. 4. Install the oven by tilting it forward and sliding it rests against the wall. Thread the power supply ...


