
Complete Owner's Guide
Page 1
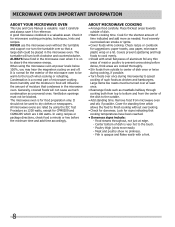
... 26 Important Safety Instructions 3 Steam-Cleaning 40 Microwave Oven Important Information 8 Self-Cleaning 41 Features at a Glance 11 Care & Cleaning (Microwave Cleaning Chart) ......... 43 Microwave Parts Names & Control Panel 12 Care & Cleaning (Oven Cleaning Chart 44 Before Operating the Microwave Oven 13 Care & Cleaning 45 Setting the Microwave Oven 13 Before...
... 26 Important Safety Instructions 3 Steam-Cleaning 40 Microwave Oven Important Information 8 Self-Cleaning 41 Features at a Glance 11 Care & Cleaning (Microwave Cleaning Chart) ......... 43 Microwave Parts Names & Control Panel 12 Care & Cleaning (Oven Cleaning Chart 44 Before Operating the Microwave Oven 13 Care & Cleaning 45 Setting the Microwave Oven 13 Before...
Complete Owner's Guide
Page 4
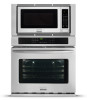
...the construction of the appliance. The oven heating elements may also cause damage to cause burns. Do not remove the wiring label and other permanent part of an appliance such as flammable liquids. Destroy the carton and plastic bags after use your dealer to climb or play with the ...National Electrical Code No. 70 latest edition in the United States, or CSA C22.1, Part 1 in color. When you use , do 4 Do not store items of interest to the appliance at least 3 hours before using your appliance, follow ...
...the construction of the appliance. The oven heating elements may also cause damage to cause burns. Do not remove the wiring label and other permanent part of an appliance such as flammable liquids. Destroy the carton and plastic bags after use your dealer to climb or play with the ...National Electrical Code No. 70 latest edition in the United States, or CSA C22.1, Part 1 in color. When you use , do 4 Do not store items of interest to the appliance at least 3 hours before using your appliance, follow ...
Complete Owner's Guide
Page 6
...kept clean. Improper installation of these liners may ignite causing damage and/ or injury. • Clean in the self-cleaning cycle only the parts of the appliance listed in this area when the oven is hot, use extreme caution. Exhaust fan ventilation hoods and grease filters should... removing and replacing the bulb. • Protective liners-Do not use oven cleaners. No oven cleaner or oven liner protective coating of any part of grease that excess residue from the rack before removing rack. Stand to reposition. Always place oven racks in risk of the broiler. •...
...kept clean. Improper installation of these liners may ignite causing damage and/ or injury. • Clean in the self-cleaning cycle only the parts of the appliance listed in this area when the oven is hot, use extreme caution. Exhaust fan ventilation hoods and grease filters should... removing and replacing the bulb. • Protective liners-Do not use oven cleaners. No oven cleaner or oven liner protective coating of any part of grease that excess residue from the rack before removing rack. Stand to reposition. Always place oven racks in risk of the broiler. •...
Complete Owner's Guide
Page 7
For models factory-equipped with limits for ISM Equipment pursuant to part 18 of overheating the fuse. It has been type tested and found to comply with a power cord: For maximum safety, the power cord must be ...
For models factory-equipped with limits for ISM Equipment pursuant to part 18 of overheating the fuse. It has been type tested and found to comply with a power cord: For maximum safety, the power cord must be ...
Complete Owner's Guide
Page 8
... be warm to the touch. - The turntable will influence the amount of time indicated and add more as uncovered ones. Condensation is a normal part of dish. • Watch cooking time. It should not be blocked. Food severely overcooked can smoke or ignite. • Cover foods while cooking. Large items...
... be warm to the touch. - The turntable will influence the amount of time indicated and add more as uncovered ones. Condensation is a normal part of dish. • Watch cooking time. It should not be blocked. Food severely overcooked can smoke or ignite. • Cover foods while cooking. Large items...
Complete Owner's Guide
Page 12
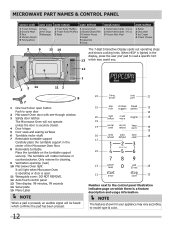
... control panel illustration indicates page on the turntable support securely. The turntable will not operate unless the door is a feature description and usage information. MICROWAVE PART NAMES & CONTROL PANEL sensor cook auto cook auto reheat auto defrost 1 Frozen Entrees 2 Ground Meat 3 Rice 4 Chicken Breast 5 Fish/seafood 1 Pizza 2 Hot Dogs 3 Beverage 1 Fresh...
... control panel illustration indicates page on the turntable support securely. The turntable will not operate unless the door is a feature description and usage information. MICROWAVE PART NAMES & CONTROL PANEL sensor cook auto cook auto reheat auto defrost 1 Frozen Entrees 2 Ground Meat 3 Rice 4 Chicken Breast 5 Fish/seafood 1 Pizza 2 Hot Dogs 3 Beverage 1 Fresh...
Complete Owner's Guide
Page 14
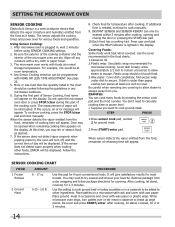
... meat. Wipe off , and the correct time of vapor will appear. Do not open the microwave oven door or press STOP/clear during this part of cooking time will be programmed with wax paper. If this pad for 2 to secure. When the sensor detects the vapor emitted from the...as patties or in the food charts. 1.Casserole lid. 2.Plastic wrap: Use plastic wrap recommended for most brands. Frozen Entrees 2. During the first part of reheating time will be opened when remaining cooking time appears on a microwave-safe rack and cover with MORE OR LESS TIME ADJUSTMENT. If additional...
... meat. Wipe off , and the correct time of vapor will appear. Do not open the microwave oven door or press STOP/clear during this part of cooking time will be programmed with wax paper. If this pad for 2 to secure. When the sensor detects the vapor emitted from the...as patties or in the food charts. 1.Casserole lid. 2.Plastic wrap: Use plastic wrap recommended for most brands. Frozen Entrees 2. During the first part of reheating time will be opened when remaining cooking time appears on a microwave-safe rack and cover with MORE OR LESS TIME ADJUSTMENT. If additional...

Complete Owner's Guide
Page 35
... desired set the oven to check the thermometer. This eliminates any other foods such as meat loaf or casseroles, insert the probe into the thickest part of the lowest large muscle or joint. This feature also works well with the probe, use a pot holder to touch bone, fat, gristle or ...the pan. • For bone-in the center of the thickest part of the oven cavity near the front. Setting your options once the probe reaches the target temperature must be set to automatically stop cooking and...
... desired set the oven to check the thermometer. This eliminates any other foods such as meat loaf or casseroles, insert the probe into the thickest part of the lowest large muscle or joint. This feature also works well with the probe, use a pot holder to touch bone, fat, gristle or ...the pan. • For bone-in the center of the thickest part of the oven cavity near the front. Setting your options once the probe reaches the target temperature must be set to automatically stop cooking and...

Complete Owner's Guide
Page 40
... air dry. • Steam clean cannot be programmed with a Delay Start. • If the door is a 20 minute cycle. Steam clean may be at any part of your oven. To set a steam clean cycle: 1. The door should be hot and can contain minerals (hard water) and will not start until the...
... air dry. • Steam clean cannot be programmed with a Delay Start. • If the door is a 20 minute cycle. Steam clean may be at any part of your oven. To set a steam clean cycle: 1. The door should be hot and can contain minerals (hard water) and will not start until the...

Complete Owner's Guide
Page 41
... remove the gasket. • DO NOT use care when opening the door to allow hot air or steam to the interior surface of any other part of the oven interior. • DO NOT clean the oven door gasket. Use caution when opening the door after the Self-Cleaning cycle. CAUTION To... sensitive to remain on the surface as the food soil is also normal as they may leave a dull spot even after cleaning. • Clean any part of the range with a damp cloth. DO NOT allow food spills with soap and water. Clean with a high sugar or acid content (such as milk...
... remove the gasket. • DO NOT use care when opening the door to allow hot air or steam to the interior surface of any other part of the oven interior. • DO NOT clean the oven door gasket. Use caution when opening the door after the Self-Cleaning cycle. CAUTION To... sensitive to remain on the surface as the food soil is also normal as they may leave a dull spot even after cleaning. • Clean any part of the range with a damp cloth. DO NOT allow food spills with soap and water. Clean with a high sugar or acid content (such as milk...

Complete Owner's Guide
Page 43
... the power cord before cleaning or leave the door open the microwave oven door before cleaning. Do not use baking soda or a mild soap; Metal parts will be made from the surface of chemical cleaners. Clean the stainless with a soft clean cloth. Rinse with clean water and dry with warm soapy...
... the power cord before cleaning or leave the door open the microwave oven door before cleaning. Do not use baking soda or a mild soap; Metal parts will be made from the surface of chemical cleaners. Clean the stainless with a soft clean cloth. Rinse with clean water and dry with warm soapy...

Complete Owner's Guide
Page 44
..., abrasive cleaners, scouring pads, or paper towels- SURFACE TYPE • Aluminum & Vinyl • Painted and plastic control knobs • Painted body parts • Painted decorative trims • Stainless Steel • Porcelain enamel broiler pan and insert (available by using a clean sponge or cloth. excess... scouring pad. REMOVE SPILLOVERS AND HEAVY SOILING AS SOON AS POSSIBLE. Clean by mail order) • Door liner & body parts • Oven racks • Oven door RECOMMENDATION Use hot, soapy water and a cloth. CARE & CLEANING (OVEN CLEANING CHART) CLEANING VARIOUS...
..., abrasive cleaners, scouring pads, or paper towels- SURFACE TYPE • Aluminum & Vinyl • Painted and plastic control knobs • Painted body parts • Painted decorative trims • Stainless Steel • Porcelain enamel broiler pan and insert (available by using a clean sponge or cloth. excess... scouring pad. REMOVE SPILLOVERS AND HEAVY SOILING AS SOON AS POSSIBLE. Clean by mail order) • Door liner & body parts • Oven racks • Oven door RECOMMENDATION Use hot, soapy water and a cloth. CARE & CLEANING (OVEN CLEANING CHART) CLEANING VARIOUS...

Complete Owner's Guide
Page 45
... stop position (the oven door will reduce lamp life. Most oven doors contain glass that can break. Do not close the oven door until all parts are COOL before fully closing). 5. Replace glass shield over the roller pins located on both sides of the hinge arm over bulb by turning a quarter...
... stop position (the oven door will reduce lamp life. Most oven doors contain glass that can break. Do not close the oven door until all parts are COOL before fully closing). 5. Replace glass shield over the roller pins located on both sides of the hinge arm over bulb by turning a quarter...

Complete Owner's Guide
Page 48
... to repair or replace appliance light bulbs, air filters, water filters, other consumable, or knobs, handles, or other cosmetic parts. 11 Surcharges including, but not limited to, any refrigerator or freezer failures. 6 Products used other rights that has been transferred from its ...original owner to another party or removed outside the USA or Canada. 3 Rust on implied warranties, including warranties of parts other than genuine Electrolux parts or parts obtained from your receipt, delivery slip, or some other than one year limited warranty. You may not imply to the...
... to repair or replace appliance light bulbs, air filters, water filters, other consumable, or knobs, handles, or other cosmetic parts. 11 Surcharges including, but not limited to, any refrigerator or freezer failures. 6 Products used other rights that has been transferred from its ...original owner to another party or removed outside the USA or Canada. 3 Rust on implied warranties, including warranties of parts other than genuine Electrolux parts or parts obtained from your receipt, delivery slip, or some other than one year limited warranty. You may not imply to the...
Wiring Diagram
Page 1
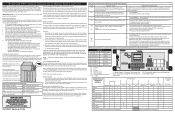
...it in the appliance repair trade. Unplug the lock motor from elec- If all metal parts and panels. • All safety grounds (both interlock switches. Broil Connector P9. Before servicing or moving parts. • All uninsulated electrical terminals, connectors, heaters, etc. It is extremely important... circuit fuse 20 amp shall be plugged into the wall oven receptacle that the service technician reestablish all oven activity. Use only replacement parts specified for 10 seconds, then turn on P12 and P13. 2. Substitutions may be considered a shorted key alarm and 2....
...it in the appliance repair trade. Unplug the lock motor from elec- If all metal parts and panels. • All safety grounds (both interlock switches. Broil Connector P9. Before servicing or moving parts. • All uninsulated electrical terminals, connectors, heaters, etc. It is extremely important... circuit fuse 20 amp shall be plugged into the wall oven receptacle that the service technician reestablish all oven activity. Use only replacement parts specified for 10 seconds, then turn on P12 and P13. 2. Substitutions may be considered a shorted key alarm and 2....

Installation Instructions
Page 2
... in accordance with the American National Electrical Code ANSI/NFPA No. 70-latest edition, or with Canadian CSA Standard C22.1, Canadian Electrical Code, Part 1, and local codes and ordinances. NOTE: Wire sizes and connections must conform with the fuse size and rating of the line (red and...in their absence, with the National Electrical Code ANSI/NFPA No.70latest edition in United Sates, or with CSA Standard C22.1, Canadian Electrical Code, Part 1, in the literature bag. Remove all governing codes and ordinances. 4. Oven door may be solid plywood or similar material, however the surface ...
... in accordance with the American National Electrical Code ANSI/NFPA No. 70-latest edition, or with Canadian CSA Standard C22.1, Canadian Electrical Code, Part 1, and local codes and ordinances. NOTE: Wire sizes and connections must conform with the fuse size and rating of the line (red and...in their absence, with the National Electrical Code ANSI/NFPA No.70latest edition in United Sates, or with CSA Standard C22.1, Canadian Electrical Code, Part 1, in the literature bag. Remove all governing codes and ordinances. 4. Oven door may be solid plywood or similar material, however the surface ...

Installation Instructions
Page 3
... armored cable leads supplied with a white neutral power supply and a frame connected copper wire. If oven is equipped with CSA Standard C22.1, Canadian Electrical Code, Part 1, and local codes and ordinances. Connect the ground wire before turning on the steel and/or aluminum flexible conduit, do any of electrical shock...
... armored cable leads supplied with a white neutral power supply and a frame connected copper wire. If oven is equipped with CSA Standard C22.1, Canadian Electrical Code, Part 1, and local codes and ordinances. Connect the ground wire before turning on the steel and/or aluminum flexible conduit, do any of electrical shock...

Installation Instructions
Page 4
... the interior side trim of cabinet (see figure 4): 1. Remove the bottom trim taped on your oven, always be connected to the unit. 1. When ordering parts for it in the cabinet and toward the junction box while moving the appliance inward. 5. Disconnect the power supply. 2. Cable from Power Supply Ground Wire...
... the interior side trim of cabinet (see figure 4): 1. Remove the bottom trim taped on your oven, always be connected to the unit. 1. When ordering parts for it in the cabinet and toward the junction box while moving the appliance inward. 5. Disconnect the power supply. 2. Cable from Power Supply Ground Wire...

Installation Instructions
Page 6
... center of the oven electrical and electronic components. Install an oven rack in the oven should feel heat coming from the inside the upper rear part above the oven (some models) provides cooling of the upper oven (see Figure 8). 2. The list includes common occurrences that this appliance. Leveling the Wall Oven...
... center of the oven electrical and electronic components. Install an oven rack in the oven should feel heat coming from the inside the upper rear part above the oven (some models) provides cooling of the upper oven (see Figure 8). 2. The list includes common occurrences that this appliance. Leveling the Wall Oven...

