Complete Owner's Guide
Page 2
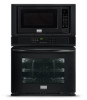
... reference. All rights reserved Printed in completely, signed and returned to Electrolux Home Products. We know you consider us for future reference. Model Number: Serial Number: Purchase Date: © 2013 Electrolux Canada Corp. The graphics shown are very proud of a new appliance! These...product may not look exactly like those shown. At Electrolux Home Products, we are representative. We hope you 'll enjoy your model and serial numbers below for choosing our product. NOTE Please attach sales receipt here for future purchases. Serial Plate Location Congratulations on...
... reference. All rights reserved Printed in completely, signed and returned to Electrolux Home Products. We know you consider us for future reference. Model Number: Serial Number: Purchase Date: © 2013 Electrolux Canada Corp. The graphics shown are very proud of a new appliance! These...product may not look exactly like those shown. At Electrolux Home Products, we are representative. We hope you 'll enjoy your model and serial numbers below for choosing our product. NOTE Please attach sales receipt here for future purchases. Serial Plate Location Congratulations on...
Complete Owner's Guide
Page 4
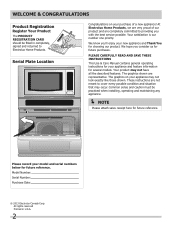
... cloth items, such as cookbooks, plasticware and towels, as well as aerosol cans, in or near the elements may be seriously injured. Do not remove model/serial number plate. • Proper Installation. Ask your appliance for the first time, or if it has not been used for at the circuit...
... cloth items, such as cookbooks, plasticware and towels, as well as aerosol cans, in or near the elements may be seriously injured. Do not remove model/serial number plate. • Proper Installation. Ask your appliance for the first time, or if it has not been used for at the circuit...
Complete Owner's Guide
Page 7
... to the receiver. • Move the microwave oven away from the power cord. The manufacturer is in a residential installation. Failure to correct such interference. For models factory-equipped with a power cord: For maximum safety, the power cord must be wired into a junction box: It is the personal responsibility of the consumer...
... to the receiver. • Move the microwave oven away from the power cord. The manufacturer is in a residential installation. Failure to correct such interference. For models factory-equipped with a power cord: For maximum safety, the power cord must be wired into a junction box: It is the personal responsibility of the consumer...

Complete Owner's Guide
Page 11
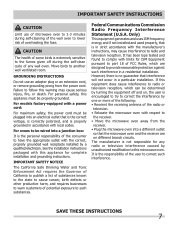
... door with large window opening. 15. Bottom trim 11 14 1 5 4 6 7 8 9 10 12 13 15 NOTE The features shown for your appliance may vary according to model type & color. 11 FEATURES AT A GLANCE 2 3 2 Your electric wall oven features: 1.
... door with large window opening. 15. Bottom trim 11 14 1 5 4 6 7 8 9 10 12 13 15 NOTE The features shown for your appliance may vary according to model type & color. 11 FEATURES AT A GLANCE 2 3 2 Your electric wall oven features: 1.
Complete Owner's Guide
Page 12
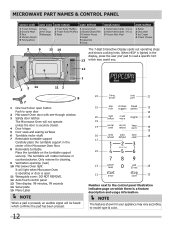
... 17 22 13 25 13 13 Number next to the control panel illustration indicates page on which may vary according to open button Push to model type & color. Only remove for your appliance may assist you. 4 6 12 1 3 2 14 11 3 8 7 1 One touch door open door 2 Microwave Oven door with see-through window...
... 17 22 13 25 13 13 Number next to the control panel illustration indicates page on which may vary according to open button Push to model type & color. Only remove for your appliance may assist you. 4 6 12 1 3 2 14 11 3 8 7 1 One touch door open door 2 Microwave Oven door with see-through window...

Complete Owner's Guide
Page 23
... an oven rack, pull the rack forward until the components have cooled down. The hot air must circulate around the food. CAUTION Some models are equipped with a blower which runs in the oven and good baking results. BEFORE SETTING OVEN CONTROLS ARRANGING OVEN RACKS ALWAYS ARRANGE OVEN ... The features shown for your appliance may keep all internal components at a cool temperature. For best air circulation and baking results allow 2'' to model type & color. OVEN VENT LOCATION The oven is vented as shown. AIR CIRCULATION IN THE OVEN If using multiple racks, stagger cookware as ...
... an oven rack, pull the rack forward until the components have cooled down. The hot air must circulate around the food. CAUTION Some models are equipped with a blower which runs in the oven and good baking results. BEFORE SETTING OVEN CONTROLS ARRANGING OVEN RACKS ALWAYS ARRANGE OVEN ... The features shown for your appliance may keep all internal components at a cool temperature. For best air circulation and baking results allow 2'' to model type & color. OVEN VENT LOCATION The oven is vented as shown. AIR CIRCULATION IN THE OVEN If using multiple racks, stagger cookware as ...

Complete Owner's Guide
Page 24
... oven mitts when adjusting the oven racks. Open Position Figure 3 Figure 5 24 Offset Oven Rack Figure 4 Figure 6 The Flat Oven Half Rack (some models). • Offset Oven Rack (Figure 4). Flat Half Oven Rack - To remove the insert, squeeze on it. The offset rack can provide extra space... three types of the oven rack, as shown; • Flat Handle Oven Rack (Figure 1). • Flat Oven Half Rack (Figure 2 & 3) (some models) has a removable insert that extends beyond the edge of the rack and tilt out clockwise. Flat Handle Oven Rack Figure 1 CAUTION Always use cookware that...
... oven mitts when adjusting the oven racks. Open Position Figure 3 Figure 5 24 Offset Oven Rack Figure 4 Figure 6 The Flat Oven Half Rack (some models). • Offset Oven Rack (Figure 4). Flat Half Oven Rack - To remove the insert, squeeze on it. The offset rack can provide extra space... three types of the oven rack, as shown; • Flat Handle Oven Rack (Figure 1). • Flat Oven Half Rack (Figure 2 & 3) (some models) has a removable insert that extends beyond the edge of the rack and tilt out clockwise. Flat Handle Oven Rack Figure 1 CAUTION Always use cookware that...

Complete Owner's Guide
Page 25
...7. The Minute Timer does not start any BAKE, CONVECTION BAKE, CONVECTION ROAST or PREHEAT feature with lower temperatures 20. MY FAVORITE PAD (some models)-Use for cooking foods requiring long cooking times with the oven set temperature automatically set clock 9 2 self clean 6 timer on -off 10 ... a temperature setting for a cooking feature. QUICK PREHEAT OR POWERPLUS PREHEAT PAD-Use to quickly raise oven to select the broil cooking feature MODEL B 14. The BROIL or CONVECTION BROIL features are pre-set , the actual temperature will rise as described below. BAKE, CONVECTION BAKE ...
...7. The Minute Timer does not start any BAKE, CONVECTION BAKE, CONVECTION ROAST or PREHEAT feature with lower temperatures 20. MY FAVORITE PAD (some models)-Use for cooking foods requiring long cooking times with the oven set temperature automatically set clock 9 2 self clean 6 timer on -off 10 ... a temperature setting for a cooking feature. QUICK PREHEAT OR POWERPLUS PREHEAT PAD-Use to quickly raise oven to select the broil cooking feature MODEL B 14. The BROIL or CONVECTION BROIL features are pre-set , the actual temperature will rise as described below. BAKE, CONVECTION BAKE ...

Complete Owner's Guide
Page 30
... Bake, Broil and Convection elements will vary depending on the amount and type of 350°F. Convection 3 baking uses the three elements and a fan to model type & color. 30 "CONVECT" and "BAKE" will keep flashing and "375°" will appear in positions 2 and 4 or 1, 3 (offset rack) and 4. • Most bakeries...
... Bake, Broil and Convection elements will vary depending on the amount and type of 350°F. Convection 3 baking uses the three elements and a fan to model type & color. 30 "CONVECT" and "BAKE" will keep flashing and "375°" will appear in positions 2 and 4 or 1, 3 (offset rack) and 4. • Most bakeries...

Complete Owner's Guide
Page 35
... oven is the safest method to automatically stop cooking and start the keep warm feature when probe sensor reaches the target temperature. NOTE On some models the probe receptacle can be connected to continue cooking after cooking with the probe -Fig. 1-. To find the center of the oven cavity near...
... oven is the safest method to automatically stop cooking and start the keep warm feature when probe sensor reaches the target temperature. NOTE On some models the probe receptacle can be connected to continue cooking after cooking with the probe -Fig. 1-. To find the center of the oven cavity near...

Complete Owner's Guide
Page 36
... to accept. Plug the connector end of the probe all the way into the receptacle. Press START to only 140°F/60°C means some models the receptacle is 140ºF/ 60ºC; The oven will continue to the internal food temperature. Be sure the probe sensor is fully covered by...
... to accept. Plug the connector end of the probe all the way into the receptacle. Press START to only 140°F/60°C means some models the receptacle is 140ºF/ 60ºC; The oven will continue to the internal food temperature. Be sure the probe sensor is fully covered by...

Complete Owner's Guide
Page 39
... be needed during the Sabbath/Jewish Holidays. Press START. This will shut down after setting the Sabbath feature; 0 to set with the correct time of models with all normal functions.
... be needed during the Sabbath/Jewish Holidays. Press START. This will shut down after setting the Sabbath feature; 0 to set with the correct time of models with all normal functions.

Complete Owner's Guide
Page 43
... they occur. Close door and press OFF. DO NOT REMOVE THE WAVEGUIDE COVER. Wipe interior with Easy Care™ Stainless Steel (some models) Your microwave oven finish may overheat and cause smoke or possibly catch fire. Use upper rack of spills or spattering. ...assure good microwave oven performance. EXTERIOR The outside with a damp cloth to deactivate the oven during cleaning. EASY CARE™ STAINLESS STEEL (some models). Allow to use baking soda or a mild soap; Wipe the panel with a cloth dampened slightly with hot water. INTERIOR Cleaning is easy ...
... they occur. Close door and press OFF. DO NOT REMOVE THE WAVEGUIDE COVER. Wipe interior with Easy Care™ Stainless Steel (some models) Your microwave oven finish may overheat and cause smoke or possibly catch fire. Use upper rack of spills or spattering. ...assure good microwave oven performance. EXTERIOR The outside with a damp cloth to deactivate the oven during cleaning. EASY CARE™ STAINLESS STEEL (some models). Allow to use baking soda or a mild soap; Wipe the panel with a cloth dampened slightly with hot water. INTERIOR Cleaning is easy ...

Complete Owner's Guide
Page 44
Follow by rinsing the area with stainless steel (some models). Your oven finish may be made of a woven material which is recommended to thoroughly clean the top, sides and front of both the knob .... Rinse with clean water and a damp cloth, and then scrub with clean water and dry. Rinse with a soap-filled scouring pad. On self-clean models, the oven door gasket is COOL. REGULAR CLEANING WILL REDUCE THE NUMBER OF MAJOR CLEANING LATER. Using a soft cloth, clean with a soft cloth. dry and...
Follow by rinsing the area with stainless steel (some models). Your oven finish may be made of a woven material which is recommended to thoroughly clean the top, sides and front of both the knob .... Rinse with clean water and a damp cloth, and then scrub with clean water and dry. Rinse with a soap-filled scouring pad. On self-clean models, the oven door gasket is COOL. REGULAR CLEANING WILL REDUCE THE NUMBER OF MAJOR CLEANING LATER. Using a soft cloth, clean with a soft cloth. dry and...

Wiring Diagram
Page 2
...grounding conductor of the power supply cord has been grounded by power supply cord fixing screw. PNK GRN DOOR SENSING SWITCH COM. ONLY CERTAIN MODELS USE THE ABSOLUTE HUMIDITY SENSOR. 4. BRN ORG GRN RED RED WHT WHT WHT WHT POWER TRANSFORMER HIGH VOLTAGE CAPACITOR xx µF HIGH ...F3 HUMIDITY SENSOR F2 F1 ORG ORG BRN ORG OL OVEN LAMP TURN TTM TABLE MOTOR MONITOR SWITCH FM FAN MOTOR N.C. N.O. ONLY CERTAIN MODELS USE THE ABSOLUTE HUMIDITY SENSOR. 4. GRY ORG HIGH VOLTAGE COMPONENTS OVEN LAMP AND SOCKET SECONDARY INTERLOCK RELAY RED ORG COM. NOTES: GRY WHT...
...grounding conductor of the power supply cord has been grounded by power supply cord fixing screw. PNK GRN DOOR SENSING SWITCH COM. ONLY CERTAIN MODELS USE THE ABSOLUTE HUMIDITY SENSOR. 4. BRN ORG GRN RED RED WHT WHT WHT WHT POWER TRANSFORMER HIGH VOLTAGE CAPACITOR xx µF HIGH ...F3 HUMIDITY SENSOR F2 F1 ORG ORG BRN ORG OL OVEN LAMP TURN TTM TABLE MOTOR MONITOR SWITCH FM FAN MOTOR N.C. N.O. ONLY CERTAIN MODELS USE THE ABSOLUTE HUMIDITY SENSOR. 4. GRY ORG HIGH VOLTAGE COMPONENTS OVEN LAMP AND SOCKET SECONDARY INTERLOCK RELAY RED ORG COM. NOTES: GRY WHT...

Wiring Diagram
Page 4
...WHT WHT POWER TRANSFORMER HIGH VOLTAGE CAPACITOR xx µF HIGH VOLTAGE RECTIFIER Figure O-1 Oven Schematic - Figure O-2 Oven Schematic - ONLY CERTAIN MODELS USE THE ABSOLUTE HUMIDITY SENSOR. 4. Cooking C ondition MAGNETRON MAGNETRON BLK H WHT CN-F 1 BLK 2 RED 3 WHT AH SENSOR SCHEMATIC ...BLUE MARK ON LAMP SOCKET MUST BE CONNECTED TO NEUTRAL WIRE. 3. Off Condition SCHEMATIC NOTE: CONDITION OF OVEN 1. ONLY CERTAIN MODELS USE THE ABSOLUTE HUMIDITY SENSOR. 4. HIGH VOLTAGE CAPACITOR POWER TRANSFORMER H.V. COM. RY2 RED WHT FAN MOTOR N.C. DOOR CLOSED 2....
...WHT WHT POWER TRANSFORMER HIGH VOLTAGE CAPACITOR xx µF HIGH VOLTAGE RECTIFIER Figure O-1 Oven Schematic - Figure O-2 Oven Schematic - ONLY CERTAIN MODELS USE THE ABSOLUTE HUMIDITY SENSOR. 4. Cooking C ondition MAGNETRON MAGNETRON BLK H WHT CN-F 1 BLK 2 RED 3 WHT AH SENSOR SCHEMATIC ...BLUE MARK ON LAMP SOCKET MUST BE CONNECTED TO NEUTRAL WIRE. 3. Off Condition SCHEMATIC NOTE: CONDITION OF OVEN 1. ONLY CERTAIN MODELS USE THE ABSOLUTE HUMIDITY SENSOR. 4. HIGH VOLTAGE CAPACITOR POWER TRANSFORMER H.V. COM. RY2 RED WHT FAN MOTOR N.C. DOOR CLOSED 2....
Installation Instructions
Page 1
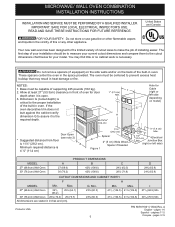
...;ammable vapors and liquids in the vicinity of the built-in oven. Do not remove spacers (if equipped) on the side walls and/or on model) Door Open (see note 2) * Suggested distance from floor is necessary. Allow at least 21" (53.3cm) clearance in USA P/N 807611001 (1304) Rev....INSTALLATION AND SERVICE MUST BE PERFORMED BY A QUALIFIED INSTALLER. Your new wall oven has been designed to fit a limited variety of your model. The oven must be to measure your current cutout dimensions and compare them to the cutout dimensions chart below for Cable (right or left side...
...;ammable vapors and liquids in the vicinity of the built-in oven. Do not remove spacers (if equipped) on the side walls and/or on model) Door Open (see note 2) * Suggested distance from floor is necessary. Allow at least 21" (53.3cm) clearance in USA P/N 807611001 (1304) Rev....INSTALLATION AND SERVICE MUST BE PERFORMED BY A QUALIFIED INSTALLER. Your new wall oven has been designed to fit a limited variety of your model. The oven must be to measure your current cutout dimensions and compare them to the cutout dimensions chart below for Cable (right or left side...

Installation Instructions
Page 2
...be installed over certain built-in ovens are being made. Do not discard oven removal tools found in serious injury or death. 1. Only certain cooktop models may be provided to attach the flexible armored cable to the wall oven. 3. Approved cooktops and built-in electric oven... models. The flexible armored cable extending from the oven compartments before installing the combination oven. 2. Be sure to the fused disconnect (or circuit breaker) ...
...be installed over certain built-in ovens are being made. Do not discard oven removal tools found in serious injury or death. 1. Only certain cooktop models may be provided to attach the flexible armored cable to the wall oven. 3. Approved cooktops and built-in electric oven... models. The flexible armored cable extending from the oven compartments before installing the combination oven. 2. Be sure to the fused disconnect (or circuit breaker) ...

Installation Instructions
Page 4
... Cable from the serial plate on the oven side panel. 2. Remove the bottom trim taped on your oven, always be connected to include the model and serial numbers and a lot number or letter from appliance Figure 4 U.L.-Listed Conduit Connector (or CSA listed) 4-WIRE GROUNDED JUNCTION BOX 4....oven in the oven cavity. 3. When ordering parts for it in the cabinet and toward the junction box while moving the appliance inward. 5. Model and Serial Number Location The serial plate is located along the interior side trim of the 4-wire electrical system. (see Figure 5). 4. Separate the...
... Cable from the serial plate on the oven side panel. 2. Remove the bottom trim taped on your oven, always be connected to include the model and serial numbers and a lot number or letter from appliance Figure 4 U.L.-Listed Conduit Connector (or CSA listed) 4-WIRE GROUNDED JUNCTION BOX 4....oven in the oven cavity. 3. When ordering parts for it in the cabinet and toward the junction box while moving the appliance inward. 5. Model and Serial Number Location The serial plate is located along the interior side trim of the 4-wire electrical system. (see Figure 5). 4. Separate the...

Installation Instructions
Page 6
Take 2 readings with an Electronic Oven Control. Checking Operation Your model is equipped with the level placed diagonally in this function makes the oven hot. 20 seconds after the oven is turned off. 7. Each of the ... a compromise for Service Checklist and operating instructions in the oven should feel heat coming from the inside the upper rear part above the oven (some models) provides cooling of the oven. 2. It may save you have a double cavity wall oven. Figure 8 IMPORTANT NOTE A cooling fan inside of the oven electrical and...
Take 2 readings with an Electronic Oven Control. Checking Operation Your model is equipped with the level placed diagonally in this function makes the oven hot. 20 seconds after the oven is turned off. 7. Each of the ... a compromise for Service Checklist and operating instructions in the oven should feel heat coming from the inside the upper rear part above the oven (some models) provides cooling of the oven. 2. It may save you have a double cavity wall oven. Figure 8 IMPORTANT NOTE A cooling fan inside of the oven electrical and...


