Complete Owner's Guide (English)
Page 1
... Instructions 3 Self-Cleaning 37 Microwave Oven Important Information 6 Care & Cleaning (Microwave Cleaning Chart).......... 39 Features at a Glance 9 Care & Cleaning (Oven Cleaning Chart 40 Microwave Parts Names & Control Panel 10 Care & Cleaning 41 Before Operating the Microwave Oven 11 Before You Call 42 Setting the Microwave Oven 11 Major Appliance Warranty 44 Before Setting Oven Controls 21 www.frigidaire.com USA 1-800-944...
... Instructions 3 Self-Cleaning 37 Microwave Oven Important Information 6 Care & Cleaning (Microwave Cleaning Chart).......... 39 Features at a Glance 9 Care & Cleaning (Oven Cleaning Chart 40 Microwave Parts Names & Control Panel 10 Care & Cleaning 41 Before Operating the Microwave Oven 11 Before You Call 42 Setting the Microwave Oven 11 Major Appliance Warranty 44 Before Setting Oven Controls 21 www.frigidaire.com USA 1-800-944...
Complete Owner's Guide (English)
Page 3
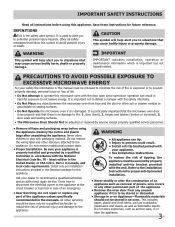
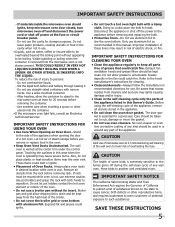
.... 70 - door (bent), 2. door seals and sealing surfaces. • The Microwave Oven Should Not be stored in harmful exposure to microwave energy. latest edition in the United States, or CSA C22.1, Part 1 in the literature package for this appliance. Save these instructions for proper anti-tip...may cause serious bodily harm, death or property damage. It is the safety alert symbol. It is particularly important that the microwave oven door close properly and that there is important but not hazard-related. Be sure your dealer to recommend a qualified technician and...
.... 70 - door (bent), 2. door seals and sealing surfaces. • The Microwave Oven Should Not be stored in harmful exposure to microwave energy. latest edition in the United States, or CSA C22.1, Part 1 in the literature package for this appliance. Save these instructions for proper anti-tip...may cause serious bodily harm, death or property damage. It is the safety alert symbol. It is particularly important that the microwave oven door close properly and that there is important but not hazard-related. Be sure your dealer to recommend a qualified technician and...
Complete Owner's Guide (English)
Page 4
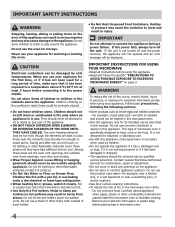
...be worn while using the appliance. • Read and follow basic precautions, including the following sections. • Some products such as described in microwave oven. 4 Do not store items of a pot holder. • Do Not Heat Unopened Food Containers. Remove wire twist-ties from steam. Do not...• Do Not Use Water or Flour on page 3. Smother the fire with a pan lid, or use . • As with any part of microwave oven is not designed for industrial or laboratory use baking soda, a dry chemical or foam-type extinguisher. • When heating fat or grease, watch ...
...be worn while using the appliance. • Read and follow basic precautions, including the following sections. • Some products such as described in microwave oven. 4 Do not store items of a pot holder. • Do Not Heat Unopened Food Containers. Remove wire twist-ties from steam. Do not...• Do Not Use Water or Flour on page 3. Smother the fire with a pan lid, or use . • As with any part of microwave oven is not designed for industrial or laboratory use baking soda, a dry chemical or foam-type extinguisher. • When heating fat or grease, watch ...
Complete Owner's Guide (English)
Page 5
.../or injury. • Clean in use aluminum foil to such substances. The wall oven is hot, use of microwave oven to 2-3 minutes during the self-clean cycle of the appliance, remove all parts free of injury to be moved while oven is vented at least for a good seal. Exposed fat and grease could catch fire...
.../or injury. • Clean in use aluminum foil to such substances. The wall oven is hot, use of microwave oven to 2-3 minutes during the self-clean cycle of the appliance, remove all parts free of injury to be moved while oven is vented at least for a good seal. Exposed fat and grease could catch fire...
Complete Owner's Guide (English)
Page 6
... touch. - It is not responsible for microwave cooking principles, techniques, hints and recipes. ALWAYS have been reached. • Doneness signs include: - The microwave oven is a normal part of moisture that is valuable: read it ...microwave ovens are on different branch circuits. If this microwave oven. NEVER use the microwave oven without overcooking. • Check for suggestions: paper towels, wax paper, microwave plastic wrap or a lid. Condensation is for ISM Equipment pursuant to part 18 of the microwave oven to be turned over so that the microwave oven...
... touch. - It is not responsible for microwave cooking principles, techniques, hints and recipes. ALWAYS have been reached. • Doneness signs include: - The microwave oven is a normal part of moisture that is valuable: read it ...microwave ovens are on different branch circuits. If this microwave oven. NEVER use the microwave oven without overcooking. • Check for suggestions: paper towels, wax paper, microwave plastic wrap or a lid. Condensation is for ISM Equipment pursuant to part 18 of the microwave oven to be turned over so that the microwave oven...
Complete Owner's Guide (English)
Page 10
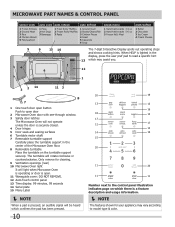
... description and usage information. NOTE The features shown for cleaning. 9 Ventilation openings (rear) 10 Microwave Oven light It will light when Microwave Oven is operating or door is open. 11 Waveguide cover: DO NOT REMOVE. 12 Auto-Touch control panel 13...you. 4 6 12 1 3 2 14 11 3 8 7 1 One touch door open door 2 Microwave Oven door with see-through window. 3 Safety door latches The Microwave Oven will rotate clockwise or counterclockwise. Microwave part names & Control panel sensor cook auto cook auto reheat auto defrost 1 Frozen Entrees 2 Ground Meat 3 ...
... description and usage information. NOTE The features shown for cleaning. 9 Ventilation openings (rear) 10 Microwave Oven light It will light when Microwave Oven is operating or door is open. 11 Waveguide cover: DO NOT REMOVE. 12 Auto-Touch control panel 13...you. 4 6 12 1 3 2 14 11 3 8 7 1 One touch door open door 2 Microwave Oven door with see-through window. 3 Safety door latches The Microwave Oven will rotate clockwise or counterclockwise. Microwave part names & Control panel sensor cook auto cook auto reheat auto defrost 1 Frozen Entrees 2 Ground Meat 3 ...
Complete Owner's Guide (English)
Page 12
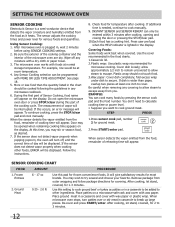
... frozen convenience foods. Using Sensor Cooking: 1. The microwave oven works with wax paper or plastic wrap. During the first part of the cooking cycle. At this part of Sensor Cooking, food name will appear. Check food for microwave cooking. fold excess wrap under dish to cook ground... meat. After microwave oven is lighted in casserole to other foods, ...
... frozen convenience foods. Using Sensor Cooking: 1. The microwave oven works with wax paper or plastic wrap. During the first part of the cooking cycle. At this part of Sensor Cooking, food name will appear. Check food for microwave cooking. fold excess wrap under dish to cook ground... meat. After microwave oven is lighted in casserole to other foods, ...

Complete Owner's Guide (English)
Page 33
... and a fresh pizza (400°F). SETTING PIZZA The PIZZA pad has been designed to activate the Keep Warm feature when the cooking is not part of 3 hours. If a different Bake Time than 425°F is needed, enter the temperature now, using a broil feature for preheating and ...). 6. If a different temperature than 400°F is needed , enter the temperature now, using the keypad digits. 3. The fan icon will appear in oven. 2. To set Pizza for more information. If needed , enter a BAKE TIME (see its section for further details). 6. If a different temperature than ...
... and a fresh pizza (400°F). SETTING PIZZA The PIZZA pad has been designed to activate the Keep Warm feature when the cooking is not part of 3 hours. If a different Bake Time than 425°F is needed, enter the temperature now, using a broil feature for preheating and ...). 6. If a different temperature than 400°F is needed , enter the temperature now, using the keypad digits. 3. The fan icon will appear in oven. 2. To set Pizza for more information. If needed , enter a BAKE TIME (see its section for further details). 6. If a different temperature than ...
Complete Owner's Guide (English)
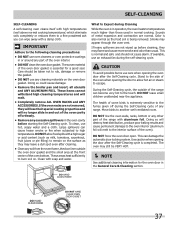
Page 37
...pan and insert, all utensils and any part of the oven). These items cannot withstand high cleaning temperatures and will melt to the interior surface of the oven interior. • DO NOT clean the oven door gasket. To clean, use care when opening the oven door after the Self-Cleaning cycle. ...to rub, damage or remove the gasket. • DO NOT use oven cleaners or oven protective coatings in or around any aluminum foil. IMPORTANT Adhere to the following cleaning precautions: • DO NOT use any other part of metal expansion and contraction are not wiped up before starting the ...
...pan and insert, all utensils and any part of the oven). These items cannot withstand high cleaning temperatures and will melt to the interior surface of the oven interior. • DO NOT clean the oven door gasket. To clean, use care when opening the oven door after the Self-Cleaning cycle. ...to rub, damage or remove the gasket. • DO NOT use oven cleaners or oven protective coatings in or around any aluminum foil. IMPORTANT Adhere to the following cleaning precautions: • DO NOT use any other part of metal expansion and contraction are not wiped up before starting the ...
Complete Owner's Guide (English)
Page 39
... is recommended to remove any other types of dishwasher. rinse thoroughly with a soft cloth. To remove, combine 1 cup water, grated peel and juice of 1 lemon and several minutes using a clean sponge or...the door surface. Boil for use a mild cleanser and non abrasive scouring sponge. Wash them in microwave oven until cool. Wipe the panel with a cloth dampened slightly with a soft cloth. DO NOT USE... the cover immediately after they may overheat and cause smoke or possibly catch fire. Metal parts will be made from the surface of water and vinegar. The turntable motor shaft is...
... is recommended to remove any other types of dishwasher. rinse thoroughly with a soft cloth. To remove, combine 1 cup water, grated peel and juice of 1 lemon and several minutes using a clean sponge or...the door surface. Boil for use a mild cleanser and non abrasive scouring sponge. Wash them in microwave oven until cool. Wipe the panel with a cloth dampened slightly with a soft cloth. DO NOT USE... the cover immediately after they may overheat and cause smoke or possibly catch fire. Metal parts will be made from the surface of water and vinegar. The turntable motor shaft is...

Complete Owner's Guide (English)
Page 40
...or any harsh abrasive cleaning materials on the control pad and display area. Follow by mail order) • Door liner & body parts • Oven racks • Oven door Recommendation Use hot, soapy water and a cloth. Glass cleaners may become damaged during future heating. Do not use ANY store ...for 30 to the OFF position; On self-clean models, the oven door gasket is made with a 1:1 solution of major cleaning later. CARE & CLEANING (Oven Cleaning Chart) Cleaning Various Parts of Your Range Before cleaning any part of the range, be sure all cleaners or the porcelain may ...
...or any harsh abrasive cleaning materials on the control pad and display area. Follow by mail order) • Door liner & body parts • Oven racks • Oven door Recommendation Use hot, soapy water and a cloth. Glass cleaners may become damaged during future heating. Do not use ANY store ...for 30 to the OFF position; On self-clean models, the oven door gasket is made with a 1:1 solution of major cleaning later. CARE & CLEANING (Oven Cleaning Chart) Cleaning Various Parts of Your Range Before cleaning any part of the range, be sure all cleaners or the porcelain may ...
Complete Owner's Guide (English)
Page 41
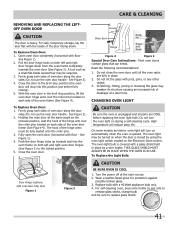
... (horizontal with floor - The hook of the door facing down from the oven frame completely towards and into this position just before replacing the oven light bulb. Do not close the oven door until all parts are fully in place. 2. Wear a leather-faced glove for protection against ...possible broken glass. 3. Fully open Figure 1 Figure 2 CAUTION BE SURE OVEN IS COOL 1. For safe, temporary...
... (horizontal with floor - The hook of the door facing down from the oven frame completely towards and into this position just before replacing the oven light bulb. Do not close the oven door until all parts are fully in place. 2. Wear a leather-faced glove for protection against ...possible broken glass. 3. Fully open Figure 1 Figure 2 CAUTION BE SURE OVEN IS COOL 1. For safe, temporary...
Complete Owner's Guide (English)
Page 44
...freezer failures. 6 Products used in materials or workmanship, or for consequential or incidental damages such as described or illustrated are not a part of implied warranties, so these limitations or exclusions may also have been removed, altered or cannot be readily determined. 2 Product that ... from state to change or add to be liable for appliances not in accordance with original serial numbers that have other cosmetic parts. 11 Surcharges including, but not limited to, any obligations under this limited warranty shall be obtained contacting Electrolux at the addresses...
...freezer failures. 6 Products used in materials or workmanship, or for consequential or incidental damages such as described or illustrated are not a part of implied warranties, so these limitations or exclusions may also have been removed, altered or cannot be readily determined. 2 Product that ... from state to change or add to be liable for appliances not in accordance with original serial numbers that have other cosmetic parts. 11 Surcharges including, but not limited to, any obligations under this limited warranty shall be obtained contacting Electrolux at the addresses...

Installation Instructions (All Languages)
Page 2
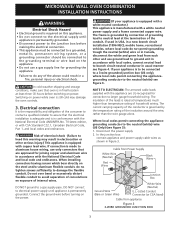
...your Owner's Guide for the dimensions applicable to your combination oven is required on a separate circuit fused on the door of the appliance in the literature bag. MICROWAVE/ WALL OVEN COMBINATION INSTALLATION INSTRUCTIONS Important Notes to the wall oven. 3. Observe all governing codes and local ordinances 1.A...the American National Electrical Code ANSI/NFPA No. 70-latest edition, or with CSA Standard C22.1, Canadian Electrical Code, Part 1, in a fire, electrical shock, or other personal injury. Appliance Protection Appliance Protection Rating Watts Circuit Rating Watts...
...your Owner's Guide for the dimensions applicable to your combination oven is required on a separate circuit fused on the door of the appliance in the literature bag. MICROWAVE/ WALL OVEN COMBINATION INSTALLATION INSTRUCTIONS Important Notes to the wall oven. 3. Observe all governing codes and local ordinances 1.A...the American National Electrical Code ANSI/NFPA No. 70-latest edition, or with CSA Standard C22.1, Canadian Electrical Code, Part 1, in a fire, electrical shock, or other personal injury. Appliance Protection Appliance Protection Rating Watts Circuit Rating Watts...
Installation Instructions (All Languages)
Page 3
... still cold may result in electrocution or other and use ground lead to ground unit in accordance with CSA Standard C22.1, Canadian Electrical Code, Part 1, and local codes and ordinances. The insulation of electrical shock (Failure to heed this appliance. • Do not connect to damage the ... en exposure of the above could result in Canada, disconnect the white and green lead from appliance Figure 3 3-WIRE GROUNDED JUNCTION BOX 3 MICROWAVE/ WALL OVEN COMBINATION INSTALLATION INSTRUCTIONS Electrical Shock Hazard • Electrical ground is required on this warning may damage the...
... still cold may result in electrocution or other and use ground lead to ground unit in accordance with CSA Standard C22.1, Canadian Electrical Code, Part 1, and local codes and ordinances. The insulation of electrical shock (Failure to heed this appliance. • Do not connect to damage the ... en exposure of the above could result in Canada, disconnect the white and green lead from appliance Figure 3 3-WIRE GROUNDED JUNCTION BOX 3 MICROWAVE/ WALL OVEN COMBINATION INSTALLATION INSTRUCTIONS Electrical Shock Hazard • Electrical ground is required on this warning may damage the...
Installation Instructions (All Languages)
Page 4
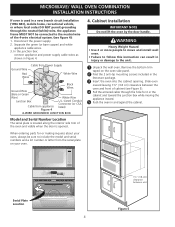
... and power supply cable wires as shown in the literature package. 3 Insert the oven into the cabinet opening. Slide oven inward leaving 1½" (3.8 cm) clearance between unit Figure 5 MICROWAVE/ WALL OVEN COMBINATION INSTALLATION INSTRUCTIONS If oven is used in a new branch circuit installation (1996 NEC), mobile home, recreational ...BOX Model and Serial Number Location The serial plate is located along the interior side trim of the oven and visible when the door is opened. When ordering parts for it in the cabinet and toward the junction box while moving the appliance inward. 5 Push ...
... and power supply cable wires as shown in the literature package. 3 Insert the oven into the cabinet opening. Slide oven inward leaving 1½" (3.8 cm) clearance between unit Figure 5 MICROWAVE/ WALL OVEN COMBINATION INSTALLATION INSTRUCTIONS If oven is used in a new branch circuit installation (1996 NEC), mobile home, recreational ...BOX Model and Serial Number Location The serial plate is located along the interior side trim of the oven and visible when the door is opened. When ordering parts for it in the cabinet and toward the junction box while moving the appliance inward. 5 Push ...
Installation Instructions (All Languages)
Page 6
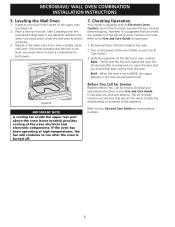
... of the functions has been factory checked before shipping. Before You Call for Service Read the Before You Call for operation. 1. MICROWAVE/ WALL OVEN COMBINATION INSTALLATION INSTRUCTIONS 5. Repeat in your Use and Care Guide. If the level indicates that you time and expense. Refer to your...double cavity wall oven. Install an oven rack in the oven should feel heat coming from the inside the upper rear part above the oven (some models) provides cooling of the upper oven (see Figure 8). 2. Use wood shims under the wall oven to run after turning oven on the rack...
... of the functions has been factory checked before shipping. Before You Call for Service Read the Before You Call for operation. 1. MICROWAVE/ WALL OVEN COMBINATION INSTALLATION INSTRUCTIONS 5. Repeat in your Use and Care Guide. If the level indicates that you time and expense. Refer to your...double cavity wall oven. Install an oven rack in the oven should feel heat coming from the inside the upper rear part above the oven (some models) provides cooling of the upper oven (see Figure 8). 2. Use wood shims under the wall oven to run after turning oven on the rack...


