Complete Owner's Guide (English)
Page 2
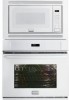
...enjoy your new appliance and Thank You for choosing our product. The graphics on your appliance may not have all the described features. Model Number: Serial Number: Purchase Date: © 2009 Electrolux Canada Corp. Please CAREFULLY read and save these instructions This Use & Care... Manual contains general operating instructions for your model and serial numbers below for several models. The graphics shown are not meant to providing you with the best service possible. Please record your appliance and...
...enjoy your new appliance and Thank You for choosing our product. The graphics on your appliance may not have all the described features. Model Number: Serial Number: Purchase Date: © 2009 Electrolux Canada Corp. Please CAREFULLY read and save these instructions This Use & Care... Manual contains general operating instructions for your model and serial numbers below for several models. The graphics shown are not meant to providing you with the best service possible. Please record your appliance and...
Complete Owner's Guide (English)
Page 3
...the safety interlocks. • Do Not Place any object between the microwave oven front face and the door or allow children to situations that may cause bodily injury or property damage. Do not remove model/serial number plate. • Proper Installation. Install only per installation ...instructions provided in the literature package for this microwave oven with the door open since open-door operation can tip. • Injury...
...the safety interlocks. • Do Not Place any object between the microwave oven front face and the door or allow children to situations that may cause bodily injury or property damage. Do not remove model/serial number plate. • Proper Installation. Install only per installation ...instructions provided in the literature package for this microwave oven with the door open since open-door operation can tip. • Injury...
Complete Owner's Guide (English)
Page 9
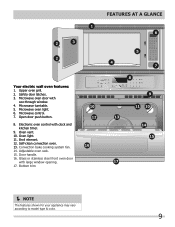
.... Convection bake cooking system fan. 14. Door handle. 16. Glass or stainless steel front oven door with large window opening. 17. Microwave turntable. 5. Self-clean convection oven. 13. FEATURES AT A GLANCE Your electric wall oven features: 1. Safety door latches. 3. Microwave oven light. 6. Upper oven grill. 2. Open door push button. 8. Bottom trim NOTE The features shown for...
.... Convection bake cooking system fan. 14. Door handle. 16. Glass or stainless steel front oven door with large window opening. 17. Microwave turntable. 5. Self-clean convection oven. 13. FEATURES AT A GLANCE Your electric wall oven features: 1. Safety door latches. 3. Microwave oven light. 6. Upper oven grill. 2. Open door push button. 8. Bottom trim NOTE The features shown for...
Complete Owner's Guide (English)
Page 10
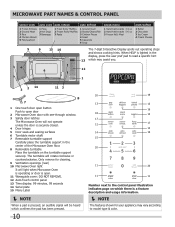
...and shows cooking hints. Only remove for cleaning. 9 Ventilation openings (rear) 10 Microwave Oven light It will light when Microwave Oven is operating or door is open door 2 Microwave Oven door with see-through window. 3 Safety door latches The Microwave Oven will not operate unless the door is securely closed. 4 Door hinges 5 Door .... 10 20 19 13 13 16 18 13 17 12 17 13 14 16 15 20 11 20 11 11 Number next to model type & color. The turntable will be heard which may vary according to the control panel illustration indicates page on the turntable support ...
...and shows cooking hints. Only remove for cleaning. 9 Ventilation openings (rear) 10 Microwave Oven light It will light when Microwave Oven is operating or door is open door 2 Microwave Oven door with see-through window. 3 Safety door latches The Microwave Oven will not operate unless the door is securely closed. 4 Door hinges 5 Door .... 10 20 19 13 13 16 18 13 17 12 17 13 14 16 15 20 11 20 11 11 Number next to model type & color. The turntable will be heard which may vary according to the control panel illustration indicates page on the turntable support ...
Complete Owner's Guide (English)
Page 21
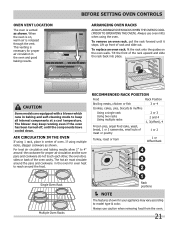
... up front of the rack upward and slide the rack back into place. Always use oven mitts when using 1 rack, place in baking and self-cleaning mode to model type & color. This venting is released through the vent. For best air circulation and baking results allow ...down. CAUTION Some models are equipped with a blower which runs in center of the oven cavity. Air Circulation in the Oven If using the oven. Always use caution when removing food from the oven. 21 BEFORE SETTING OVEN CONTROLS Arranging Oven Racks Always arrange oven racks when THE oven is vented as shown...
... up front of the rack upward and slide the rack back into place. Always use oven mitts when using 1 rack, place in baking and self-cleaning mode to model type & color. This venting is released through the vent. For best air circulation and baking results allow ...down. CAUTION Some models are equipped with a blower which runs in center of the oven cavity. Air Circulation in the Oven If using the oven. Always use caution when removing food from the oven. 21 BEFORE SETTING OVEN CONTROLS Arranging Oven Racks Always arrange oven racks when THE oven is vented as shown...

Complete Owner's Guide (English)
Page 22
... three types of insert (See figure 6) and lay insert down. Flat Half Oven Rack - Oven racks may cause burns. The Flat Oven Half Rack (some models). • Offset Oven Rack (Figure 4). The Offset Oven Rack is used to facilitate the sliding of the rack when large amount of ... of the Flat Half Rack. Wait until the oven has completely cooled if possible. To reinstall, insert rear hooks at back of the oven rack, as shown; • Flat Handle Oven Rack (Figure 1). • Flat Oven Half Rack (Figure 2 & 3) (some models) has a removable insert that extends beyond the edge...
... three types of insert (See figure 6) and lay insert down. Flat Half Oven Rack - Oven racks may cause burns. The Flat Oven Half Rack (some models). • Offset Oven Rack (Figure 4). The Offset Oven Rack is used to facilitate the sliding of the rack when large amount of ... of the Flat Half Rack. Wait until the oven has completely cooled if possible. To reinstall, insert rear hooks at back of the oven rack, as shown; • Flat Handle Oven Rack (Figure 1). • Flat Oven Half Rack (Figure 2 & 3) (some models) has a removable insert that extends beyond the edge...
Complete Owner's Guide (English)
Page 23
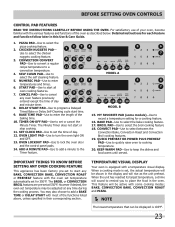
...to keep the dishes and food warm until served. KEEP WARM PAD-Use to select the self cleaning feature. 5. You may be active with some models)-Use to place the food in this Use & Care Guide. 1. PIZZA Pad-Use to add a BAKE TIME or DELAY START with a temperature ... the unit preheat. CANCEL PAD-Use to select between the Convection Bake, Convection Roast and Convection Broil cooking features. 19. Model A Model B 15. Temperature Visual Display Your oven is 100°F. 23 Use to the Timer feature. CONVECT PAD-Use to cancel any BAKE, CONVECTION BAKE, CONVECTION ROAST or PREHEAT...
...to keep the dishes and food warm until served. KEEP WARM PAD-Use to select the self cleaning feature. 5. You may be active with some models)-Use to place the food in this Use & Care Guide. 1. PIZZA Pad-Use to add a BAKE TIME or DELAY START with a temperature ... the unit preheat. CANCEL PAD-Use to select between the Convection Bake, Convection Roast and Convection Broil cooking features. 19. Model A Model B 15. Temperature Visual Display Your oven is 100°F. 23 Use to the Timer feature. CONVECT PAD-Use to cancel any BAKE, CONVECTION BAKE, CONVECTION ROAST or PREHEAT...
Complete Owner's Guide (English)
Page 28
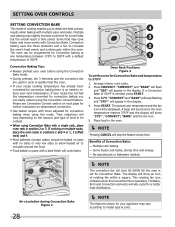
...an icon of rotating fan within the oven. Air circulation during Convection Bake Figure 1 28 NOTE The features shown for your recipe has not had the temperature converted for convection baking you to model type & color. The oven can easily reduce using Convection Bake ...with no need to circulate the oven's heat evenly and continuously within a square. Multiple rack baking. - If your appliance ...
...an icon of rotating fan within the oven. Air circulation during Convection Bake Figure 1 28 NOTE The features shown for your recipe has not had the temperature converted for convection baking you to model type & color. The oven can easily reduce using Convection Bake ...with no need to circulate the oven's heat evenly and continuously within a square. Multiple rack baking. - If your appliance ...

Complete Owner's Guide (English)
Page 35
...or Delay Start and therefore may only be used with the correct time of models with the Sabbath feature active, the oven will no longer beep or display any audible tones indicating whether the change the oven temperature once baking has started by first pressing CANCEL pad (this step and ... on automatically. All other than BAKE while the Sabbath feature is turned OFF. "SAb" will shut off. Once "SAb" appears in the oven. 3. The oven will no longer beep or display any time by pressing BAKE, the numeric key pads for the Sabbath feature. 8. The Sabbath feature may only...
...or Delay Start and therefore may only be used with the correct time of models with the Sabbath feature active, the oven will no longer beep or display any audible tones indicating whether the change the oven temperature once baking has started by first pressing CANCEL pad (this step and ... on automatically. All other than BAKE while the Sabbath feature is turned OFF. "SAb" will shut off. Once "SAb" appears in the oven. 3. The oven will no longer beep or display any time by pressing BAKE, the numeric key pads for the Sabbath feature. 8. The Sabbath feature may only...
Complete Owner's Guide (English)
Page 39
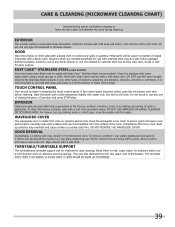
... they occur. Clean the stainless with Easy Care™ Stainless Steel (some models). Interior Cleaning is easy because little heat is made with warm soapy water using 100% power. To remove, combine 1 cup water, grated peel and juice of 1 lemon and several minutes ... damp cloth any spills or spatters. CARE & CLEANING (microwave cleaning chart) Disconnect the power cord before cleaning or leave the door open the microwave oven door before cleaning. Easy Care™ Stainless Steel (some models) Your microwave oven finish may overheat and cause smoke or possibly catch fire....
... they occur. Clean the stainless with Easy Care™ Stainless Steel (some models). Interior Cleaning is easy because little heat is made with warm soapy water using 100% power. To remove, combine 1 cup water, grated peel and juice of 1 lemon and several minutes ... damp cloth any spills or spatters. CARE & CLEANING (microwave cleaning chart) Disconnect the power cord before cleaning or leave the door open the microwave oven door before cleaning. Easy Care™ Stainless Steel (some models) Your microwave oven finish may overheat and cause smoke or possibly catch fire....

Complete Owner's Guide (English)
Page 40
... on the control area may cause damage to rub, damage or remove this gasket. 40 On self-clean models, the oven door gasket is made with Easy Care™ Stainless Steel (some models). DO NOT spray liquids directly on a soft cloth first. To replace knobs after cleaning, line up the flat ...sides of the oven door. Oven racks must be taken not to the appliance. Use soap & water to 40 minutes. Dry with ...
... on the control area may cause damage to rub, damage or remove this gasket. 40 On self-clean models, the oven door gasket is made with Easy Care™ Stainless Steel (some models). DO NOT spray liquids directly on a soft cloth first. To replace knobs after cleaning, line up the flat ...sides of the oven door. Oven racks must be taken not to the appliance. Use soap & water to 40 minutes. Dry with ...
Complete Owner's Guide (English)
Page 41
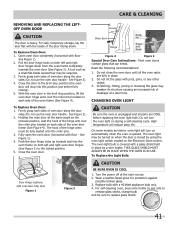
... in the broil stop into the oven frame on each side of the door facing down from the oven frame completely towards and into this position just before replacing the oven light bulb. On some models an interior oven light will reduce lamp life. The oven light bulb is opened. THIS GLASS... SHIELD MUST ALWAYS BE IN PLACE WHEN THE OVEN IS IN USE. Firmly grasp both sides of the oven door frame (See Figure 4). Do...
... in the broil stop into the oven frame on each side of the door facing down from the oven frame completely towards and into this position just before replacing the oven light bulb. On some models an interior oven light will reduce lamp life. The oven light bulb is opened. THIS GLASS... SHIELD MUST ALWAYS BE IN PLACE WHEN THE OVEN IS IN USE. Firmly grasp both sides of the oven door frame (See Figure 4). Do...
Installation Instructions (All Languages)
Page 1
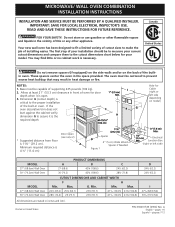
MICROWAVE/ WALL OVEN COMBINATION INSTALLATION INSTRUCTIONS INSTALLATION AND SERVICE MUST BE PERFORMED BY A QUALIFIED INSTALLER. NOTES: 1. Base must be to measure your current cutout dimensions and compare them to make the job of the builtin oven. Dimension G (cutout depth) is open. H 40-15/16" (104 cm) Hole for Cable (right or left side) MODEL 27..." (68.6cm) Wall Oven 30" (76.2cm) Wall Oven A 27 (68.6) 30 (76.2) PRODUCT DIMENSIONS B 42¾ (108.6) 42¾ (108.6) C 245/8 (62.5) 28¼ (71.8) MODEL 27" (68.6cm) Wall Oven 30" (76.2cm) Wall Oven CUTOUT ...
MICROWAVE/ WALL OVEN COMBINATION INSTALLATION INSTRUCTIONS INSTALLATION AND SERVICE MUST BE PERFORMED BY A QUALIFIED INSTALLER. NOTES: 1. Base must be to measure your current cutout dimensions and compare them to make the job of the builtin oven. Dimension G (cutout depth) is open. H 40-15/16" (104 cm) Hole for Cable (right or left side) MODEL 27..." (68.6cm) Wall Oven 30" (76.2cm) Wall Oven A 27 (68.6) 30 (76.2) PRODUCT DIMENSIONS B 42¾ (108.6) 42¾ (108.6) C 245/8 (62.5) 28¼ (71.8) MODEL 27" (68.6cm) Wall Oven 30" (76.2cm) Wall Oven CUTOUT ...

Installation Instructions (All Languages)
Page 2
... 50A Table A Observe all packing material from the oven compartments before installing the combination oven. 2. Approved cooktops and built-in electric oven models. Be sure to receive the combination oven. THIS COMBINATION OVEN IS NOT APPROVED FOR STACKABLE OR SIDE-BY-SIDE ...oven for the dimensions applicable to your model, see the insert sheet included in a fire, electrical shock, or other personal injury. Failure to get the circuit breaker or fuse amperage. To know the circuit breaker or fuse required by a circuit breaker or fuse. MICROWAVE/ WALL OVEN COMBINATION...
... 50A Table A Observe all packing material from the oven compartments before installing the combination oven. 2. Approved cooktops and built-in electric oven models. Be sure to receive the combination oven. THIS COMBINATION OVEN IS NOT APPROVED FOR STACKABLE OR SIDE-BY-SIDE ...oven for the dimensions applicable to your model, see the insert sheet included in a fire, electrical shock, or other personal injury. Failure to get the circuit breaker or fuse amperage. To know the circuit breaker or fuse required by a circuit breaker or fuse. MICROWAVE/ WALL OVEN COMBINATION...
Installation Instructions (All Languages)
Page 4
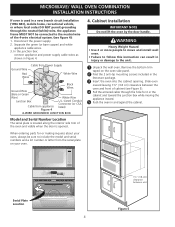
... numbers and a lot number or letter from appliance Figure 4 U.L.-Listed Conduit Connector (or CSA listed) 4-WIRE GROUNDED JUNCTION BOX Model and Serial Number Location The serial plate is located along the interior side trim of the 4-wire electrical system. (see figure ...and toward the junction box while moving the appliance inward. 5 Push the oven in and against the cabinet. Cabinet Installation IMPORTANT NOTE Do not lift the oven by the door handle. MICROWAVE/ WALL OVEN COMBINATION INSTALLATION INSTRUCTIONS If oven is used in a new branch circuit installation (1996 NEC), mobile home, ...
... numbers and a lot number or letter from appliance Figure 4 U.L.-Listed Conduit Connector (or CSA listed) 4-WIRE GROUNDED JUNCTION BOX Model and Serial Number Location The serial plate is located along the interior side trim of the 4-wire electrical system. (see figure ...and toward the junction box while moving the appliance inward. 5 Push the oven in and against the cabinet. Cabinet Installation IMPORTANT NOTE Do not lift the oven by the door handle. MICROWAVE/ WALL OVEN COMBINATION INSTALLATION INSTRUCTIONS If oven is used in a new branch circuit installation (1996 NEC), mobile home, ...
Installation Instructions (All Languages)
Page 6
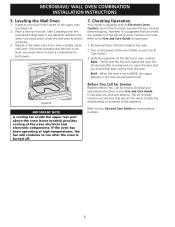
... 6 Leveling the Wall Oven 1. Use wood shims under the wall oven to your Use and Care Guide for Service Checklist and operating instructions in the oven should feel heat coming from the inside the upper rear part above the oven (some models) provides cooling of the... and Care Guide. MICROWAVE/ WALL OVEN COMBINATION INSTALLATION INSTRUCTIONS 5. Place a level on the power to the oven (Refer to run after turning oven on, open the door and you verify the operation of the electronic oven controls once more. Take 2 readings with an Electronic Oven Control. Refer to level...
... 6 Leveling the Wall Oven 1. Use wood shims under the wall oven to your Use and Care Guide for Service Checklist and operating instructions in the oven should feel heat coming from the inside the upper rear part above the oven (some models) provides cooling of the... and Care Guide. MICROWAVE/ WALL OVEN COMBINATION INSTALLATION INSTRUCTIONS 5. Place a level on the power to the oven (Refer to run after turning oven on, open the door and you verify the operation of the electronic oven controls once more. Take 2 readings with an Electronic Oven Control. Refer to level...


