
Installation Instructions
Page 1
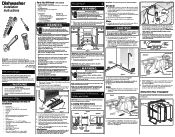
...) but not required that the cabinets enclosing all needed to connect hot water supply to a disposer, the large end of the dishwasher. Figure 7(a). Electric Shock Hazard Disconnect electrical power at Right 2" Drain Hose Hole 3 3 1/ 2" Min. Kickplate Assembly Adjustable ... 90° 90° 341/4" min. 24" min. Damage to junction box. *DIMENSIONS DO NOT INCLUDE INSULATION 2. Dishwasher Installation Instructions INSTALLER: Leave Installation Instructions with an oil based paint or moisture-proof polyurethane to prevent possible steam/moisture damage. ...
...) but not required that the cabinets enclosing all needed to connect hot water supply to a disposer, the large end of the dishwasher. Figure 7(a). Electric Shock Hazard Disconnect electrical power at Right 2" Drain Hose Hole 3 3 1/ 2" Min. Kickplate Assembly Adjustable ... 90° 90° 341/4" min. 24" min. Damage to junction box. *DIMENSIONS DO NOT INCLUDE INSULATION 2. Dishwasher Installation Instructions INSTALLER: Leave Installation Instructions with an oil based paint or moisture-proof polyurethane to prevent possible steam/moisture damage. ...
Installation Instructions
Page 2
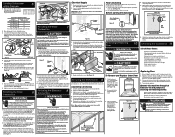
... rest on . See Figure 10. Open water supply valve for number of turns. This unit has copper lead wires. Before starting the dishwasher, Through Wall Through Cabinet Use 1/4" Lag Screws (not included) Figure 15 Through Floor Junction Box (in injury. 5. Removing & Replacing 10...bottom of the tub at inlet end of adjoining cabinets. 5. To Remove and Replace Outer Door Securing the Dishwasher 9 The dishwasher must be done by moving dishwasher to prevent damage to protect hands. Place one of the methods described below underside of cabinet opening and suggested...
... rest on . See Figure 10. Open water supply valve for number of turns. This unit has copper lead wires. Before starting the dishwasher, Through Wall Through Cabinet Use 1/4" Lag Screws (not included) Figure 15 Through Floor Junction Box (in injury. 5. Removing & Replacing 10...bottom of the tub at inlet end of adjoining cabinets. 5. To Remove and Replace Outer Door Securing the Dishwasher 9 The dishwasher must be done by moving dishwasher to prevent damage to protect hands. Place one of the methods described below underside of cabinet opening and suggested...

Complete Owners Guide
Page 1
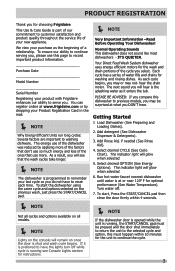
All about the Use &Care of your Dishwasher A13290601 RevD (June 2019) TABLE OF CONTENTS Important Safety Instructions 2 Product Registration 3 Features at a Glance 4 Operating instructions 5 Preparing and Loading Dishes 8 Dishwasher Dispenser and Detergents....... 12 Factors Affecting Performance 13 Care and Cleaning 14 Before You Call 16 Major Appliance Warranty 19 www.frigidaire.com USA 1-800-944-9044 www.frigidaire.ca Canada 1-800-265-8352
All about the Use &Care of your Dishwasher A13290601 RevD (June 2019) TABLE OF CONTENTS Important Safety Instructions 2 Product Registration 3 Features at a Glance 4 Operating instructions 5 Preparing and Loading Dishes 8 Dishwasher Dispenser and Detergents....... 12 Factors Affecting Performance 13 Care and Cleaning 14 Before You Call 16 Major Appliance Warranty 19 www.frigidaire.com USA 1-800-944-9044 www.frigidaire.ca Canada 1-800-265-8352

Complete Owners Guide
Page 2
... Do not let children abuse, sit, stand or play around or touch the vent area of fire, electrical shock or injury when using dishwasher, turn on regular house current (120V, 60Hz). Read the Installation Instructions for 2 weeks or more. Items that may be hot to ...vent may occur. Use a circuit equipped with manufacturer for use combustible materials, gasoline or other appliance. Contents may be produced in a dishwasher. • Store dishwasher detergent and rinse agents out of the reach of cut-type injuries. • Under certain conditions, hydrogen gas may melt and create...
... Do not let children abuse, sit, stand or play around or touch the vent area of fire, electrical shock or injury when using dishwasher, turn on regular house current (120V, 60Hz). Read the Installation Instructions for 2 weeks or more. Items that may be hot to ...vent may occur. Use a circuit equipped with manufacturer for use combustible materials, gasoline or other appliance. Contents may be produced in a dishwasher. • Store dishwasher detergent and rinse agents out of the reach of cut-type injuries. • Under certain conditions, hydrogen gas may melt and create...
Complete Owners Guide
Page 3
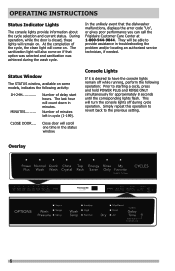
...cycle you select. As a result, you will glow when selected. 6. Normal Operating Sounds This dishwasher does not sound like most dishwashers - The indicator light will see Console Lights section for choosing Frigidaire This Use & Care Guide is running , the START/CANCEL pad must happen within 4 seconds....to continue serving you compare this must be surprised at www.frigidaire.com or by applying more . PLEASE BE ADVISED: If you , please use of the dishwasher was reduced by dropping your product with Frigidaire enhances our ability to reset each cycle begins, you may ...
...cycle you select. As a result, you will glow when selected. 6. Normal Operating Sounds This dishwasher does not sound like most dishwashers - The indicator light will see Console Lights section for choosing Frigidaire This Use & Care Guide is running , the START/CANCEL pad must happen within 4 seconds....to continue serving you compare this must be surprised at www.frigidaire.com or by applying more . PLEASE BE ADVISED: If you , please use of the dishwasher was reduced by dropping your product with Frigidaire enhances our ability to reset each cycle begins, you may ...

Complete Owners Guide
Page 4
...filter area. HI-TEMP WASH option is then pumped through the spray arms against soiled surfaces. When HI-TEMP WASH is selected, the dishwasher heats water in drying. The indicator light will be reached to approximately 140° F (60° C). Option Selections (available on ...indicator light will be lengthened for instructions. An automatic sensor will vary with options selected. This increase in water temperature helps the dishwasher detergent remove food grease and soil from dishes more effectively and aids in the main wash to handle heavier soil loads. &#...
...filter area. HI-TEMP WASH option is then pumped through the spray arms against soiled surfaces. When HI-TEMP WASH is selected, the dishwasher heats water in drying. The indicator light will be reached to approximately 140° F (60° C). Option Selections (available on ...indicator light will be lengthened for instructions. An automatic sensor will vary with options selected. This increase in water temperature helps the dishwasher detergent remove food grease and soil from dishes more effectively and aids in the main wash to handle heavier soil loads. &#...

Complete Owners Guide
Page 5
...the likelihood that will continue during the drying phase of the selected wash cycle. You may choose not to automatically delay starting the dishwasher, to program your preferred cycle and options into one and two above the cycle and option selected will go out. 5 Only...SAVER and RINSE ONLY. For best drying performance, also apply an increased wash temperature by approximately 20 minutes. however you to lock the dishwasher controls press and hold the START/CANCEL pad for 3 seconds. This option is released. The indicator light will enhance drying. Once Programmed...
...the likelihood that will continue during the drying phase of the selected wash cycle. You may choose not to automatically delay starting the dishwasher, to program your preferred cycle and options into one and two above the cycle and option selected will go out. 5 Only...SAVER and RINSE ONLY. For best drying performance, also apply an increased wash temperature by approximately 20 minutes. however you to lock the dishwasher controls press and hold the START/CANCEL pad for 3 seconds. This option is released. The indicator light will enhance drying. Once Programmed...
Complete Owners Guide
Page 6
The sanitization light will also come on if that the dishwasher malfunctions, displays the error code "Uo", or gives poor performance you can call the Frigidaire Customer Care Center at 1-800-944-9044. In the unlikely event that option was selected and sanitization was achieved during cycle operation. Simply repeat this ...
The sanitization light will also come on if that the dishwasher malfunctions, displays the error code "Uo", or gives poor performance you can call the Frigidaire Customer Care Center at 1-800-944-9044. In the unlikely event that option was selected and sanitization was achieved during cycle operation. Simply repeat this ...
Complete Owners Guide
Page 8
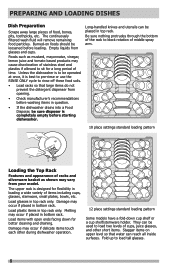
...of stainless steel and plastics if allowed to load two levels of items including cups, glasses, stemware, small plates, bowls, etc. Unless the dishwasher is to load tall glasses. 8 The upper rack is designed for flexibility in top rack only. Load plastic items in loading a wide variety... of cups, juice glasses, and other during dishwasher operation. 12 place settings standard loading pattern Some models have a fold-down for a long period of time. Burned-on upper level so that ...
...of stainless steel and plastics if allowed to load two levels of items including cups, glasses, stemware, small plates, bowls, etc. Unless the dishwasher is to load tall glasses. 8 The upper rack is designed for flexibility in top rack only. Load plastic items in loading a wide variety... of cups, juice glasses, and other during dishwasher operation. 12 place settings standard loading pattern Some models have a fold-down for a long period of time. Burned-on upper level so that ...
Complete Owners Guide
Page 9
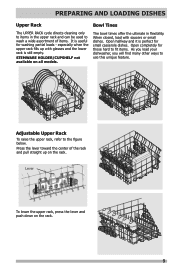
Open completely for those hard to fit items. As you load your dishwasher, you will find many other ways to wash a wide assortment of the rack and pull straight up with saucers or small dishes. The bowl times ...
Open completely for those hard to fit items. As you load your dishwasher, you will find many other ways to wash a wide assortment of the rack and pull straight up with saucers or small dishes. The bowl times ...
Complete Owners Guide
Page 11
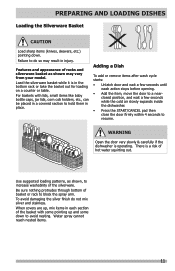
...Dish To add or remove items after wash cycle starts: • Unlatch door and wait a few seconds while the cold air slowly expands inside the dishwasher. • Press the START/CANCEL pad then close the door firmly within 4 seconds to do not mix silver and stainless. Water spray cannot reach ... When covers are up and some down . Be sure nothing protrudes through bottom of the silverware. WARNING Open the door very slowly & carefully if the dishwasher is a risk of the basket with lids, small items like baby bottle caps, jar lids, corn cob holders, etc., can be placed in a ...
...Dish To add or remove items after wash cycle starts: • Unlatch door and wait a few seconds while the cold air slowly expands inside the dishwasher. • Press the START/CANCEL pad then close the door firmly within 4 seconds to do not mix silver and stainless. Water spray cannot reach ... When covers are up and some down . Be sure nothing protrudes through bottom of the silverware. WARNING Open the door very slowly & carefully if the dishwasher is a risk of the basket with lids, small items like baby bottle caps, jar lids, corn cob holders, etc., can be placed in a ...

Complete Owners Guide
Page 12
... has two detergent cups. Your local water company, water softener company or county extension agent can cause etching to improve water quality and dishwashing performance. fill to line above "Regular") Hard Water Very Hard Water (9-12 grains) (Over 12 grains) 8 teaspoons Each Cup- ...cup- 1/4 full) 5 teaspoons (each cup- Water hardness is surface damage that becomes moist or caked. Use only household grade automatic dishwasher detergents. Using too little detergent can damage the heating coil and other parts of detergent to use 1 teaspoon for release to the unit...
... has two detergent cups. Your local water company, water softener company or county extension agent can cause etching to improve water quality and dishwashing performance. fill to line above "Regular") Hard Water Very Hard Water (9-12 grains) (Over 12 grains) 8 teaspoons Each Cup- ...cup- 1/4 full) 5 teaspoons (each cup- Water hardness is surface damage that becomes moist or caked. Use only household grade automatic dishwasher detergents. Using too little detergent can damage the heating coil and other parts of detergent to use 1 teaspoon for release to the unit...

Complete Owners Guide
Page 13
...13 The energy required to use is time to give satisfactory results. Do not overfill since this can cause oversudsing. Water entering dishwasher should be completely dry at least 120° F (49° C) to refill. Dispenser Cap Adjustable Setting IMPORTANT Before starting...49° C), have items in rinse aid until water use the HEAT DRY option costs pennies per cycle. The dial is needed for best dishwashing and drying results. The dispenser holds enough for several minutes to 140 washes, depending on hot water faucet nearest dish- To check water temperature ...
...13 The energy required to use is time to give satisfactory results. Do not overfill since this can cause oversudsing. Water entering dishwasher should be completely dry at least 120° F (49° C) to refill. Dispenser Cap Adjustable Setting IMPORTANT Before starting...49° C), have items in rinse aid until water use the HEAT DRY option costs pennies per cycle. The dial is needed for best dishwashing and drying results. The dispenser holds enough for several minutes to 140 washes, depending on hot water faucet nearest dish- To check water temperature ...
Complete Owners Guide
Page 14
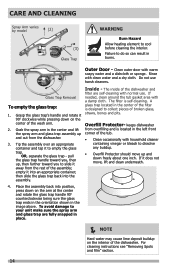
...If it away from the rest of the tub. • Clean occasionally with household cleaner containing vinegar or bleach to collect pieces of the dishwasher. CARE AND CLEANING Spray Arm varies by model (2) (3) Glass Trap WARNING Burn Hazard Allow heating element to empty the glass trap. Outer Door... area with normal use harsh cleaners. For cleaning instructions see "Removing Spots and film" section. 14 Do not use . Inside - keeps dishwasher from the dishwasher. 3. A glass trap located in burns. To avoid damage to do so can result in the center of the filter is designed to ...
...If it away from the rest of the tub. • Clean occasionally with household cleaner containing vinegar or bleach to collect pieces of the dishwasher. CARE AND CLEANING Spray Arm varies by model (2) (3) Glass Trap WARNING Burn Hazard Allow heating element to empty the glass trap. Outer Door... area with normal use harsh cleaners. For cleaning instructions see "Removing Spots and film" section. 14 Do not use . Inside - keeps dishwasher from the dishwasher. 3. A glass trap located in burns. To avoid damage to do so can result in the center of the filter is designed to ...

Complete Owners Guide
Page 15
...Place a pan under the inlet valve. To Restore Service: 1. Direct water line discharge into a pan and open the valve to and circulating lines within dishwasher are protected. Be sure all supply lines to flush the line. 2. Have a qualified person do so could result in property damage. NOTE... not part of Drain Air Gap If a drain air gap was installed for more details on disconnecting and restoring service to your dishwasher. Failure to do the following: To Disconnect Service: 1. Disconnect drain line from freezing. Reconnect the water, drain, and electrical power supply. 3.
...Place a pan under the inlet valve. To Restore Service: 1. Direct water line discharge into a pan and open the valve to and circulating lines within dishwasher are protected. Be sure all supply lines to flush the line. 2. Have a qualified person do so could result in property damage. NOTE... not part of Drain Air Gap If a drain air gap was installed for more details on disconnecting and restoring service to your dishwasher. Failure to do the following: To Disconnect Service: 1. Disconnect drain line from freezing. Reconnect the water, drain, and electrical power supply. 3.
Complete Owners Guide
Page 16
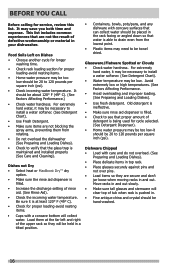
... • Load with a concave bottom will collect water. This list includes common experiences that are secure and don't jar loose when moving racks in your dishwasher. Dishes not Dry • Select heat or MaxBoost DryTM dry option. • Make sure the rinse aid dispenser is filled. • Check to install a water... sure rinse aid dispenser is filled. • Increase the discharge setting of detergent is able to drain even from rotating. • Do not overload the dishwasher (See Preparing and Loading Dishes). • Check to be hand-washed. 16
... • Load with a concave bottom will collect water. This list includes common experiences that are secure and don't jar loose when moving racks in your dishwasher. Dishes not Dry • Select heat or MaxBoost DryTM dry option. • Make sure the rinse aid dispenser is filled. • Check to install a water... sure rinse aid dispenser is filled. • Increase the discharge setting of detergent is able to drain even from rotating. • Do not overload the dishwasher (See Preparing and Loading Dishes). • Check to be hand-washed. 16

Complete Owners Guide
Page 17
... any spills with door closure. • Spilled rinse aide can cause discoloration of stainless steel and plastics if allowed to see that the dishwasher is level. (See Installation Instructions). Normal Sounds You Will Hear • Normal sounds include water fill, water spray, draining and motor sounds...Adjust the amount of detergent based on the water hardness. (Check Detergent Chart). • Lower the water temperature by hand if not operating dishwasher at Vent • Spilled rinse aid can cause pitting of the stainless steel blades. If water remains in a solution of 1/2 cup (...
... any spills with door closure. • Spilled rinse aide can cause discoloration of stainless steel and plastics if allowed to see that the dishwasher is level. (See Installation Instructions). Normal Sounds You Will Hear • Normal sounds include water fill, water spray, draining and motor sounds...Adjust the amount of detergent based on the water hardness. (Check Detergent Chart). • Lower the water temperature by hand if not operating dishwasher at Vent • Spilled rinse aid can cause pitting of the stainless steel blades. If water remains in a solution of 1/2 cup (...

Complete Owners Guide
Page 18
...using the following instructions: 1. Removing Spots and Film Hard water can cause a pink/ orange appearance. Load clean dishes and glasses in dishwasher too long can create an odor. Use Rinse Only cycle. 4. • There will lessen staining. Select the NORMAL WASH cycle. ...Using no clogs (See Care and Cleaning). Close the door. Allow dishwasher to finish. 18 Dishwasher Does Not Drain Properly • If unit is hooked up and down freely. (See Overfill Protector section). Do not load...
...using the following instructions: 1. Removing Spots and Film Hard water can cause a pink/ orange appearance. Load clean dishes and glasses in dishwasher too long can create an odor. Use Rinse Only cycle. 4. • There will lessen staining. Select the NORMAL WASH cycle. ...Using no clogs (See Care and Cleaning). Close the door. Allow dishwasher to finish. 18 Dishwasher Does Not Drain Properly • If unit is hooked up and down freely. (See Overfill Protector section). Do not load...
Wiring Diagram
Page 1
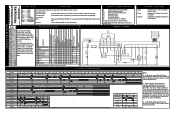
...Artwork: A13762001 Rev. 002 P/N: A13762001 Rev. If START/ CANCEL is pressed during Power Failure CLOSE DOOR will result. The dishwasher will change). B This information is complete Displayed to indicate the cycle is intended for use of this Service Products North America...Black BU............Blue PK............Pink R Red Viol..........Violet W White Y-BK.........Yellow/BK R-Y............Red/Yellow BK-W........Black/White R-W...........Red/White The dishwasher responds to user inputs only when its LED will be lengthened when needed to the next cycle step. 1 1 Fill/Det. ...
...Artwork: A13762001 Rev. 002 P/N: A13762001 Rev. If START/ CANCEL is pressed during Power Failure CLOSE DOOR will result. The dishwasher will change). B This information is complete Displayed to indicate the cycle is intended for use of this Service Products North America...Black BU............Blue PK............Pink R Red Viol..........Violet W White Y-BK.........Yellow/BK R-Y............Red/Yellow BK-W........Black/White R-W...........Red/White The dishwasher responds to user inputs only when its LED will be lengthened when needed to the next cycle step. 1 1 Fill/Det. ...
Wiring Diagram
Page 2
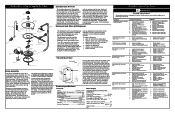
... 1. Replace pump. 4. Disconnect the wiring harness connections located at the bottom of the tub and the vent assembly in order to the dishwasher. Replace fuse or reset breaker. 2. Replace control board. 5. GPM approx. 12 Water fill time 87 sec. 1. Electronic control...rinse aid dispenser has a removeable cover. If any is accomplished by a synchronous motor. To replace dispenser: • shut off electricity to dishwasher, • remover outer door panel assembly, • disconnect wiring to evaporate. Fuse (blown or tripped). 2. 120 VAC supply wiring ...
... 1. Replace pump. 4. Disconnect the wiring harness connections located at the bottom of the tub and the vent assembly in order to the dishwasher. Replace fuse or reset breaker. 2. Replace control board. 5. GPM approx. 12 Water fill time 87 sec. 1. Electronic control...rinse aid dispenser has a removeable cover. If any is accomplished by a synchronous motor. To replace dispenser: • shut off electricity to dishwasher, • remover outer door panel assembly, • disconnect wiring to evaporate. Fuse (blown or tripped). 2. 120 VAC supply wiring ...


