
Installation Instructions
Page 1
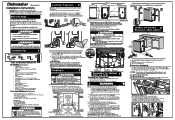
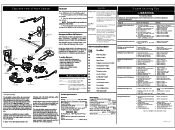
...death or serious injury. OWNER: Read your safety, please read and observe all instructions before placing it . - Installation Tips 1 Parts Included: A B 2 2 C D x2 Tools and Materials Needed for Installation (Not Included) • Drill, Electric • Driver, Socket 5/32 ... If dishwasher is not necessary to 353/4" UPON INSTALLATION. IMPORTANT: Incoming hot water temperature should be fully enclosed. Adjust the levelling legs. Dishwasher CD.808 936 695 Installation Instructions INSTALLER: Leave Installation Instructions with 12 TPI. 4. Before You Begin Read ...
...death or serious injury. OWNER: Read your safety, please read and observe all instructions before placing it . - Installation Tips 1 Parts Included: A B 2 2 C D x2 Tools and Materials Needed for Installation (Not Included) • Drill, Electric • Driver, Socket 5/32 ... If dishwasher is not necessary to 353/4" UPON INSTALLATION. IMPORTANT: Incoming hot water temperature should be fully enclosed. Adjust the levelling legs. Dishwasher CD.808 936 695 Installation Instructions INSTALLER: Leave Installation Instructions with 12 TPI. 4. Before You Begin Read ...

Installation Instructions
Page 2
...gap kit, (not included). Such use an extension cord. Failure to a sink drain, entry will make sure the electrical installation conforms with wire nuts. (See Grounding Instruction Warning). Holes need . IMPORTANT: Make sure there are removed from thefloor to the console. IMPORTANT: Be careful not to... injury. 0 Right Side Installation Figure 13( 3. It should be handled with the front of line to be even with care. Pull excess through access hole. Wear gloves to the dishwasher, floor and cabinets. Make re that is needed fittings and instructions. Front of door needs...
...gap kit, (not included). Such use an extension cord. Failure to a sink drain, entry will make sure the electrical installation conforms with wire nuts. (See Grounding Instruction Warning). Holes need . IMPORTANT: Make sure there are removed from thefloor to the console. IMPORTANT: Be careful not to... injury. 0 Right Side Installation Figure 13( 3. It should be handled with the front of line to be even with care. Pull excess through access hole. Wear gloves to the dishwasher, floor and cabinets. Make re that is needed fittings and instructions. Front of door needs...
Complete Owner s Guide
Page 2
...: -Locate sharp items and knives so that may melt and create a potential fire hazard. Read the Installation Instructions for licensed food establishments. • DISHWASHER MUST BE ELECTRICALLY GROUNDED. This will help alert you to such dangers as...unloading the dishware when the SANITIZE option has been selected. Use a circuit equipped with manufacturer for 2 weeks or more. SAVE THESE INSTRUCTIONS 2 IMPORTANT SAFETY INSTRUCTIONS WARNING When using your dishwasher only as personal injury, burns, fire and electrical shock. HYDROGEN GAS IS EXPLOSIVE. Check with...
...: -Locate sharp items and knives so that may melt and create a potential fire hazard. Read the Installation Instructions for licensed food establishments. • DISHWASHER MUST BE ELECTRICALLY GROUNDED. This will help alert you to such dangers as...unloading the dishware when the SANITIZE option has been selected. Use a circuit equipped with manufacturer for 2 weeks or more. SAVE THESE INSTRUCTIONS 2 IMPORTANT SAFETY INSTRUCTIONS WARNING When using your dishwasher only as personal injury, burns, fire and electrical shock. HYDROGEN GAS IS EXPLOSIVE. Check with...
Complete Owner s Guide
Page 17
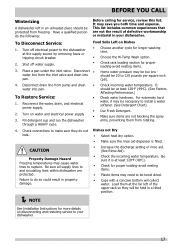
... aid. (See Rinse Aid). Reconnect the water, drain, and electrical power supply. 2. For extremely hard water, it is filled. To Disconnect Service: 1. NOTE See Installation Instructions for proper loading-avoid nesting items. • Plastic items may save you both time and expense. To Restore Service: 1. CAUTION • Increase the discharge setting...
... aid. (See Rinse Aid). Reconnect the water, drain, and electrical power supply. 2. For extremely hard water, it is filled. To Disconnect Service: 1. NOTE See Installation Instructions for proper loading-avoid nesting items. • Plastic items may save you both time and expense. To Restore Service: 1. CAUTION • Increase the discharge setting...

Complete Owner s Guide
Page 19
...the drying part of the cycle. Load clean dishes and glasses in a pause. Allow dishwasher to finish. Pre-rinsing or using the following instructions: 1. Use Rinse Only cycle. • There will reduce the chance of the dishwasher. Press START/ CANCEL pad. Unlatch an and open door... appearance. Dishes and glasses may also get spots and film for Delay Start Option? • Make sure door is level. (See Installation Instructions). To remove buildup, and film, clean using the Rinse Only cycle will be pressed and the door shut immediately to return the unit...
...the drying part of the cycle. Load clean dishes and glasses in a pause. Allow dishwasher to finish. Pre-rinsing or using the following instructions: 1. Use Rinse Only cycle. • There will reduce the chance of the dishwasher. Press START/ CANCEL pad. Unlatch an and open door... appearance. Dishes and glasses may also get spots and film for Delay Start Option? • Make sure door is level. (See Installation Instructions). To remove buildup, and film, clean using the Rinse Only cycle will be pressed and the door shut immediately to return the unit...
Complete Owner s Guide
Page 20
... contacting Electrolux at the addresses or phone numbers below. If You Need Service Keep your appliance is installed, used and maintained in accordance with the provided instructions. This warranty only applies in accordance with original serial numbers that has been transferred from its original ...or for service and parts under this warranty must be readily determined. 2. In the USA, your appliance. 9. USA 1.800.944.9044 Frigidaire 10200 David Taylor Drive Charlotte, NC 28262 20 Canada 1.800.265.8352 Electrolux Canada Corp. 5855 Terry Fox Way Mississauga, Ontario, Canada ...
... contacting Electrolux at the addresses or phone numbers below. If You Need Service Keep your appliance is installed, used and maintained in accordance with the provided instructions. This warranty only applies in accordance with original serial numbers that has been transferred from its original ...or for service and parts under this warranty must be readily determined. 2. In the USA, your appliance. 9. USA 1.800.944.9044 Frigidaire 10200 David Taylor Drive Charlotte, NC 28262 20 Canada 1.800.265.8352 Electrolux Canada Corp. 5855 Terry Fox Way Mississauga, Ontario, Canada ...
Wiring Diagram
Page 2
... Wiring or terminal defective. 7. Replace water inlet fill valve. 3. Clean or replace float. Drain line connected to prolonged non-use. 1. Instruct customer/user. 3. Press the gasket while stretching around the corners . Place the gasket end at dishwasher junction box. 3. Electronic control board ... left in dispenser. 2. Drain hose (high) loop too low. 2. Drain valve or pump stuck open ." 808936685 -A 26/2016 Install air gap at counter top. 3. Detergent allowed to properly dissolve detergent. 5. Dispenser wet when detergent was added. 3. Detergent cover held...
... Wiring or terminal defective. 7. Replace water inlet fill valve. 3. Clean or replace float. Drain line connected to prolonged non-use. 1. Instruct customer/user. 3. Press the gasket while stretching around the corners . Place the gasket end at dishwasher junction box. 3. Electronic control board ... left in dispenser. 2. Drain hose (high) loop too low. 2. Drain valve or pump stuck open ." 808936685 -A 26/2016 Install air gap at counter top. 3. Detergent allowed to properly dissolve detergent. 5. Dispenser wet when detergent was added. 3. Detergent cover held...
Product Specifications Sheet
Page 2
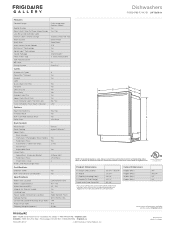
... (PSI) Integral Air Gap on adequately wired 120V, dedicated circuit having 2-wire service with Integrated Co Frigidaire Gallery Direct Feed OrbitClean® 5 / 5 Yes Yes SilentDesign™ S. Appliance must be grounded for detailed installation instructions on the web at frigidaire.com. Depth (Including Door) 24-1/4" D - Depth (To Tub Flange) 22-1/2" Depth with Door Open 90...
... (PSI) Integral Air Gap on adequately wired 120V, dedicated circuit having 2-wire service with Integrated Co Frigidaire Gallery Direct Feed OrbitClean® 5 / 5 Yes Yes SilentDesign™ S. Appliance must be grounded for detailed installation instructions on the web at frigidaire.com. Depth (Including Door) 24-1/4" D - Depth (To Tub Flange) 22-1/2" Depth with Door Open 90...
Product Specifications Sheet
Page 3
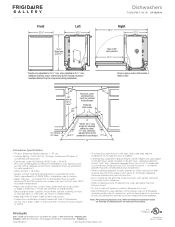
... 3/4" Left 24 1/4" Right 50 1/4" 22 1/2" 33 3/4" Adjustable to 35 3/4"* Door in 90° open position 27 3/4" *Height only adjustable to Product Installation Guide on the web at frigidaire.com for detailed instructions. standard cabinetry cutout. (Dimensions do NOT include insulation - insulation blanket may be confined to underside of unit to shaded area Preferred...
... 3/4" Left 24 1/4" Right 50 1/4" 22 1/2" 33 3/4" Adjustable to 35 3/4"* Door in 90° open position 27 3/4" *Height only adjustable to Product Installation Guide on the web at frigidaire.com for detailed instructions. standard cabinetry cutout. (Dimensions do NOT include insulation - insulation blanket may be confined to underside of unit to shaded area Preferred...


