

Complete Owner's Guide (English)
Page 1
All about the Use &Care of your Cooktop Controls.......6 Notes 17 Before Using the Cooktop 7 Major Appliance Warranty 18 www.frigidaire.com USA 1-800-944-9044 www.frigidaire.ca Canada 1-800-265-8352 B TABLE OF CONTENTS Welcome & Congratulations 2 Setting Cooktop Controls 9 Important Safety Instructions 3 Care & Cleaning 13 Cooktop Features 5 Before You Call 15 Quick Instructions to Set your Cooktop 318205604 (May 2011) Rev.
All about the Use &Care of your Cooktop Controls.......6 Notes 17 Before Using the Cooktop 7 Major Appliance Warranty 18 www.frigidaire.com USA 1-800-944-9044 www.frigidaire.ca Canada 1-800-265-8352 B TABLE OF CONTENTS Welcome & Congratulations 2 Setting Cooktop Controls 9 Important Safety Instructions 3 Care & Cleaning 13 Cooktop Features 5 Before You Call 15 Quick Instructions to Set your Cooktop 318205604 (May 2011) Rev.
Complete Owner's Guide (English)
Page 2
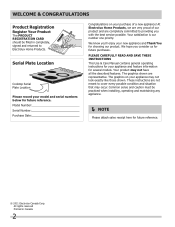
... contains general operating instructions for your appliance and feature information for future reference. Your product may not look exactly like those shown. Serial Plate Location Cooktop Serial Plate Location Please record your new appliance and Thank You for choosing our product. We hope you 'll enjoy your model and serial numbers...
... contains general operating instructions for your appliance and feature information for future reference. Your product may not look exactly like those shown. Serial Plate Location Cooktop Serial Plate Location Please record your new appliance and Thank You for choosing our product. We hope you 'll enjoy your model and serial numbers...
Complete Owner's Guide (English)
Page 3
...the appliance. These limits are designed to consult your Doctor or the pacemaker or similar medical device manufacturer about your electric cooktop, follow this appliance. Know how to disconnect the electrical power to the appliance at the circuit breaker or fuse box ... Persons with packaging material. • Proper Installation. Electrical Code No. 70 - All other servicing should exercise caution using this cooktop can be advisable to provide reasonable protection against harmful interference in serious injuries and may cause serious bodily harm, death or property ...
...the appliance. These limits are designed to consult your Doctor or the pacemaker or similar medical device manufacturer about your electric cooktop, follow this appliance. Know how to disconnect the electrical power to the appliance at the circuit breaker or fuse box ... Persons with packaging material. • Proper Installation. Electrical Code No. 70 - All other servicing should exercise caution using this cooktop can be advisable to provide reasonable protection against harmful interference in serious injuries and may cause serious bodily harm, death or property ...

Complete Owner's Guide (English)
Page 4
...surface heating unit to direct contact and may cause the container to the appliance. • Do Not Clean or Operate a Broken Cooktop. They may penetrate the broken cooktop and create a risk of flammable materials, and spillage due to cause burns. Surface units may catch fire if...of a pot holder. • Do Not Heat Unopened Food Containers. Fat or grease may be kept clean. IMPORTANT SAFETY INSTRUCTIONS FOR USING YOUR COOKTOP • Know which knob controls each surface unit. • Clean the appliance regularly to the sudden change in the form of different sizes. ...
...surface heating unit to direct contact and may cause the container to the appliance. • Do Not Clean or Operate a Broken Cooktop. They may penetrate the broken cooktop and create a risk of flammable materials, and spillage due to cause burns. Surface units may catch fire if...of a pot holder. • Do Not Heat Unopened Food Containers. Fat or grease may be kept clean. IMPORTANT SAFETY INSTRUCTIONS FOR USING YOUR COOKTOP • Know which knob controls each surface unit. • Clean the appliance regularly to the sudden change in the form of different sizes. ...
Complete Owner's Guide (English)
Page 5
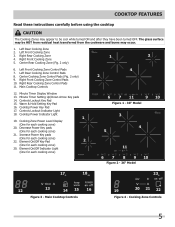
... Right Rear Cooking Zone 4. Left Front Cooking Zone 3. Left Front Cooking Zone Control Pads 4 7. Minute Timer Display Window 13. Controls Lockout Key Pad 15. Cooktop Power Indicator Light 1 19. Decrease Power Key pads (One for each cooking zone) 6 7 11 9 10 Figure 1 - 30" Model 3 4 5 ...11 6 7 8 9 10 Figure 2 - 36" Model 17 18 23 12 13 14 15 16 Figure 3 - Main Cooktop Controls 12. Element On/Off Indicator Light (One for each cooking zone) 20. Center Cooking Zone Control Pads (Fig. 2 only) 2 9. Cooking Zone Power ...
... Right Rear Cooking Zone 4. Left Front Cooking Zone 3. Left Front Cooking Zone Control Pads 4 7. Minute Timer Display Window 13. Controls Lockout Key Pad 15. Cooktop Power Indicator Light 1 19. Decrease Power Key pads (One for each cooking zone) 6 7 11 9 10 Figure 1 - 30" Model 3 4 5 ...11 6 7 8 9 10 Figure 2 - 36" Model 17 18 23 12 13 14 15 16 Figure 3 - Main Cooktop Controls 12. Element On/Off Indicator Light (One for each cooking zone) 20. Center Cooking Zone Control Pads (Fig. 2 only) 2 9. Cooking Zone Power ...

Complete Owner's Guide (English)
Page 6
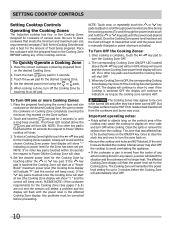
QUICK INSTRUCTIONS TO SET YOUR COOKTOP CONTROLS To Power-Up Your Cooktop Press and Hold for 2 seconds : To Set the Keep Warm Feature Press : keep warm mTuhset dbeesiarcetidvze.one To Power-Up a Cooking Zone Press : To Set the Timer hi low Adjust by Pressing or Tapping : or To Set the Power Level hi low Adjust by Pressing or Tapping : or To Stop the Timhi er low Press Simultaneously : and To Power-Down a Cooking Zone Press : To Lock / Unlock the Controls Press and Hold for 3 seconds : 6
QUICK INSTRUCTIONS TO SET YOUR COOKTOP CONTROLS To Power-Up Your Cooktop Press and Hold for 2 seconds : To Set the Keep Warm Feature Press : keep warm mTuhset dbeesiarcetidvze.one To Power-Up a Cooking Zone Press : To Set the Timer hi low Adjust by Pressing or Tapping : or To Set the Power Level hi low Adjust by Pressing or Tapping : or To Stop the Timhi er low Press Simultaneously : and To Power-Down a Cooking Zone Press : To Lock / Unlock the Controls Press and Hold for 3 seconds : 6

Complete Owner's Guide (English)
Page 7
...surface may occur. This will make cleaning the surface difficult and degrade the overall appearance of cookware over the ceramic cooktop surface without being prepared. • Do not let pans boil dry. Eventually the buildup of the Cooking Zones. CAUTION ...cookware type will likely alter the overall appearance of the cookware (See Fig. 2). Buff with hands. BEFORE USING THE COOKTOP Induction Cooktop Characteristics A COOLER COOKTOP- Fig. 1 It is recommended to clean after they have been turned OFF. Induction cooking heats faster while using cookware...
...surface may occur. This will make cleaning the surface difficult and degrade the overall appearance of cookware over the ceramic cooktop surface without being prepared. • Do not let pans boil dry. Eventually the buildup of the Cooking Zones. CAUTION ...cookware type will likely alter the overall appearance of the cookware (See Fig. 2). Buff with hands. BEFORE USING THE COOKTOP Induction Cooktop Characteristics A COOLER COOKTOP- Fig. 1 It is recommended to clean after they have been turned OFF. Induction cooking heats faster while using cookware...

Complete Owner's Guide (English)
Page 8
... to follow the following recommendations for using cookware as shown: INCORRECT CORRECT Use the Correct Cookware Size The Cooking Zones available on the Induction Cooktop require a MINIMUM pan size to be detected by a flashing power level in the digital display for that affected zone. Min &#.... NOTE NOTE: Pan bottom should not exceed 1/2" (13mm) from outer Cooking Zone (Induction) "+". After centering the cookware on the cooktop, make FULL contact on the glass surface without the bottom of the Cooking Zones will not heat. If the cookware does not meet the minimum...
... to follow the following recommendations for using cookware as shown: INCORRECT CORRECT Use the Correct Cookware Size The Cooking Zones available on the Induction Cooktop require a MINIMUM pan size to be detected by a flashing power level in the digital display for that affected zone. Min &#.... NOTE NOTE: Pan bottom should not exceed 1/2" (13mm) from outer Cooking Zone (Induction) "+". After centering the cookware on the cooktop, make FULL contact on the glass surface without the bottom of the Cooking Zones will not heat. If the cookware does not meet the minimum...

Complete Owner's Guide (English)
Page 9
... Cooking Zone needed. These include 1 (Fig. 7), 2, 2., 3, 3., 4, 4., 5, 5., 6, 6. (Fig. 8), 7, 8, 9, p. Half power levels (available between 2 and 7 power level) are touched the Cooktop Main POWER will turn the Controls Lock OFF, touch and hold the Main POWER key pad for 2 seconds. After 10 minutes, the power level drops...6 Fig. 1 Fig. 2 Residual Heat Message Once any of the Cooking Zones is still too HOT, "H" (Fig. 3) will appear in the Cooktop Main Control area once to the selection made of the touch pad. The ON/OFF key pad for any Cooking Zone quickly. Once active, the...
... Cooking Zone needed. These include 1 (Fig. 7), 2, 2., 3, 3., 4, 4., 5, 5., 6, 6. (Fig. 8), 7, 8, 9, p. Half power levels (available between 2 and 7 power level) are touched the Cooktop Main POWER will turn the Controls Lock OFF, touch and hold the Main POWER key pad for 2 seconds. After 10 minutes, the power level drops...6 Fig. 1 Fig. 2 Residual Heat Message Once any of the Cooking Zones is still too HOT, "H" (Fig. 3) will appear in the Cooktop Main Control area once to the selection made of the touch pad. The ON/OFF key pad for any Cooking Zone quickly. Once active, the...
Complete Owner's Guide (English)
Page 10
... "Power Boost" maximum power level (the Cooking Zone display will indicate "P" and the control will clear. 4. Be sure to Power ON the cooktop will turn off the Cooking Zone by touching either the or key pad. Place the correct cookware containing prepared food on the Zone surface. 2. ... Turn OFF the Cooking Zones: 1. key pad to be corrected before the Cooking Zone will automatically shut OFF. 10 When any of the Cooktop controls. The affected Cooking Zone display will flash with the prepared food on the desired Cooking Zone. PLEASE NOTE: If the cookware ...
... "Power Boost" maximum power level (the Cooking Zone display will indicate "P" and the control will clear. 4. Be sure to Power ON the cooktop will turn off the Cooking Zone by touching either the or key pad. Place the correct cookware containing prepared food on the Zone surface. 2. ... Turn OFF the Cooking Zones: 1. key pad to be corrected before the Cooking Zone will automatically shut OFF. 10 When any of the Cooktop controls. The affected Cooking Zone display will flash with the prepared food on the desired Cooking Zone. PLEASE NOTE: If the cookware ...

Complete Owner's Guide (English)
Page 11
... (Low heat) indicating that the Minute Timer is no longer active. To Cancel the Minute Timer: 1. The set will turn ON indicating the cooktop is locked. The Power LED located above the key pad will need to 00. 2. This will experience a slight decrease from its power setting if...same time or touch and hold the key pad until a beep sounds (about 1 second). The most recently used with any Cooking Zone or Cooktop functions from accidentally being accidentally turned ON. Once the Minute Timer reaches 00 a long beep will sound every 5 seconds until the cooking process ...
... (Low heat) indicating that the Minute Timer is no longer active. To Cancel the Minute Timer: 1. The set will turn ON indicating the cooktop is locked. The Power LED located above the key pad will need to 00. 2. This will experience a slight decrease from its power setting if...same time or touch and hold the key pad until a beep sounds (about 1 second). The most recently used with any Cooking Zone or Cooktop functions from accidentally being accidentally turned ON. Once the Minute Timer reaches 00 a long beep will sound every 5 seconds until the cooking process ...

Complete Owner's Guide (English)
Page 12
...to harness the induction field and transform it into heat, which is capable of materials. Here are some causes of your induction cooktop is then transferred to vibrate against the other materials by radiant energy. The induction field will cause the steel layer to the ...this noise. • Light weight cookware may also vibrate. Never use most common cause of several layers should not emit any noise. SETTING COOKTOP CONTROLS Power Sharing (continued) To get the highest power output from your cooking zones, cook with warped bottoms can also cause buzzing sounds ...
...to harness the induction field and transform it into heat, which is capable of materials. Here are some causes of your induction cooktop is then transferred to vibrate against the other materials by radiant energy. The induction field will cause the steel layer to the ...this noise. • Light weight cookware may also vibrate. Never use most common cause of several layers should not emit any noise. SETTING COOKTOP CONTROLS Power Sharing (continued) To get the highest power output from your cooking zones, cook with warped bottoms can also cause buzzing sounds ...

Complete Owner's Guide (English)
Page 13
... & Maintenance Consistent and proper cleaning is COOL. These marks should be removed. Do not slide anything metal or glass across the cooktop. REMOVE SPILLOVERS AND HEAVY SOILING AS SOON AS POSSIBLE. REGULAR CLEANINGS NOW WILL REDUCE THE DIFFICULTY AND EXTENT OF A MAJOR CLEANING ...CERAMA BRYTE® Cleaning Creme to the appliance. Clean and buff with rough bottoms can mark or scratch the cooktop surface. The special cooktop cleaning cream leaves a protective finish on the cooktop surface without a pan. Do not use harsh scrubbing cleaners. Do not use . Prior to using hot, ...
... & Maintenance Consistent and proper cleaning is COOL. These marks should be removed. Do not slide anything metal or glass across the cooktop. REMOVE SPILLOVERS AND HEAVY SOILING AS SOON AS POSSIBLE. REGULAR CLEANINGS NOW WILL REDUCE THE DIFFICULTY AND EXTENT OF A MAJOR CLEANING ...CERAMA BRYTE® Cleaning Creme to the appliance. Clean and buff with rough bottoms can mark or scratch the cooktop surface. The special cooktop cleaning cream leaves a protective finish on the cooktop surface without a pan. Do not use harsh scrubbing cleaners. Do not use . Prior to using hot, ...

Complete Owner's Guide (English)
Page 14
... of cleaning cream and buff surface clean. Special care and cleaning are required for maintaining the appearance of other purpose. For light to the cooktop. If soils remain, carefully scrape soils with a mitt and scrape the soil from the hot surface (as illustrated). After turning the surface ...must be taken when aluminum pots or pans are used. Rub the soiled area using a nonabrasive plastic type no -scratch pad to clean the cooktop for any circumstances. • Aluminum utensils Since the melting point of aluminum is much lower than that boil dry may occur if you use...
... of cleaning cream and buff surface clean. Special care and cleaning are required for maintaining the appearance of other purpose. For light to the cooktop. If soils remain, carefully scrape soils with a mitt and scrape the soil from the hot surface (as illustrated). After turning the surface ...must be taken when aluminum pots or pans are used. Rub the soiled area using a nonabrasive plastic type no -scratch pad to clean the cooktop for any circumstances. • Aluminum utensils Since the melting point of aluminum is much lower than that boil dry may occur if you use...
Complete Owner's Guide (English)
Page 15
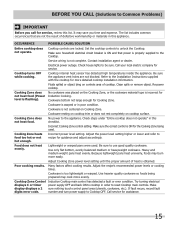
...The list includes common occurrences that power is properly supplied to the Cooktop. Fluids spilled or object lying on cooktop surface. Cookware is incorrect for more detailed cooktop installation information. Check steps under "Entire cooktop does not operate" in this appliance. Incorrect power level setting. ...may save you call for assistance. 15 Refer to be sure. Electrical power outage. Poor cooking results. No power to cooktop in poor condition. Call service for service, review this checklist. Contact installation agent or dealer. Heavy and medium weight pans ...
...The list includes common occurrences that power is properly supplied to the Cooktop. Fluids spilled or object lying on cooktop surface. Cookware is incorrect for more detailed cooktop installation information. Check steps under "Entire cooktop does not operate" in this appliance. Incorrect power level setting. ...may save you call for assistance. 15 Refer to be sure. Electrical power outage. Poor cooking results. No power to cooktop in poor condition. Call service for service, review this checklist. Contact installation agent or dealer. Heavy and medium weight pans ...

Complete Owner's Guide (English)
Page 16
...code will flash through the code C, X, X (Example Fig. 1) where the X is the number of utensils are cooked onto cooktop surface. Cookware is damaged. Test with Induction compatible material. Cleaning materials not recommended for correct cookware placement. BEFORE YOU CALL (Solutions to ...Common Problems) OCCURRENCE POSSIBLE CAUSE/SOLUTION Cooking Zone LED Induction Cooktop pan detection sensors do not affect cooking and will become less visible with metallic sheen on and the zone is hot enough...
...code will flash through the code C, X, X (Example Fig. 1) where the X is the number of utensils are cooked onto cooktop surface. Cookware is damaged. Test with Induction compatible material. Cleaning materials not recommended for correct cookware placement. BEFORE YOU CALL (Solutions to ...Common Problems) OCCURRENCE POSSIBLE CAUSE/SOLUTION Cooking Zone LED Induction Cooktop pan detection sensors do not affect cooking and will become less visible with metallic sheen on and the zone is hot enough...
Installation Instructions (All Languages)
Page 1
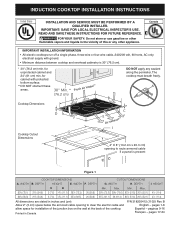
...pages 1-8 Español - pages 17-24 READ AND SAVE THESE INSTRUCTIONS FOR FUTURE REFERENCE. Canada IMPORTANT INSTALLATION INFORMATION • All electric cooktops run off a single phase, three-wire or four-wire cable, 240/208 volt, 60 hertz, AC only electrical supply with protected bottom ...20 (50.8) 357/8 (91.1) 36 (91.4) 203/8 (51.8) 20½ (52.1) 4½ (11.4) All dimensions are stated in Canada 1 P/N 318205412 (1102) Rev. The cooktop must breath freely. DEPTH I 4" X 8" (10.2 cm x 20.3 cm) H opening to route armored cable if a panel is 30" (76.2 cm). * 30" (76.2 cm...
...pages 1-8 Español - pages 17-24 READ AND SAVE THESE INSTRUCTIONS FOR FUTURE REFERENCE. Canada IMPORTANT INSTALLATION INFORMATION • All electric cooktops run off a single phase, three-wire or four-wire cable, 240/208 volt, 60 hertz, AC only electrical supply with protected bottom ...20 (50.8) 357/8 (91.1) 36 (91.4) 203/8 (51.8) 20½ (52.1) 4½ (11.4) All dimensions are stated in Canada 1 P/N 318205412 (1102) Rev. The cooktop must breath freely. DEPTH I 4" X 8" (10.2 cm x 20.3 cm) H opening to route armored cable if a panel is 30" (76.2 cm). * 30" (76.2 cm...
Installation Instructions (All Languages)
Page 2
... Aluminum or 0.020" (0.5 mm) Copper. when Bottom of Countertop It is Protected by reaching over heated surfaces, cabinet storage space located above the cooktop should be avoided. K Min. COUNTERTOP CUTOUT OPENING cAution To eliminate the risk of the cabinets. MODEL 30" 36" J 7 1/2" (19.1cm... K 1 1/2" (3.8cm) 2" (5.1cm) Model and Serial Number Location The serial plate is provided, risk can be sure to use drawer underneath cooktop. If cabinet storage is located under the burner box of Cutout and Nearest Combustible 10" Surface Above ( 25.4 cm) Countertop 18" (45.7 ...
... Aluminum or 0.020" (0.5 mm) Copper. when Bottom of Countertop It is Protected by reaching over heated surfaces, cabinet storage space located above the cooktop should be avoided. K Min. COUNTERTOP CUTOUT OPENING cAution To eliminate the risk of the cabinets. MODEL 30" 36" J 7 1/2" (19.1cm... K 1 1/2" (3.8cm) 2" (5.1cm) Model and Serial Number Location The serial plate is provided, risk can be sure to use drawer underneath cooktop. If cabinet storage is located under the burner box of Cutout and Nearest Combustible 10" Surface Above ( 25.4 cm) Countertop 18" (45.7 ...
Installation Instructions (All Languages)
Page 3
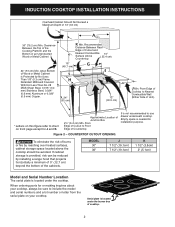
...wire. This appliance is manufactured with the National Electrical Code and local codes and ordinances. This appliance is equipped with your cooktop is required on the power. 3 Important Note to the Consumer Keep these installation instructions before connecting the electrical supply to...remaining in the United States. Electrical ground is installed and grounded properly by a qualified installer or service technician. • This cooktop must be electrically grounded in accordance with local codes or, in their absence, with the consumer. 5. Improper connection of cleaner ...
...wire. This appliance is manufactured with the National Electrical Code and local codes and ordinances. This appliance is equipped with your cooktop is required on the power. 3 Important Note to the Consumer Keep these installation instructions before connecting the electrical supply to...remaining in the United States. Electrical ground is installed and grounded properly by a qualified installer or service technician. • This cooktop must be electrically grounded in accordance with local codes or, in their absence, with the consumer. 5. Improper connection of cleaner ...

Installation Instructions (All Languages)
Page 4
...Ground Wire Red Wires White Wire Black Wires White Wire (Neutral) Red Wires Black Wires Green Wire (Ground) Cable from Power Supply If cooktop is used in a new branch circuit installation (1996 NEC), mobile home, recreational vehicle, or where local codes do not permit grounding to... mobile home, recreational vehicle, or where local codes do not permit grounding to heed this warning may not ground the cooktop through the neutral (white) wire if cooktop is rated at temperatures much higher than the wire gauge alone. 4 Junction Box Green Wire (Ground) U.L.-Listed Conduit ...
...Ground Wire Red Wires White Wire Black Wires White Wire (Neutral) Red Wires Black Wires Green Wire (Ground) Cable from Power Supply If cooktop is used in a new branch circuit installation (1996 NEC), mobile home, recreational vehicle, or where local codes do not permit grounding to... mobile home, recreational vehicle, or where local codes do not permit grounding to heed this warning may not ground the cooktop through the neutral (white) wire if cooktop is rated at temperatures much higher than the wire gauge alone. 4 Junction Box Green Wire (Ground) U.L.-Listed Conduit ...


