
Complete Owner's Guide (English)
Page 2
...symbol. IMPORTANT IMPORTANT indicates installation, operation or maintenance information which , if not avoided, could result in contact with any moving parts of this refrigerator. Staples can cause severe cuts, and also destroy finishes if they come in death or serious injury. Obey all safety messages... that follow this symbol to refrigerator No water leaks present at all staples from the carton. CAUTION CAUTION indicates a potentially hazardous situation which , if not ...
...symbol. IMPORTANT IMPORTANT indicates installation, operation or maintenance information which , if not avoided, could result in contact with any moving parts of this refrigerator. Staples can cause severe cuts, and also destroy finishes if they come in death or serious injury. Obey all safety messages... that follow this symbol to refrigerator No water leaks present at all staples from the carton. CAUTION CAUTION indicates a potentially hazardous situation which , if not ...

Complete Owner's Guide (English)
Page 6
... metal refrigerator handle: 1 Place rounded part of handle onto shoulder screw on face of door and align the two (2) holes in bottom of door. Do not tighten the set screw yet. 2 Install the two (2) screws into the bottom of the handle. 3 Tighten the set screw on the rounded part of ... tighten the set screw yet. 2 Install the two (2) screws into the top of the handle. 3 Tighten the set screw on the rounded part of door. Stainless Steel Models 6 IMPORTANT To ensure proper installation of the handles may be sharp. Handle installation CAUTION Wear gloves and use extreme CAUTION...
... metal refrigerator handle: 1 Place rounded part of handle onto shoulder screw on face of door and align the two (2) holes in bottom of door. Do not tighten the set screw yet. 2 Install the two (2) screws into the bottom of the handle. 3 Tighten the set screw on the rounded part of ... tighten the set screw yet. 2 Install the two (2) screws into the top of the handle. 3 Tighten the set screw on the rounded part of door. Stainless Steel Models 6 IMPORTANT To ensure proper installation of the handles may be sharp. Handle installation CAUTION Wear gloves and use extreme CAUTION...
Complete Owner's Guide (English)
Page 10
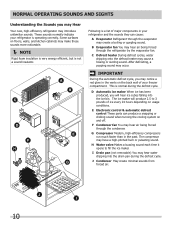
This is not a sound insulator. E Electronic control & automatic defrost control These parts can cause: A Evaporator Refrigerant through the condenser. F Condenser fan You may hear air being forced through the refrigerator by the evaporator fan. I Drain pan (not removable) You may make these sounds more noticeable. ...the automatic defrost cycle, you may create a boiling or gurgling sound. The compressor may occur. These sounds normally indicate your refrigerator and the sounds they can produce a snapping or clicking sound when turning the cooling system on the back wall of your ...
This is not a sound insulator. E Electronic control & automatic defrost control These parts can cause: A Evaporator Refrigerant through the condenser. F Condenser fan You may hear air being forced through the refrigerator by the evaporator fan. I Drain pan (not removable) You may make these sounds more noticeable. ...the automatic defrost cycle, you may create a boiling or gurgling sound. The compressor may occur. These sounds normally indicate your refrigerator and the sounds they can produce a snapping or clicking sound when turning the cooling system on the back wall of your ...

Complete Owner's Guide (English)
Page 11
...Use a soft cloth to wring excess water out of sponge or cloth before cleaning around controls, light bulb or any removable parts in the refrigerator CAUTION: Wear gloves when replacing light bulbs to clean handles. Remove toe grille (see Installation Instructions). Soap and water Do not... home improvement or major department stores. These cleaners can scratch the appliance surface. • Do not remove the serial plate. Unplug refrigerator Wear gloves Remove light cover Replace old bulb Replace light cover Plug in a dishwasher. • Always unplug the electrical power cord ...
...Use a soft cloth to wring excess water out of sponge or cloth before cleaning around controls, light bulb or any removable parts in the refrigerator CAUTION: Wear gloves when replacing light bulbs to clean handles. Remove toe grille (see Installation Instructions). Soap and water Do not... home improvement or major department stores. These cleaners can scratch the appliance surface. • Do not remove the serial plate. Unplug refrigerator Wear gloves Remove light cover Replace old bulb Replace light cover Plug in a dishwasher. • Always unplug the electrical power cord ...

Complete Owner's Guide (English)
Page 13
...warranted by Electrolux Major Appliances North America, a division of appliance or home incurred during installation, including but not limited to, any refrigerator or freezer failures. 6. Product that have been removed, altered or cannot be required. Service calls to any after hour, weekend, ... Keep your receipt, delivery slip, or some other appropriate payment record to remote areas, including the state of parts other than genuine Electrolux parts or parts obtained from persons other than in accordance with the provided instructions. 8. Box 212378 Augusta, GA 30907 Canada 1....
...warranted by Electrolux Major Appliances North America, a division of appliance or home incurred during installation, including but not limited to, any refrigerator or freezer failures. 6. Product that have been removed, altered or cannot be required. Service calls to any after hour, weekend, ... Keep your receipt, delivery slip, or some other appropriate payment record to remote areas, including the state of parts other than genuine Electrolux parts or parts obtained from persons other than in accordance with the provided instructions. 8. Box 212378 Augusta, GA 30907 Canada 1....


