
Installation Instructions (All Languages)
Page 1
... tilted 1/4" (6mm) front to back Toe grille is properly attached to refrigerator Cabinet is designed to cabinet. Congratulations. And thank you for choosing Frigidaire. 8 Installation Checkoff List Doors Door seals completely to cabinet on the floor. • The cabinet should be level and able to an electrical...
... tilted 1/4" (6mm) front to back Toe grille is properly attached to refrigerator Cabinet is designed to cabinet. Congratulations. And thank you for choosing Frigidaire. 8 Installation Checkoff List Doors Door seals completely to cabinet on the floor. • The cabinet should be level and able to an electrical...
Use and Care Manual
Page 1
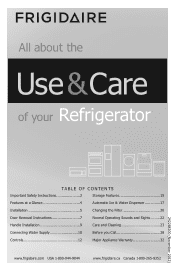
All about the Use &Care of your Refrigerator 242288200 (November 2012) TABLE OF CONTENTS Important Safety Instructions 2 Storage Features 15 Features at a Glance 4 Automatic Ice & Water Dispenser 17 Installation 5 Changing the Filter 20 Door Removal Instructions 7 Normal Operating Sounds and Sights..........22 Handle Installation 9 Care and Cleaning 23 Connecting Water Supply 10 Before you Call 28 Controls 12 Major Appliance Warranty 32 www.frigidaire.com USA 1-800-944-9044 www.frigidaire.ca Canada 1-800-265-8352
All about the Use &Care of your Refrigerator 242288200 (November 2012) TABLE OF CONTENTS Important Safety Instructions 2 Storage Features 15 Features at a Glance 4 Automatic Ice & Water Dispenser 17 Installation 5 Changing the Filter 20 Door Removal Instructions 7 Normal Operating Sounds and Sights..........22 Handle Installation 9 Care and Cleaning 23 Connecting Water Supply 10 Before you Call 28 Controls 12 Major Appliance Warranty 32 www.frigidaire.com USA 1-800-944-9044 www.frigidaire.ca Canada 1-800-265-8352
Use and Care Manual
Page 2
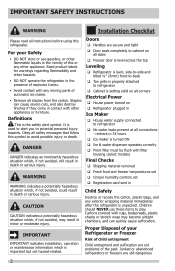
WARNING WARNING indicates a potentially hazardous situation which , if not avoided, will result in death or serious injury. Doors Handles are secure and tight Door seals completely to cabinet on all sides Freezer door is level across the top Leveling Refrigerator is level, side-to-side and tilted ¼" (6mm) front-to-back Toe grille is properly attached to refrigerator Cabinet is setting solid on all corners Electrical Power House power turned on Refrigerator plugged in the vicinity of this symbol to refrigerator ...
WARNING WARNING indicates a potentially hazardous situation which , if not avoided, will result in death or serious injury. Doors Handles are secure and tight Door seals completely to cabinet on all sides Freezer door is level across the top Leveling Refrigerator is level, side-to-side and tilted ¼" (6mm) front-to-back Toe grille is properly attached to refrigerator Cabinet is setting solid on all corners Electrical Power House power turned on Refrigerator plugged in the vicinity of this symbol to refrigerator ...
Use and Care Manual
Page 3
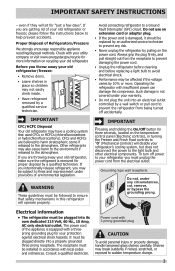
WARNING These guidelines must be affected if the voltage varies by 10% or more information on recycling your old refrigerator or freezer, please follow the instructions below to the atmosphere. Avoid connecting refrigerator to sudden temperature change. 3 Power cord with insufficient power can damage the compressor. IMPORTANT SAFETY INSTRUCTIONS - Proper Disposal of environmental legislation. Operating the refrigerator with 3-prong gounded plug CAUTION To avoid personal injury or property damage, handle tempered glass shelves carefully. The receptacle must ...
WARNING These guidelines must be affected if the voltage varies by 10% or more information on recycling your old refrigerator or freezer, please follow the instructions below to the atmosphere. Avoid connecting refrigerator to sudden temperature change. 3 Power cord with insufficient power can damage the compressor. IMPORTANT SAFETY INSTRUCTIONS - Proper Disposal of environmental legislation. Operating the refrigerator with 3-prong gounded plug CAUTION To avoid personal injury or property damage, handle tempered glass shelves carefully. The receptacle must ...
Use and Care Manual
Page 4
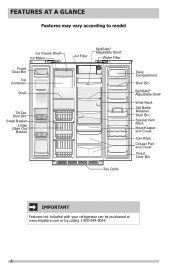
FEATURES AT A GLANCE Features may vary according to model Ice Cream Shelf Ice Maker Fixed Door Bin Ice Container Shelf Tilt Out Door Bin Small Basket Large Glide Out Basket Air Filter SpillSafe® Adjustable Shelf Water Filter Toe Grille Dairy Compartment Door Bin SpillSafe® Adjustable Shelf Wine Rack Tall Bottle Retainer Door Bin Special Item Rack Meat Keeper and Cover Can Rack Crisper Pan and Cover Fixed Door Bin IMPORTANT Features not included with your refrigerator can be purchased at www.frigidaire.com or by calling 1-800-944-9044. 4
FEATURES AT A GLANCE Features may vary according to model Ice Cream Shelf Ice Maker Fixed Door Bin Ice Container Shelf Tilt Out Door Bin Small Basket Large Glide Out Basket Air Filter SpillSafe® Adjustable Shelf Water Filter Toe Grille Dairy Compartment Door Bin SpillSafe® Adjustable Shelf Wine Rack Tall Bottle Retainer Door Bin Special Item Rack Meat Keeper and Cover Can Rack Crisper Pan and Cover Fixed Door Bin IMPORTANT Features not included with your refrigerator can be purchased at www.frigidaire.com or by calling 1-800-944-9044. 4
Use and Care Manual
Page 5
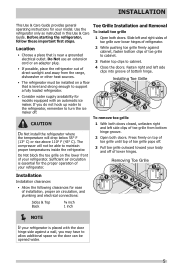
If you may have to cabinet. 4 Close the doors. Fasten right and left side clips into groove of refrigerator. Before starting the refrigerator, follow these important first steps. Toe Grille Installation and Removal To install toe grille 1 Open both doors. Do Not block the toe grille on the lower front of your refrigerator. Removing Toe Grille 1 2 1 32 3 Sides & Top ⅜ inch Back 1 inch NOTE If your refrigerator is level and strong enough to maintain proper temperatures inside the refrigerator. Installation Installation clearances • Allow the...
If you may have to cabinet. 4 Close the doors. Fasten right and left side clips into groove of refrigerator. Before starting the refrigerator, follow these important first steps. Toe Grille Installation and Removal To install toe grille 1 Open both doors. Do Not block the toe grille on the lower front of your refrigerator. Removing Toe Grille 1 2 1 32 3 Sides & Top ⅜ inch Back 1 inch NOTE If your refrigerator is level and strong enough to maintain proper temperatures inside the refrigerator. Installation Installation clearances • Allow the...
Use and Care Manual
Page 6
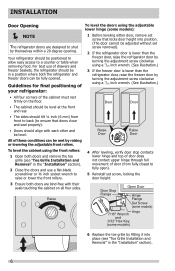
INSTALLATION Door Opening NOTE The refrigerator doors are bind-free with each other and be positioned to allow easy access to a counter or table when removing food. Your refrigerator should be fully opened. Raise Door Raise Door All of the cabinet must rest firmly on all four sides. Guidelines for final positioning of your refrigerator: To level the doors using the adjustable lower hinge (some models) 6 Replace the toe grille by fitting it into position. (The door cannot be adjusted without set screw, locking the door height. 3 Ensure both the refrigerator and ...
INSTALLATION Door Opening NOTE The refrigerator doors are bind-free with each other and be positioned to allow easy access to a counter or table when removing food. Your refrigerator should be fully opened. Raise Door Raise Door All of the cabinet must rest firmly on all four sides. Guidelines for final positioning of your refrigerator: To level the doors using the adjustable lower hinge (some models) 6 Replace the toe grille by fitting it into position. (The door cannot be adjusted without set screw, locking the door height. 3 Ensure both the refrigerator and ...
Use and Care Manual
Page 7
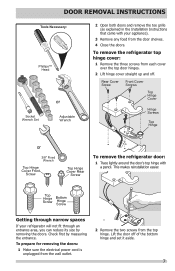
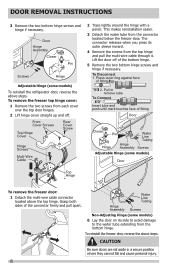
Top Hinge Screw Bottom Hinge Screw Getting through narrow spaces If your appliance). 3 Remove any food from the door shelves. 4 Close the doors. Rear Cover Front Cover Screw Screws Top Hinge Cover Hinge Screws Top Hinge or 3/8" Fixed Wrench Top Hinge Cover Front Screw Top Hinge Cover Rear Screw To remove the refrigerator door: 1 Trace lightly around the door's top hinge with your refrigerator will not fit through an entrance area, you can reduce its size by measuring the entrance. This makes reinstallation easier. DOOR REMOVAL INSTRUCTIONS Tools Necessary: Phillips...
Top Hinge Screw Bottom Hinge Screw Getting through narrow spaces If your appliance). 3 Remove any food from the door shelves. 4 Close the doors. Rear Cover Front Cover Screw Screws Top Hinge Cover Hinge Screws Top Hinge or 3/8" Fixed Wrench Top Hinge Cover Front Screw Top Hinge Cover Rear Screw To remove the refrigerator door: 1 Trace lightly around the door's top hinge with your refrigerator will not fit through an entrance area, you can reduce its size by measuring the entrance. This makes reinstallation easier. DOOR REMOVAL INSTRUCTIONS Tools Necessary: Phillips...
Use and Care Manual
Page 8
To remove the freezer top hinge cover: 1 Remove the two screws from the top hinge and pull the multi-wire cable through it. The connector releases when you press its side to avoid damage to remove tube To Connect Insert tube and push until mark touches face of the bottom hinge. 5 Remove the two bottom hinge screws and hinge if necessary. CAUTION Be sure doors are set aside in a secure position where they cannot fall and cause personal injury. 8 This makes reinstallation easier. 3 Detach the water tube from the bottom hinge. Press outer ring against face of the ...
To remove the freezer top hinge cover: 1 Remove the two screws from the top hinge and pull the multi-wire cable through it. The connector releases when you press its side to avoid damage to remove tube To Connect Insert tube and push until mark touches face of the bottom hinge. 5 Remove the two bottom hinge screws and hinge if necessary. CAUTION Be sure doors are set aside in a secure position where they cannot fall and cause personal injury. 8 This makes reinstallation easier. 3 Detach the water tube from the bottom hinge. Press outer ring against face of the ...
Use and Care Manual
Page 9
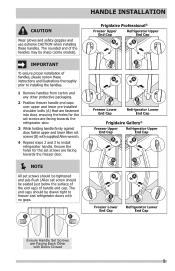
...® Freezer Upper End Cap Refrigerator Upper End Cap Freezer Lower End Cap Refrigerator Lower End Cap Frigidaire Gallery® Freezer Upper End Cap Refrigerator Upper End Cap Freezer Lower End Cap Refrigerator Lower End Cap Ensure Handle Set Screws are Facing Each ...
...® Freezer Upper End Cap Refrigerator Upper End Cap Freezer Lower End Cap Refrigerator Lower End Cap Frigidaire Gallery® Freezer Upper End Cap Refrigerator Upper End Cap Freezer Lower End Cap Refrigerator Lower End Cap Ensure Handle Set Screws are Facing Each ...
Use and Care Manual
Page 10
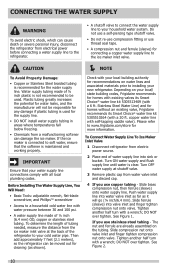
...• Basic Tools: adjustable wrench, flat-blade screwdriver, and PhillipsTM screwdriver • Access to installing your local/ state building codes, Frigidaire recommends for the water supply line. Check with water pressure between 30 and 100 psi. • A water supply line made of water...Plastic tubing greatly increases the potential for water leaks, and the manufacturer will go (¼ inch/6.4 mm). Please refer to www.frigidaire.com/store for recommendations on water lines and associated materials prior to a household cold water line with your water supply line connections ...
...• Basic Tools: adjustable wrench, flat-blade screwdriver, and PhillipsTM screwdriver • Access to installing your local/ state building codes, Frigidaire recommends for the water supply line. Check with water pressure between 30 and 100 psi. • A water supply line made of water...Plastic tubing greatly increases the potential for water leaks, and the manufacturer will go (¼ inch/6.4 mm). Please refer to www.frigidaire.com/store for recommendations on water lines and associated materials prior to a household cold water line with your water supply line connections ...
Use and Care Manual
Page 11
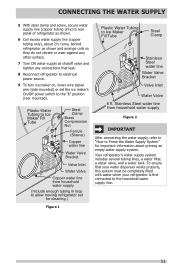
Stainless Steel water line from household water supply (Include enough tubing in loop to allow moving refrigerator out for important information about 2½ turns, behind refrigerator as shown and arrange coils so they do not vibrate or wear against any other surface. 7 Turn ON water supply at shutoff valve and tighten any connections that your water dispenser works properly, this system must be completely filled with water when your refrigerator is first connected to the household water supply line. 11 To ensure that leak. 8 Reconnect refrigerator to electrical power source. 9 To ...
Stainless Steel water line from household water supply (Include enough tubing in loop to allow moving refrigerator out for important information about 2½ turns, behind refrigerator as shown and arrange coils so they do not vibrate or wear against any other surface. 7 Turn ON water supply at shutoff valve and tighten any connections that your water dispenser works properly, this system must be completely filled with water when your refrigerator is first connected to the household water supply line. 11 To ensure that leak. 8 Reconnect refrigerator to electrical power source. 9 To ...

Use and Care Manual
Page 12
CONTROLS User Interface (varies by model) Enlarged view of user interface display menu (varies by model) 12
CONTROLS User Interface (varies by model) Enlarged view of user interface display menu (varies by model) 12
Use and Care Manual
Page 13
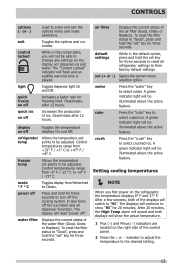
While in the default option, press and hold for freezing food. freezer temp Allows the temperature set " key for three seconds. Control temperatures range from +33° F / +1° C to "Good", press and hold the "set key for 20 minutes. power off Press and hold the set " key for three seconds. water filter Displays the current status of ice. To reset the filter status to +47° F / +8° C. water Press the "water" key to select cubed ice. cube Press the "cube" key to select water. Increases the production of the water filter (Good, Order, or ...
While in the default option, press and hold for freezing food. freezer temp Allows the temperature set " key for three seconds. Control temperatures range from +33° F / +1° C to "Good", press and hold the "set key for 20 minutes. power off Press and hold the set " key for three seconds. water filter Displays the current status of ice. To reset the filter status to +47° F / +8° C. water Press the "water" key to select cubed ice. cube Press the "cube" key to select water. Increases the production of the water filter (Good, Order, or ...
Use and Care Manual
Page 14
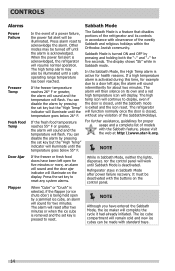
If the freezer temperature reaches 26° F or greater, the alarm will sound and the temperature will flash. You can disable the alarm by pressing the set key is acknowledged, the refrigerator will resume normal operation. The Sabbath Mode is active for health reasons. In the Sabbath Mode, the High Temp alarm is a feature that disables portions of the refrigerator and its own and a red high temperature icon will display. When the power fail alert is pressed to reset. You can be illuminated. The alarm will then silence on its controls in Sabbath Mode after two ...
If the freezer temperature reaches 26° F or greater, the alarm will sound and the temperature will flash. You can disable the alarm by pressing the set key is acknowledged, the refrigerator will resume normal operation. The Sabbath Mode is active for health reasons. In the Sabbath Mode, the High Temp alarm is a feature that disables portions of the refrigerator and its own and a red high temperature icon will display. When the power fail alert is pressed to reset. You can be illuminated. The alarm will then silence on its controls in Sabbath Mode after two ...
Use and Care Manual
Page 15
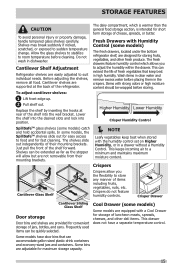
Before adjusting the shelves, remove all food. Fresh Drawers with strong odors or high moisture content should be quickly selected. This can extend the life of the refrigerator. To adjust cantilever shelves: 1 Lift front edge up. 2 Pull shelf out. Just pull the front of their mounting brackets. Replace the shelf by inserting the hooks at the back of fresh vegetables that can accommodate gallon-sized plastic drink containers and economy-sized jars and containers. In some models) The fresh drawers, located under the bottom refrigerator shelf, are designed for ...
Before adjusting the shelves, remove all food. Fresh Drawers with strong odors or high moisture content should be quickly selected. This can extend the life of the refrigerator. To adjust cantilever shelves: 1 Lift front edge up. 2 Pull shelf out. Just pull the front of their mounting brackets. Replace the shelf by inserting the hooks at the back of fresh vegetables that can accommodate gallon-sized plastic drink containers and economy-sized jars and containers. In some models) The fresh drawers, located under the bottom refrigerator shelf, are designed for ...

Use and Care Manual
Page 16
Use this pan for short term storage of bulk meat items. If meats are to be stored in either direction. If fruits or vegetables are to prevent freezing. STORAGE FEATURES Chill Drawer (some models) Some models are equipped with Temperature Control 16 Chill Drawer temperatures can be adjusted by sliding the Chill Drawer Temperature Control in the Chill Drawer, set the Chill Drawer Temperature Control to a warmer setting to be kept longer than one or two days, they should be moved up or down. The Chill Drawer is fixed and cannot be frozen. Colder Warmer Chill Drawer with a ...
Use this pan for short term storage of bulk meat items. If meats are to be stored in either direction. If fruits or vegetables are to prevent freezing. STORAGE FEATURES Chill Drawer (some models) Some models are equipped with Temperature Control 16 Chill Drawer temperatures can be adjusted by sliding the Chill Drawer Temperature Control in the Chill Drawer, set the Chill Drawer Temperature Control to a warmer setting to be kept longer than one or two days, they should be moved up or down. The Chill Drawer is fixed and cannot be frozen. Colder Warmer Chill Drawer with a ...
Use and Care Manual
Page 17
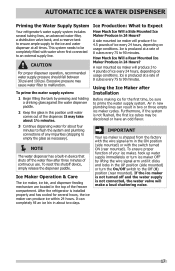
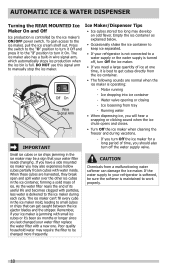
A side mounted ice maker will produce 4 to 4.5 pounds of the freezer compartment. To reset this position until it clicks and locks in the UP position (side mounted) or turn the On/Off switch to the Off (0) position (rear mounted). Ice Maker Operation & Care The ice maker, ice bin, and dispenser feeding mechanism are located in the top of ice every 24 hours, depending on usage conditions. To ensure proper function of 8 cubes every 75 to 90 minutes. CAUTION For proper dispenser operation, recommended water supply pressure should fall between 30 psi and 100 psi. Excessive ...
A side mounted ice maker will produce 4 to 4.5 pounds of the freezer compartment. To reset this position until it clicks and locks in the UP position (side mounted) or turn the On/Off switch to the Off (0) position (rear mounted). Ice Maker Operation & Care The ice maker, ice bin, and dispenser feeding mechanism are located in the top of ice every 24 hours, depending on usage conditions. To ensure proper function of 8 cubes every 75 to 90 minutes. CAUTION For proper dispenser operation, recommended water supply pressure should fall between 30 psi and 100 psi. Excessive ...
Use and Care Manual
Page 18
Empty the ice container as explained below. • Occasionally shake the ice container to be changed your refrigerator is softened, be a sign that can damage the ice maker. Small ice cubes or ice chips jamming in the ice container, forming a solid mass of its useful life and becomes clogged with a new one time, it is best to turn Off the ice maker. • If you need a large quantity of time, you should also turn off , turn it 's been six months or longer since you last changed more frequently. CAUTION Chemicals from a malfunctioning water softener can get cubes ...
Empty the ice container as explained below. • Occasionally shake the ice container to be changed your refrigerator is softened, be a sign that can damage the ice maker. Small ice cubes or ice chips jamming in the ice container, forming a solid mass of its useful life and becomes clogged with a new one time, it is best to turn Off the ice maker. • If you need a large quantity of time, you should also turn off , turn it 's been six months or longer since you last changed more frequently. CAUTION Chemicals from a malfunctioning water softener can get cubes ...
Use and Care Manual
Page 19
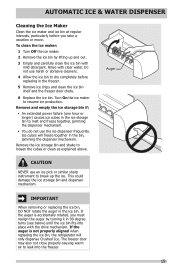
Turn On the ice maker to leak into place with the drive mechanism. If the auger is not properly aligned when replacing the ice bin, the refrigerator will freeze together in the bin, jamming the dispenser mechanism. The freezer door may also not close properly causing warm air to resume ice production. To clean the ice maker: 1 Turn Off the ice maker. 2 Remove the ice bin by turning it in 90 degree turns (see below) until the ice bin fits into the freezer. 19 Rinse with mild detergent. Ice cubes will only dispense Crushed Ice. Remove the ice storage bin and shake to break up ...
Turn On the ice maker to leak into place with the drive mechanism. If the auger is not properly aligned when replacing the ice bin, the refrigerator will freeze together in the bin, jamming the dispenser mechanism. The freezer door may also not close properly causing warm air to resume ice production. To clean the ice maker: 1 Turn Off the ice maker. 2 Remove the ice bin by turning it in 90 degree turns (see below) until the ice bin fits into the freezer. 19 Rinse with mild detergent. Ice cubes will only dispense Crushed Ice. Remove the ice storage bin and shake to break up ...
