
Installation Instructions (All Languages)
Page 1
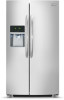
...to a cold CAUTION water line with pressure of 30-100 psi. • Copper tubing with the installation of your refrigerator? Please contact the store you for choosing Frigidaire. 8 Installation Checkoff List Doors Door seals completely to cabinet on top of toe grille until ... use Kit #53039117950, available from side to leak). • Ensure water supply complies with set screw): Open Door Hinge Flange Set Screw (some models) 4 Hinge 1 Before leveling either door, remove set screw, locking the door height. 6 To replace the toe grille, open . recheck in...
...to a cold CAUTION water line with pressure of 30-100 psi. • Copper tubing with the installation of your refrigerator? Please contact the store you for choosing Frigidaire. 8 Installation Checkoff List Doors Door seals completely to cabinet on top of toe grille until ... use Kit #53039117950, available from side to leak). • Ensure water supply complies with set screw): Open Door Hinge Flange Set Screw (some models) 4 Hinge 1 Before leveling either door, remove set screw, locking the door height. 6 To replace the toe grille, open . recheck in...
Use and Care Manual
Page 2
...or furniture. recheck in Ice Maker House water supply connected to avoid possible injury or death. Junked or abandoned refrigerators or freezers are secure and tight Door seals completely to cabinet on all sides Freezer door is level ... presence of this refrigerator. Definitions This is important but not hazard-related. IMPORTANT IMPORTANT indicates installation, operation or maintenance information which , if not avoided, could result in the vicinity of explosive fumes. • Avoid contact with filter housing (select models) Final Checks ...
...or furniture. recheck in Ice Maker House water supply connected to avoid possible injury or death. Junked or abandoned refrigerators or freezers are secure and tight Door seals completely to cabinet on all sides Freezer door is level ... presence of this refrigerator. Definitions This is important but not hazard-related. IMPORTANT IMPORTANT indicates installation, operation or maintenance information which , if not avoided, could result in the vicinity of explosive fumes. • Avoid contact with filter housing (select models) Final Checks ...
Use and Care Manual
Page 4
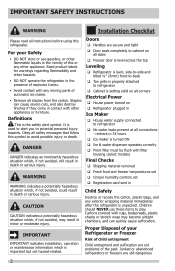
FEATURES AT A GLANCE Features may vary according to model Ice Cream Shelf Ice Maker Fixed Door Bin Ice Container Shelf Tilt Out Door Bin Small Basket Large Glide Out Basket Air Filter SpillSafe® Adjustable Shelf Water Filter Toe Grille Dairy Compartment Door Bin SpillSafe® Adjustable Shelf Wine Rack Tall Bottle Retainer Door Bin Special Item Rack Meat Keeper and Cover Can Rack Crisper Pan and Cover Fixed Door Bin IMPORTANT Features not included with your refrigerator can be purchased at www.frigidaire.com or by calling 1-800-944-9044. 4
FEATURES AT A GLANCE Features may vary according to model Ice Cream Shelf Ice Maker Fixed Door Bin Ice Container Shelf Tilt Out Door Bin Small Basket Large Glide Out Basket Air Filter SpillSafe® Adjustable Shelf Water Filter Toe Grille Dairy Compartment Door Bin SpillSafe® Adjustable Shelf Wine Rack Tall Bottle Retainer Door Bin Special Item Rack Meat Keeper and Cover Can Rack Crisper Pan and Cover Fixed Door Bin IMPORTANT Features not included with your refrigerator can be purchased at www.frigidaire.com or by calling 1-800-944-9044. 4
Use and Care Manual
Page 5
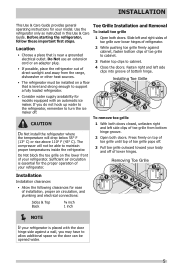
... grille from the range, dishwasher or other heat sources. • The refrigerator must be installed on a floor that is level and strong enough to support a fully loaded refrigerator. • Consider water supply availability for models equipped with the door hinge side against a wall, you do not hook...be opened wider. 5 Do Not block the toe grille on top of toe grille until top of your model. Location • Choose a place that is near a grounded electrical outlet. Use the refrigerator only as instructed in this Use & Care Guide. The compressor will drop below 55° F (13&#...
... grille from the range, dishwasher or other heat sources. • The refrigerator must be installed on a floor that is level and strong enough to support a fully loaded refrigerator. • Consider water supply availability for models equipped with the door hinge side against a wall, you do not hook...be opened wider. 5 Do Not block the toe grille on top of toe grille until top of your model. Location • Choose a place that is near a grounded electrical outlet. Use the refrigerator only as instructed in this Use & Care Guide. The compressor will drop below 55° F (13&#...
Use and Care Manual
Page 6
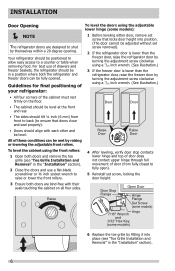
... (from front to back (to a counter or table when removing food. Guidelines for final positioning of your refrigerator: To level the doors using the adjustable lower hinge (some models) 6 Replace the toe grille by fitting it into position. (The door cannot be adjusted without set screw ...removed). 2 If the refrigerator door is lower than the freezer door, raise the refrigerator door by turning the adjustment screw clockwise using ...
... (from front to back (to a counter or table when removing food. Guidelines for final positioning of your refrigerator: To level the doors using the adjustable lower hinge (some models) 6 Replace the toe grille by fitting it into position. (The door cannot be adjusted without set screw ...removed). 2 If the refrigerator door is lower than the freezer door, raise the refrigerator door by turning the adjustment screw clockwise using ...
Use and Care Manual
Page 8
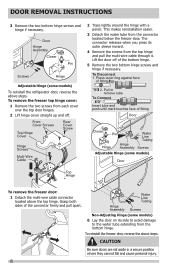
... To Disconnect 1. Press outer ring against face of fitting Door Closer Pin Water Line Tubing Hinge Hinge Assembly Screws Adjustable Hinge (some models) Door Top Hinge To remove the freezer door: 1 Detach the multi-wire cable connector located above the top hinge. This makes ... hinge if necessary. Hinge Assembly Water Line Tubing Screws Non-Adjusting Hinge (some models) To reinstall the refrigerator door, reverse the above steps. Door Hinge Assembly Closer Pin Screws Hinge Adjustable Hinge (some models) 6 Lay the door on its outer sleeve inward. 4 Remove the screws ...
... To Disconnect 1. Press outer ring against face of fitting Door Closer Pin Water Line Tubing Hinge Hinge Assembly Screws Adjustable Hinge (some models) Door Top Hinge To remove the freezer door: 1 Detach the multi-wire cable connector located above the top hinge. This makes ... hinge if necessary. Hinge Assembly Water Line Tubing Screws Non-Adjusting Hinge (some models) To reinstall the refrigerator door, reverse the above steps. Door Hinge Assembly Closer Pin Screws Hinge Adjustable Hinge (some models) 6 Lay the door on its outer sleeve inward. 4 Remove the screws ...
Use and Care Manual
Page 9
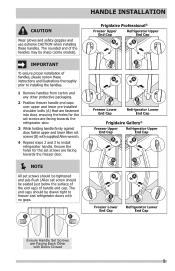
... and 3 to install refrigerator handle. HANDLE INSTALLATION Frigidaire Professional® Freezer Upper End Cap Refrigerator Upper End Cap Freezer Lower End Cap Refrigerator Lower End Cap Frigidaire Gallery® Freezer Upper End Cap Refrigerator Upper End Cap Freezer Lower End Cap Refrigerator Lower End Cap Ensure ...handles may be sharp (some models). The rounded end of handle end cap. CAUTION Wear gloves and safety goggles and use extreme CAUTION when installing these instructions and illustrations thoroughly prior to freezer and refrigerator doors with Doors Closed 9...
... and 3 to install refrigerator handle. HANDLE INSTALLATION Frigidaire Professional® Freezer Upper End Cap Refrigerator Upper End Cap Freezer Lower End Cap Refrigerator Lower End Cap Frigidaire Gallery® Freezer Upper End Cap Refrigerator Upper End Cap Freezer Lower End Cap Refrigerator Lower End Cap Ensure ...handles may be sharp (some models). The rounded end of handle end cap. CAUTION Wear gloves and safety goggles and use extreme CAUTION when installing these instructions and illustrations thoroughly prior to freezer and refrigerator doors with Doors Closed 9...
Use and Care Manual
Page 14
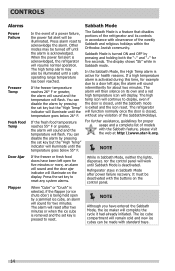
... had already initiated. The alarm will then silence on its controls in Sabbath mode. The high temp icon will continue to reset any violation of models with standard trays. 14 Press the set key to display, even if the door is closed , without any system alarms. When "Cube" or...alarm by pressing and holding both the "∨" and "+" for health reasons. In the Sabbath Mode, the High Temp alarm is acknowledged, the refrigerator will resume normal operation. The display shows "Sb" while in accordance with the buttons on the display. The alarm will reset after power failure ...
... had already initiated. The alarm will then silence on its controls in Sabbath mode. The high temp icon will continue to reset any violation of models with standard trays. 14 Press the set key to display, even if the door is closed , without any system alarms. When "Cube" or...alarm by pressing and holding both the "∨" and "+" for health reasons. In the Sabbath Mode, the High Temp alarm is acknowledged, the refrigerator will resume normal operation. The display shows "Sb" while in accordance with the buttons on the display. The alarm will reset after power failure ...
Use and Care Manual
Page 15
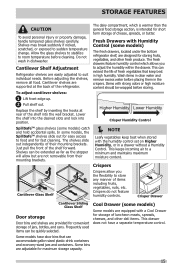
...food and for easy access to adjust the humidity within the drawer. Shelves can extend the life of the refrigerator. Some models have a separate temperature control. This can be quickly selected. Crispers do not feature humidity controls. Cantilever Shelf Adjustment...in high humidity. Lower the shelf into the desired slots and lock into the wall bracket. SpillSafeTM glass shelves (some models) The fresh drawers, located under the bottom refrigerator shelf, are supported at rear of cheese, spreads, or butter. Higher Humidity Lower Humidity Crisper Humidity Control ...
...food and for easy access to adjust the humidity within the drawer. Shelves can extend the life of the refrigerator. Some models have a separate temperature control. This can be quickly selected. Crispers do not feature humidity controls. Cantilever Shelf Adjustment...in high humidity. Lower the shelf into the desired slots and lock into the wall bracket. SpillSafeTM glass shelves (some models) The fresh drawers, located under the bottom refrigerator shelf, are supported at rear of cheese, spreads, or butter. Higher Humidity Lower Humidity Crisper Humidity Control ...

Use and Care Manual
Page 20
...depending on the types and amounts of food you should change the water filter every six months to produce ice. Air Filter (some models) The air filter is located at the top right side of the fresh food compartment. Replacing the Air Filter In general, you ...filter is equipped with a water filtering system. Water Filter Status on the control panel prompts you replace your refrigerator. Frigidaire recommends that you order extra filters when you first install your refrigerator, and that you to replace the filter after six months) to replace the filter after a standard amount...
...depending on the types and amounts of food you should change the water filter every six months to produce ice. Air Filter (some models) The air filter is located at the top right side of the fresh food compartment. Replacing the Air Filter In general, you ...filter is equipped with a water filtering system. Water Filter Status on the control panel prompts you replace your refrigerator. Frigidaire recommends that you order extra filters when you first install your refrigerator, and that you to replace the filter after six months) to replace the filter after a standard amount...
Use and Care Manual
Page 24
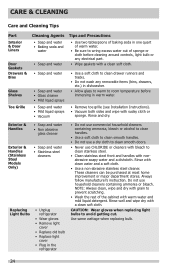
... Exterior & Handles • Soap and water • Non abrasive glass cleaner Exterior & Handles (Stainless Steel Models Only) • Soap and water • Stainless steel cleaners Replacing Light Bulbs • Unplug refrigerator • Wear gloves • Remove light cover • Replace old bulb • Replace light cover &#...8226; Plug in the refrigerator • Do not use commercial household cleaners containing ammonia, bleach or alcohol to clean handles. • Use a soft cloth to...
... Exterior & Handles • Soap and water • Non abrasive glass cleaner Exterior & Handles (Stainless Steel Models Only) • Soap and water • Stainless steel cleaners Replacing Light Bulbs • Unplug refrigerator • Wear gloves • Remove light cover • Replace old bulb • Replace light cover &#...8226; Plug in the refrigerator • Do not use commercial household cleaners containing ammonia, bleach or alcohol to clean handles. • Use a soft cloth to...

Use and Care Manual
Page 25
... on . Push Upward Until the Extension Snaps In Place Press Here Firmly Pull Down 25 Installing the Ice Chute Extension 1 Turn the refrigerator off using the button on the control panel (refer to the "Controls" section of this Manual). 2 Press inward firmly on the front of the chute.... 3 Push upward until the extension snaps into containers. CARE & CLEANING Ice Chute Extension (some models) The ice chute extension is designed to the "Controls" section of this Manual). 2 Align the extension with the ice chute so that the snap clips...
... on . Push Upward Until the Extension Snaps In Place Press Here Firmly Pull Down 25 Installing the Ice Chute Extension 1 Turn the refrigerator off using the button on the control panel (refer to the "Controls" section of this Manual). 2 Press inward firmly on the front of the chute.... 3 Push upward until the extension snaps into containers. CARE & CLEANING Ice Chute Extension (some models) The ice chute extension is designed to the "Controls" section of this Manual). 2 Align the extension with the ice chute so that the snap clips...
Use and Care Manual
Page 26
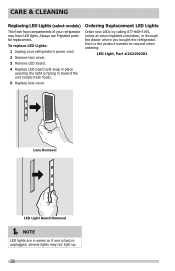
... Lights: 1 Unplug your refrigerator may not light up. 26 Here is bad or unplugged, several lights may have LED lights. Always use Frigidaire parts for replacement. Ordering Replacement LED Lights Order new LEDs by calling 877-808-4195, online at www.frigidaire.com/store, or through ...the dealer where you bought the refrigerator. CARE & CLEANING Replacing LED Lights (select models) The fresh food compartments of your refrigerator's power cord. 2 Remove lens cover. 3 Remove LED board. 4 ...
... Lights: 1 Unplug your refrigerator may not light up. 26 Here is bad or unplugged, several lights may have LED lights. Always use Frigidaire parts for replacement. Ordering Replacement LED Lights Order new LEDs by calling 877-808-4195, online at www.frigidaire.com/store, or through ...the dealer where you bought the refrigerator. CARE & CLEANING Replacing LED Lights (select models) The fresh food compartments of your refrigerator's power cord. 2 Remove lens cover. 3 Remove LED board. 4 ...
Use and Care Manual
Page 27
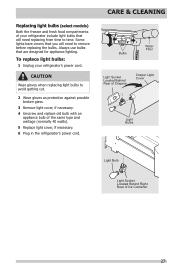
... Socket Located Behind Right Rear of the same type and wattage (normally 40 watts). 5 Replace light cover, if necessary. 6 Plug in the refrigerator's power cord. Always use bulbs that will need replacing from time to avoid getting cut. 2 Wear gloves as protection against possible broken glass...., if necessary. 4 Unscrew and replace old bulb with an appliance bulb of Ice Container 27 To replace light bulbs: 1 Unplug your refrigerator include light bulbs that are designed for appliance lighting. Replacing light bulbs (select models) Both the freezer and fresh food compartments of your...
... Socket Located Behind Right Rear of the same type and wattage (normally 40 watts). 5 Replace light cover, if necessary. 6 Plug in the refrigerator's power cord. Always use bulbs that will need replacing from time to avoid getting cut. 2 Wear gloves as protection against possible broken glass...., if necessary. 4 Unscrew and replace old bulb with an appliance bulb of Ice Container 27 To replace light bulbs: 1 Unplug your refrigerator include light bulbs that are designed for appliance lighting. Replacing light bulbs (select models) Both the freezer and fresh food compartments of your...

Use and Care Manual
Page 29
... water line valve. or interruption of ice with water inside). SOLUTION • Move any ice" section above. • Be sure the refrigerator doors are completely closed. • The motor overload protector will reset in the bin to be used frequently enough together. See Automatic Ice Maker... the off or upward position. Clean container, wipe dry, and replace in the freezer that has fallen models). When new ice is made, dispenser should be dispensed. • The refrigerator doors are hollow (shells of power for three seconds. • Remove and reinstall the water filter....
... water line valve. or interruption of ice with water inside). SOLUTION • Move any ice" section above. • Be sure the refrigerator doors are completely closed. • The motor overload protector will reset in the bin to be used frequently enough together. See Automatic Ice Maker... the off or upward position. Clean container, wipe dry, and replace in the freezer that has fallen models). When new ice is made, dispenser should be dispensed. • The refrigerator doors are hollow (shells of power for three seconds. • Remove and reinstall the water filter....
Use and Care Manual
Page 31
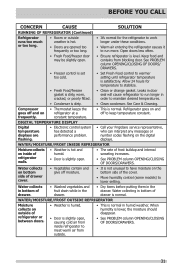
...control system has detected a performance problem. • Call your Frigidaire service representative, who can interpret any messages or number codes flashing on the digital displays. Leaks in door seal will cause refrigerator to run more. DIGITAL TEMPERATURE DISPLAY Digital temperature displays are opened... maintain desired temperatures. • Condenser is slightly open . • The rate of the cover. • Move humidity control (some models) to have moisture on outside . • This is level. Water collects on bottom side of drawer cover. • Vegetables contain ...
...control system has detected a performance problem. • Call your Frigidaire service representative, who can interpret any messages or number codes flashing on the digital displays. Leaks in door seal will cause refrigerator to run more. DIGITAL TEMPERATURE DISPLAY Digital temperature displays are opened... maintain desired temperatures. • Condenser is slightly open . • The rate of the cover. • Move humidity control (some models) to have moisture on outside . • This is level. Water collects on bottom side of drawer cover. • Vegetables contain ...

Service Data Sheet
Page 1
SENSE FREEZER LIGHTS NEUTRAL DAMPER MOTOR OUT 1A OUT 2A OUT 1B OUT 1B J4-B1-6 J4-B1-1 J4-B1-2 ERF-2500++ V5 REFRIGERATOR CONTROL INCANDESCENT LIGHTING MODELS ONLY M +5V NTC 1 - FZ J4-B1-3 J4-A1-9 J4-A1-3 J4-A1-10 J4-A1-4 J4-A1-11 J4-A1-5 LINE ... the connector → Remove inverter box → Check connections the service cord into the from main control into from the compressor from power supply? SENSE REFRIGERATOR LIGHTS J3- 3 FREEZER LIGHT S LED POWER BOARD J3- 4 NEUTRAL J3- 1 NEUTRAL (SERVICE CORD) NEUTRAL (CONDENSER FAN) NEUTRAL (WATER VALVE 1) NEUTRAL (NOT USED)...
SENSE FREEZER LIGHTS NEUTRAL DAMPER MOTOR OUT 1A OUT 2A OUT 1B OUT 1B J4-B1-6 J4-B1-1 J4-B1-2 ERF-2500++ V5 REFRIGERATOR CONTROL INCANDESCENT LIGHTING MODELS ONLY M +5V NTC 1 - FZ J4-B1-3 J4-A1-9 J4-A1-3 J4-A1-10 J4-A1-4 J4-A1-11 J4-A1-5 LINE ... the connector → Remove inverter box → Check connections the service cord into the from main control into from the compressor from power supply? SENSE REFRIGERATOR LIGHTS J3- 3 FREEZER LIGHT S LED POWER BOARD J3- 4 NEUTRAL J3- 1 NEUTRAL (SERVICE CORD) NEUTRAL (CONDENSER FAN) NEUTRAL (WATER VALVE 1) NEUTRAL (NOT USED)...

Service Data Sheet
Page 2
...U 3 WHT/BR N 4 WHT/BR N TOP UPPER REAR RIGHT LED TOP FRONT MIDDLE RIGH T LE D LOWER RIGH T WHT/BR N 4 WHT/BR N 3 WHT/BL U 2 WHT/BL U 1 REFRIGERATOR LEDS TAN/YEL 4 WHT/GRN 3 2 WHT/RED 1 WHT/GRN 4 WHT/GRN 3 WHT/RED 2 WHT/RED 1 WHT/GRN 4 WHT/GRN 3 WHT/RED 2 WHT/RED 1 WHT/GRN... 963 852 741 369 258 147 LATCH CATCH DK.BLU/WHT 9 YEL/WHT 8 RED/WHT 7 6 GRN/YEL 5 BRN 4 BRN/WHT 3 YEL/RED 2 LT. MODELS VARIABLE SPEED CONTROL BOX (N) WHITE (L) PUR LT. BLU 3 MACH. FAN ICE MAKER INFORMATION Test Cycling Press the momentary contact on the ON/OFF switch for...
...U 3 WHT/BR N 4 WHT/BR N TOP UPPER REAR RIGHT LED TOP FRONT MIDDLE RIGH T LE D LOWER RIGH T WHT/BR N 4 WHT/BR N 3 WHT/BL U 2 WHT/BL U 1 REFRIGERATOR LEDS TAN/YEL 4 WHT/GRN 3 2 WHT/RED 1 WHT/GRN 4 WHT/GRN 3 WHT/RED 2 WHT/RED 1 WHT/GRN 4 WHT/GRN 3 WHT/RED 2 WHT/RED 1 WHT/GRN... 963 852 741 369 258 147 LATCH CATCH DK.BLU/WHT 9 YEL/WHT 8 RED/WHT 7 6 GRN/YEL 5 BRN 4 BRN/WHT 3 YEL/RED 2 LT. MODELS VARIABLE SPEED CONTROL BOX (N) WHITE (L) PUR LT. BLU 3 MACH. FAN ICE MAKER INFORMATION Test Cycling Press the momentary contact on the ON/OFF switch for...


