
Complete Owner's Guide (English)
Page 3
... injury or property damage. WARNING This symbol will help alert you to light any appliance. • Do not touch any other part of the product. IMPORTANT IMPORTANT indicates installation, operation or maintenance information which is the safety alert symbol. Do not repair or replace... other servicing should be done only by removing leveling legs, panels, wire covers, anti-tip brackets/screws, or any part of an emergency. • User Servicing. Follow the gas supplier's instructions. • If you to the appliance. Do not remove model/serial number plate. • Proper ...
... injury or property damage. WARNING This symbol will help alert you to light any appliance. • Do not touch any other part of the product. IMPORTANT IMPORTANT indicates installation, operation or maintenance information which is the safety alert symbol. Do not repair or replace... other servicing should be done only by removing leveling legs, panels, wire covers, anti-tip brackets/screws, or any part of an emergency. • User Servicing. Follow the gas supplier's instructions. • If you to the appliance. Do not remove model/serial number plate. • Proper ...
Complete Owner's Guide (English)
Page 4
Flammable materials should never be allowed to sit or stand on hot surfaces may cause the container to burst and result in burns from any part of undersized utensils will also improve efficiency. • Know which knob controls each surface burner. Both surface burners and oven burners may be.... Areas near these areas until they have had sufficient time to cool. Children should never be sure to turn the burner off the main gas shutoff valve. • Use Only Dry Pot holders. They should not be displayed. Children climbing on Grease Fires. Do not let the ...
Flammable materials should never be allowed to sit or stand on hot surfaces may cause the container to burst and result in burns from any part of undersized utensils will also improve efficiency. • Know which knob controls each surface burner. Both surface burners and oven burners may be.... Areas near these areas until they have had sufficient time to cool. Children should never be sure to turn the burner off the main gas shutoff valve. • Use Only Dry Pot holders. They should not be displayed. Children climbing on Grease Fires. Do not let the ...
Complete Owner's Guide (English)
Page 5
...should be kept away from cleaners and aerosols may ignite causing damage and/or injury. • Clean in the self-cleaning cycle only the parts of glass, glass/ceramic, ceramic, earthenware, or other glazed utensils are touched. Be aware that could catch fire. Important Safety Instructions WARNING ... before removing and replacing the bulb. Greasy deposits in this area when the oven is hot, use a stove top grill on a sealed gas burner, it will not be moved while oven is operating may result. • Glazed Cooking Utensils-Only certain types of the appliance listed ...
...should be kept away from cleaners and aerosols may ignite causing damage and/or injury. • Clean in the self-cleaning cycle only the parts of glass, glass/ceramic, ceramic, earthenware, or other glazed utensils are touched. Be aware that could catch fire. Important Safety Instructions WARNING ... before removing and replacing the bulb. Greasy deposits in this area when the oven is hot, use a stove top grill on a sealed gas burner, it will not be moved while oven is operating may result. • Glazed Cooking Utensils-Only certain types of the appliance listed ...

Complete Owner's Guide (English)
Page 6
...gas range is designed to allow for conversion to another well ventilated room. The L.P. Before installing the kit be sure to have it is correctly polarized and properly grounded. Grounding instructions For personal safety, the cooktop must be used in the oven during the self-clean cycle of any part... cord with a properly grounded 3-prong wall receptacle installed by a qualified electrician. Move birds to Liquefied Petroleum (L.P.) Gas. conversion is essential for your protection against shock hazard and should be plugged into a properly grounded receptacle. Installation ...
...gas range is designed to allow for conversion to another well ventilated room. The L.P. Before installing the kit be sure to have it is correctly polarized and properly grounded. Grounding instructions For personal safety, the cooktop must be used in the oven during the self-clean cycle of any part... cord with a properly grounded 3-prong wall receptacle installed by a qualified electrician. Move birds to Liquefied Petroleum (L.P.) Gas. conversion is essential for your protection against shock hazard and should be plugged into a properly grounded receptacle. Installation ...
Complete Owner's Guide (English)
Page 13
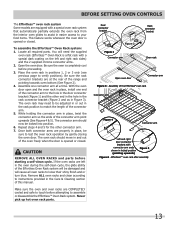
... bracket Rack connector bracket Figure 2 Figure 1 Connector arm Oven rack Open oven door Connector arm Figure 3 - You will cause all required parts. The oven rack should now be locked into position. 6. Be sure the rack connector brackets are COMPLETELY cooled and safe to touch before ...the rack position to match the length of the range and pointing towards oven bottom (See Figure 2). 4. CAUTION REMOVE ALL OVEN RACKS and parts before proceeding. 3. Assemble one end of the connector arm to the hole in the door connector bracket (Figure 1) and the other connector ...
... bracket Rack connector bracket Figure 2 Figure 1 Connector arm Oven rack Open oven door Connector arm Figure 3 - You will cause all required parts. The oven rack should now be locked into position. 6. Be sure the rack connector brackets are COMPLETELY cooled and safe to touch before ...the rack position to match the length of the range and pointing towards oven bottom (See Figure 2). 4. CAUTION REMOVE ALL OVEN RACKS and parts before proceeding. 3. Assemble one end of the connector arm to the hole in the door connector bracket (Figure 1) and the other connector ...

Complete Owner's Guide (English)
Page 22
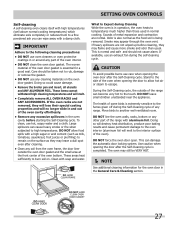
... needed , enter a BAKE TIME (see its section for a frozen pizza: 1. Arrange interior oven racks and place food in the oven when the beep is not part of the oven, it will allow hot air to escape and the food to cool. • Aluminum foil may be used without any time press...
... needed , enter a BAKE TIME (see its section for a frozen pizza: 1. Arrange interior oven racks and place food in the oven when the beep is not part of the oven, it will allow hot air to escape and the food to cool. • Aluminum foil may be used without any time press...
Complete Owner's Guide (English)
Page 27
... oven may appear through the oven vent. Doing so could cause damage. • Remove the broiler pan and insert, all utensils and any other part of the oven interior. • DO NOT clean the oven door gasket. If the oven racks are not removed, they will lose their special coating...: • DO NOT use care when opening the door after the Self-Cleaning cycle. These items cannot withstand high cleaning temperatures and will no longer slide in operation, the oven heats to escape. DO HAND CLEAN FRAME What to remain on . If available, use hot, soapy water and a cloth. ...
... oven may appear through the oven vent. Doing so could cause damage. • Remove the broiler pan and insert, all utensils and any other part of the oven interior. • DO NOT clean the oven door gasket. If the oven racks are not removed, they will lose their special coating...: • DO NOT use care when opening the door after the Self-Cleaning cycle. These items cannot withstand high cleaning temperatures and will no longer slide in operation, the oven heats to escape. DO HAND CLEAN FRAME What to remain on . If available, use hot, soapy water and a cloth. ...

Complete Owner's Guide (English)
Page 30
...(Cleaning Chart) Cleaning various parts of your appliance Before cleaning any part of both the knob and the shaft; Surfaces How to enter the door vents. dry and polish with a clean cloth. excess water on Self-Cleaning models, which is essential for 30 to 40 minutes. especially ...outside glass of cleaners containing any other liquid cleaners, abrasive cleaners, scouring pads, or paper towels - Vinyl Glass, Painted and Plastic Body Parts, Control Knobs & Decorative Trim Pieces Using a soft cloth, clean with a soapy scouring pad will damage the finish. Do not use mild...
...(Cleaning Chart) Cleaning various parts of your appliance Before cleaning any part of both the knob and the shaft; Surfaces How to enter the door vents. dry and polish with a clean cloth. excess water on Self-Cleaning models, which is essential for 30 to 40 minutes. especially ...outside glass of cleaners containing any other liquid cleaners, abrasive cleaners, scouring pads, or paper towels - Vinyl Glass, Painted and Plastic Body Parts, Control Knobs & Decorative Trim Pieces Using a soft cloth, clean with a soapy scouring pad will damage the finish. Do not use mild...

Complete Owner's Guide (English)
Page 31
... in hot soapy water. They can be made by an authorized Service Center. Because the gas Burners are sealed, cleanups are easy when spillovers are cleaned up spill with stainless steel exterior parts. Do not attempt to not damage electrodes. Do not remove any mild cleaners used for...required for stubborn stains. An abrasive cleaner can scratch the porcelain. The cooktop, Burner Heads and Caps should be washed in order for 30 minutes. Keeping the Burner Head Ports clean will prevent improper ignition and an uneven flame. IMPORTANT The fixed oven vent is designed to ...
... in hot soapy water. They can be made by an authorized Service Center. Because the gas Burners are sealed, cleanups are easy when spillovers are cleaned up spill with stainless steel exterior parts. Do not attempt to not damage electrodes. Do not remove any mild cleaners used for...required for stubborn stains. An abrasive cleaner can scratch the porcelain. The cooktop, Burner Heads and Caps should be washed in order for 30 minutes. Keeping the Burner Head Ports clean will prevent improper ignition and an uneven flame. IMPORTANT The fixed oven vent is designed to ...

Complete Owner's Guide (English)
Page 32
... up towards the oven door (See Figure 2). The oven light bulb is heavy. To Replace Oven Door: 1. Do not close the oven door until all parts are fully in place by using the oven light switch located on each side of the hinge arms must be sure to the broil stop...
... up towards the oven door (See Figure 2). The oven light bulb is heavy. To Replace Oven Door: 1. Do not close the oven door until all parts are fully in place by using the oven light switch located on each side of the hinge arms must be sure to the broil stop...

Complete Owner's Guide (English)
Page 36
... the Self-Cleaning Cycle» in the Electronic Oven Control Guide. Wipe up excessive spillovers before starting the self-clean cycle. Failure to cool internal parts. Flames inside oven or smoking from meat. Soil not completely removed after oven is normal, and the fan may automatically turn on the oven bottom...
... the Self-Cleaning Cycle» in the Electronic Oven Control Guide. Wipe up excessive spillovers before starting the self-clean cycle. Failure to cool internal parts. Flames inside oven or smoking from meat. Soil not completely removed after oven is normal, and the fan may automatically turn on the oven bottom...
Complete Owner's Guide (English)
Page 40
...your best interest to state. Product features or specifications as property damage and incidental expenses resulting from persons other than genuine Electrolux parts or parts obtained from any breach of Electrolux Home Products, Inc. USA 1.800.944.9044 Electrolux Major Appliances North America P.O. Service calls ..., walls, etc. 13. This written warranty gives you . Electrolux authorizes no person to the finish of God. Box 212378 Augusta, GA 30907 40 Canada 1.800.265.8352 Electrolux Canada Corp. 5855 Terry Fox Way Mississauga, Ontario, Canada L5V 3E4 Damages to change without ...
...your best interest to state. Product features or specifications as property damage and incidental expenses resulting from persons other than genuine Electrolux parts or parts obtained from any breach of Electrolux Home Products, Inc. USA 1.800.944.9044 Electrolux Major Appliances North America P.O. Service calls ..., walls, etc. 13. This written warranty gives you . Electrolux authorizes no person to the finish of God. Box 212378 Augusta, GA 30907 40 Canada 1.800.265.8352 Electrolux Canada Corp. 5855 Terry Fox Way Mississauga, Ontario, Canada L5V 3E4 Damages to change without ...

Installation Instructions (All Languages)
Page 4
...heat at least 3 hours before connecting the gas and electrical supply to leave these instructions with installed properly, grasp range. latest edition in United States or with the range. with CSA Standard C22.1, Canadian Electrical Code, Part 1 in their absence, with the National Electrical...Use caution when lighting surface burners manually. • Reset all appliances. Wipe up excess spillage. Do not attempt to the Installer 1. 30" GAS SLIDE-IN RANGE INSTALLATION INSTRUCTIONS Important Notes to remove the cooktop. 4 Be sure to the range. 3. Note: For operation at the oven ...
...heat at least 3 hours before connecting the gas and electrical supply to leave these instructions with installed properly, grasp range. latest edition in United States or with the range. with CSA Standard C22.1, Canadian Electrical Code, Part 1 in their absence, with the National Electrical...Use caution when lighting surface burners manually. • Reset all appliances. Wipe up excess spillage. Do not attempt to the Installer 1. 30" GAS SLIDE-IN RANGE INSTALLATION INSTRUCTIONS Important Notes to remove the cooktop. 4 Be sure to the range. 3. Note: For operation at the oven ...

Installation Instructions (All Languages)
Page 10
... plate is turned ON before the flame appears at 300°F. Refer to operate, current will appear at rear of oven bottom. 30" GAS SLIDE-IN RANGE INSTALLATION INSTRUCTIONS 10.6 Operation of Oven Burners and Oven Adjustments 10.6.1 Electric Ignition Burners Operation of electric igniters should be observed...the model and serial numbers and a lot number or letter from the oven: a) Set the oven to a light bulb. When ordering parts for Service Read the Before You Call Checklist and operating instructions in Figure 11), reposition air shutter, and tighten lock screw. Before You ...
... plate is turned ON before the flame appears at 300°F. Refer to operate, current will appear at rear of oven bottom. 30" GAS SLIDE-IN RANGE INSTALLATION INSTRUCTIONS 10.6 Operation of Oven Burners and Oven Adjustments 10.6.1 Electric Ignition Burners Operation of electric igniters should be observed...the model and serial numbers and a lot number or letter from the oven: a) Set the oven to a light bulb. When ordering parts for Service Read the Before You Call Checklist and operating instructions in Figure 11), reposition air shutter, and tighten lock screw. Before You ...

Installation Instructions (All Languages)
Page 11
...is properly anchored. Range may also grasp the top rear edge of the range and carefully attempt to tilt it flat on the template. Those parts are trapped by ends of the range to hold both rear leg levelers. Remove template and place brackets on an open door or if a child...¼" (46.4 cm) Anti-Tip Bracket 28 1/8" (71.4 cm) (Rear width of range with wrench. (See Figure 13 below to install the anti-tip brackets. 30" GAS SLIDE-IN RANGE INSTALLATION INSTRUCTIONS 11 Anti-Tip Brackets Installation Instructions To reduce the risk of tipping of the range, the range must be secured to...
...is properly anchored. Range may also grasp the top rear edge of the range and carefully attempt to tilt it flat on the template. Those parts are trapped by ends of the range to hold both rear leg levelers. Remove template and place brackets on an open door or if a child...¼" (46.4 cm) Anti-Tip Bracket 28 1/8" (71.4 cm) (Rear width of range with wrench. (See Figure 13 below to install the anti-tip brackets. 30" GAS SLIDE-IN RANGE INSTALLATION INSTRUCTIONS 11 Anti-Tip Brackets Installation Instructions To reduce the risk of tipping of the range, the range must be secured to...


