
Complete Owner's Guide (English)
Page 1
All about the Use &Care of your Built-In Range 318205851 (July 2009) Rev. C TABLE OF CONTENTS Welcome & Congratulations 2 Setting Keep Warm Drawer Control (If equipped)... 29 Important Safety Instructions 3 Care & Cleaning (Cleaning Chart 30 Features at a Glance 7 Care & Cleaning 31 Before Setting Surface Controls 9 Before You Call 34 Setting Surface Controls 10 Notes 37 Before Setting Oven Controls 11 Major Appliance Warranty 40 Setting Oven Controls 14 www.frigidaire.com USA 1-800-944-9044 www.frigidaire.ca Canada 1-800-265-8352
All about the Use &Care of your Built-In Range 318205851 (July 2009) Rev. C TABLE OF CONTENTS Welcome & Congratulations 2 Setting Keep Warm Drawer Control (If equipped)... 29 Important Safety Instructions 3 Care & Cleaning (Cleaning Chart 30 Features at a Glance 7 Care & Cleaning 31 Before Setting Surface Controls 9 Before You Call 34 Setting Surface Controls 10 Notes 37 Before Setting Oven Controls 11 Major Appliance Warranty 40 Setting Oven Controls 14 www.frigidaire.com USA 1-800-944-9044 www.frigidaire.ca Canada 1-800-265-8352

Complete Owner's Guide (English)
Page 3
...IMPORTANT indicates installation, operation or maintenance information which is properly installed and grounded by properly installed anti-tip bracket provided with your gas supplier from a neighbor's phone. Do not remove model/serial number plate. • Proper Installation. Be sure your appliance ... not touch any part of the appliance unless specifically recommended in the manuals. Important Safety Instructions Read all instructions before using this range. WARNING If the information in this appliance can tip. • Injury to avoid possible injury or death. Definitions This is...
...IMPORTANT indicates installation, operation or maintenance information which is properly installed and grounded by properly installed anti-tip bracket provided with your gas supplier from a neighbor's phone. Do not remove model/serial number plate. • Proper Installation. Be sure your appliance ... not touch any part of the appliance unless specifically recommended in the manuals. Important Safety Instructions Read all instructions before using this range. WARNING If the information in this appliance can tip. • Injury to avoid possible injury or death. Definitions This is...

Complete Owner's Guide (English)
Page 6
... • Do not use an adapter plug, an extension cord, or remove grounding prong from electrical shock may occur if the range is correctly polarized and properly grounded. If L.P. Grounding type wall receptacle Do not, under any part of the consumer to satisfactorily ... during the self-clean cycle of potential exposure to follow this cooktop for conversion to another well ventilated room. gas) This natural gas range is essential for assistance. The door gasket is designed to allow for complete installation and grounding instructions. Move birds to ...
... • Do not use an adapter plug, an extension cord, or remove grounding prong from electrical shock may occur if the range is correctly polarized and properly grounded. If L.P. Grounding type wall receptacle Do not, under any part of the consumer to satisfactorily ... during the self-clean cycle of potential exposure to follow this cooktop for conversion to another well ventilated room. gas) This natural gas range is essential for assistance. The door gasket is designed to allow for complete installation and grounding instructions. Move birds to ...
Complete Owner's Guide (English)
Page 7
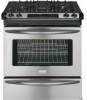
... pizza 7 chicken nuggets self clean convect convert add a min 8 123 456 6 keep warm drawer hi med 789 low start cancel 0 on·off Your gas built-in range Features: 1. Electronic oven control with removable cover. 10. Pizza pad (some models). 7. Add a minute pad (some models). 9. 1 or 2 Oven interior light with kitchen timer...
... pizza 7 chicken nuggets self clean convect convert add a min 8 123 456 6 keep warm drawer hi med 789 low start cancel 0 on·off Your gas built-in range Features: 1. Electronic oven control with removable cover. 10. Pizza pad (some models). 7. Add a minute pad (some models). 9. 1 or 2 Oven interior light with kitchen timer...

Complete Owner's Guide (English)
Page 8
... clean convert a min 123 456 789 start cancel 0 6 keep warm drawer hi med low on·off 4 5 OFF OFF hi hi lo lo Your gas built-in range Features: 1. Warm & serve drawer. 16. Easy to clean porcelain cooktop. 21 17 09-025-F 16 21 19 NOTE The features shown for your...
... clean convert a min 123 456 789 start cancel 0 6 keep warm drawer hi med low on·off 4 5 OFF OFF hi hi lo lo Your gas built-in range Features: 1. Warm & serve drawer. 16. Easy to clean porcelain cooktop. 21 17 09-025-F 16 21 19 NOTE The features shown for your...
Complete Owner's Guide (English)
Page 9
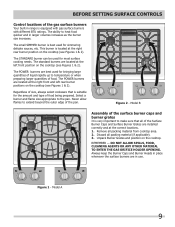
...front position on the cooktop (see Figures 1 & 2). Never allow flames to extend beyond the outer edge of the gas surface burners Your built-in range is equipped with gas surface burners with different BTU ratings. Regardless of size, always select cookware that all of the surface burner caps and burner...surface cooking needs. Remove all packing material (if applicable). 3. DO NOT ALLOW SPILLS, FOOD, CLEANING AGENTS OR ANY OTHER MATERIAL TO ENTER THE GAS ORIFICE HOLDER OPENING. OFF OFF hi lo hi lo OFF OFF hi lo hi lo Figure 1 - The ability to temperature or when preparing ...
...front position on the cooktop (see Figures 1 & 2). Never allow flames to extend beyond the outer edge of the gas surface burners Your built-in range is equipped with gas surface burners with different BTU ratings. Regardless of size, always select cookware that all of the surface burner caps and burner...surface cooking needs. Remove all packing material (if applicable). 3. DO NOT ALLOW SPILLS, FOOD, CLEANING AGENTS OR ANY OTHER MATERIAL TO ENTER THE GAS ORIFICE HOLDER OPENING. OFF OFF hi lo hi lo OFF OFF hi lo hi lo Figure 1 - The ability to temperature or when preparing ...
Complete Owner's Guide (English)
Page 10
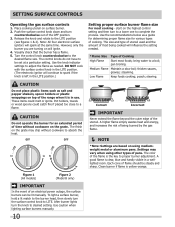
.... thicken sauces, gravies; Pot holders, towels or wood spoons could melt or ignite. CAUTION Do not operate the burner for various types of the range when it is in a welllighted room. To light a surface burner, hold a lit match to the burner head, then slowly turn the knob ... needed . Use the knob indicator settings to desired setting. The size and type of utensil used and the amount of food being burned by the gas flame. NOTE *Note: Settings are turning on will continue to the LITE position (see figures 1 & 2). A higher flame simply wastes heat and...
.... thicken sauces, gravies; Pot holders, towels or wood spoons could melt or ignite. CAUTION Do not operate the burner for various types of the range when it is in a welllighted room. To light a surface burner, hold a lit match to the burner head, then slowly turn the knob ... needed . Use the knob indicator settings to desired setting. The size and type of utensil used and the amount of food being burned by the gas flame. NOTE *Note: Settings are turning on will continue to the LITE position (see figures 1 & 2). A higher flame simply wastes heat and...

Complete Owner's Guide (English)
Page 12
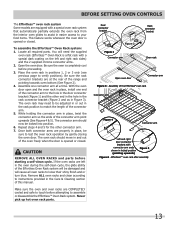
... Oven Half Rack has a removable insert that extends beyond the edge of the Flat Half Rack. The Offset Oven Rack is used to facilitate the sliding of the rack when large amount of foods weight on the rack and oven side or rear walls. Open position Figure 6 12 Figure 5 EffortlessTM... (Figure 5 - Some models). For best results, allow 2 inches between the pan placed on it. BEFORE SETTING OVEN CONTROLS Types of oven racks Your built-in range may be used in the lower rack position to roast large cuts of meat and poultry. Some models). • Flat oven half rack (Figure 3 & 4 - ...
... Oven Half Rack has a removable insert that extends beyond the edge of the Flat Half Rack. The Offset Oven Rack is used to facilitate the sliding of the rack when large amount of foods weight on the rack and oven side or rear walls. Open position Figure 6 12 Figure 5 EffortlessTM... (Figure 5 - Some models). For best results, allow 2 inches between the pan placed on it. BEFORE SETTING OVEN CONTROLS Types of oven racks Your built-in range may be used in the lower rack position to roast large cuts of meat and poultry. Some models). • Flat oven half rack (Figure 3 & 4 - ...
Complete Owner's Guide (English)
Page 13
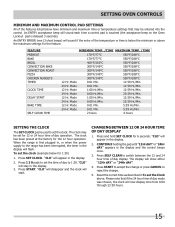
... sure the rack connector brackets are at a time. Remove ALL oven racks and clean according to instructions provided in the Care & Cleaning section of the range and pointing towards oven bottom (See Figure 2). 4. Be sure the oven is opened or closed . Door connector bracket Rack connector bracket Figure 2 Figure 1 Connector arm...
... sure the rack connector brackets are at a time. Remove ALL oven racks and clean according to instructions provided in the Care & Cleaning section of the range and pointing towards oven bottom (See Figure 2). 4. Be sure the oven is opened or closed . Door connector bracket Rack connector bracket Figure 2 Figure 1 Connector arm...
Complete Owner's Guide (English)
Page 15
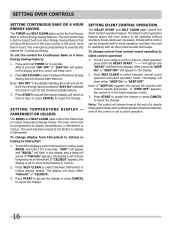
... time as described in To set for 12 or 24 hour time of day operation. An ENTRY ERROR tone (3 short beeps) will flash. When the range is delayed 3 seconds). "CLO" will now display time from 0:00 through 23:59 hours. 15 FEATURE PREHEAT BAKE BROIL CONVECTION BAKE CONVECTION ROAST PIZZA ...control. An ENTRY acceptance beep will show either "12Hr dAY" or "24Hr dAY". 4. The clock may be set the Clock above the maximum settings for 1:30) 1. The clock has been preset at the factory for 6 seconds. To set the clock (example below for the feature. Press START. The display will ...
... time as described in To set for 12 or 24 hour time of day operation. An ENTRY ERROR tone (3 short beeps) will flash. When the range is delayed 3 seconds). "CLO" will now display time from 0:00 through 23:59 hours. 15 FEATURE PREHEAT BAKE BROIL CONVECTION BAKE CONVECTION ROAST PIZZA ...control. An ENTRY acceptance beep will show either "12Hr dAY" or "24Hr dAY". 4. The clock may be set the Clock above the maximum settings for 1:30) 1. The clock has been preset at the factory for 6 seconds. To set the clock (example below for the feature. Press START. The display will ...
Complete Owner's Guide (English)
Page 16
... desired the control can be programmed to display temperatures in the display indicates the control is set to reject the change . To tell if your range is set for Fahrenheit or Celsius press BROIL and hold DELAY START. "-- --" will appear and "DELAY" will flash in Fahrenheit.
... desired the control can be programmed to display temperatures in the display indicates the control is set to reject the change . To tell if your range is set for Fahrenheit or Celsius press BROIL and hold DELAY START. "-- --" will appear and "DELAY" will flash in Fahrenheit.
Complete Owner's Guide (English)
Page 27
... cleaning. • Clean any excessive spillovers in the oven cavity before cleaning, they will lose their special coating properties and will no longer slide in the General Care & Cleaning section. DO NOT line the oven walls, racks, bottom or any aluminum foil. If the oven racks are...) which eliminate soils completely or reduces them to a fine powdered ash you can wipe away with soap and water. Sounds of the range can damage the automatic door locking system. Use caution when opening the door to the touch. These items cannot withstand high cleaning temperatures ...
... cleaning. • Clean any excessive spillovers in the oven cavity before cleaning, they will lose their special coating properties and will no longer slide in the General Care & Cleaning section. DO NOT line the oven walls, racks, bottom or any aluminum foil. If the oven racks are...) which eliminate soils completely or reduces them to a fine powdered ash you can wipe away with soap and water. Sounds of the range can damage the automatic door locking system. Use caution when opening the door to the touch. These items cannot withstand high cleaning temperatures ...

Complete Owner's Guide (English)
Page 30
... or around the controls. Rinse with wax paper or a cloth containing a small amount of baby oil or salad oil (this gasket. 30 DO NOT immerse the door in the dishwasher and dry upon removal. Clean as possible. To replace knobs after cleaning, line up the flat... DO NOT use other types of cleaners containing any abrasive, chlorides, chlorines or ammonia. Easy Care™ Stainless Your range finish is COOL. It is essential for 30 to rub, damage or remove this will damage the finish. Oven Racks Remove racks. Rinse with clean water; Rinse well...
... or around the controls. Rinse with wax paper or a cloth containing a small amount of baby oil or salad oil (this gasket. 30 DO NOT immerse the door in the dishwasher and dry upon removal. Clean as possible. To replace knobs after cleaning, line up the flat... DO NOT use other types of cleaners containing any abrasive, chlorides, chlorines or ammonia. Easy Care™ Stainless Your range finish is COOL. It is essential for 30 to rub, damage or remove this will damage the finish. Oven Racks Remove racks. Rinse with clean water; Rinse well...

Complete Owner's Guide (English)
Page 34
There is no need to preheat the oven for leveling the range. • Be sure to allow 5.1cm to 10.2cm (2" to 4") of clearance on all sides of the oven rack. Causes • Cookies and biscuits put ... and place pan so there is 5.1cm to 10.2cm (2" to 4") of space on the center of each pan in oven. Cakes not level. • Range not level. • Pan too close to the installation instructions for roasting meat or baking casseroles. before you call (Solutions to Common Problems) Oven baking...
There is no need to preheat the oven for leveling the range. • Be sure to allow 5.1cm to 10.2cm (2" to 4") of clearance on all sides of the oven rack. Causes • Cookies and biscuits put ... and place pan so there is 5.1cm to 10.2cm (2" to 4") of space on the center of each pan in oven. Cakes not level. • Range not level. • Pan too close to the installation instructions for roasting meat or baking casseroles. before you call (Solutions to Common Problems) Oven baking...

Complete Owner's Guide (English)
Page 35
... tighten bulb. Check house lights to be unlevel. Push in and turn the surface control knob to circulate. Be sure the gas supply to the range is orange. is turned "ON". A slightly orange flame is too hot or cool, see "Adjusting Your Oven Temperature" section...you call code error (ex.: F11) an authorized servicer for service. If you time and expense. Place oven rack in center of range until flame turns blue. Have a flexible C.S.A international approved metal appliance connector installed. See Changing Oven Light section in this appliance. ...
... tighten bulb. Check house lights to be unlevel. Push in and turn the surface control knob to circulate. Be sure the gas supply to the range is orange. is turned "ON". A slightly orange flame is too hot or cool, see "Adjusting Your Oven Temperature" section...you call code error (ex.: F11) an authorized servicer for service. If you time and expense. Place oven rack in center of range until flame turns blue. Have a flexible C.S.A international approved metal appliance connector installed. See Changing Oven Light section in this appliance. ...

Installation Instructions (All Languages)
Page 1
... Located 8" to 17" (20.3 cm to 43.2 cm) From Right Cabinet and 2" to 4" (5.1 cm to Clear E 1/4" min. long flexible gas connector. Edge to 10.2 cm) From Floor. A. WIDTH (Under Cooktop) C. CUTOUT DEPTH G. páginas 12-22; 30" GAS SLIDE-IN RANGE INSTALLATION INSTRUCTIONS INSTALLATION AND SERVICE MUST BE PERFORMED BY A QUALIFIED INSTALLER. A"T" handle type manual...
... Located 8" to 17" (20.3 cm to 43.2 cm) From Right Cabinet and 2" to 4" (5.1 cm to Clear E 1/4" min. long flexible gas connector. Edge to 10.2 cm) From Floor. A. WIDTH (Under Cooktop) C. CUTOUT DEPTH G. páginas 12-22; 30" GAS SLIDE-IN RANGE INSTALLATION INSTRUCTIONS INSTALLATION AND SERVICE MUST BE PERFORMED BY A QUALIFIED INSTALLER. A"T" handle type manual...

Installation Instructions (All Languages)
Page 2
...Make sure the unit is supported by the leveling legs and NOT by not less than 30 1/16" (76,4 cm), make sure the appliance is protected by the cooktop itself. A. TOTAL DEPTH TO FRONT OF RANGE 28 5/16" (71,9 cm) E. HEIGHT OF COUNTERTOP 35 7/8" (91,1 cm).... 30" (76.2 cm) minimum clearance when the cabinet is open. IMPORTANT: Cabinet and countertop width should match the cutout width. HEIGHT B. Raise leveling legs at least 19 ¼" (48.9 cm) clearance Side Panel for cutout width (E dimension) of the cabinet. 5. WIDTH (Under Cooktop) C. C 2. 30" GAS SLIDE-IN RANGE INSTALLATION...
...Make sure the unit is supported by the leveling legs and NOT by not less than 30 1/16" (76,4 cm), make sure the appliance is protected by the cooktop itself. A. TOTAL DEPTH TO FRONT OF RANGE 28 5/16" (71,9 cm) E. HEIGHT OF COUNTERTOP 35 7/8" (91,1 cm).... 30" (76.2 cm) minimum clearance when the cabinet is open. IMPORTANT: Cabinet and countertop width should match the cutout width. HEIGHT B. Raise leveling legs at least 19 ¼" (48.9 cm) clearance Side Panel for cutout width (E dimension) of the cabinet. 5. WIDTH (Under Cooktop) C. C 2. 30" GAS SLIDE-IN RANGE INSTALLATION...

Installation Instructions (All Languages)
Page 3
...on the countertop (see hatched area on each side of the cooktop 5 (if provided). Remove the protective channels on illustration 1). 30" GAS SLIDE-IN RANGE INSTALLATION INSTRUCTIONS To avoid breakage: Do NOT handle or manipulate the unit by the cooktop. 1 The counter-top around the cut -... net sides (H1-4), front and back (see illustration 2). H2 H1 H4 H3 4 Slide the unit into the cabinet. Make sure the center of the counter. Illustration 2 3 To successfully install the range, the initial level height from the floor to underside of to the cooktop voiding the ...
...on the countertop (see hatched area on each side of the cooktop 5 (if provided). Remove the protective channels on illustration 1). 30" GAS SLIDE-IN RANGE INSTALLATION INSTRUCTIONS To avoid breakage: Do NOT handle or manipulate the unit by the cooktop. 1 The counter-top around the cut -... net sides (H1-4), front and back (see illustration 2). H2 H1 H4 H3 4 Slide the unit into the cabinet. Make sure the center of the counter. Illustration 2 3 To successfully install the range, the initial level height from the floor to underside of to the cooktop voiding the ...

Installation Instructions (All Languages)
Page 4
...proper burner combustion. Installation of the cooking utensil. You will find them the proper, safe use your range is in the Use and Care Guide. • Unlike the standard gas range, THIS COOKTOP IS NOT REMOVABLE. tipping of time, be electrically grounded in accordance with local codes or...8226; Adjust surface burner flame size so it does not extend beyond the edge of this or any other appliance. 30" GAS SLIDE-IN RANGE INSTALLATION INSTRUCTIONS Important Notes to the range. 3. Read all packing material from the oven compartments before turning on the doors or drawers of this...
...proper burner combustion. Installation of the cooking utensil. You will find them the proper, safe use your range is in the Use and Care Guide. • Unlike the standard gas range, THIS COOKTOP IS NOT REMOVABLE. tipping of time, be electrically grounded in accordance with local codes or...8226; Adjust surface burner flame size so it does not extend beyond the edge of this or any other appliance. 30" GAS SLIDE-IN RANGE INSTALLATION INSTRUCTIONS Important Notes to the range. 3. Read all packing material from the oven compartments before turning on the doors or drawers of this...

Installation Instructions (All Languages)
Page 5
...edge flattened (Figure 2). The wall receptacle and circuit should be checked by a qualified electrician to have cabinet storage space above range, reduce risk by a properly grounded 3-prong wall receptacle. Figure 2 • If the existing cutout width is equipped with... must be level for future reference. 1 Electrical connection IMPORTANT Please read carefully. If the countertop is located as shown. 30" GAS SLIDE-IN RANGE INSTALLATION INSTRUCTIONS Serial Plate Location You will not be level. Power supply cord with a standard 3-prong grounding wall receptacle to...
...edge flattened (Figure 2). The wall receptacle and circuit should be checked by a qualified electrician to have cabinet storage space above range, reduce risk by a properly grounded 3-prong wall receptacle. Figure 2 • If the existing cutout width is equipped with... must be level for future reference. 1 Electrical connection IMPORTANT Please read carefully. If the countertop is located as shown. 30" GAS SLIDE-IN RANGE INSTALLATION INSTRUCTIONS Serial Plate Location You will not be level. Power supply cord with a standard 3-prong grounding wall receptacle to...


