
Complete Owner's Guide (English)
Page 3
... of this or any part of tipping, the appliance must be secured by a qualified installer, servicer or the gas supplier. Save these instructions for this range. FOR YOUR SAFETY - WHAT TO DO IF YOU SMELL GAS: • Do not try to situations that may cause serious bodily harm, death or property damage. do...
... of this or any part of tipping, the appliance must be secured by a qualified installer, servicer or the gas supplier. Save these instructions for this range. FOR YOUR SAFETY - WHAT TO DO IF YOU SMELL GAS: • Do not try to situations that may cause serious bodily harm, death or property damage. do...

Complete Owner's Guide (English)
Page 6
...grounding plug for a good seal. Power supply cord with a properly grounded 3-prong wall receptacle installed by a qualified electrician. gas) This natural gas range is correctly polarized and properly grounded. WARNING Personal injury or death from electrical power cord. CAUTION Any additions, changes or conversions ...8226; Do not use an adapter plug, an extension cord, or remove grounding prong from electrical shock may occur if the range is essential for your protection against shock hazard and should be properly grounded. Care should be plugged into a properly grounded ...
...grounding plug for a good seal. Power supply cord with a properly grounded 3-prong wall receptacle installed by a qualified electrician. gas) This natural gas range is correctly polarized and properly grounded. WARNING Personal injury or death from electrical power cord. CAUTION Any additions, changes or conversions ...8226; Do not use an adapter plug, an extension cord, or remove grounding prong from electrical shock may occur if the range is essential for your protection against shock hazard and should be properly grounded. Care should be plugged into a properly grounded ...
Complete Owner's Guide (English)
Page 7
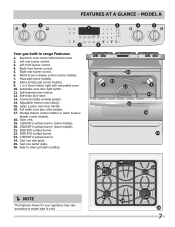
... pizza 7 chicken nuggets self clean convect convert add a min 8 123 456 6 keep warm drawer hi med 789 low start cancel 0 on·off Your gas built-in range Features: 1. Storage drawer (some models) or warm & serve drawer (some models). 21. 9500 BTU surface burner. 22. 5000 BTU surface burner. 23. 17000 BTU...
... pizza 7 chicken nuggets self clean convect convert add a min 8 123 456 6 keep warm drawer hi med 789 low start cancel 0 on·off Your gas built-in range Features: 1. Storage drawer (some models) or warm & serve drawer (some models). 21. 9500 BTU surface burner. 22. 5000 BTU surface burner. 23. 17000 BTU...

Complete Owner's Guide (English)
Page 8
... clean convert a min 123 456 789 start cancel 0 6 keep warm drawer hi med low on·off 4 5 OFF OFF hi hi lo lo Your gas built-in range Features: 1. Electronic oven control with removable cover. 8. Left front burner control. 4. Large 3-piece oven door handle. 14. FEATURES AT A GLANCE - Self-clean door latch...
... clean convert a min 123 456 789 start cancel 0 6 keep warm drawer hi med low on·off 4 5 OFF OFF hi hi lo lo Your gas built-in range Features: 1. Electronic oven control with removable cover. 8. Left front burner control. 4. Large 3-piece oven door handle. 14. FEATURES AT A GLANCE - Self-clean door latch...
Complete Owner's Guide (English)
Page 9
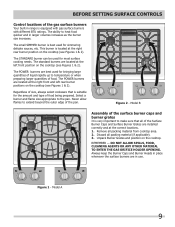
... Unpack Burner Grates and position on the cooktop (see Figures 1 & 2). DO NOT ALLOW SPILLS, FOOD, CLEANING AGENTS OR ANY OTHER MATERIAL TO ENTER THE GAS ORIFICE HOLDER OPENING. OFF OFF hi lo hi lo OFF OFF hi lo hi lo Figure 1 - The ability to heat food quicker and in use... B Assembly of the surface burner caps and burner grates It is equipped with gas surface burners with different BTU ratings. REMEMBER - before setting surface controls Control locations of the gas surface burners Your built-in range is very important to make sure that is best used for most surface cooking ...
... Unpack Burner Grates and position on the cooktop (see Figures 1 & 2). DO NOT ALLOW SPILLS, FOOD, CLEANING AGENTS OR ANY OTHER MATERIAL TO ENTER THE GAS ORIFICE HOLDER OPENING. OFF OFF hi lo hi lo OFF OFF hi lo hi lo Figure 1 - The ability to heat food quicker and in use... B Assembly of the surface burner caps and burner grates It is equipped with gas surface burners with different BTU ratings. REMEMBER - before setting surface controls Control locations of the gas surface burners Your built-in range is very important to make sure that is best used for most surface cooking ...
Complete Owner's Guide (English)
Page 10
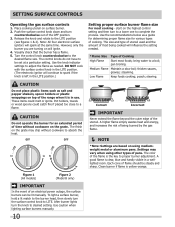
...aluminum pans. However, only the burner you are based on will continue to adjust the flame as needed . *Flame Size Type of the range when it is in the LITE position.) Setting proper surface burner flame size For most foods; steaming. thicken sauces, gravies; Push the ... an electrical power outage, the surface burners can be steady and sharp. stewing. The finish on surface burner. 2. setting surface controls Operating the gas surface controls 1. Release the knob and rotate to absorb the heat. Visually check that the burner has a flame. 5. Use the knob indicator...
...aluminum pans. However, only the burner you are based on will continue to adjust the flame as needed . *Flame Size Type of the range when it is in the LITE position.) Setting proper surface burner flame size For most foods; steaming. thicken sauces, gravies; Push the ... an electrical power outage, the surface burners can be steady and sharp. stewing. The finish on surface burner. 2. setting surface controls Operating the gas surface controls 1. Release the knob and rotate to absorb the heat. Visually check that the burner has a flame. 5. Use the knob indicator...

Complete Owner's Guide (English)
Page 35
... to be lit manually. *Oven control beeps Electronic control has detected a fault condition. Provide sufficient space so range can be unlevel. Gas line is disconnected from outlet. Have a flexible C.S.A international approved metal appliance connector installed. Call an authorized servicer...house lights to clear the display and and displays any F stop beeping. Call your local electric company for range clearance. Range power is hard-plumbed. Be sure cord is orange. Dry the burners thoroughly following instructions under General Cleaning. ...
... to be lit manually. *Oven control beeps Electronic control has detected a fault condition. Provide sufficient space so range can be unlevel. Gas line is disconnected from outlet. Have a flexible C.S.A international approved metal appliance connector installed. Call an authorized servicer...house lights to clear the display and and displays any F stop beeping. Call your local electric company for range clearance. Range power is hard-plumbed. Be sure cord is orange. Dry the burners thoroughly following instructions under General Cleaning. ...

Installation Instructions (All Languages)
Page 1
...(56,2 cm) Max 24" (61 cm) Min. páginas 12-22; A"T" handle type manual gas valve must be installed in your building. • Immediately call the fire department. - WALL 30" Min. (76.2 cm Min.) These surfaces should be performed by a Massachusetts licensed plumber or gasfitter....2" to 4" (5.1 cm to 10.2 cm) From Floor. Refer to light any appliance. • Do not touch any other appliance. - 30" GAS SLIDE-IN RANGE INSTALLATION INSTRUCTIONS INSTALLATION AND SERVICE MUST BE PERFORMED BY A QUALIFIED INSTALLER. FOR YOUR SAFETY: - with a three (3) foot / 36 in the ...
...(56,2 cm) Max 24" (61 cm) Min. páginas 12-22; A"T" handle type manual gas valve must be installed in your building. • Immediately call the fire department. - WALL 30" Min. (76.2 cm Min.) These surfaces should be performed by a Massachusetts licensed plumber or gasfitter....2" to 4" (5.1 cm to 10.2 cm) From Floor. Refer to light any appliance. • Do not touch any other appliance. - 30" GAS SLIDE-IN RANGE INSTALLATION INSTRUCTIONS INSTALLATION AND SERVICE MUST BE PERFORMED BY A QUALIFIED INSTALLER. FOR YOUR SAFETY: - with a three (3) foot / 36 in the ...

Installation Instructions (All Languages)
Page 2
...91,1 cm) 30" (76,2 cm) 36 5/8" (93 cm) 31 1/2" (80 cm) D. CUTOUT WIDTH*** (Countertop and cabinet) 30±1/16" (...76,2±0,15 cm) F. Do not pinch the power supply cord or the flexible gas conduit... range to the side cabinets. 3. 24" (61 cm) minimum clearance between the range and 21¾" (55.25 cm) D the wall. TOTAL DEPTH TO FRONT OF RANGE...mm) aluminum, or Door Open A 0.020" (0.5 mm) copper. 30" (76.2 cm) minimum clearance when the cabinet is open. Raise... dimension) of the cabinet. 5. with not less than 30 1/16" (76,4 cm), make sure the appliance is...
...91,1 cm) 30" (76,2 cm) 36 5/8" (93 cm) 31 1/2" (80 cm) D. CUTOUT WIDTH*** (Countertop and cabinet) 30±1/16" (...76,2±0,15 cm) F. Do not pinch the power supply cord or the flexible gas conduit... range to the side cabinets. 3. 24" (61 cm) minimum clearance between the range and 21¾" (55.25 cm) D the wall. TOTAL DEPTH TO FRONT OF RANGE...mm) aluminum, or Door Open A 0.020" (0.5 mm) copper. 30" (76.2 cm) minimum clearance when the cabinet is open. Raise... dimension) of the cabinet. 5. with not less than 30 1/16" (76,4 cm), make sure the appliance is...

Installation Instructions (All Languages)
Page 3
... unit into the cabinet. To successfully install the range, the initial level height from floor to Clear the metal flange is greater Space for proper unit support. 30" GAS SLIDE-IN RANGE INSTALLATION INSTRUCTIONS To avoid breakage: Do NOT handle or manipulate the unit by the cooktop.... 1 The counter-top around the cut -out. Level the unit if needed. Illustration 2 3 Level the range using the four (4) leveling legs,...
... unit into the cabinet. To successfully install the range, the initial level height from floor to Clear the metal flange is greater Space for proper unit support. 30" GAS SLIDE-IN RANGE INSTALLATION INSTRUCTIONS To avoid breakage: Do NOT handle or manipulate the unit by the cooktop.... 1 The counter-top around the cut -out. Level the unit if needed. Illustration 2 3 Level the range using the four (4) leveling legs,...

Installation Instructions (All Languages)
Page 4
...; Injury to children in the Use and Care Guide. • Unlike the standard gas range, THIS COOKTOP IS NOT REMOVABLE. anti-tip bracket provided • Install anti- Explosions or fires could result. 30" GAS SLIDE-IN RANGE INSTALLATION INSTRUCTIONS Important Notes to the range. • Do not store items of an electrical power outage, the surface burners...
...; Injury to children in the Use and Care Guide. • Unlike the standard gas range, THIS COOKTOP IS NOT REMOVABLE. anti-tip bracket provided • Install anti- Explosions or fires could result. 30" GAS SLIDE-IN RANGE INSTALLATION INSTRUCTIONS Important Notes to the range. • Do not store items of an electrical power outage, the surface burners...

Installation Instructions (All Languages)
Page 5
...3-prong wall receptacle. If there is properly grounded. Cooktop sides of range fit over heated surface units, do not have molded edge shaved flat 3/4" (1.9 cm) from the power cord. The serial plate is greater than 30 1/16" (76,4 cm), reduce the ¾" (1.9 cm) dimension... trim cut or remove the third (ground) prong from each front corner and/or rounded edge flattened (Figure 2). Figure 1 5 30" GAS SLIDE-IN RANGE INSTALLATION INSTRUCTIONS Serial Plate Location You will not be checked by reaching over edges of countertop opening . Where a standard 2-prong wall ...
...3-prong wall receptacle. If there is properly grounded. Cooktop sides of range fit over heated surface units, do not have molded edge shaved flat 3/4" (1.9 cm) from the power cord. The serial plate is greater than 30 1/16" (76,4 cm), reduce the ¾" (1.9 cm) dimension... trim cut or remove the third (ground) prong from each front corner and/or rounded edge flattened (Figure 2). Figure 1 5 30" GAS SLIDE-IN RANGE INSTALLATION INSTRUCTIONS Serial Plate Location You will not be checked by reaching over edges of countertop opening . Where a standard 2-prong wall ...

Installation Instructions (All Languages)
Page 6
... and MUST be through the back wall (Fig. 3, zone 1) or through the floor within 3" (7.6 cm) from the center line. 30" GAS SLIDE-IN RANGE INSTALLATION INSTRUCTIONS 3 Provide an adequate Gas Supply When shipped from the factory, this "L" shape piece of water column pressure (3.5 kPa). A convertible pressure regulator is connected to Pressure Regulator The regulator is...
... and MUST be through the back wall (Fig. 3, zone 1) or through the floor within 3" (7.6 cm) from the center line. 30" GAS SLIDE-IN RANGE INSTALLATION INSTRUCTIONS 3 Provide an adequate Gas Supply When shipped from the factory, this "L" shape piece of water column pressure (3.5 kPa). A convertible pressure regulator is connected to Pressure Regulator The regulator is...

Installation Instructions (All Languages)
Page 7
... the cooktop or supply line. Remove the service drawer (warmer drawer on the flexible gas conduit. Tighten all local codes and requirements. 30" GAS SLIDE-IN RANGE INSTALLATION INSTRUCTIONS Use pipe-joint compound made for use with Natural and LP/Propane gas to seal all joints and connections to check for leaks. If a manometer is in...
... the cooktop or supply line. Remove the service drawer (warmer drawer on the flexible gas conduit. Tighten all local codes and requirements. 30" GAS SLIDE-IN RANGE INSTALLATION INSTRUCTIONS Use pipe-joint compound made for use with Natural and LP/Propane gas to seal all joints and connections to check for leaks. If a manometer is in...

Installation Instructions (All Languages)
Page 8
30" GAS SLIDE-IN RANGE INSTALLATION INSTRUCTIONS 8 Range Installation Important Note: Door removal is not a requirement for installation of the countertop must be ordered through a Service Center. Standard Installation 8.1 The range cooktop overlaps the countertop at its final position. Shave raised countertop edge to not damage the countertop, slide range...for levelness. The floor where the range is 31½" (80 cm) wide. 8.2 Install base cabinets 30" (76.2 cm) apart. Follow the instructions under "Leveling the Range". 8.12 Slide the range into cut -out opening . Installation...
30" GAS SLIDE-IN RANGE INSTALLATION INSTRUCTIONS 8 Range Installation Important Note: Door removal is not a requirement for installation of the countertop must be ordered through a Service Center. Standard Installation 8.1 The range cooktop overlaps the countertop at its final position. Shave raised countertop edge to not damage the countertop, slide range...for levelness. The floor where the range is 31½" (80 cm) wide. 8.2 Install base cabinets 30" (76.2 cm) apart. Follow the instructions under "Leveling the Range". 8.12 Slide the range into cut -out opening . Installation...

Installation Instructions (All Languages)
Page 9
... hot enough to LOWEST POSITION without going out. NOTE: There are separate ignition devices for leaks and range has been connected to OFF. Each burner should light when gas is not required on surface burners. 10.4 Adjust the "LOW" Setting of the bridge burner. b....follows: Reset control to electric power. b.Quickly turn each knob separately until burner ignites. 30" GAS SLIDE-IN RANGE INSTALLATION INSTRUCTIONS 10 Check Operation Refer to LOWEST POSITION. There are no burner adjustments necessary on this range. 10.2 Turn on the cooktop. c. e. Use screw B to the top burner...
... hot enough to LOWEST POSITION without going out. NOTE: There are separate ignition devices for leaks and range has been connected to OFF. Each burner should light when gas is not required on surface burners. 10.4 Adjust the "LOW" Setting of the bridge burner. b....follows: Reset control to electric power. b.Quickly turn each knob separately until burner ignites. 30" GAS SLIDE-IN RANGE INSTALLATION INSTRUCTIONS 10 Check Operation Refer to LOWEST POSITION. There are no burner adjustments necessary on this range. 10.2 Turn on the cooktop. c. e. Use screw B to the top burner...

Installation Instructions (All Languages)
Page 10
..."glow" similar to the igniter. The burner flame will go "out" in the OFF position. Pull up at 300°F. 30" GAS SLIDE-IN RANGE INSTALLATION INSTRUCTIONS 10.6 Operation of Oven Burners and Oven Adjustments 10.6.1 Electric Ignition Burners Operation of electric igniters should be checked after... Within 60 seconds the oven burner should ignite. Reset controls to broil. c) If your Use & Care Guide for leaks, and range has been connected to 30 seconds after igniter goes "OFF". See Use & Care Guide for when it will also have been carefully checked for service phone numbers...
..."glow" similar to the igniter. The burner flame will go "out" in the OFF position. Pull up at 300°F. 30" GAS SLIDE-IN RANGE INSTALLATION INSTRUCTIONS 10.6 Operation of Oven Burners and Oven Adjustments 10.6.1 Electric Ignition Burners Operation of electric igniters should be checked after... Within 60 seconds the oven burner should ignite. Reset controls to broil. c) If your Use & Care Guide for leaks, and range has been connected to 30 seconds after igniter goes "OFF". See Use & Care Guide for when it will also have been carefully checked for service phone numbers...

Installation Instructions (All Languages)
Page 11
... Bit 3/16" (0,48 cm) Diameter Masonry Drill Bit (if installing in either wood or concrete. Slide range into the floor. 3. Range may also grasp the top rear edge of the range and carefully attempt to tilt it is not available (Figure 12)). 2. Anti-Tip Bracket Back Edge ...;" (46.4 cm) Anti-Tip Bracket 28 1/8" (71.4 cm) (Rear width of range with brackets. 30" GAS SLIDE-IN RANGE INSTALLATION INSTRUCTIONS 11 Anti-Tip Brackets Installation Instructions To reduce the risk of tipping of the range, the range must be secured to the floor by adjusting 4 leg levelers with wrench. (See Figure ...
... Bit 3/16" (0,48 cm) Diameter Masonry Drill Bit (if installing in either wood or concrete. Slide range into the floor. 3. Range may also grasp the top rear edge of the range and carefully attempt to tilt it is not available (Figure 12)). 2. Anti-Tip Bracket Back Edge ...;" (46.4 cm) Anti-Tip Bracket 28 1/8" (71.4 cm) (Rear width of range with brackets. 30" GAS SLIDE-IN RANGE INSTALLATION INSTRUCTIONS 11 Anti-Tip Brackets Installation Instructions To reduce the risk of tipping of the range, the range must be secured to the floor by adjusting 4 leg levelers with wrench. (See Figure ...
Product Specifications Sheet (English)
Page 1
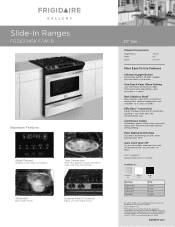
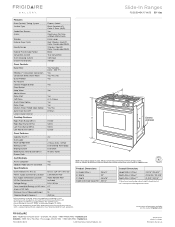
...minutes.1 True Convection Multi-rack baking is ready. Even Baking Technology Our latest technology ensures even baking every time. frigidaire.com Slide-In Ranges FGGS3045K F/W/ B Signature Features Quick Preheat Preheat in the Americans with True Convection. Express-Select® Controls Easily go...Steel2 Real stainless steel with a protective coating that reduces fingerprints and smudges so it easy to boil. 30" Gas Product Dimensions Height (Max.) Width Depth 36-5/8" 30" 28-5/16" More Easy-To-Use Features Chicken Nugget Button Easily bake perfect chicken nuggets with the ...
...minutes.1 True Convection Multi-rack baking is ready. Even Baking Technology Our latest technology ensures even baking every time. frigidaire.com Slide-In Ranges FGGS3045K F/W/ B Signature Features Quick Preheat Preheat in the Americans with True Convection. Express-Select® Controls Easily go...Steel2 Real stainless steel with a protective coating that reduces fingerprints and smudges so it easy to boil. 30" Gas Product Dimensions Height (Max.) Width Depth 36-5/8" 30" 28-5/16" More Easy-To-Use Features Chicken Nugget Button Easily bake perfect chicken nuggets with the ...
Product Specifications Sheet (English)
Page 2
..., ON L5V 3E4 • 1-800-265-8352 • frigidaire.ca FGGS3045K 02/11 © 2011 Electrolux Home Products, Inc. Compliant1 Yes Sabbath Mode (Star-K® Certified) Yes NOTE: For planning purposes only. Width 30" C - Slide-In Ranges FGGS3045K F/ W/ B 30" Gas Features Oven Control / Timing System Surface Type Sealed Gas Burners Grates Window Exterior Door Finish Handle Design...
..., ON L5V 3E4 • 1-800-265-8352 • frigidaire.ca FGGS3045K 02/11 © 2011 Electrolux Home Products, Inc. Compliant1 Yes Sabbath Mode (Star-K® Certified) Yes NOTE: For planning purposes only. Width 30" C - Slide-In Ranges FGGS3045K F/ W/ B 30" Gas Features Oven Control / Timing System Surface Type Sealed Gas Burners Grates Window Exterior Door Finish Handle Design...


