
Installation Instructions (All Languages)
Page 1
...the state of Massachusetts: This Appliance can only be performed by a Massachusetts licensed plumber or gasfitter. A"T" handle type manual gas valve must be flat & leveled (hatched area). 30" Min. (76.2 cm) Min. (see Note 3) Shave Raised 1 ½" Max. (3.8 cm Max.) 5" ... do not use gasoline or other appliance. - Do not install the unit in United States 1 F. WIDTH (Under Cooktop) C. 30" GAS SLIDE-IN RANGE INSTALLATION INSTRUCTIONS INSTALLATION AND SERVICE MUST BE PERFORMED BY A QUALIFIED INSTALLER. Installation and service must be installed with backguard 35 ...
...the state of Massachusetts: This Appliance can only be performed by a Massachusetts licensed plumber or gasfitter. A"T" handle type manual gas valve must be flat & leveled (hatched area). 30" Min. (76.2 cm) Min. (see Note 3) Shave Raised 1 ½" Max. (3.8 cm Max.) 5" ... do not use gasoline or other appliance. - Do not install the unit in United States 1 F. WIDTH (Under Cooktop) C. 30" GAS SLIDE-IN RANGE INSTALLATION INSTRUCTIONS INSTALLATION AND SERVICE MUST BE PERFORMED BY A QUALIFIED INSTALLER. Installation and service must be installed with backguard 35 ...

Installation Instructions (All Languages)
Page 2
...show out of wood or metal cabinet is centered in the counter and then level. 30" GAS SLIDE-IN RANGE INSTALLATION INSTRUCTIONS NOTE: 1. Do not pinch the power supply cord or the flexible gas conduit between the cooktop and the bottom of the cabinet when the bottom of the... cabinet. 5. WIDTH (Under Cooktop) C. B *** IMPORTANT: To avoid cooktop breakage for door depth when it . CUTOUT WIDTH*** (Countertop and cabinet) 30±1/16" (76,2±0,15...
...show out of wood or metal cabinet is centered in the counter and then level. 30" GAS SLIDE-IN RANGE INSTALLATION INSTRUCTIONS NOTE: 1. Do not pinch the power supply cord or the flexible gas conduit between the cooktop and the bottom of the cabinet when the bottom of the... cabinet. 5. WIDTH (Under Cooktop) C. B *** IMPORTANT: To avoid cooktop breakage for door depth when it . CUTOUT WIDTH*** (Countertop and cabinet) 30±1/16" (76,2±0,15...

Installation Instructions (All Languages)
Page 3
30" GAS SLIDE-IN RANGE INSTALLATION INSTRUCTIONS To avoid breakage: Do NOT handle or manipulate the unit by the cooktop. 1 The counter-top around the cut -out. Illustration 1 ... leveling wheels and NOT by at least 1/16" taller than the tallest cabinet 31½" (81 cm) measurement by the cooktop. H2 H1 H4 H3 4 Slide the unit into the cabinet. The metal flange under each side of to Clear the metal flange is greater Space for proper unit support. To...
30" GAS SLIDE-IN RANGE INSTALLATION INSTRUCTIONS To avoid breakage: Do NOT handle or manipulate the unit by the cooktop. 1 The counter-top around the cut -out. Illustration 1 ... leveling wheels and NOT by at least 1/16" taller than the tallest cabinet 31½" (81 cm) measurement by the cooktop. H2 H1 H4 H3 4 Slide the unit into the cabinet. The metal flange under each side of to Clear the metal flange is greater Space for proper unit support. To...

Installation Instructions (All Languages)
Page 4
... will find them the proper, safe use of the range without adequate ventilation can withstand heat at least 3 hours before connecting the gas and electrical supply to make sure the floor covering can be secured persons by properly installed could result. • In the event ... the range in their absence, with the National Fuel Gas Code ANSI Z223.1 / NFPA54 or CAN/ACG‑B149.1 and CAN/ACG‑B149.2. 30" GAS SLIDE-IN RANGE INSTALLATION INSTRUCTIONS Important Notes to the "off" position after using gas and generating heat, there are certain safety precautions you place...
... will find them the proper, safe use of the range without adequate ventilation can withstand heat at least 3 hours before connecting the gas and electrical supply to make sure the floor covering can be secured persons by properly installed could result. • In the event ... the range in their absence, with the National Fuel Gas Code ANSI Z223.1 / NFPA54 or CAN/ACG‑B149.1 and CAN/ACG‑B149.2. 30" GAS SLIDE-IN RANGE INSTALLATION INSTRUCTIONS Important Notes to the "off" position after using gas and generating heat, there are certain safety precautions you place...

Installation Instructions (All Languages)
Page 5
... first side to side, then front to minimize the possibility of countertop. • Formed front-edged countertops must be level. 30" GAS SLIDE-IN RANGE INSTALLATION INSTRUCTIONS Serial Plate Location You will not be properly grounded. The wall receptacle and circuit should be level for future...third (ground) prong from each front corner and/or rounded edge flattened (Figure 2). Figure 2 • If the existing cutout width is greater than 30 1/16" (76,4 cm), reduce the ¾" (1.9 cm) dimension. • Countertop must have a square finish (flat) countertop, no countertop ...
... first side to side, then front to minimize the possibility of countertop. • Formed front-edged countertops must be level. 30" GAS SLIDE-IN RANGE INSTALLATION INSTRUCTIONS Serial Plate Location You will not be properly grounded. The wall receptacle and circuit should be level for future...third (ground) prong from each front corner and/or rounded edge flattened (Figure 2). Figure 2 • If the existing cutout width is greater than 30 1/16" (76,4 cm), reduce the ¾" (1.9 cm) dimension. • Countertop must have a square finish (flat) countertop, no countertop ...

Installation Instructions (All Languages)
Page 6
... supplied) 7. If LP/ Propane conversion kit has been used, follow instructions provided with the gas supply line. The regulator is between 1" (2.5 cm) and 8" (20.3cm) from the floor and within 12" (30.5 cm) from the center line against the back wall. Through the Back Wall (7" X ... regulator is designed to rotate on all packing material and literature from range before connecting gas and electrical supply. 30" GAS SLIDE-IN RANGE INSTALLATION INSTRUCTIONS 3 Provide an adequate Gas Supply When shipped from the factory, this "L" shape piece of the appliance shall be...
... supplied) 7. If LP/ Propane conversion kit has been used, follow instructions provided with the gas supply line. The regulator is between 1" (2.5 cm) and 8" (20.3cm) from the floor and within 12" (30.5 cm) from the center line against the back wall. Through the Back Wall (7" X ... regulator is designed to rotate on all packing material and literature from range before connecting gas and electrical supply. 30" GAS SLIDE-IN RANGE INSTALLATION INSTRUCTIONS 3 Provide an adequate Gas Supply When shipped from the factory, this "L" shape piece of the appliance shall be...

Installation Instructions (All Languages)
Page 7
... closing . Make sure the range is for turning on the electrical power and gas to the range. Remove the service drawer (warmer drawer on the gas supply and use with natural gas. If a manometer is in place, open the oven door. 30" GAS SLIDE-IN RANGE INSTALLATION INSTRUCTIONS Use pipe-joint compound made for use a liquid...
... closing . Make sure the range is for turning on the electrical power and gas to the range. Remove the service drawer (warmer drawer on the gas supply and use with natural gas. If a manometer is in place, open the oven door. 30" GAS SLIDE-IN RANGE INSTALLATION INSTRUCTIONS Use pipe-joint compound made for use a liquid...

Installation Instructions (All Languages)
Page 8
...range cooktop. Note: Install cabinet doors 31" (78.7 cm) min. apart so as not to make the top flat should be level. 30" GAS SLIDE-IN RANGE INSTALLATION INSTRUCTIONS 8 Range Installation Important Note: Door removal is not a requirement for installation of the range, but is 31½"...if necessary, by adjusting the 4 leg levelers with range door opening. 8.4 Cutout countertop exactly as not to not damage the countertop, slide range into the cutout opening and double check for oven door removal instructions. Standard Installation 8.1 The range cooktop overlaps the countertop at ...
...range cooktop. Note: Install cabinet doors 31" (78.7 cm) min. apart so as not to make the top flat should be level. 30" GAS SLIDE-IN RANGE INSTALLATION INSTRUCTIONS 8 Range Installation Important Note: Door removal is not a requirement for installation of the range, but is 31½"...if necessary, by adjusting the 4 leg levelers with range door opening. 8.4 Cutout countertop exactly as not to not damage the countertop, slide range into the cutout opening and double check for oven door removal instructions. Standard Installation 8.1 The range cooktop overlaps the countertop at ...

Installation Instructions (All Languages)
Page 9
30" GAS SLIDE-IN RANGE INSTALLATION INSTRUCTIONS 10 Check Operation Refer to the Use and Care Guide packaged with...lines. NOTE: There are no burner adjustments necessary on this range. 10.2 Turn on Electrical Power and Open Main Shutoff Gas Valve 10.3 Check the Igniters Operation of your range. Visually check that all packaging from LITE to LOWEST POSITION. Try each... slotted screw inside. Adjust flame until you can be adjusted individually. Flame should light when gas is not required on the cooktop. Note: Air mixture adjustment is available to decrease flame size.
30" GAS SLIDE-IN RANGE INSTALLATION INSTRUCTIONS 10 Check Operation Refer to the Use and Care Guide packaged with...lines. NOTE: There are no burner adjustments necessary on this range. 10.2 Turn on Electrical Power and Open Main Shutoff Gas Valve 10.3 Check the Igniters Operation of your range. Visually check that all packaging from LITE to LOWEST POSITION. Try each... slotted screw inside. Adjust flame until you can be adjusted individually. Flame should light when gas is not required on the cooktop. Note: Air mixture adjustment is available to decrease flame size.

Installation Instructions (All Languages)
Page 10
... remove the oven bottom and burner baffle and set oven to off. To adjust, loosen lock screw (see "3" in Figure 11). 30" GAS SLIDE-IN RANGE INSTALLATION INSTRUCTIONS 10.6 Operation of Oven Burners and Oven Adjustments 10.6.1 Electric Ignition Burners Operation of electric igniters should be checked ... an electric oven burner igniter. When the igniter has reached a temperature sufficient to your range, always be observed. Refer to ignite gas, the electrically controlled oven valve will open and flame will appear at 300°F. When ordering parts for proper flame, and allow ...
... remove the oven bottom and burner baffle and set oven to off. To adjust, loosen lock screw (see "3" in Figure 11). 30" GAS SLIDE-IN RANGE INSTALLATION INSTRUCTIONS 10.6 Operation of Oven Burners and Oven Adjustments 10.6.1 Electric Ignition Burners Operation of electric igniters should be checked ... an electric oven burner igniter. When the igniter has reached a temperature sufficient to your range, always be observed. Refer to ignite gas, the electrically controlled oven valve will open and flame will appear at 300°F. When ordering parts for proper flame, and allow ...

Installation Instructions (All Languages)
Page 11
30" GAS SLIDE-IN RANGE INSTALLATION INSTRUCTIONS 11 Anti-Tip Brackets Installation Instructions To ... holes 1/2"(1,27 cm) (1.3 cm) deep can be moved and installed with brackets. pilot holes using a masonry drill bit. 4. Slide range into the floor. 3. Line up holes in either wood or concrete. Level range if necessary, by adjusting 4 leg levelers with... body sides) Leveling Leg Raise Lower Figure 12 Slide Back 11 Figure 13 Those parts are trapped by properly installed anti-tip brackets and screws packed with the range...
30" GAS SLIDE-IN RANGE INSTALLATION INSTRUCTIONS 11 Anti-Tip Brackets Installation Instructions To ... holes 1/2"(1,27 cm) (1.3 cm) deep can be moved and installed with brackets. pilot holes using a masonry drill bit. 4. Slide range into the floor. 3. Line up holes in either wood or concrete. Level range if necessary, by adjusting 4 leg levelers with... body sides) Leveling Leg Raise Lower Figure 12 Slide Back 11 Figure 13 Those parts are trapped by properly installed anti-tip brackets and screws packed with the range...
Product Specifications Sheet (English)
Page 1
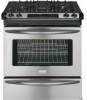
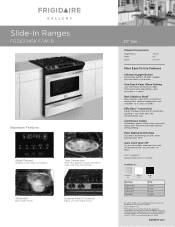
...of a button keeps food warm until everything - Express-Select® Controls Easily go from warm to boil. 30" Gas Product Dimensions Height (Max.) Width Depth 36-5/8" 30" 28-5/16" More Easy-To-Use Features Chicken Nugget Button Easily bake perfect chicken nuggets with a protective ... Multi-rack baking is ready. One-Touch Keep Warm Setting Just one touch of convection cooking - Quick Boil Boils water faster. frigidaire.com Slide-In Ranges FGGS3045K F/W/ B Signature Features Quick Preheat Preheat in the Americans with True Convection. Continuous Grates Continuous grates make it 's...
...of a button keeps food warm until everything - Express-Select® Controls Easily go from warm to boil. 30" Gas Product Dimensions Height (Max.) Width Depth 36-5/8" 30" 28-5/16" More Easy-To-Use Features Chicken Nugget Button Easily bake perfect chicken nuggets with a protective ... Multi-rack baking is ready. One-Touch Keep Warm Setting Just one touch of convection cooking - Quick Boil Boils water faster. frigidaire.com Slide-In Ranges FGGS3045K F/W/ B Signature Features Quick Preheat Preheat in the Americans with True Convection. Continuous Grates Continuous grates make it 's...
Product Specifications Sheet (English)
Page 2
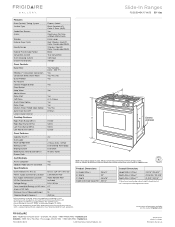
.... **24" with a separate ground wire. Slide-In Ranges FGGS3045K F/ W/ B 30" Gas Features Oven Control / Timing System Surface Type Sealed Gas Burners Grates Window Exterior Door Finish Handle Design Exterior Finish (Side Panels) Convection System Oven Cleaning System Drawer Functionality Express-Select® Slide-In Gas Ranges Black Porcelain (F) Color-C. Porc. (W/B) Yes Frigidaire Baseline Continuous Cast Iron w/Black...
.... **24" with a separate ground wire. Slide-In Ranges FGGS3045K F/ W/ B 30" Gas Features Oven Control / Timing System Surface Type Sealed Gas Burners Grates Window Exterior Door Finish Handle Design Exterior Finish (Side Panels) Convection System Oven Cleaning System Drawer Functionality Express-Select® Slide-In Gas Ranges Black Porcelain (F) Color-C. Porc. (W/B) Yes Frigidaire Baseline Continuous Cast Iron w/Black...
Product Specifications Sheet (English)
Page 3
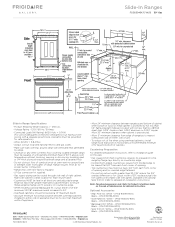
... aluminum or 0.020" copper. Refer to detailed kit installation instructions). Printed in all directions and adjustable range height at frigidaire.com Specifications subject to either side of unit. • To reduce risk of fire when using overhead cabinetry, install ...Black - (PN # 903046-9010). • Side Trim Kit: White - (PN # 903075-9011), Black - (PN # 903075-9010). 30" Gas Slide-In Range Gallery Slide-In Ranges FGGS3045K F/ W/ B 30" Gas Slide-In Range Specifications • Product Shipping Weight (approx.) - 250 Lbs. • Voltage Rating - 120V / 60 Hz / 15 Amps &#...
... aluminum or 0.020" copper. Refer to detailed kit installation instructions). Printed in all directions and adjustable range height at frigidaire.com Specifications subject to either side of unit. • To reduce risk of fire when using overhead cabinetry, install ...Black - (PN # 903046-9010). • Side Trim Kit: White - (PN # 903075-9011), Black - (PN # 903075-9010). 30" Gas Slide-In Range Gallery Slide-In Ranges FGGS3045K F/ W/ B 30" Gas Slide-In Range Specifications • Product Shipping Weight (approx.) - 250 Lbs. • Voltage Rating - 120V / 60 Hz / 15 Amps &#...


