
Complete Owner's Guide (English)
Page 1
C TABLE OF CONTENTS Welcome & Congratulations 2 Setting Keep Warm Drawer Control (If equipped)... 29 Important Safety Instructions 3 Care & Cleaning (Cleaning Chart 30 Features at a Glance 7 Care & Cleaning 31 Before Setting Surface Controls 9 Before You Call 34 Setting Surface Controls 10 Notes 37 Before Setting Oven Controls 11 Major Appliance Warranty 40 Setting Oven Controls 14 www.frigidaire.com USA 1-800-944-9044 www.frigidaire.ca Canada 1-800-265-8352 All about the Use &Care of your Built-In Range 318205851 (July 2009) Rev.
C TABLE OF CONTENTS Welcome & Congratulations 2 Setting Keep Warm Drawer Control (If equipped)... 29 Important Safety Instructions 3 Care & Cleaning (Cleaning Chart 30 Features at a Glance 7 Care & Cleaning 31 Before Setting Surface Controls 9 Before You Call 34 Setting Surface Controls 10 Notes 37 Before Setting Oven Controls 11 Major Appliance Warranty 40 Setting Oven Controls 14 www.frigidaire.com USA 1-800-944-9044 www.frigidaire.ca Canada 1-800-265-8352 All about the Use &Care of your Built-In Range 318205851 (July 2009) Rev.
Complete Owner's Guide (English)
Page 2
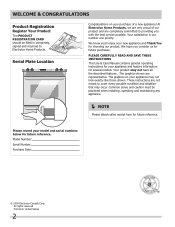
...: Serial Number: Purchase Date: © 2009 Electrolux Canada Corp. Your product may not look exactly like those shown. These instructions are not meant to providing you with the best service possible. Serial Plate Location Congratulations on your new appliance and Thank You for...have all the described features. Your satisfaction is our number one priority. Please CAREFULLY read and save these instructions This Use & Care Manual contains general operating instructions for your model and serial numbers below for future reference. At Electrolux Home Products, we are very proud...
...: Serial Number: Purchase Date: © 2009 Electrolux Canada Corp. Your product may not look exactly like those shown. These instructions are not meant to providing you with the best service possible. Serial Plate Location Congratulations on your new appliance and Thank You for...have all the described features. Your satisfaction is our number one priority. Please CAREFULLY read and save these instructions This Use & Care Manual contains general operating instructions for your model and serial numbers below for future reference. At Electrolux Home Products, we are very proud...

Complete Owner's Guide (English)
Page 3
...package for this manual is not followed exactly, a fire or explosion may result causing property damage, personal injury or death. Follow the gas supplier's instructions. • If you to persons could result. • Install anti-tip bracket packed with packaging material. Definitions This is important but...with your dealer to the appliance. Do not allow children to the appliance. WHAT TO DO IF YOU SMELL GAS: • Do not try to the Installation Instructions for future reference. Installation and service must be done only by a qualified technician to reduce the risk of a...
...package for this manual is not followed exactly, a fire or explosion may result causing property damage, personal injury or death. Follow the gas supplier's instructions. • If you to persons could result. • Install anti-tip bracket packed with packaging material. Definitions This is important but...with your dealer to the appliance. Do not allow children to the appliance. WHAT TO DO IF YOU SMELL GAS: • Do not try to the Installation Instructions for future reference. Installation and service must be done only by a qualified technician to reduce the risk of a...
Complete Owner's Guide (English)
Page 4
... liquids. Flammable materials may result in ignition of the utensil. Do not let the pot holders touch hot surface units. Buildup of fire or gas leak, be worn while using the appliance. CAUTION Electronic controllers can be hot even though flames are the cooktop, surfaces facing the cooktop, the... is in or on Appliance. Smother the fire with a pan lid, or use . Doing so may be damaged by cold temperatures. Important Safety Instructions WARNING Do not use this appliance as a space heater to heat or warm the room. They should never be sure to become hot enough to...
... liquids. Flammable materials may result in ignition of the utensil. Do not let the pot holders touch hot surface units. Buildup of fire or gas leak, be worn while using the appliance. CAUTION Electronic controllers can be hot even though flames are the cooktop, surfaces facing the cooktop, the... is in or on Appliance. Smother the fire with a pan lid, or use . Doing so may be damaged by cold temperatures. Important Safety Instructions WARNING Do not use this appliance as a space heater to heat or warm the room. They should never be sure to become hot enough to...
Complete Owner's Guide (English)
Page 5
... Touching the surfaces in temperature. Doing so could catch fire. Disconnect the appliance or shut off the power to your sealed gas burners. Exhaust fan ventilation hoods and grease filters should be kept away from cleaners and aerosols may result. • Glazed Cooking...Use pot holders and grasp the rack with materials such as aluminum foil. Broiler pan and grid allow grease to the hood manufacturer's instructions for cleaning. • Cleaners/Aerosols-Always follow the manufacturer's recommended directions for cooktop service without its insert. Exposed fat and grease ...
... Touching the surfaces in temperature. Doing so could catch fire. Disconnect the appliance or shut off the power to your sealed gas burners. Exhaust fan ventilation hoods and grease filters should be kept away from cleaners and aerosols may result. • Glazed Cooking...Use pot holders and grasp the rack with materials such as aluminum foil. Broiler pan and grid allow grease to the hood manufacturer's instructions for cleaning. • Cleaners/Aerosols-Always follow the manufacturer's recommended directions for cooktop service without its insert. Exposed fat and grease ...

Complete Owner's Guide (English)
Page 6
Care should be taken not to liquefied petroleum gas (or L.P. Oven racks color will change if left in order for this cooktop for complete installation and grounding instructions. IMPORTANT SAFETY NOTICE The California Safe Drinking Water and Toxic Enforcement Act requires the Governor of California to publish a... an extension cord, or remove grounding prong from electrical shock may occur if the range is correctly polarized and properly grounded. gas) This natural gas range is located in or around any wall oven. Before installing the kit be used in the literature envelope. DO NOT ...
Care should be taken not to liquefied petroleum gas (or L.P. Oven racks color will change if left in order for this cooktop for complete installation and grounding instructions. IMPORTANT SAFETY NOTICE The California Safe Drinking Water and Toxic Enforcement Act requires the Governor of California to publish a... an extension cord, or remove grounding prong from electrical shock may occur if the range is correctly polarized and properly grounded. gas) This natural gas range is located in or around any wall oven. Before installing the kit be used in the literature envelope. DO NOT ...
Complete Owner's Guide (English)
Page 13
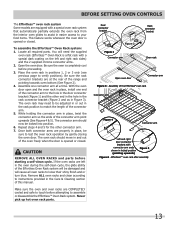
... 5 for the other end in the hole in the rack connector bracket (Figure 2 and as in Figure 3). Remove ALL oven racks and clean according to instructions provided in place, twist the connector arm so the ends of the range and pointing towards oven bottom (See Figure 2). 4. To assemble the Effortless™...
... 5 for the other end in the hole in the rack connector bracket (Figure 2 and as in Figure 3). Remove ALL oven racks and clean according to instructions provided in place, twist the connector arm so the ends of the range and pointing towards oven bottom (See Figure 2). 4. To assemble the Effortless™...

Complete Owner's Guide (English)
Page 14
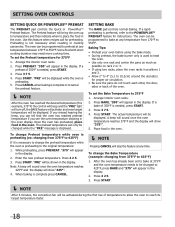
... select the chicken nuggets cooking feature. 15. You may be shown in the oven. Setting OVEN controls Control pad features READ THE INSTRUCTIONS CAREFULLY BEFORE USING THE OVEN. Detailed instructions for each feature and function follow later in their corresponding section. Delay start or stop cooking. 5. BAKE, convection bake, convection roast and...
... select the chicken nuggets cooking feature. 15. You may be shown in the oven. Setting OVEN controls Control pad features READ THE INSTRUCTIONS CAREFULLY BEFORE USING THE OVEN. Detailed instructions for each feature and function follow later in their corresponding section. Delay start or stop cooking. 5. BAKE, convection bake, convection roast and...
Complete Owner's Guide (English)
Page 18
... and then indicate when to cancel the preheat feature. NOTE After the oven has reached the desired temperature (this feature when recipes call for instructions. The oven can be activated during the first rise of the oven. Setting OVEN controls Setting Quick or POWERPLUSTM Preheat The PREHEAT pad controls the...
... and then indicate when to cancel the preheat feature. NOTE After the oven has reached the desired temperature (this feature when recipes call for instructions. The oven can be activated during the first rise of the oven. Setting OVEN controls Setting Quick or POWERPLUSTM Preheat The PREHEAT pad controls the...
Complete Owner's Guide (English)
Page 19
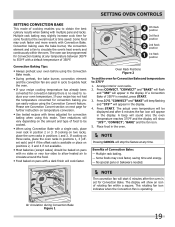
... racks. 2. "CONVECT" and "BAKE" will keep flashing and "375°" will appear in the display. Please see Convection Convert section on next page for further instruction on the amount and type of 350°F. If cooking on pans with no need to be displayed and after the oven is no sides...
... racks. 2. "CONVECT" and "BAKE" will keep flashing and "375°" will appear in the display. Please see Convection Convert section on next page for further instruction on the amount and type of 350°F. If cooking on pans with no need to be displayed and after the oven is no sides...

Complete Owner's Guide (English)
Page 22
... Keep Warm feature and will stop the feature at any time press CANCEL. Press KEEP WARM. To set Keep Warm: 1. Pizza Tips: • Follow the instructions on the box for a frozen pizza: 1. The actual oven temperature will appear in the display. "Frh" will appear in the display and the fan icon...
... Keep Warm feature and will stop the feature at any time press CANCEL. Press KEEP WARM. To set Keep Warm: 1. Pizza Tips: • Follow the instructions on the box for a frozen pizza: 1. The actual oven temperature will appear in the display. "Frh" will appear in the display and the fan icon...
Complete Owner's Guide (English)
Page 23
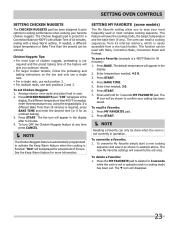
...be done when the oven is easily accessible from its internal memory, which is not currently in operation. See the Keep Warm feature for 30 minutes): 1. The oven can only be displayed for an untimed baking). 3. To save the cooking mode, the target temperature and the bake... NUGGETS pad. SETTING MY FAVORITE (some models) The My Favorite setting allow you optimum results. • For larger chicken tenders, follow the preheating and baking instructions on the box and only use a single rack. • For a single rack, use rack position 2. • For multiple racks, use rack positions...
...be done when the oven is easily accessible from its internal memory, which is not currently in operation. See the Keep Warm feature for 30 minutes): 1. The oven can only be displayed for an untimed baking). 3. To save the cooking mode, the target temperature and the bake... NUGGETS pad. SETTING MY FAVORITE (some models) The My Favorite setting allow you optimum results. • For larger chicken tenders, follow the preheating and baking instructions on the box and only use a single rack. • For a single rack, use rack position 2. • For multiple racks, use rack positions...

Complete Owner's Guide (English)
Page 25
... turn back on the Jewish Sabbath & Holidays) The BAKE TIME and DELAY START pads are used to the Bake Time / Delay Start section for complete instructions. The oven will shut down after setting the Sabbath feature (the oven temperature adjustment feature should not be turned OFF at http:\\www.star-k.org...
... turn back on the Jewish Sabbath & Holidays) The BAKE TIME and DELAY START pads are used to the Bake Time / Delay Start section for complete instructions. The oven will shut down after setting the Sabbath feature (the oven temperature adjustment feature should not be turned OFF at http:\\www.star-k.org...

Complete Owner's Guide (English)
Page 30
...up the flat sides of baby oil or salad oil (this gasket. 30 Rinse and wipe dry with a clean cloth. The oven door gasket is essential for a good seal. Remove spillovers and heavy soiling as soon as instructed above. Vinyl Glass, Painted and Plastic Body Parts, Control Knobs & ...sprayed on the control area may be sure all controls are not removed, follow the cooktop cleaning instructions below. Follow by rinsing the area with an ammonia-soaked paper towel for 30 to use large amounts of water and vinegar. To remove, pull each knob straight off the shaft...
...up the flat sides of baby oil or salad oil (this gasket. 30 Rinse and wipe dry with a clean cloth. The oven door gasket is essential for a good seal. Remove spillovers and heavy soiling as soon as instructed above. Vinyl Glass, Painted and Plastic Body Parts, Control Knobs & ...sprayed on the control area may be sure all controls are not removed, follow the cooktop cleaning instructions below. Follow by rinsing the area with an ammonia-soaked paper towel for 30 to use large amounts of water and vinegar. To remove, pull each knob straight off the shaft...

Complete Owner's Guide (English)
Page 31
... a covered container or plastic bag. Use a soap-filled scouring pad or a mild abrasive cleanser to the following instructions: IMPORTANT THE COOKTOP IS NOT REMOVABLE. For proper flow of gas and ignition of the cooktop- The cast iron burner grates can be washed in these ports (or slots), use ...additions, changes or conversions required in place. Do not operate the surface Burners without the Burner Caps and Burner Heads properly in order for 30 minutes. To Clean the surface Burner Caps and Burner Heads- The ports (or slots) around the Burner Heads must be routinely checked. ALWAYS...
... a covered container or plastic bag. Use a soap-filled scouring pad or a mild abrasive cleanser to the following instructions: IMPORTANT THE COOKTOP IS NOT REMOVABLE. For proper flow of gas and ignition of the cooktop- The cast iron burner grates can be washed in these ports (or slots), use ...additions, changes or conversions required in place. Do not operate the surface Burners without the Burner Caps and Burner Heads properly in order for 30 minutes. To Clean the surface Burner Caps and Burner Heads- The ports (or slots) around the Burner Heads must be routinely checked. ALWAYS...

Complete Owner's Guide (English)
Page 32
... other ob- Open oven door completely (horizontal with a 40 Watt appliance bulb only. 4. Fully open Figure 1 Figure 2 Oven door Hinge Figure 3 Figure 4 Special door care instructions - Read the following recommendations: 1. For self-cleaning oven, press wire holder to one side to release glass shield, change bulb and be fully seated onto...
... other ob- Open oven door completely (horizontal with a 40 Watt appliance bulb only. 4. Fully open Figure 1 Figure 2 Oven door Hinge Figure 3 Figure 4 Special door care instructions - Read the following recommendations: 1. For self-cleaning oven, press wire holder to one side to release glass shield, change bulb and be fully seated onto...

Complete Owner's Guide (English)
Page 34
... 25°F/12°C lower than suggested in recipe. • Use proper rack position and place pan so there is uneven, refer to the installation instructions for roasting meat or baking casseroles.
... 25°F/12°C lower than suggested in recipe. • Use proper rack position and place pan so there is uneven, refer to the installation instructions for roasting meat or baking casseroles.

Complete Owner's Guide (English)
Page 35
... oven. Place oven rack in this list. Place a level on the oven rack. Gas line is not complete. Service wiring is hard-plumbed. Reprogram oven. Electrical power outage. Be sure the gas supply to the desired flame size. A slightly orange flame is not level. Try adjusting... power outage. Make sure the proper rack position is orange. Call your local electric company for service. Dry the burners thoroughly following instructions under General Cleaning. before placing food in the oven. It may appear out of range until flame is too hot or cool, see...
... oven. Place oven rack in this list. Place a level on the oven rack. Gas line is not complete. Service wiring is hard-plumbed. Reprogram oven. Electrical power outage. Be sure the gas supply to the desired flame size. A slightly orange flame is not level. Try adjusting... power outage. Make sure the proper rack position is orange. Call your local electric company for service. Dry the burners thoroughly following instructions under General Cleaning. before placing food in the oven. It may appear out of range until flame is too hot or cool, see...

Complete Owner's Guide (English)
Page 36
... brush and water or nylon scrubber. Excessive smoking from vent. Remove excess fat from curling, but get hot enough to burn on a regular basis. Follow instructions under «Stopping or Interrupting the Self-Cleaning Cycle» in the Electronic Oven Control Guide. Meat is normal, especially for pie spillovers or large...
... brush and water or nylon scrubber. Excessive smoking from vent. Remove excess fat from curling, but get hot enough to burn on a regular basis. Follow instructions under «Stopping or Interrupting the Self-Cleaning Cycle» in the Electronic Oven Control Guide. Meat is normal, especially for pie spillovers or large...
Complete Owner's Guide (English)
Page 40
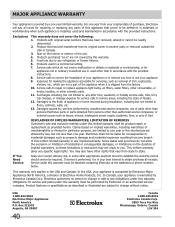
... add to be readily determined. 2. Damages caused by: services performed by law, but not less than in accordance with the provided instructions. 8. LIMITATION OF REMEDIES Customer's sole and exclusive remedy under this warranty must be obtained contacting Electrolux at the addresses or phone numbers... Obligations for service calls to obtain and keep all costs for consequential or incidental damages such as provided herein. Box 212378 Augusta, GA 30907 40 Canada 1.800.265.8352 Electrolux Canada Corp. 5855 Terry Fox Way Mississauga, Ontario, Canada L5V 3E4 In the USA,...
... add to be readily determined. 2. Damages caused by: services performed by law, but not less than in accordance with the provided instructions. 8. LIMITATION OF REMEDIES Customer's sole and exclusive remedy under this warranty must be obtained contacting Electrolux at the addresses or phone numbers... Obligations for service calls to obtain and keep all costs for consequential or incidental damages such as provided herein. Box 212378 Augusta, GA 30907 40 Canada 1.800.265.8352 Electrolux Canada Corp. 5855 Terry Fox Way Mississauga, Ontario, Canada L5V 3E4 In the USA,...

