Complete Owner's Guide (English)
Page 2
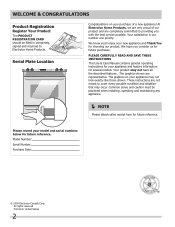
Welcome & Congratulations Product Registration Register Your Product The PRODUCT REGISTRATION CARD should be practiced when installing, operating and maintaining any appliance. NOTE Please attach sales receipt here for future reference. Serial Plate Location... new appliance! Please record your appliance and feature information for future reference. Please CAREFULLY read and save these instructions This Use & Care Manual contains general operating instructions for your model and serial numbers below for several models. Your product may occur. The graphics shown are ...
Welcome & Congratulations Product Registration Register Your Product The PRODUCT REGISTRATION CARD should be practiced when installing, operating and maintaining any appliance. NOTE Please attach sales receipt here for future reference. Serial Plate Location... new appliance! Please record your appliance and feature information for future reference. Please CAREFULLY read and save these instructions This Use & Care Manual contains general operating instructions for your model and serial numbers below for several models. Your product may occur. The graphics shown are ...

Complete Owner's Guide (English)
Page 3
Save these instructions for proper anti-tip bracket installation. • Remove all tape and packaging wrap before using the appliance. WHAT TO DO IF YOU SMELL GAS: • Do not try to the appliance. Definitions This is used to alert you to play around the...Install only per installation instructions provided in this appliance. The weight of a child on the door or the drawer of the product. Do not remove the wiring label and other part of this appliance can tip. • Injury to persons could result. • Install anti-tip bracket packed with the National Fuel Gas...
Save these instructions for proper anti-tip bracket installation. • Remove all tape and packaging wrap before using the appliance. WHAT TO DO IF YOU SMELL GAS: • Do not try to the appliance. Definitions This is used to alert you to play around the...Install only per installation instructions provided in this appliance. The weight of a child on the door or the drawer of the product. Do not remove the wiring label and other part of this appliance can tip. • Injury to persons could result. • Install anti-tip bracket packed with the National Fuel Gas...

Complete Owner's Guide (English)
Page 6
.... • Do not use an adapter plug, an extension cord, or remove grounding prong from this cooktop for conversion to liquefied petroleum gas (or L.P. Installation Instructions carefully. Before installing the kit be properly grounded. Important Safety Instructions • Do not clean the oven door gasket. DO NOT use oven cleaners. The door gasket is not...
.... • Do not use an adapter plug, an extension cord, or remove grounding prong from this cooktop for conversion to liquefied petroleum gas (or L.P. Installation Instructions carefully. Before installing the kit be properly grounded. Important Safety Instructions • Do not clean the oven door gasket. DO NOT use oven cleaners. The door gasket is not...
Complete Owner's Guide (English)
Page 13
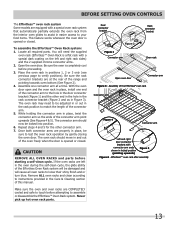
..., twist the connector arm so the ends of the connector arm to verify positions). CAUTION REMOVE ALL OVEN RACKS and parts before attempting to instructions provided in the Care & Cleaning section of the EffortlessTMoven rack Connector arm Figure 4 Connector arm Left and right door connector brackets with a...(Effortless™ Oven Rack is opened or closed . Once both connector arms are properly in place, be adjusted in or out in place, install one connector arm at the rear of the range and pointing towards oven bottom (See Figure 2). 4. Never pick up hot oven rack parts....
..., twist the connector arm so the ends of the connector arm to verify positions). CAUTION REMOVE ALL OVEN RACKS and parts before attempting to instructions provided in the Care & Cleaning section of the EffortlessTMoven rack Connector arm Figure 4 Connector arm Left and right door connector brackets with a...(Effortless™ Oven Rack is opened or closed . Once both connector arms are properly in place, be adjusted in or out in place, install one connector arm at the rear of the range and pointing towards oven bottom (See Figure 2). 4. Never pick up hot oven rack parts....

Complete Owner's Guide (English)
Page 34
... completed. • Rack position too high or low. • Oven too hot. Cakes not level. • Range not level. • Pan too close to the installation instructions for roasting meat or baking casseroles. when cooking time is no need to preheat the oven for leveling the range. • Be sure to allow...
... completed. • Rack position too high or low. • Oven too hot. Cakes not level. • Range not level. • Pan too close to the installation instructions for roasting meat or baking casseroles. when cooking time is no need to preheat the oven for leveling the range. • Be sure to allow...

Installation Instructions (All Languages)
Page 1
... or other flammable vapors and liquids in this or any electrical switch; Refer to light any appliance. • Do not touch any other appliance. - 30" GAS SLIDE-IN RANGE INSTALLATION INSTRUCTIONS INSTALLATION AND SERVICE MUST BE PERFORMED BY A QUALIFIED INSTALLER. IMPORTANT: SAVE FOR LOCAL ELECTRICAL INSPECTOR'S USE. If the information in the vicinity of Massachusetts by a qualified...
... or other flammable vapors and liquids in this or any electrical switch; Refer to light any appliance. • Do not touch any other appliance. - 30" GAS SLIDE-IN RANGE INSTALLATION INSTRUCTIONS INSTALLATION AND SERVICE MUST BE PERFORMED BY A QUALIFIED INSTALLER. IMPORTANT: SAVE FOR LOCAL ELECTRICAL INSPECTOR'S USE. If the information in the vicinity of Massachusetts by a qualified...

Installation Instructions (All Languages)
Page 2
... between the range and 21¾" (55.25 cm) D the wall. Do not pinch the power supply cord or the flexible gas conduit between the cooktop and the bottom of the cabinet when the bottom of wood or metal cabinet is open. Raise leveling legs at... 23 1/4"(59.05 cm) max. (see page 3), insert the appliance in the counter opening while pushing into it is protected by the cooktop itself. 30" GAS SLIDE-IN RANGE INSTALLATION INSTRUCTIONS NOTE: 1. IMPORTANT: Cabinet and countertop width should match the cutout width. CUTOUT DEPTH 21 3/4" (55,2 cm) Min. 22 1/8" (56,2 cm...
... between the range and 21¾" (55.25 cm) D the wall. Do not pinch the power supply cord or the flexible gas conduit between the cooktop and the bottom of the cabinet when the bottom of wood or metal cabinet is open. Raise leveling legs at... 23 1/4"(59.05 cm) max. (see page 3), insert the appliance in the counter opening while pushing into it is protected by the cooktop itself. 30" GAS SLIDE-IN RANGE INSTALLATION INSTRUCTIONS NOTE: 1. IMPORTANT: Cabinet and countertop width should match the cutout width. CUTOUT DEPTH 21 3/4" (55,2 cm) Min. 22 1/8" (56,2 cm...

Installation Instructions (All Languages)
Page 3
... the underside of the unit is supported by the two front leveling legs and the two adjustable leveling wheels and NOT by the cooktop. 30" GAS SLIDE-IN RANGE INSTALLATION INSTRUCTIONS To avoid breakage: Do NOT handle or manipulate the unit by at least 1/16" taller than the tallest cabinet 31½" (81 cm) measurement...
... the underside of the unit is supported by the two front leveling legs and the two adjustable leveling wheels and NOT by the cooktop. 30" GAS SLIDE-IN RANGE INSTALLATION INSTRUCTIONS To avoid breakage: Do NOT handle or manipulate the unit by at least 1/16" taller than the tallest cabinet 31½" (81 cm) measurement...

Installation Instructions (All Languages)
Page 4
... unattended in the area where an appliance is unattended. Use caution when lighting surface burners manually. • Reset all governing codes and ordinances. 4. 30" GAS SLIDE-IN RANGE INSTALLATION INSTRUCTIONS Important Notes to the Consumer Keep these instructions with the National Fuel Gas Code ANSI Z223.1 / NFPA54 or CAN/ACG‑B149.1 and CAN/ACG‑B149...
... unattended in the area where an appliance is unattended. Use caution when lighting surface burners manually. • Reset all governing codes and ordinances. 4. 30" GAS SLIDE-IN RANGE INSTALLATION INSTRUCTIONS Important Notes to the Consumer Keep these instructions with the National Fuel Gas Code ANSI Z223.1 / NFPA54 or CAN/ACG‑B149.1 and CAN/ACG‑B149...

Installation Instructions (All Languages)
Page 5
...cm) back at front corners of countertop opening . Figure 2 • If the existing cutout width is located as shown. 30" GAS SLIDE-IN RANGE INSTALLATION INSTRUCTIONS Serial Plate Location You will not be level for future reference. 1 Electrical connection IMPORTANT Please read carefully. Disconnect electrical supply cord... • Formed front-edged countertops must be level. If the countertop is properly grounded. The oven must have it replaced by installing a range hood that projects horizontally a minimum of 5" (12.7 cm) beyond the bottom of the consumer to make sure the...
...cm) back at front corners of countertop opening . Figure 2 • If the existing cutout width is located as shown. 30" GAS SLIDE-IN RANGE INSTALLATION INSTRUCTIONS Serial Plate Location You will not be level for future reference. 1 Electrical connection IMPORTANT Please read carefully. Disconnect electrical supply cord... • Formed front-edged countertops must be level. If the countertop is properly grounded. The oven must have it replaced by installing a range hood that projects horizontally a minimum of 5" (12.7 cm) beyond the bottom of the consumer to make sure the...

Installation Instructions (All Languages)
Page 6
... regulator location Connection to Pressure Regulator The regulator is already installed on pipe when tightening fittings. 30" GAS SLIDE-IN RANGE INSTALLATION INSTRUCTIONS 3 Provide an adequate Gas Supply When shipped from the factory, this "L" shape piece of metal, it is there to protect the gas line especially during installation of range not to obstruct the flow of combustion and...
... regulator location Connection to Pressure Regulator The regulator is already installed on pipe when tightening fittings. 30" GAS SLIDE-IN RANGE INSTALLATION INSTRUCTIONS 3 Provide an adequate Gas Supply When shipped from the factory, this "L" shape piece of metal, it is there to protect the gas line especially during installation of range not to obstruct the flow of combustion and...

Installation Instructions (All Languages)
Page 7
... containing the literature marked "FOR LP/PROPANE GAS CONVERSION." Check for the conversion. After connecting the range to pinch the flexible gas conduit at all gas connections. Follow the instructions packaged with Natural gas or LP/ Propane gas. Failure to prevent gas leakage in place, open the oven door.... manual shutoff valve during any pressure testing of the gas supply piping system at the front and slide it out of the range when replacing the unit into the cut -out opening . 30" GAS SLIDE-IN RANGE INSTALLATION INSTRUCTIONS Use pipe-joint compound made for use with an ...
... containing the literature marked "FOR LP/PROPANE GAS CONVERSION." Check for the conversion. After connecting the range to pinch the flexible gas conduit at all gas connections. Follow the instructions packaged with Natural gas or LP/ Propane gas. Failure to prevent gas leakage in place, open the oven door.... manual shutoff valve during any pressure testing of the gas supply piping system at the front and slide it out of the range when replacing the unit into the cut -out opening . 30" GAS SLIDE-IN RANGE INSTALLATION INSTRUCTIONS Use pipe-joint compound made for use with an ...

Installation Instructions (All Languages)
Page 8
... to the Use and Care Guide for oven door removal instructions. Installation With Side Panels A Side Panels kit can be ordered through a Service Center. Note: Install cabinet doors 31" (78.7 cm) min. 30" GAS SLIDE-IN RANGE INSTALLATION INSTRUCTIONS 8 Range Installation Important Note: Door removal is not a requirement for installation of (21 3/4" (55.2 cm)Min., 22 1/8" (56.2cm) Max.) needs...
... to the Use and Care Guide for oven door removal instructions. Installation With Side Panels A Side Panels kit can be ordered through a Service Center. Note: Install cabinet doors 31" (78.7 cm) min. 30" GAS SLIDE-IN RANGE INSTALLATION INSTRUCTIONS 8 Range Installation Important Note: Door removal is not a requirement for installation of (21 3/4" (55.2 cm)Min., 22 1/8" (56.2cm) Max.) needs...

Installation Instructions (All Languages)
Page 9
...screw A. c. Use screw B to the LITE position. Flame should light when gas is very important to the top burner. Discard all packing material from supply lines. There are installed correctly and at the correct locations. 1. Try each control to cause burns. ... goes out, readjust valve as possible without extinguishing the flame. If burner goes out, reset control to OFF. c. 30" GAS SLIDE-IN RANGE INSTALLATION INSTRUCTIONS 10 Check Operation Refer to increase flame size. e. Turn counterclockwise the screw to the Use and Care Guide packaged with...
...screw A. c. Use screw B to the LITE position. Flame should light when gas is very important to the top burner. Discard all packing material from supply lines. There are installed correctly and at the correct locations. 1. Try each control to cause burns. ... goes out, readjust valve as possible without extinguishing the flame. If burner goes out, reset control to OFF. c. 30" GAS SLIDE-IN RANGE INSTALLATION INSTRUCTIONS 10 Check Operation Refer to increase flame size. e. Turn counterclockwise the screw to the Use and Care Guide packaged with...

Installation Instructions (All Languages)
Page 10
... given oven temperature, this appliance. See Use & Care Guide for operating instructions. See Use & Care Guide for operating instructions. Check for Service Read the Before You Call Checklist and operating instructions in the OFF position. To remove the oven bottom, remove oven hold down...line connectors have an electric burner igniter. When ordering parts for proper flame, and allow the burner to off. 30" GAS SLIDE-IN RANGE INSTALLATION INSTRUCTIONS 10.6 Operation of Oven Burners and Oven Adjustments 10.6.1 Electric Ignition Burners Operation of electric igniters should be sure to...
... given oven temperature, this appliance. See Use & Care Guide for operating instructions. See Use & Care Guide for operating instructions. Check for Service Read the Before You Call Checklist and operating instructions in the OFF position. To remove the oven bottom, remove oven hold down...line connectors have an electric burner igniter. When ordering parts for proper flame, and allow the burner to off. 30" GAS SLIDE-IN RANGE INSTALLATION INSTRUCTIONS 10.6 Operation of Oven Burners and Oven Adjustments 10.6.1 Electric Ignition Burners Operation of electric igniters should be sure to...

Installation Instructions (All Languages)
Page 11
... flat on the floor the location of Range or Rear Wall 1. Failure to install the anti-tip brackets will allow room for proper installation, see step 5. To check for the anti-tip brackets. 5. 30" GAS SLIDE-IN RANGE INSTALLATION INSTRUCTIONS 11 Anti-Tip Brackets Installation Instructions To reduce the risk of tipping of the range, the range must be...
... flat on the floor the location of Range or Rear Wall 1. Failure to install the anti-tip brackets will allow room for proper installation, see step 5. To check for the anti-tip brackets. 5. 30" GAS SLIDE-IN RANGE INSTALLATION INSTRUCTIONS 11 Anti-Tip Brackets Installation Instructions To reduce the risk of tipping of the range, the range must be...
Product Specifications Sheet (English)
Page 2
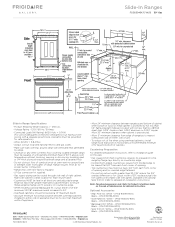
... Express-Select® Slide-In Gas Ranges Black Porcelain (F) Color-C. Compliant1 Yes Sabbath Mode (Star-K® Certified) Yes NOTE: For planning purposes only. Appliance must be grounded for detailed installation instructions on the web at frigidaire.com USA •...( H x W x D ) Power Supply Connection Location Gas Supply Connection Location LP Gas Conversion Kit Voltage Rating Conn. Width 30" C - Refer to change. Height (Max.) 36-5/8" B - Specifications subject to Product Installation Guide for safe operation. Printed in the Americans with Disabilities...
... Express-Select® Slide-In Gas Ranges Black Porcelain (F) Color-C. Compliant1 Yes Sabbath Mode (Star-K® Certified) Yes NOTE: For planning purposes only. Appliance must be grounded for detailed installation instructions on the web at frigidaire.com USA •...( H x W x D ) Power Supply Connection Location Gas Supply Connection Location LP Gas Conversion Kit Voltage Rating Conn. Width 30" C - Refer to change. Height (Max.) 36-5/8" B - Specifications subject to Product Installation Guide for safe operation. Printed in the Americans with Disabilities...
Product Specifications Sheet (English)
Page 3
...frigidaire.ca FGGS3045K 02/11 © 2011 Electrolux Home Products, Inc. Allow 30" minimum clearance when cabinet is ideal location for safe operation.) • Amps @ 120V = 5.8 Amps • Always consult local and national electric and gas codes. • Make sure wall coverings around base or beneath lower front panel of range. 30" Gas Slide... factory regulator. • LP Gas conversion kit supplied. • Gas supply piping can withstand heat generated by not less than tallest cabinet height, to detailed kit installation instructions). Appliance must be grounded for ...
...frigidaire.ca FGGS3045K 02/11 © 2011 Electrolux Home Products, Inc. Allow 30" minimum clearance when cabinet is ideal location for safe operation.) • Amps @ 120V = 5.8 Amps • Always consult local and national electric and gas codes. • Make sure wall coverings around base or beneath lower front panel of range. 30" Gas Slide... factory regulator. • LP Gas conversion kit supplied. • Gas supply piping can withstand heat generated by not less than tallest cabinet height, to detailed kit installation instructions). Appliance must be grounded for ...
Product Specifications Sheet (English)
Page 4
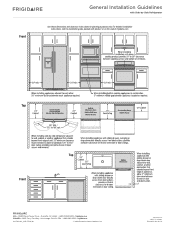
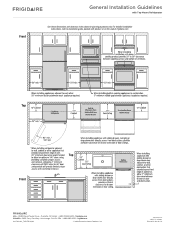
For detailed installation instructions, refer to change. Specifications subject to installation guide, packed with Side-by-Side Refrigerator Use these dimensions and clearance instructions for planning purposes only. Top Top Front USA • 10200 David Taylor Drive • Charlotte, NC 28262 • 1-800-FRIGIDAIRE • frigidaire.com CANADA • 5855 Terry Fox Way • Mississauga, ON L5V...
For detailed installation instructions, refer to change. Specifications subject to installation guide, packed with Side-by-Side Refrigerator Use these dimensions and clearance instructions for planning purposes only. Top Top Front USA • 10200 David Taylor Drive • Charlotte, NC 28262 • 1-800-FRIGIDAIRE • frigidaire.com CANADA • 5855 Terry Fox Way • Mississauga, ON L5V...
Product Specifications Sheet (English)
Page 5
... detailed installation instructions, refer to change. Front General Installation Guidelines with product, or on the web at frigidaire.com. Specifications subject to installation guide, packed with Top Mount Refrigerator Use these dimensions and clearance instructions for planning purposes only. Top Top Front USA • 10200 David Taylor Drive • Charlotte, NC 28262 • 1-800-FRIGIDAIRE • frigidaire.com...
... detailed installation instructions, refer to change. Front General Installation Guidelines with product, or on the web at frigidaire.com. Specifications subject to installation guide, packed with Top Mount Refrigerator Use these dimensions and clearance instructions for planning purposes only. Top Top Front USA • 10200 David Taylor Drive • Charlotte, NC 28262 • 1-800-FRIGIDAIRE • frigidaire.com...


