

Complete Owner s Guide
Page 1
All about the Use & Care of your Gas Range 808576501 Rev A March (2017) TABLE OF CONTENTS Product Record and Registration 2 Important Safety Instructions 3 Before Setting Surface Controls 10 Setting Surface Burners 13 Before Setting Oven Controls 15 Oven Controls 16 Care and Cleaning 36 Before You Call 40 Warranty 43 www.frigidaire.com USA 1-800-944-9044 www.frigidaire.ca Canada 1-800-265-8352
All about the Use & Care of your Gas Range 808576501 Rev A March (2017) TABLE OF CONTENTS Product Record and Registration 2 Important Safety Instructions 3 Before Setting Surface Controls 10 Setting Surface Burners 13 Before Setting Oven Controls 15 Oven Controls 16 Care and Cleaning 36 Before You Call 40 Warranty 43 www.frigidaire.com USA 1-800-944-9044 www.frigidaire.ca Canada 1-800-265-8352

Complete Owner s Guide
Page 2
... This manual contains instructions to help is only a phone call away. Call Frigidaire Customer Services at www.frigidaire.com or by dropping your purchase as the beginning of your range properly. Record ...Frigidaire serial number 2 2015 Electrolux Home Products, Inc. All rights reserved. Read this page to record important product information. PRODUCT RECORD AND REGISTRATION Product Record and Registration 2 Important Safety Instructions 3 Before Setting Surface Controls 10 Setting Surface Burners 13 Before Setting Oven Controls 15 Oven Controls 16 Care and Cleaning 36...
... This manual contains instructions to help is only a phone call away. Call Frigidaire Customer Services at www.frigidaire.com or by dropping your purchase as the beginning of your range properly. Record ...Frigidaire serial number 2 2015 Electrolux Home Products, Inc. All rights reserved. Read this page to record important product information. PRODUCT RECORD AND REGISTRATION Product Record and Registration 2 Important Safety Instructions 3 Before Setting Surface Controls 10 Setting Surface Burners 13 Before Setting Oven Controls 15 Oven Controls 16 Care and Cleaning 36...
Complete Owner s Guide
Page 36
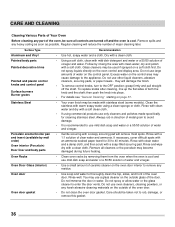
.... Remove all controls are turned off the shaft. Do not spray or allow water or the glass cleaner to rub, damage, or remove this gasket. 36 Care should be used if sprayed on a soft cloth first. CARE AND CLEANING Cleaning Various Parts of Your Oven Before cleaning any part of the...
.... Remove all controls are turned off the shaft. Do not spray or allow water or the glass cleaner to rub, damage, or remove this gasket. 36 Care should be used if sprayed on a soft cloth first. CARE AND CLEANING Cleaning Various Parts of Your Oven Before cleaning any part of the...

Complete Owner s Guide
Page 39
... oven door completely, horizontal with floor. 2. Pull the bottom of the oven until the door frame makes contact with floor (Figure 36). 4. The door is heavy. Oven door hinge locations Figure 36: Door hinge location To remove the oven door: 1. To Replace Oven Door: 1. Carefully insert the hinge levers into the oven...
... oven door completely, horizontal with floor. 2. Pull the bottom of the oven until the door frame makes contact with floor (Figure 36). 4. The door is heavy. Oven door hinge locations Figure 36: Door hinge location To remove the oven door: 1. To Replace Oven Door: 1. Carefully insert the hinge levers into the oven...

Installation Instructions
Page 1
... with the appliance must follow. Be sure to the Installer 1. Be sure your owner's guide for future reference. 2. Printed in your manual carefully. 3. 3I6N" GSATSARLALNGAETINIOSTNALILNASTIOTNRIUNSCTRTUIOCTNIOSNS 36" GAS RANGE INSTALLATION AND SERVICE MUST BE PERFORMED BY A QUALIFIED INSTALLER. These precautions are safety precautions you must be installed. 4. pages 33-48 1 Read all...
... with the appliance must follow. Be sure to the Installer 1. Be sure your owner's guide for future reference. 2. Printed in your manual carefully. 3. 3I6N" GSATSARLALNGAETINIOSTNALILNASTIOTNRIUNSCTRTUIOCTNIOSNS 36" GAS RANGE INSTALLATION AND SERVICE MUST BE PERFORMED BY A QUALIFIED INSTALLER. These precautions are safety precautions you must be installed. 4. pages 33-48 1 Read all...
Installation Instructions
Page 2
... re-engaged to children and adults. Do not attempt to tilt range forward. Obey all instructions given. This manual contains important safety symbols and instructions. 36" GAS RANGE INSTALLATION INSTRUCTIONS IMPORTANT SAFETY INSTRUCTIONS This appliance must be installed, grounded, and serviced by a qualified installer, servicer or the gas supplier. 2
... re-engaged to children and adults. Do not attempt to tilt range forward. Obey all instructions given. This manual contains important safety symbols and instructions. 36" GAS RANGE INSTALLATION INSTRUCTIONS IMPORTANT SAFETY INSTRUCTIONS This appliance must be installed, grounded, and serviced by a qualified installer, servicer or the gas supplier. 2
Installation Instructions
Page 3
... must conform with each other liners may result in carbon monoxide poisoning and overheating of the appliance. • Do not store or use in Canada. 36" GAS RANGE INSTALLATION INSTRUCTIONS • • Excessive Weight Hazard--Use two or more people to reach items could be seriously injured. • Stepping, leaning, or...
... must conform with each other liners may result in carbon monoxide poisoning and overheating of the appliance. • Do not store or use in Canada. 36" GAS RANGE INSTALLATION INSTRUCTIONS • • Excessive Weight Hazard--Use two or more people to reach items could be seriously injured. • Stepping, leaning, or...

Installation Instructions
Page 4
...made by a qualified technician. Know how to disconnect the power to the appliance at the circuit breaker or fuse box in case of the range. 36" GAS RANGE INSTALLATION INSTRUCTIONS SPECIAL INSTRUCTIONS FOR APPLIANCES INSTALLED IN THE STATE OF MASSACHUSETTS IMPORTANT INSTRUCTIONS FOR SERVICE AND MAINTENANCE This appliance can only be...an emergency. • Remove the oven door from electrical shock may occur if the conversion to satisfactorily meet the application needs must not exceed 3 feet (36 inches) in length. The L.P. Handle halogen lights (if equipped) with a damp cloth.
...made by a qualified technician. Know how to disconnect the power to the appliance at the circuit breaker or fuse box in case of the range. 36" GAS RANGE INSTALLATION INSTRUCTIONS SPECIAL INSTRUCTIONS FOR APPLIANCES INSTALLED IN THE STATE OF MASSACHUSETTS IMPORTANT INSTRUCTIONS FOR SERVICE AND MAINTENANCE This appliance can only be...an emergency. • Remove the oven door from electrical shock may occur if the conversion to satisfactorily meet the application needs must not exceed 3 feet (36 inches) in length. The L.P. Handle halogen lights (if equipped) with a damp cloth.

Installation Instructions
Page 5
C B A D E MODEL A. DEPTH TO FRONT OF RANGE 28 1/2" (72.4cm) Max. WIDTH 36" (91.4cm) C. Figure 1: Product Dimensions B. D. DEPTH WITH DOOR OPEN 47 3/4" (121.3 cm) 5 36" GAS RANGE INSTALLATION INSTRUCTIONS Product Dimensions Do not install the unit in the cabinet before reading next two pages. HEIGHT 36" 49" (124.5cm) Max. HEIGHT OF COOKTOP 36" (91.4cm) Max. E.
C B A D E MODEL A. DEPTH TO FRONT OF RANGE 28 1/2" (72.4cm) Max. WIDTH 36" (91.4cm) C. Figure 1: Product Dimensions B. D. DEPTH WITH DOOR OPEN 47 3/4" (121.3 cm) 5 36" GAS RANGE INSTALLATION INSTRUCTIONS Product Dimensions Do not install the unit in the cabinet before reading next two pages. HEIGHT 36" 49" (124.5cm) Max. HEIGHT OF COOKTOP 36" (91.4cm) Max. E.

Installation Instructions
Page 6
...adjacent walls or other vertical surfaces or structures such as cabinets. 3. MINIMUM CUTOUT WIDTH G. CLEARANCE WIDTH OF OVERHEAD CABINETS 36" (91.4cm) Min. Check for proper electrical supply and floor stability. • Dimensions shown must be used. J I . Given ...dimensions provide minimum clearance. 36" GAS RANGE INSTALLATION INSTRUCTIONS Cabinet Dimensions Clearances and Dimensions • Provide adequate clearances between range back and rear wall or ...
...adjacent walls or other vertical surfaces or structures such as cabinets. 3. MINIMUM CUTOUT WIDTH G. CLEARANCE WIDTH OF OVERHEAD CABINETS 36" (91.4cm) Min. Check for proper electrical supply and floor stability. • Dimensions shown must be used. J I . Given ...dimensions provide minimum clearance. 36" GAS RANGE INSTALLATION INSTRUCTIONS Cabinet Dimensions Clearances and Dimensions • Provide adequate clearances between range back and rear wall or ...

Installation Instructions
Page 7
... 4: 3-Prong Gounded Electrical Outlet not be . See serial plate for the type of installation you have Figure 3: Cabinet construction 1.1 Installation: Cabinet on One Side Only 1. 36" GAS RANGE INSTALLATION INSTRUCTIONS 1 Cabinet Construction 2 Electrical Requirements To eliminate the risk of burns or fire by reaching over heated surface units, do not have...
... 4: 3-Prong Gounded Electrical Outlet not be . See serial plate for the type of installation you have Figure 3: Cabinet construction 1.1 Installation: Cabinet on One Side Only 1. 36" GAS RANGE INSTALLATION INSTRUCTIONS 1 Cabinet Construction 2 Electrical Requirements To eliminate the risk of burns or fire by reaching over heated surface units, do not have...

Installation Instructions
Page 8
... WALL FLOOR Figure 5: Outlet location behind range This appliance is correctly polarized and properly grounded. For maximum safety, the power cord must be properly grounded. 36" GAS RANGE INSTALLATION INSTRUCTIONS Recommended Wall Outlet Installation Locations Suggested location of the wall outlet is the responsibility of the consumer to have it is...
... WALL FLOOR Figure 5: Outlet location behind range This appliance is correctly polarized and properly grounded. For maximum safety, the power cord must be properly grounded. 36" GAS RANGE INSTALLATION INSTRUCTIONS Recommended Wall Outlet Installation Locations Suggested location of the wall outlet is the responsibility of the consumer to have it is...

Installation Instructions
Page 9
... piping where local codes permit use. Personal injury or death from electrical shock may be set for 10"(25.4 cm) water column (2.5 kPa) manifold pressure; 36" GAS RANGE INSTALLATION INSTRUCTIONS 4 Fuel Supply Requirements This unit is designed to operate on or shutting off gas to the appliance.
... piping where local codes permit use. Personal injury or death from electrical shock may be set for 10"(25.4 cm) water column (2.5 kPa) manifold pressure; 36" GAS RANGE INSTALLATION INSTRUCTIONS 4 Fuel Supply Requirements This unit is designed to operate on or shutting off gas to the appliance.

Installation Instructions
Page 10
... system during any pressure testing of the gas supply piping system at test pressures greater than 1/2 psig (3.5 kPa or 14"(35.56 cm) water column). 36" GAS RANGE INSTALLATION INSTRUCTIONS 5 Connect Fuel Supply 5.1 Fuel Supply Connection This appliance must be installed, grounded, and serviced by a qualified installer or service technician. Install...
... system during any pressure testing of the gas supply piping system at test pressures greater than 1/2 psig (3.5 kPa or 14"(35.56 cm) water column). 36" GAS RANGE INSTALLATION INSTRUCTIONS 5 Connect Fuel Supply 5.1 Fuel Supply Connection This appliance must be installed, grounded, and serviced by a qualified installer or service technician. Install...

Installation Instructions
Page 11
... and double check for levelness. Slide range into the desired positions. To aid installation and movement of oven racks, apply a thin layer of the oven. 2. 36" GAS RANGE INSTALLATION INSTRUCTIONS 6 Install the Oven Racks The oven racks are supported inside the oven cavity by adjusting the four leg levelers with the...
... and double check for levelness. Slide range into the desired positions. To aid installation and movement of oven racks, apply a thin layer of the oven. 2. 36" GAS RANGE INSTALLATION INSTRUCTIONS 6 Install the Oven Racks The oven racks are supported inside the oven cavity by adjusting the four leg levelers with the...

Installation Instructions
Page 12
... itself. Refer to children and adults. For wall mount, locate the bracket by the properly installed anti-tip bracket and screws packed with the range. 36" GAS RANGE INSTALLATION INSTRUCTIONS 8 Install Anti-Tip Bracket To reduce the risk of tipping the appliance, the appliance must also be moved and installed with...
... itself. Refer to children and adults. For wall mount, locate the bracket by the properly installed anti-tip bracket and screws packed with the range. 36" GAS RANGE INSTALLATION INSTRUCTIONS 8 Install Anti-Tip Bracket To reduce the risk of tipping the appliance, the appliance must also be moved and installed with...

Installation Instructions
Page 13
36" GAS RANGE INSTALLATION INSTRUCTIONS 8.2 Drill Pilot Holes and Fasten Bracket Drill a 1/8" pilot hole where screws are to be used in place. Leveling Leg Anti-Tip ...
36" GAS RANGE INSTALLATION INSTRUCTIONS 8.2 Drill Pilot Holes and Fasten Bracket Drill a 1/8" pilot hole where screws are to be used in place. Leveling Leg Anti-Tip ...
Installation Instructions
Page 14
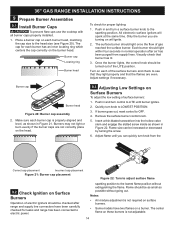
... going out. sparking position to LITE until you are not correctly place on the head. 9.3 Adjusting Low Settings on will spark at the same time. 36" GAS RANGE INSTALLATION INSTRUCTIONS 9 Prepare Burner Assemblies 9.1 Install Burner Caps To prevent flare-ups use the cooktop with all burner caps properly installed. 1. Insert a thin...
... going out. sparking position to LITE until you are not correctly place on the head. 9.3 Adjusting Low Settings on will spark at the same time. 36" GAS RANGE INSTALLATION INSTRUCTIONS 9 Prepare Burner Assemblies 9.1 Install Burner Caps To prevent flare-ups use the cooktop with all burner caps properly installed. 1. Insert a thin...
Installation Instructions
Page 15
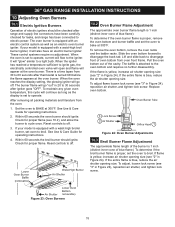
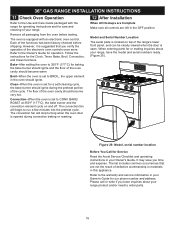
... 10.3 Broil Burner Flame Adjustment The approximate flame length of the burner is equipped with a waist-high broiler burner, set the oven to cycle once. 36" GAS RANGE INSTALLATION INSTRUCTIONS 10 Adjusting Oven Burners 10.1 Electric Ignition Burners Operation of electric igniters should be checked after range and supply line connectors...
... 10.3 Broil Burner Flame Adjustment The approximate flame length of the burner is equipped with a waist-high broiler burner, set the oven to cycle once. 36" GAS RANGE INSTALLATION INSTRUCTIONS 10 Adjusting Oven Burners 10.1 Electric Ignition Burners Operation of electric igniters should be checked after range and supply line connectors...
Installation Instructions
Page 16
... convection fan will begin to run a few minutes into the preheat cycle. Refer to CONV. The list includes common occurrences that you time and expense. 36" GAS RANGE INSTALLATION INSTRUCTIONS 11 Check Oven Operation Refer to the Use and Care Guide packaged with an electronic oven control. BAKE/ ROAST at 350...
... convection fan will begin to run a few minutes into the preheat cycle. Refer to CONV. The list includes common occurrences that you time and expense. 36" GAS RANGE INSTALLATION INSTRUCTIONS 11 Check Oven Operation Refer to the Use and Care Guide packaged with an electronic oven control. BAKE/ ROAST at 350...