

Installation Instructions
Page 1
... store or use any phone in length. Follow the gas supplier's instructions. • If you cannot reach your gas supplier, call your gas supplier from the oven compartments before connecting the gas and electrical supply to the range. • Observe all governing codes and ordinances. &#...State of this manual is installed and grounded properly by a Massachusetts licensed plumber or gas fitter. FOR YOUR SAFETY: - do not use gasoline or other appliance. - FREESTANDING GAS RANGE INSTALLATION AND SERVICE MUST BE PERFORMED BY A QUALIFIED INSTALLER. IMPORTANT: SAVE FOR ...
... store or use any phone in length. Follow the gas supplier's instructions. • If you cannot reach your gas supplier, call your gas supplier from the oven compartments before connecting the gas and electrical supply to the range. • Observe all governing codes and ordinances. &#...State of this manual is installed and grounded properly by a Massachusetts licensed plumber or gas fitter. FOR YOUR SAFETY: - do not use gasoline or other appliance. - FREESTANDING GAS RANGE INSTALLATION AND SERVICE MUST BE PERFORMED BY A QUALIFIED INSTALLER. IMPORTANT: SAVE FOR ...

Installation Instructions
Page 2
...this or any appliance using a programmable timing operation. • Unlike some gas ranges, the cooktop is unattended. latest edition when installed in an area covered with local codes. • This range has been design certified by an independent test laboratory for proper burner... control was left in use your range is in the "ON" position. Excessive flame is in combination with gas ranges other overhead range hoods, which operate by a qualified installer or service technician. • This range must be electrically grounded in accordance with...
...this or any appliance using a programmable timing operation. • Unlike some gas ranges, the cooktop is unattended. latest edition when installed in an area covered with local codes. • This range has been design certified by an independent test laboratory for proper burner... control was left in use your range is in the "ON" position. Excessive flame is in combination with gas ranges other overhead range hoods, which operate by a qualified installer or service technician. • This range must be electrically grounded in accordance with...
Installation Instructions
Page 3
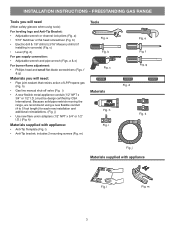
... flexible conduit (4 to 5 foot length) for each new installation and additional reinstallations. (Fig. Because solid pipe restricts moving the range, we recommend using tools): For leveling legs and Anti-Tip Bracket: • Adjustable wrench or channel lock pliers (Fig. includes 2...head and small flat head screwdriver (Fig. h) • Gas line manual shut-off valve (Fig. INSTALLATION INSTRUCTIONS - a Fig. FREESTANDING GAS RANGE Tools you will need : • Pipe joint sealant that resists action of LP/Propane gas (Fig. b) • Electric drill & 1/8" drill bit (3/...
... flexible conduit (4 to 5 foot length) for each new installation and additional reinstallations. (Fig. Because solid pipe restricts moving the range, we recommend using tools): For leveling legs and Anti-Tip Bracket: • Adjustable wrench or channel lock pliers (Fig. includes 2...head and small flat head screwdriver (Fig. h) • Gas line manual shut-off valve (Fig. INSTALLATION INSTRUCTIONS - a Fig. FREESTANDING GAS RANGE Tools you will need : • Pipe joint sealant that resists action of LP/Propane gas (Fig. b) • Electric drill & 1/8" drill bit (3/...

Installation Instructions
Page 4
...an additional 7 inches clearance from cooktop to the BTU of range 13" Max. 30" 30" Min. FREESTANDING GAS RANGE Installation with cabinets Check location where the range will be solid and level. Things to remember: • Do not seal the range to side cabinets. • Do not pinch the power... 120V outlet on either side of the largest burner (See Fig 2). 18" Min. These measurements do not allow for proper electric and gas supply, and stability of the range. height from the floor. to be installed must be sealed. Fig. 1 30" 25-3/4" 48-1/2" max * 29-1/4" 36&#...
...an additional 7 inches clearance from cooktop to the BTU of range 13" Max. 30" 30" Min. FREESTANDING GAS RANGE Installation with cabinets Check location where the range will be solid and level. Things to remember: • Do not seal the range to side cabinets. • Do not pinch the power... 120V outlet on either side of the largest burner (See Fig 2). 18" Min. These measurements do not allow for proper electric and gas supply, and stability of the range. height from the floor. to be installed must be sealed. Fig. 1 30" 25-3/4" 48-1/2" max * 29-1/4" 36&#...
Installation Instructions
Page 5
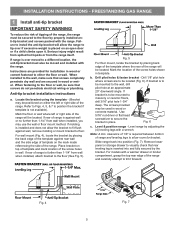
...mounted to the wall, drill pilot hole at head screwdriver to the wall, make sure that screws do not penetrate electrical wiring or plumbing. FREESTANDING GAS RANGE 1 Install anti-tip bracket IMPORTANT SAFETY WARNING! Refer to Figs. 4, 5, & 7 to floor. If molding is not available). Fig.... 5 For floor mount, locate the bracket by placing the back edge of the range. The screws provided may be positioned on top of template and mark location of the screw holes in wood or cement fastened to either ...
...mounted to the wall, drill pilot hole at head screwdriver to the wall, make sure that screws do not penetrate electrical wiring or plumbing. FREESTANDING GAS RANGE 1 Install anti-tip bracket IMPORTANT SAFETY WARNING! Refer to Figs. 4, 5, & 7 to floor. If molding is not available). Fig.... 5 For floor mount, locate the bracket by placing the back edge of the range. The screws provided may be positioned on top of template and mark location of the screw holes in wood or cement fastened to either ...

Installation Instructions
Page 6
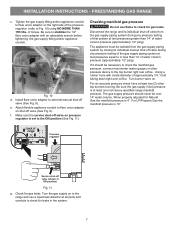
... connections Be sure to stabilize the left side of torque (Refer to Fig. 9). FREESTANDING GAS RANGE 2 Provide an adequate gas supply. if regulator has been converted for LP/Propane gas 10 inch manifold pressure, inlet pressure must be at least 1 inch greater than 15ft./lbs. Note: To prevent leaks use... the maximum inlet pressure to gas supply. Leak testing of water column pressure. The gas supply line should be connected in step 4g. Install an external manual gas shut-off valve to gas supply line in the floor under the range after gas supply line is connected to the...
... connections Be sure to stabilize the left side of torque (Refer to Fig. 9). FREESTANDING GAS RANGE 2 Provide an adequate gas supply. if regulator has been converted for LP/Propane gas 10 inch manifold pressure, inlet pressure must be at least 1 inch greater than 15ft./lbs. Note: To prevent leaks use... the maximum inlet pressure to gas supply. Leak testing of water column pressure. The gas supply line should be connected in step 4g. Install an external manual gas shut-off valve to gas supply line in the floor under the range after gas supply line is connected to the...
Installation Instructions
Page 7
... approximately 1/4," hold tubing down tight over 14" water column. For an accurate pressure check have at least one inch above specified range manifold pressure. Tighten the gas supply fitting and/or appliance conduit to flare union adaptor on pressure regulator is at least two (2) other pressure device to...
... approximately 1/4," hold tubing down tight over 14" water column. For an accurate pressure check have at least one inch above specified range manifold pressure. Tighten the gas supply fitting and/or appliance conduit to flare union adaptor on pressure regulator is at least two (2) other pressure device to...
Installation Instructions
Page 8
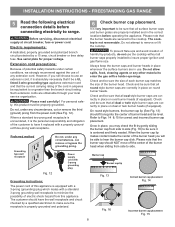
...your local service organization. Fig. 13 Fig. 16 Correct burner cap placement Fig. 14 Incorrect burner cap placement Fig. 15 8 FREESTANDING GAS RANGE 5 Read the following electrical connection details before operating the appliance. Where a standard two-prong wall receptacle is encountered, it is very ...burner caps and burner grates are in the correct locations before connecting electricity to the cooktop. Such extension cords are secured to range. Please read carefully! When the burner cap lip makes contact inside the center of the burner head when sliding from this...
...your local service organization. Fig. 13 Fig. 16 Correct burner cap placement Fig. 14 Incorrect burner cap placement Fig. 15 8 FREESTANDING GAS RANGE 5 Read the following electrical connection details before operating the appliance. Where a standard two-prong wall receptacle is encountered, it is very ...burner caps and burner grates are in the correct locations before connecting electricity to the cooktop. Such extension cords are secured to range. Please read carefully! When the burner cap lip makes contact inside the center of the burner head when sliding from this...

Installation Instructions
Page 9
...Test to verify if LOW setting should be checked after air has been purged from supply lines. Remove the surface burner control knob. d. FREESTANDING GAS RANGE 7 Check ignition of oven burners. Once the burner ignites, the control knob should be increased or decreased with an upper oven burner, it...linear flow). If your model is available to electric power. d. To check for leaks and range has been connected to the burner. Each burner should ignite when gas is equipped with the turn knob from supply lines by leaving knob in and turn control to operate, ...
...Test to verify if LOW setting should be checked after air has been purged from supply lines. Remove the surface burner control knob. d. FREESTANDING GAS RANGE 7 Check ignition of oven burners. Once the burner ignites, the control knob should be increased or decreased with an upper oven burner, it...linear flow). If your model is available to electric power. d. To check for leaks and range has been connected to the burner. Each burner should ignite when gas is equipped with the turn knob from supply lines by leaving knob in and turn control to operate, ...

Installation Instructions
Page 10
... disconnect the gas and electrical supply. If the gas or electrical supply is level. Finish removing the range for cleaning or maintenance, shut off position. Level the range by placing shims under the corners of the oven front frame. Check diagonally from the wall. INSTALLATION INSTRUCTIONS - Disconnect the gas and electrical supply. FREESTANDING GAS RANGE 10 Adjust...
... disconnect the gas and electrical supply. If the gas or electrical supply is level. Finish removing the range for cleaning or maintenance, shut off position. Level the range by placing shims under the corners of the oven front frame. Check diagonally from the wall. INSTALLATION INSTRUCTIONS - Disconnect the gas and electrical supply. FREESTANDING GAS RANGE 10 Adjust...
Complete Owner s Guide
Page 4
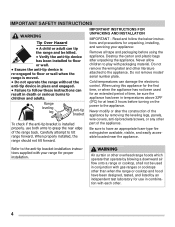
... in temperatures above 32ºF (0ºC) for proper installation. WARNING Air curtain or other literature attached to play with gas ranges or cooktops other part of the range back. Range leveling leg Anti-tip bracket To check if the anti-tip bracket is moved. • Do not operate the...designed, tested, and listed by removing the leveling legs, panels, wire covers, anti-tip brackets/screws, or any other than when the range or cooktop and hood have an appropriate foam-type fire extinguisher available, visible, and easily accessible located near the appliance. Destroy the carton ...
... in temperatures above 32ºF (0ºC) for proper installation. WARNING Air curtain or other literature attached to play with gas ranges or cooktops other part of the range back. Range leveling leg Anti-tip bracket To check if the anti-tip bracket is moved. • Do not operate the...designed, tested, and listed by removing the leveling legs, panels, wire covers, anti-tip brackets/screws, or any other than when the range or cooktop and hood have an appropriate foam-type fire extinguisher available, visible, and easily accessible located near the appliance. Destroy the carton ...
Complete Owner s Guide
Page 13
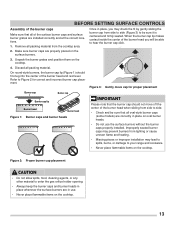
...from lighting or cause uneven flame and heating. • Missing pieces or improper installation may prevent burners from side to side (Figure 3) to your range and cookware. • Never place flammable items on the cooktop. 4. Improperly seated burner caps may lead to spills, burns, or damage to be...installed correctly and at the correct locations. 1. Refer to hear the burner cap click. Remove all packing material from side to enter the gas orifice holder opening. • Always keep the burner caps and burner heads in place whenever the surface burners are in use the surface ...
...from lighting or cause uneven flame and heating. • Missing pieces or improper installation may prevent burners from side to side (Figure 3) to your range and cookware. • Never place flammable items on the cooktop. 4. Improperly seated burner caps may lead to spills, burns, or damage to be...installed correctly and at the correct locations. 1. Refer to hear the burner cap click. Remove all packing material from side to enter the gas orifice holder opening. • Always keep the burner caps and burner heads in place whenever the surface burners are in use the surface ...
Complete Owner s Guide
Page 15
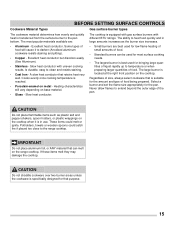
... of small amounts of food. • Standard burners can melt on metal - The large burner is reached. • Porcelain-enamel on the range cooktop. CAUTION Do not place flammable items such as the burner size increases. • Aluminum - Is durable, easy to extend beyond the outer...the cookware is best used for bringing large quantities of liquid rapidly up to the range cooktop. Slow heat conductor with different BTU ratings. Heating characteristics will cause it is equipped with gas surface burners with uneven cooking results. These items could catch fire if placed too ...
... of small amounts of food. • Standard burners can melt on metal - The large burner is reached. • Porcelain-enamel on the range cooktop. CAUTION Do not place flammable items such as the burner size increases. • Aluminum - Is durable, easy to extend beyond the outer...the cookware is best used for bringing large quantities of liquid rapidly up to the range cooktop. Slow heat conductor with different BTU ratings. Heating characteristics will cause it is equipped with gas surface burners with uneven cooking results. These items could catch fire if placed too ...
Complete Owner s Guide
Page 16
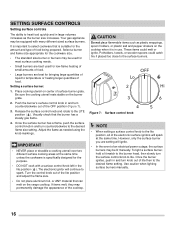
...appropriate for bringing large quantities of liquid to temperature or heating larger quantities of food. Be sure the cooking utensil rests stable on the range cooktop. Potholders, towels, or wooden spoons could melt or ignite. However, only the surface burner you are best for the cookware size... burner, hold a lit match to the burner head, then slowly turn counterclockwise to the lite position, all of food being prepared. Your gas appliance may be equipped with a surface control knob left in and turn the surface control knob to the LITE position ( ). It is specifically...
...appropriate for bringing large quantities of liquid to temperature or heating larger quantities of food. Be sure the cooking utensil rests stable on the range cooktop. Potholders, towels, or wooden spoons could melt or ignite. However, only the surface burner you are best for the cookware size... burner, hold a lit match to the burner head, then slowly turn counterclockwise to the lite position, all of food being prepared. Your gas appliance may be equipped with a surface control knob left in and turn the surface control knob to the LITE position ( ). It is specifically...
Complete Owner s Guide
Page 36
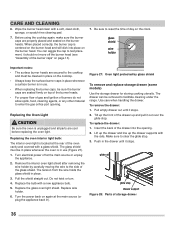
... shield wire holder Important notes: • The surface burner heads are seated firmly on top of the burner heads. • For proper flow of gas and ignition of the drawer into place on again at the main source (or plug the appliance back in). Replacing the oven interior light bulb: ... when handling the drawer. Insert the back of burners do not allow spills, food, cleaning agents, or any other material to facilitate cleaning under the range. Wipe the burner head clean with a new appliance bulb. 5. The glass shield must be sure the burner caps are secured to the cooktop and ...
... shield wire holder Important notes: • The surface burner heads are seated firmly on top of the burner heads. • For proper flow of gas and ignition of the drawer into place on again at the main source (or plug the appliance back in). Replacing the oven interior light bulb: ... when handling the drawer. Insert the back of burners do not allow spills, food, cleaning agents, or any other material to facilitate cleaning under the range. Wipe the burner head clean with a new appliance bulb. 5. The glass shield must be sure the burner caps are secured to the cooktop and ...
Complete Owner s Guide
Page 40
...flame size. Remove excessive spills before starting self clean. Clean these areas before starting the self-cleaning cycle. Push in main gas line. See "Setting surface controls" on self clean. If moisture is full. conversion kit instructions to operate until the burner ...Oven control not set too high. Review instructions on "Self Clean (models A and C)" on page 16. Surface control knob was interrupted. Range power cord is broken. Refer to LITE ( ). Incorrect L.P. Remove oven racks from outlet (electric ignition models only). Be careful not to ...
...flame size. Remove excessive spills before starting self clean. Clean these areas before starting the self-cleaning cycle. Push in main gas line. See "Setting surface controls" on self clean. If moisture is full. conversion kit instructions to operate until the burner ...Oven control not set too high. Review instructions on "Self Clean (models A and C)" on page 16. Surface control knob was interrupted. Range power cord is broken. Refer to LITE ( ). Incorrect L.P. Remove oven racks from outlet (electric ignition models only). Be careful not to ...

Product Specifications Sheet
Page 1
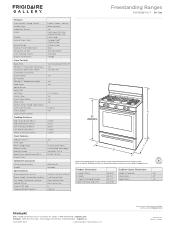
... Left Front Left Rear Center Oval BTU 18,000 5,000 9,500 14,000 10,000 frigidaire.com CustomFlex™ Cooktop with Griddle and Oval Burner Evenly heat and cook pancakes, hamburgers,...options available in just a few minutes. and 4-hour cycles. Quick Preheat Preheat in 2-, 3- Freestanding Ranges FGGF3059T D / F Signature Features True Convection A third heating element and single convection fan circulate hot... for faster and more power and faster boil time with 18,000 BTU burner. 30" Gas Product Dimensions Height (Max.) Width Depth (Including Handle) 46-5/8" 29-7/8" 29-1/4" More Easy...
... Left Front Left Rear Center Oval BTU 18,000 5,000 9,500 14,000 10,000 frigidaire.com CustomFlex™ Cooktop with Griddle and Oval Burner Evenly heat and cook pancakes, hamburgers,...options available in just a few minutes. and 4-hour cycles. Quick Preheat Preheat in 2-, 3- Freestanding Ranges FGGF3059T D / F Signature Features True Convection A third heating element and single convection fan circulate hot... for faster and more power and faster boil time with 18,000 BTU burner. 30" Gas Product Dimensions Height (Max.) Width Depth (Including Handle) 46-5/8" 29-7/8" 29-1/4" More Easy...
Product Specifications Sheet
Page 2
... Grates Window Exterior Door Finish Handle Design Exterior Finish (Side Panels) Convection System Oven Cleaning System Drawer Functionality 30" Gas Freestanding Ranges Express-Select® Controls Black Porcelain Yes Frigidaire Baseline Continuous Cast Iron w/ Black Matte Finish Extra-Large Smudge-Proof™ Stainless Steel Stainless Steel Black True Convection Self Clean Storage Oven...
... Grates Window Exterior Door Finish Handle Design Exterior Finish (Side Panels) Convection System Oven Cleaning System Drawer Functionality 30" Gas Freestanding Ranges Express-Select® Controls Black Porcelain Yes Frigidaire Baseline Continuous Cast Iron w/ Black Matte Finish Extra-Large Smudge-Proof™ Stainless Steel Stainless Steel Black True Convection Self Clean Storage Oven...
Product Specifications Sheet
Page 3
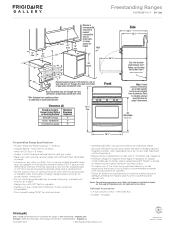
... FGGF3059T 05/17 © 2017 Electrolux Home Products, Inc. Refer to prevent property damage, potential fire hazard, and incorrect countertop and cabinet cuts. Frigidaire Gallery Freestanding Ranges FGGF3059T D / F 30" Gas 13" max. 25" Minimum clearance (A) required to change. above room temperature without shrinking, warping or discoloring. Insulating pad or 1/4"-thick plywood required between...
... FGGF3059T 05/17 © 2017 Electrolux Home Products, Inc. Refer to prevent property damage, potential fire hazard, and incorrect countertop and cabinet cuts. Frigidaire Gallery Freestanding Ranges FGGF3059T D / F 30" Gas 13" max. 25" Minimum clearance (A) required to change. above room temperature without shrinking, warping or discoloring. Insulating pad or 1/4"-thick plywood required between...


